What are the steps to block push notifications for future scheduled periods?
You can block push notifications for activities that are either not yet scheduled or are scheduled for a future date.
Block Notifications for Future Routed Dates
- Navigate to the and then open the specific Message Scenario responsible for the push notifications you want to control.
- Locate the step within the Message Scenario that sends the push notification.
- Configure the Settings tab:
- Open the Settings tab for this message step.
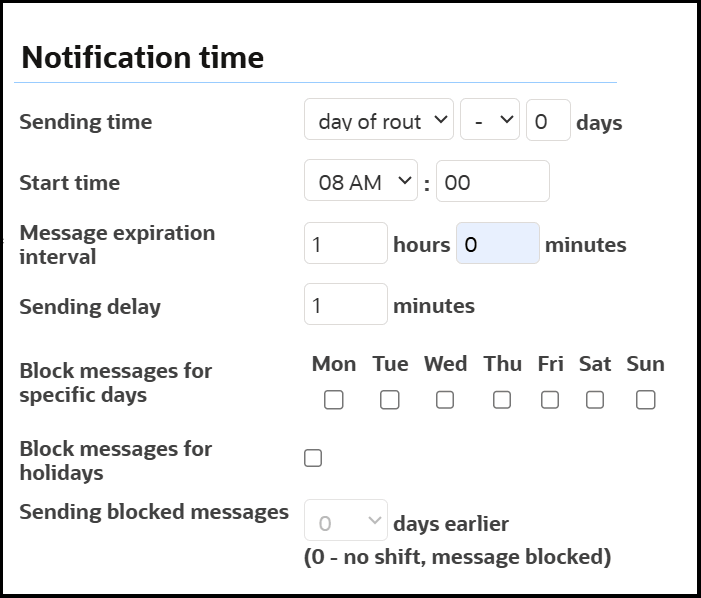
- In the Notification time section, specify the Sending time option. Set the Sending time to day of route. This ensures the notification is primarily considered for sending on the day the activity is scheduled.
- Open the Settings tab for this message step.
- Configure a Blocking Condition for Future Dates.
- Go to the Blocking Conditions tab of the message step and then
click Add new. The Add Blocking Condition tab
appears.
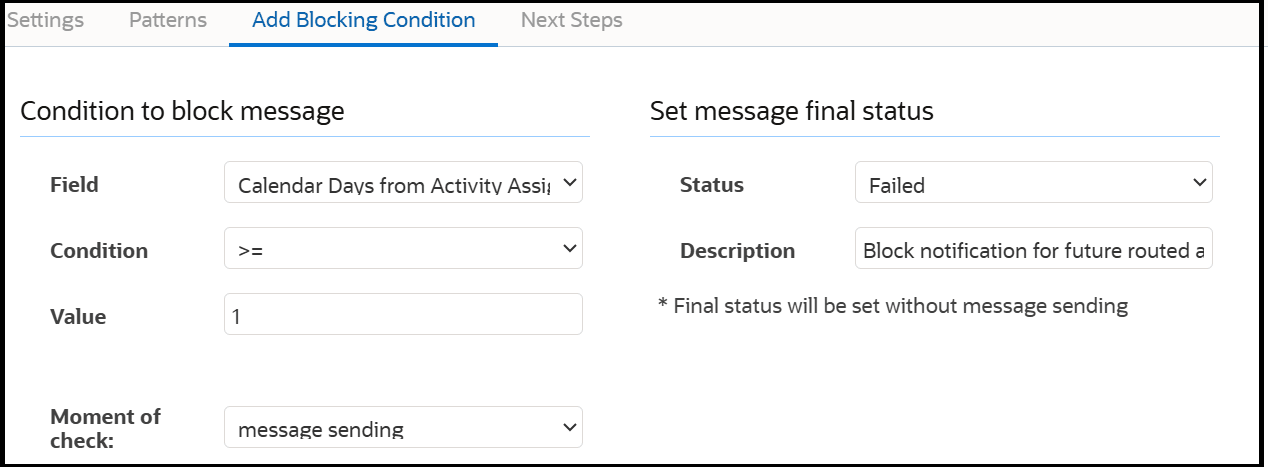
- In the Condition to block message section, in the
Field list, select "Calendar Days from
Activity Assignment"
(
[calendar_days_from_activity_assignment]). This property calculates the number of calendar days between the current date and the activity's assignment date. - In the Condition field, select >=.
- In the Value field, enter 1. This will block the notification if the activity's assignment date is one or more days in the future compared to the current date at the time of sending.
- In the Moment of check field, select this to message sending. This is crucial as it evaluates the condition right before the notification is about to be sent, ensuring it considers the current date.
- In the Set message final status section, select Status (Result). Choose a final status for the message when this condition is met (For example, Failed or Obsolete).
- In the Description field, add a description Block notification for future routed activities.
- Click Add.
- Go to the Blocking Conditions tab of the message step and then
click Add new. The Add Blocking Condition tab
appears.
- Add Blocking Conditions for Route Activation
- Go to the Blocking Conditions tab of the message step and then
click Add new. The Add Blocking Condition tab
appears.
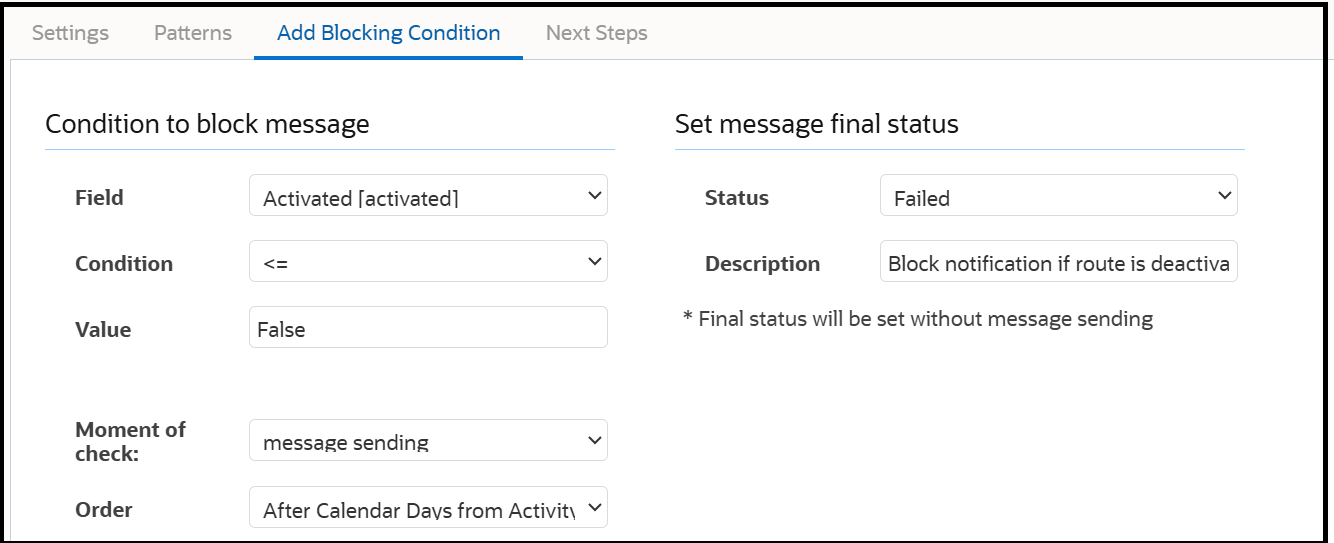
- In the Field list, select a property Route Activated indicating if the route is activated.
- In the Condition field, select <=.
- In the Value field, enter false or the value representing a deactivated route.
- In the Moment of check field, select message sending.
- In the Set message final status section, select Status (Result). Choose a final status for the message when this condition is met (For example, Failed or Obsolete).
- In the Description field, add a description Block notification if route is deactivated.
- Click Add.
- Go to the Blocking Conditions tab of the message step and then
click Add new. The Add Blocking Condition tab
appears.
Blocking Notifications for Unscheduled Activities (Example: for a 9 PM Process)
- Navigate to the and then open the Message Scenario that runs around 9 PM and triggers notifications related to the next day's schedule or pending activities.
- Locate the step responsible for sending these notifications.
- Add a Blocking Condition for Unscheduled Activities:
- Navigate to the Blocking Conditions tab.
- Click Add new. The Add Blocking Conditions tab appears.
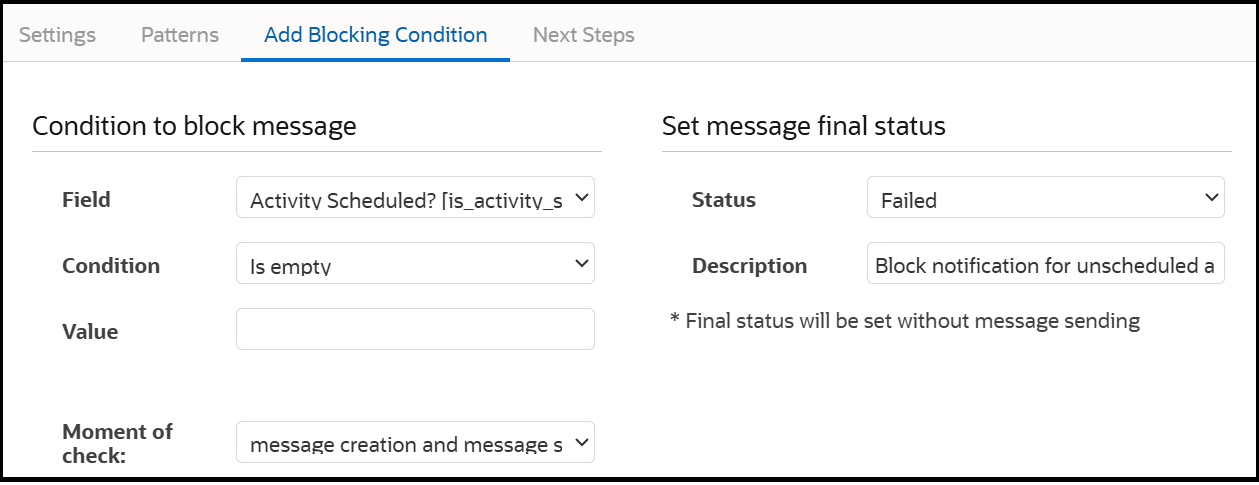
- In the Field list, select Activity scheduled?.
- In the Condition field, select Is empty.
- In the Moment of check field, select this to message creation and message sending. This is crucial as message creation might prevent the message from even being generated for unscheduled activities, while message sending provides a final check.
- In the Set message final status section, select Status (Result). Choose a final status for the message when this condition is met (For example, Failed or Obsolete).
- In the Description field, add a description Block notification for unscheduled activities.
- Click Add.