Using the SingleTime Dimension
In applications that use the Dense/Sparse Optimization (DSO) option, a system replacement dimension named SingleTime is available for data forms. The SingleTime dimension combines the Year and Period dimensions, for example, "Jul2022" for the FY22 Year and July Period. This can be useful when you want to view the data in a form for different months and years, for example, the data from the last six months of the prior year. It also enables you to use Relative functions to view form data for a range of periods or years.
Note:
The SingleTime dimension is only available in data forms, and in data forms accessed through Oracle Smart View for Office.Before you can use the SingleTime dimension feature, you must enable it during the Application Creation process, or after application creation from the Enable Features page in Application Configuration. See Enabling Application Features.
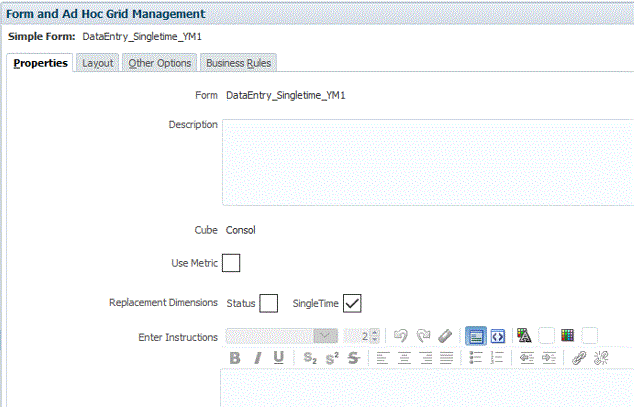
To enable Single Time in a data form, you select SingleTime as the replacement dimension when defining the form.

In order for SingleTime functionality to be available, the form must have both the Year and Period dimensions on either the row or the column, with no selections for either. Year and Period must be on the same axis. The selections for both dimensions will be based on run-time prompts for the Relative and RelativeRange rules.
When SingleTime is enabled, two additional functions are available from the Function selector in the Member Selector: Relative or Relative Range. These business rules are only available for selection in forms, and can only be selected when the SingleTime replacement dimension is selected. You can apply one or both of these rules as needed to view data for a range of periods or years. Note that these rules are used for navigation purposes within the SingleTime dimension, and actual data is still stored separately in the Year and Period dimensions. When the form is rendered, all data that is submitted or saved is written to the members from the Year and Period dimensions.
The Relative function displays the SingleTime period (for example, Jan 2020) with an optional parameter relative to the specified SingleTime period. The relative value can be positive or negative (for example, 3 or -5). For example, Relative (Mar 2022,5) will display Aug 2022 (5 periods relative to Mar 2022).
The RelativeRange function displays the SingleTime period (for example, Feb 2020) with an optional parameter for the relative range of periods to be displayed. The relative range value can be positive or negative. For example, RelativeRange (Jan 2020,2) displays display Jan 2020, Feb 2020, Mar 2020 ( Jan 2020 plus 2 additional periods after Jan 2020).
Note: Make sure to specify a SingleTime dimension function that is in the range of available years defined in your application, or errors may occur.
When the SingleTime dimension is created, a seeded User Variable called SingleTime is also created, and the default value is the first Level zero period with the first year member in the SingleTime dimension. This variable is used as the anchor period in the SingleTime dimension to either navigate forwards or backwards based on the offset selected when running the rules in the form. When you run the Relative or RelativeRange rule, select a member and enter an offset value, that member becomes the new value assigned to the SingleTime User Variable.
You can also manually modify the value for the User Variable. See Creating User Variables. For example, you can define a user variable such as "currentPeriod" = Dec 2020. When you use this with the Relative function, for example, Relative (¤tPeriod,4), the form displays Mar 2021 (4 periods relative to the current period of Dec 20).
To use the SingleTime dimension:
-
Enable the Combine Year and Period as a Single Dimension application option, either during the Application Creation process, or after application creation from the Enable Features page in Application Configuration.
When you select this option, the SingleTime dimension members will be created with the period member name, then year member name, for example Q1 2022, Jan 2022. During the creation of the members, a validation will be performed for existing members with the same name format. If there are existing members, a warning message will display, and you must remove the existing members and refresh the database before you can create the SingleTime dimension. After the SingleTime dimension has been successfully created, it will be displayed in the Dimensions list, with the dimension members based on the years and periods in your application.
-
Create a data form and on the Properties tab, for Replacement Dimensions, select SingleTime.
-
Select the Layout tab, and set the row and column layout. The SingleTime members are available in the POV, and you can drag and drop them to rows and columns.
To use SingleTime functionality, the form must have both the Year and Period dimensions on either the row or the column, with no selections for either. They both must be on the same axis.
-
To apply one of the range business rules, from the Functions drop-down box on the Member Selector, select Relative or RelativeRange.
-
Modify the member selection as needed for the SingleTime member, enter an offset value and click OK.
Valid input values for the offset are any negative or positive integers.
-
Enter data into the form, and ensure that the calculation status is updated correctly.