Running a Consolidation Report
Report Overview
You can run a Consolidation report that provides a detailed audit trail of the consolidation process. The report is available for multi-currency and single currency applications.
For the report format type, you can select HTML, PDF or XLS.
If you enabled additional cubes in the application, a Cube dropdown is displayed on the Consolidation Report Jobs list page, where you can select a cube for the report, for example, Consol2. By default, the cube is Consol. When you create any report in the selected cube, the cube name that you selected is displayed but disabled on the creation page. The dimension member selection and validations are based on the selected cube. The Cube information is also displayed in the header section of the generated report. For information on enabling cubes, see "Adding Application Cubes" in Administering Financial Consolidation and Close.
When you run the report and save it as an Excel report type, you can use a Substitution Variable
to automatically display the values in number format, rather than cell text. The
substitution value is called EnableExcelNumberFormat, and when set
to True, when you save the report as an Excel report type, the values are
automatically displayed in numeric values.
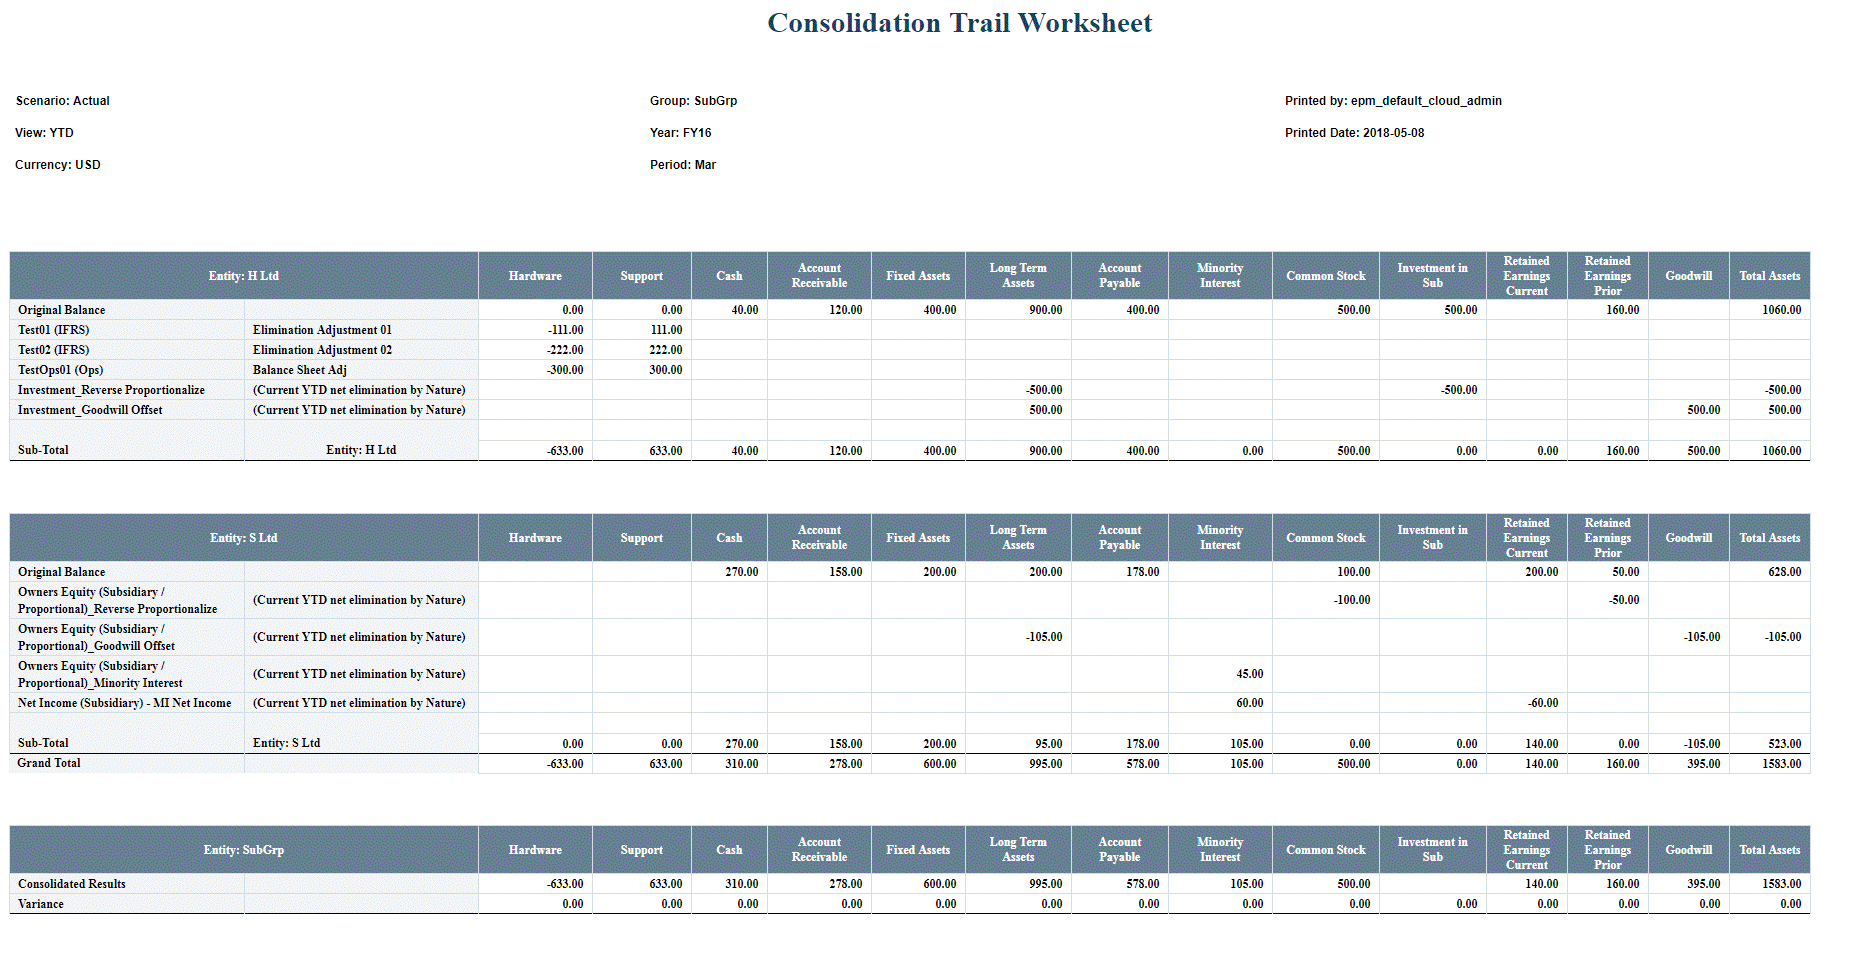
The Consolidation report provides the following information for a selected parent entity:
-
List of accounts (displayed in Columns)
-
List of child companies within the selected consolidation group contributing to each displayed account (displayed in Rows)
-
Original reported closing balance (normally general ledger balance) for Assets and Liabilities and Equity, and current YTD balances for Profit and Loss
-
Adjustments to the reported balance during consolidation, including manual journal entries, Multi-GAAP adjustments and automatic eliminations generated by Intercompany elimination and consolidation rules. These include Intercompany eliminations, Acquisitions or Disposal entries (such as Investment Eliminations, Share Capital Eliminations, Reserves Eliminations), valuation adjustments, NCI, Equity accounting, and so on.
-
Manual journals are displayed with both the journal label and description
-
Automatic eliminations are displayed with Life-To-Date amount (Opening Balance) and YTD amount on a rule-by-rule basis
-
Adjustments are displayed in Entity currency of the selected Parent entity
-
-
Net contribution of each immediate child entity for each account in the selected group
-
Any Variance - the total net contribution with consolidated group results
Consolidation Reports support Year-to-Date journals in addition to Periodic journals. If you have posted Year-to-Date journals in your application, the current period Year-to-Date journals will be displayed on the Consolidation Report.
Setting Up the Report
The report displays one level of child entities for a parent entity with a multi-level hierarchy.
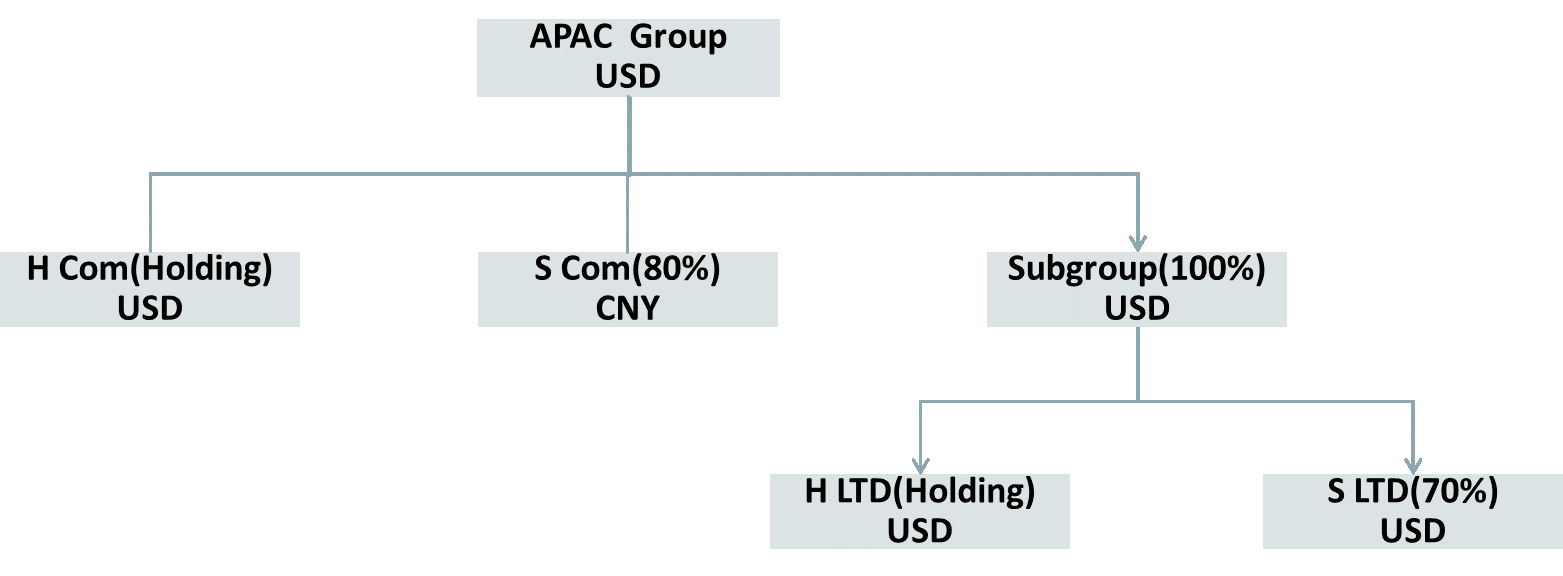
For example, suppose you have the two-level entity structure shown below. APAC is the top level group. There is one holding company (H Com), and one subsidiary (S Com), under the APAC group. There is a also a Subgroup under the APAC group, with a holding company (H LTD), and the S LTD company.
You would first run the Consolidation report using the APAC Group as the Parent Entity. The report would display results for the APAC group, including the holding company (H Com), the subsidiary (S Com), and the Subgroup total.
To drill down into more detail, you would run the same report using "Subgroup" as the Parent Entity, which would provide the total consolidation trail of the APAC group.

You can display Journal details instead of a Summary amount when you use a Parent GAAP member or Parent accounts in the POV. Journal amounts are displayed on their own accounts on a row named Manual Journals, but if you use a Parent account, the amount is displayed in the parent account in the row of the journal labels. If you select a Parent GAAP member, all journals can be displayed label by label.
Creating the Report
To create a Consolidation report, you must be a Service Administrator or Power User and have security rights to the data for the report.
For Number Formatting, the report can use the preferred number formatting style that you specify in Application Settings or User Preferences.
To create a Consolidation report:
-
On the Home page, click Reports.
-
Click Consolidation Reports.
-
From the Consolidation Reports Jobs page, click Create.
-
From Report Filtering:
-
Click on the Member Selector, select a Parent Entity for which to run the report, and then click OK.
You can select only one entity. It must be Parent entity with at least one child entity. The report rows display all the entities in the next level under the selected parent entity.
-
From the Member Selector, select one or more Accounts for which to run the report, and then click OK.
You can select multiple accounts.
-
From the Member Selector, select the Multi-GAAP dimension members for which to run the report, and then click OK.
You can select multiple Multi-GAAP members. This selection is only available if the Multi-GAAP dimension is enabled for the application.
Note: For Custom dimensions, the consolidation report always retrieves data at the "Total Custom" level.
-
-
From the POV bar, select a Scenario, Year, and Period for the report, and then click OK.
-
From Display Options, edit the Report Title, or leave it blank.
If you leave the title blank, the report is generated with the "Consolidation Trail Worksheet" title.
-
For Column Display, select Account or Movement.
If you select Movement, the report displays all of the movements in level 0 under FCCS_ClosingBalance in the Columns. However, if the zero line display option is "No", the zero column will not be displayed in the report. Selecting Movement displays the movement details on a specific POV, and as a result the column will display all the movement.
If you select multiple accounts in the POV, each account will be a sub-report. If you select multiple accounts and then select the XLS output option, the XLS file will have multiple sheets to display the result of different accounts.
The report displays the following information (if any) in Rows:
-
Entity Name
-
Original Balance
-
Manual Journal
-
Intercompany Elimination
-
Auto-Elimination
-
Subtotal
-
-
For Hierarchy Display, and Multi-GAAP Display, the report uses the default values, and you cannot change them.
-
For Zero Line Display, select Yes to display zero data lines, or leave the default setting of No to suppress rows with only zero data.
-
For Member Display, select an option:
-
Member Name
-
Alias
-
Name and Alias
The Point of View dimensions and the options that you selected are displayed in the header section of the generated report.
-
-
From Report Type, select an option:
-
HTML
-
PDF
-
XLS
-
-
To run the report immediately, click Run Report and then select to open or save the report.
-
Optional: To save the report as a Job, which you can schedule to run immediately or at a later time, click Save as Job, enter a job name and optional description, and click Submit to save the job.
After you save a report, the report name and description are displayed in the reports list on the Consolidation Reports Jobs page.
-
To run a report that was saved as a job, use one of these methods:
-
From the Consolidation Reports Jobs page, select the report from the list of reports, select an Output Format, and click Run Report. You can download the report file to a local path.
-
To submit a report as a job, from the Consolidation Reports Jobs page, select the report and select an Output Format. From the Actions menu on the right, click Submit, and then click OK.
Note that the default values for Scenario, Year, Period and Entity are the values you saved when you created the report. You can change the Parent Entity, Scenario, Period, or Years before submitting the job.
After submitting the report, navigate to the Job console and find the report in the Jobs list. When the job status turns to completed, open the job and from the Job Details page, click View/Download to download the report.
-
To schedule a report job, from the Schedule Jobs page, select the option to Run Consolidation Trail Report, then select Run Now, or schedule a time and frequency to run it. You can select a saved report from a list of saved jobs on the Job Details page.
-
-
Optional: To delete a report, from the Consolidation Reports Jobs page, select the report from the list of reports, and from the Actions menu on the right, click Delete, then click Confirm.
