Set up Toggle Agent Availability in Amazon
To make an agent available and unavailable, we need to use the
intCCP method in the core object in the Amazon Connect stream
API.
Initializing the Streams API is the first step to verify that you have
everything setup correctly and that you can listen for events.
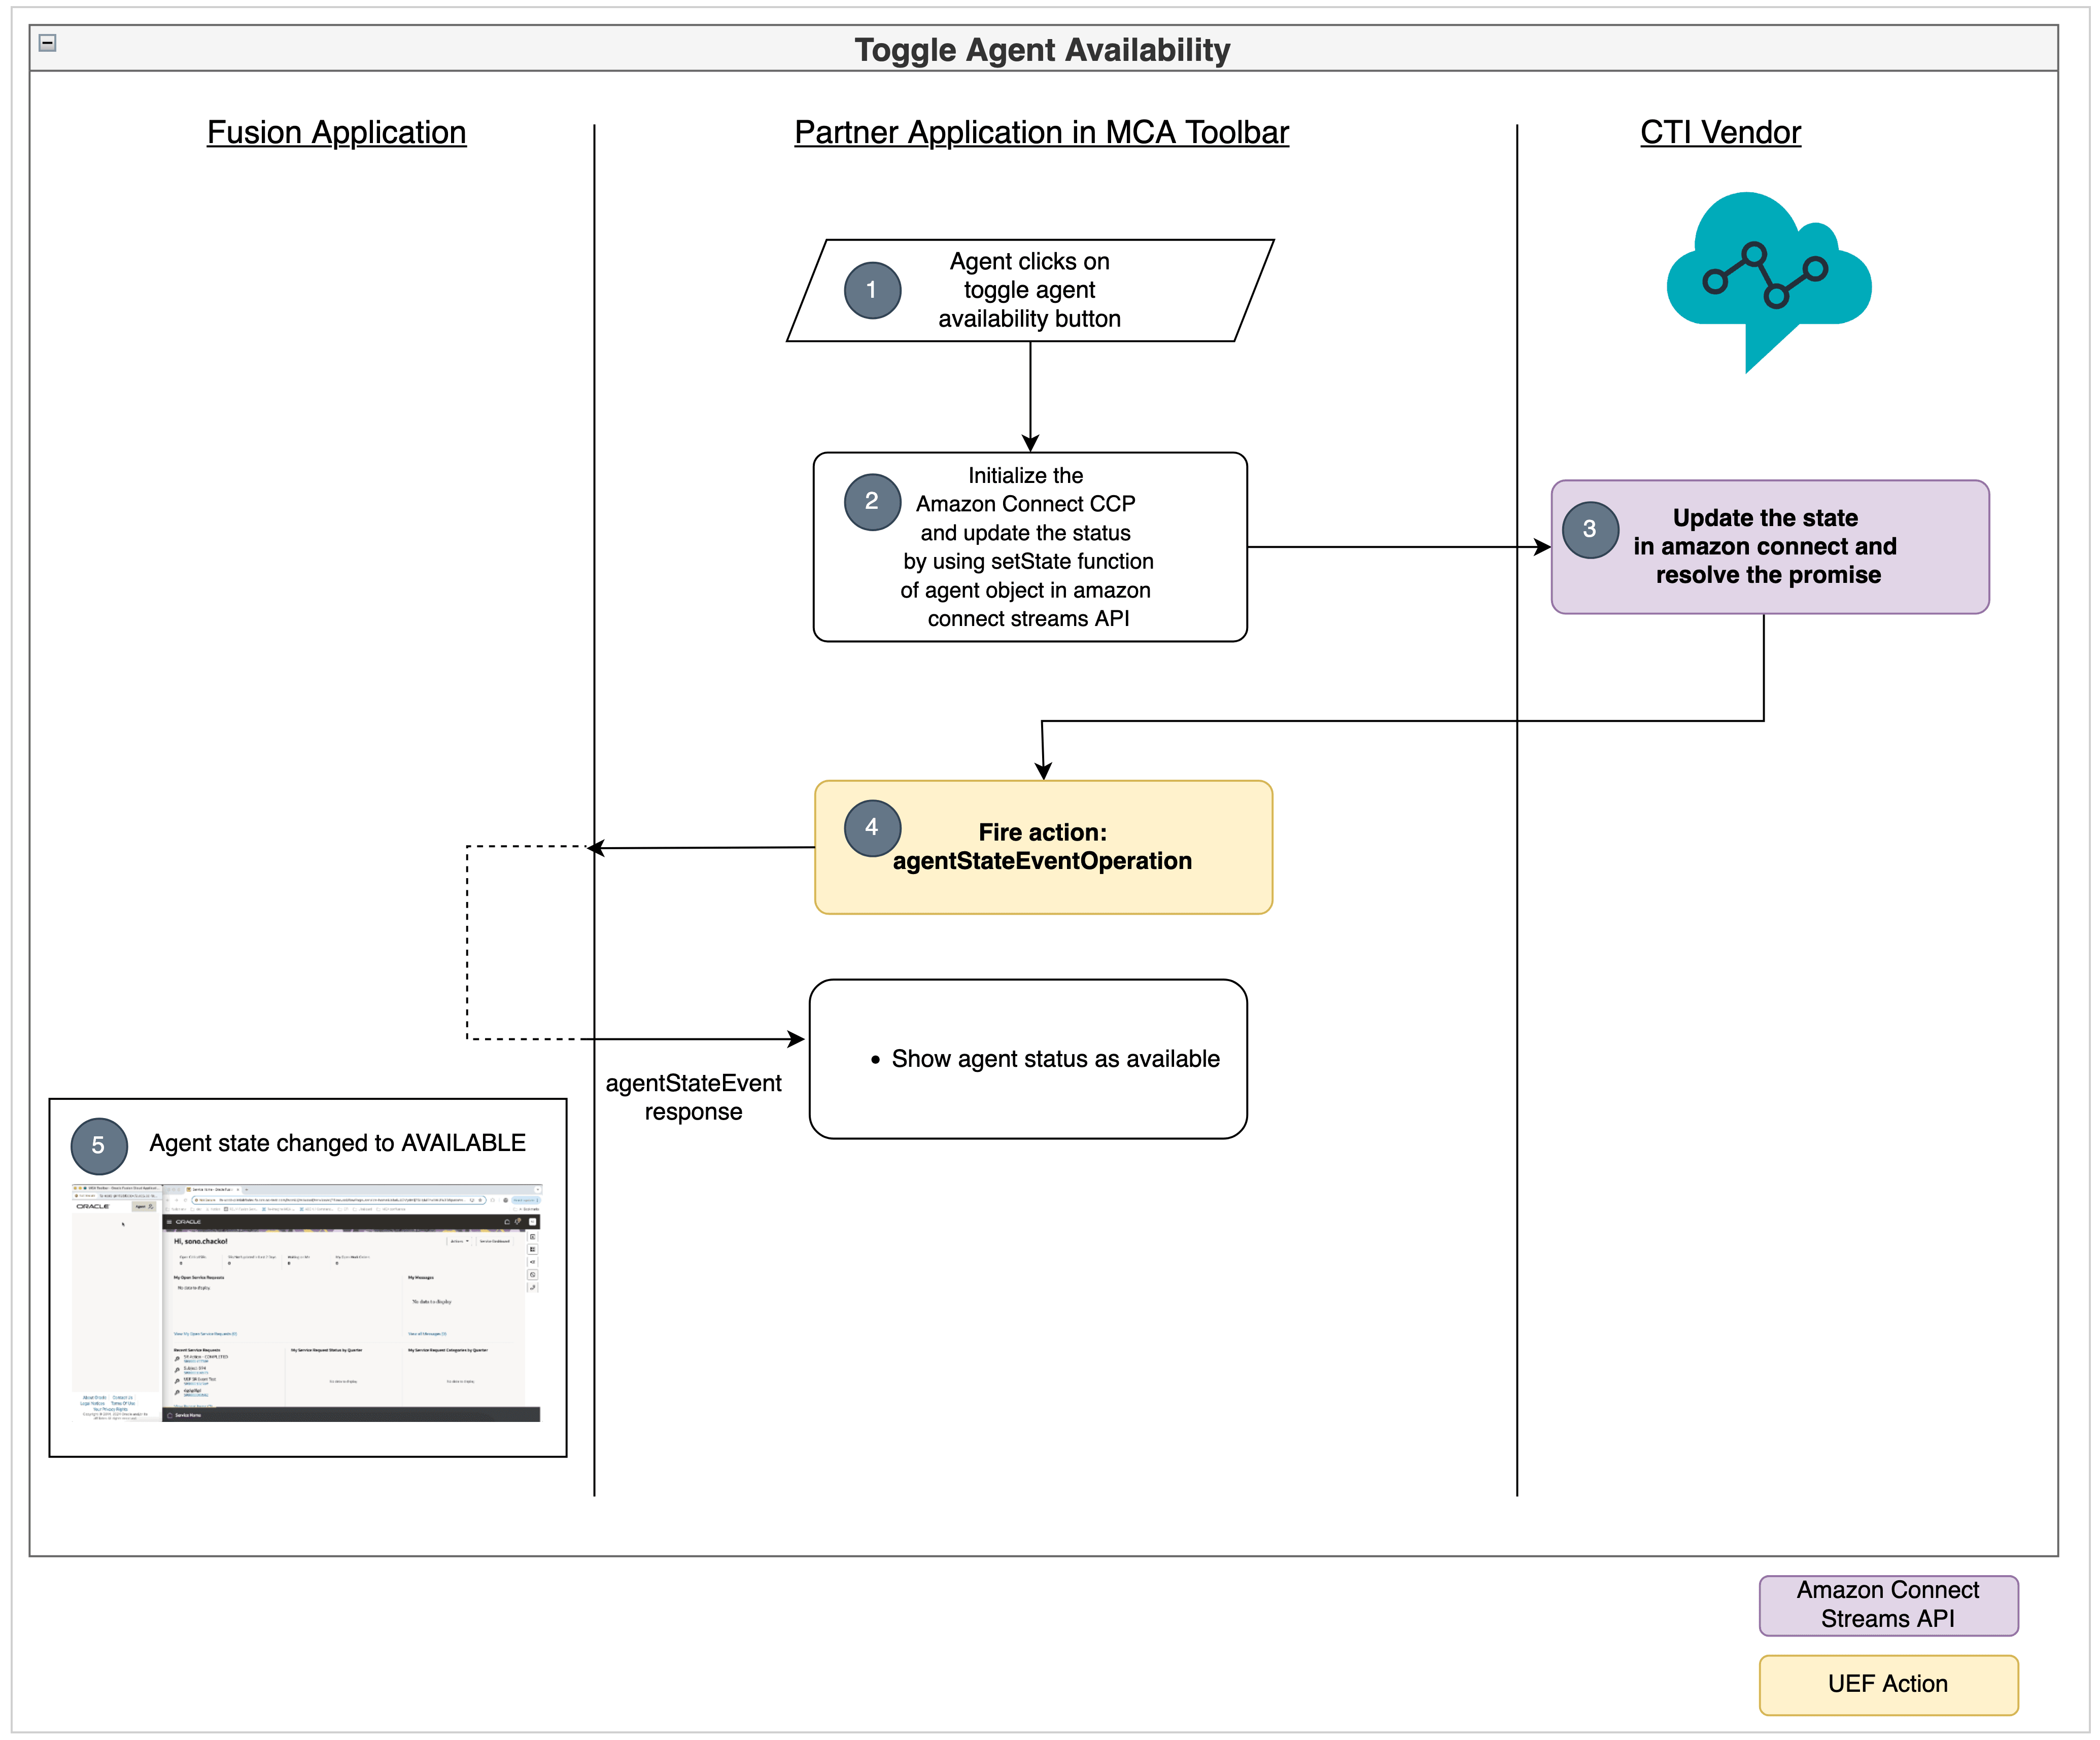
The following flow diagram shows the sequence of operations performed once an agent marks themselves as available by clicking the toggle Agent Availability button in the media toolbar application:

- The agent clicks the toggle Agent Availability button in media toolbaR.
- Initialize the Amazon Connect CCP and call the
setStatefunction of agent object in Amazon ConnectStreamsAPI. - Amazon Connect updates the agent state and resolves the promise.
- From the media toolbar fire the
agentStateEventOperationto update the agent status in the Fusion application. - Agent state is updated in the Fusion application.
Update VendorHandler Class to call the Amazon Connect Streams API to toggle agent available
- Add the import for amazon-connect-streams:
import "amazon-connect-streams"; - Add the following properties and update the connect property in the
constructor as shown in the following example:
import { ICtiVendorHandler } from './ICtiVendorHandler'; import "amazon-connect-streams"; import { IntegrationEventsHandler } from '../integrationEventsHandler'; export class VendorHandler implements ICtiVendorHandler { private connect: any; private agent: any; private contact: any; private integrationEventsHandler: IntegrationEventsHandler; constructor(integrationEventsHandler: IntegrationEventsHandler) { this.integrationEventsHandler = integrationEventsHandler; this.connect = (window as any)["connect"]; } //.... } - Create a method in the
vendorHandlerclasssrc/ts/cti/vendor/vendorHandler.tswithcodeInitializingtheStreams API is the first step to verify that you have everything setup correctly and that can listen for events.// Intialize Amazon connect ccp private init() { const containerDiv = document.getElementById("amazon-connect-cca-container"); this.connect.core.initCCP(containerDiv, { ccpUrl: 'https://cti-amazon-connect-demo.my.connect.aws/ccp-v2', // REQUIRED loginPopup: true, // optional, defaults to `true` loginPopupAutoClose: true, // optional, defaults to `false` loginOptions: { // optional, if provided opens login in new window autoClose: true, // optional, defaults to `false` height: 600, // optional, defaults to 578 width: 400, // optional, defaults to 433 top: 0, // optional, defaults to 0 left: 0, // optional, defaults to 0 }, region: "eu-west-2", // REQUIRED for `CHAT`, optional otherwise softphone: { // optional, defaults below apply if not provided allowFramedSoftphone: true, // optional, defaults to false disableRingtone: false, // optional, defaults to false }, pageOptions: { //optional enableAudioDeviceSettings: false, //optional, defaults to 'false' enableVideoDeviceSettings: false, //optional, defaults to 'false' enablePhoneTypeSettings: true, //optional, defaults to 'true' }, ccpAckTimeout: 5000, //optional, defaults to 3000 (ms) ccpSynTimeout: 3000, //optional, defaults to 1000 (ms) ccpLoadTimeout: 10000, //optional, defaults to 5000 (ms) }); } - Add a method to initialize
agentSubscribe, a method that's called when the agent is initialized. If the agent has already been initialized, the call is synchronous and the callback is called immediately. Otherwise, the callback is made when the first agent data is received from upstream. This callback is provided with anAgentAPI object, which can also be created at any time after initialization is complete usingnew connect.Agent().private subscribeForAmazonEvents() { this.connect.agent((agent: any) => { this.agent = agent; let state = this.agent.getAgentStates()[0]; this.agent.setState(state); }); } - For updating the agent's state use the
setStatemethod of the agent. Update themakeAgentAvailablemethod as shown in the following example:public async makeAgentAvailable(): Promise<void> { if (!this.agent) { this.init(); this.subscribeForAmazonEvents(); } else { let state = this.agent.getAgentStates()[0]; this.agent.setState(state); } } - Update the
makeAgentUnavailablemethod as shown in the following example:public async makeAgentUnavailable(): Promise<void> { let state = this.agent.getAgentStates()[1]; this.agent.setState(state); }
Add a div for loading the Contact Control Panel
<div id="amazon-connect-cca-container" style="height: 400px; width: 300"></div>On initializing the Stream API the Amazon Contact Control Panel
(CCP) will be embedded in a iFrame inside the div. In this example, we're using the
CCP instead of the custom call panel component, so we can hide the call panel by
adding the display none style on the call-panel component or comment out the
call-panel in index.html as shown in the following example:
<!--
<oj-bind-if test="[[callContext().state === 'RINGING' || callContext().state === 'ACCEPTED']]">
<call-panel call-context="[[callContext]]"
on-accept-button-clicked="[[ callAcceptedEventHandler ]]"
on-disconnect-button-clicked="[[ callDisconnectedEventHandler ]]"></call-panel>
</oj-bind-if>
-->Complete Code
import { ICtiVendorHandler } from './ICtiVendorHandler';
import "amazon-connect-streams";
import { IntegrationEventsHandler } from '../integrationEventsHandler';
export class VendorHandler implements ICtiVendorHandler {
private connect: any;
private agent: any;
private contact: any;
private integrationEventsHandler: IntegrationEventsHandler;
constructor(integrationEventsHandler: IntegrationEventsHandler) {
this.integrationEventsHandler = integrationEventsHandler;
this.connect = (window as any)["connect"];
}
public async makeAgentAvailable(): Promise<void> {
if (!this.agent) {
this.init();
this.subscribeForAmazonEvents();
} else {
let state = this.agent.getAgentStates()[0];
this.agent.setState(state);
}
}
public async makeAgentUnavailable(): Promise<void> {
let state = this.agent.getAgentStates()[1];
this.agent.setState(state);
}
public async makeOutboundCall(phoneNumber: string, eventId: string): Promise<void> {
}
public async acceptCall(): Promise<void> {
}
public async rejectCall(): Promise<void> {
}
public async hangupCall(): Promise<void> {
}
// Intialize Amazon connect ccp
private init() {
    const containerDiv = document.getElementById("amazon-connect-cca-container");
    this.connect.core.initCCP(containerDiv, {
        ccpUrl: 'https://cti-amazon-connect-demo.my.connect.aws/ccp-v2', // REQUIRED
        loginPopup: true, // optional, defaults to `true`
        loginPopupAutoClose: true, // optional, defaults to `false`
        loginOptions: {
            // optional, if provided opens login in new window
            autoClose: true, // optional, defaults to `false`
            height: 600, // optional, defaults to 578
            width: 400, // optional, defaults to 433
            top: 0, // optional, defaults to 0
            left: 0, // optional, defaults to 0
        },
        region: "eu-west-2", // REQUIRED for `CHAT`, optional otherwise
        softphone: {
            // optional, defaults below apply if not provided
            allowFramedSoftphone: true, // optional, defaults to false
            disableRingtone: false, // optional, defaults to false
        },
        pageOptions: {
            //optional
            enableAudioDeviceSettings: false, //optional, defaults to 'false'
            enableVideoDeviceSettings: false, //optional, defaults to 'false'
            enablePhoneTypeSettings: true, //optional, defaults to 'true'
        },
        ccpAckTimeout: 5000, //optional, defaults to 3000 (ms)
        ccpSynTimeout: 3000, //optional, defaults to 1000 (ms)
        ccpLoadTimeout: 10000, //optional, defaults to 5000 (ms)
    });
}
private subscribeForAmazonEvents() {
    this.connect.agent((agent: any) => {
        this.agent = agent;
        let state = this.agent.getAgentStates()[0];
        this.agent.setState(state);
    });
}
}Verify your progress
Sign in to your Fusion application and open the media toolbar. Click the Agent Availability button from your media toolbar application. You'll see, the button change colors and the phone icon status in the Fusion application changed to Available.