How do I Import Self-Service users?
This topic shows you how to import self-service users for use with your Digital Customer Service application.
Use cases for import include when you're migrating from one service implementation solution to Digital Customer Service, or when you've a new customer account and have been supplied with a list of authorized users.
If you're migrating from another service implementation to Digital Customer Service, you might have some existing reference identifiers that you'll want to retain from the originating service implementation. In this particular case, the following fields might help: AccountPartyNumber from the accounts, ContactPartyNumber from the contacts.
First you must create a contact. Once you've created the contact, you've two choices: you can use the Contact Party ID or Contact Party number. When contacts are created or imported, the contact party ID is automatically assigned. You can explicitly specify the Contact Party number. If you choose not to specify the Contact Party number, a number will be automatically assigned.
Accounts are handled in much the same way. An Account Party ID is automatically assigned, and you can choose to specify an Account Party number or have one automatically assigned.
Finally, there's a primary key for the imported data set. The value of the primary key column is automatically generated in the Oracle Fusion Applications data model.
Here's a high level overview of what you'll be doing when importing self-service users:
-
Creating contacts
-
Downloading the Self-Service Roles template.
-
Preparing the Import file, then importing the users.
-
Sending pending LDAP requests.
Create Contacts
Your first step is to create the contacts. The contact must have an email address. To create contacts, follow the instructions in the Import Your Contact Data task in the Related Topics list. This might also require you do the Import Your Account Data task, which is also in the Related Topics list, if you haven't already done that yet.
Download the Self-Service Role Template
This section describes how to download the self-service roles template.
The Self-Service roles template contains the following fields:
|
Field |
Usage |
|---|---|
|
AccountPartyId |
A required field if the AccountPartyNumber value isn't specified. Don't provide this value for B2C. |
|
AccountPartyNumber |
A required field if the AccountPartyId value isn't specified. Don't provide this value for B2C. |
|
ContactPartyId |
A required field if the ContactPartyNumber value isn't specified. |
|
ContactPartyNumber |
A required field if the ContactPartyId value isn't specified. |
|
LoginId |
An optional field. If a value isn't specified its assigned the value of a Contact attribute specified by the SVC_CSS_IMP_SIGN_IN_ATTR_NAME profile option. The default value for this profile option is Email Address. |
|
RelationshipTypeCd |
A required field. The following values can be assigned:
|
|
RequestTypeCd |
A required field for B2C. An optional field for Fusion. The following values can be assigned:
|
|
RoleId |
An optional field. You can remove from the first row of the file. |
To download the Self-Service roles template file:
-
Sign in to Oracle Fusion Service as an administrator or a setup user.
-
From the Navigator menu, expand Tools, and then select Import Management.
-
In the Manage Imports work area, click the Import Objects tab, and select Search.
-
In the Import Object Details page, enter Self-Service Role in the Display Name search box.
-
Click Download and then save the .zip file to a convenient directory.
Prepare the Import File
To prepare the import file:
-
Find, and open the Self-Service Role_Templates<date>.zip file that you saved in the Download the Self-Service Role Template topic.
-
Extract, then open the SelfServiceRole.csv file.
-
For each self-service user you plan to import, enter the following data in a dedicated row:
-
Enter the account information relating to the self-service user in the AccountPartyId or AccountPartyNumber column.
Note: The Account ID value isn't needed for B2C Service requests.Tip: To quickly find the values for AccountPartyId or AccountPartyNumber using REST API, run the following command as an administrator:GET <Oracle-Fusion-Application-Host>/crmRestApi/resources/11.13.18.05/accounts/ -
Enter the contact information relating to the self-service user in the ContactPartyId or ContactPartyNumber column.
Note: When importing the Contacts, it's possible to provide a unique identifier for each contact in the form of the ContactPartyNumber. This must be unique for each user. So you should provide the same unique numbers for ContactPartyNumber for the user in the Contact import file and the Self-Service Roles import file to match them up. -
Enter the ID relating to the self-service user in the LoginId column.
Note: If theSVC_CSS_IMP_SIGN_IN_ATTR_NAMEprofile option is set, then theLoginIdis optional. -
Enter the Digital Customer Service roles to assign to the self-service user in the RelationshipTypeCd column. The following values can be assigned:
-
ORA_CSS_USER. This corresponds to the Digital Customer Service User role. -
ORA_CSS_ACC_MGR. This corresponds to the Digital Customer Service Account Manager role. -
ORA_CSS_ACC_ADMIN. This corresponds to the Digital Customer Service Account Administrator role.
Note: The ORA_CSS_ACC_MGR and ORA_CSS_ACC_ADMIN roles by themselves can be only used if the self-service user already exists. If the import is going to create a new self-service user the ORA_CSS_ACC_MGR and ORA_CSS_ACC_ADMIN roles must be combined with ORA_CSS_USE role. To assign multiple roles to a user concatenate them using the&character. For example: ORA_CSS_USER&ORA_CSS_ACC_ADMIN. -
-
Enter the Digital Customer Service roles to assign to the self-service user in the RequestTypeCd column. If a value isn't supplied the default is
ORA_CSS_REQ_TYPE_CONTACT.The following values can be assigned:
-
ORA_CSS_REQ_TYPE_CONTACT. This value is for Fusion Service instances and corresponds to the Fusion Contact. -
ORA_CSS_REQ_TYPE_CONSUMER. This value is for B2C Service instances and corresponds to the B2C Consumer. B2C is general public.
-
-
-
Repeat step 4, on a dedicated row for each more self-service user you want to import.
Note: For eachAccountPartyIdorAccountPartyNumber, at least one user in the import file must have theORA_CSS_ACC_ADMINrole assigned. -
Save the SelfServiceRole.csv file.
-
Include the SelfServiceRole.csv in a new Self-Service Role_Templates<date>.zip archive, and save it.
Tip: When using a Mac, you must theziputility in terminal to create the Self-Service Role_Templates<date>.zip file.
Consider the following sample data in the SelfServiceRole.csv file:
Example 1: Using Party IDs for import
AccountPartyId,ContactPartyId,RelationshipTypeCd
300100110957452,300100156316610,ORA_CSS_User & ORA_CSS_ACC_ADMIN
Example 2: Using Party numbers for import
AccountPartyNumber,ContactPartyNumber,RelationshipTypeCd
CDRM_67617,CDRM_743628,ORA_CSS_USER
CDRM_67617,CDRM_743711,ORA_CSS_USER&ORA_CSS_ACC_ADMIN
CDRM_67617,CDRM_743651,ORA_CSS_USER&ORA_CSS_ACC_MGR
Example 3: The Login ID explicitly used
AccountPartyNum,ContactPartyNum,LoginId,RelationshipTypeCd
CDRM_67617,CDRM_743628,Mary.Smith,ORA_CSS_USER
CDRM_67617,CDRM_743711,John.Rogers,ORA_CSS_USER&ORA_CSS_ACC_ADMIN
CDRM_67617,CDRM_743651,Pat.Williams,ORA_CSS_USER&ORA_CSS_ACC_MGR
Example 4: B2C
ContactPartyNum,RelationshipTypeCd, RequestTypeCd
CDRM_943831,ORA_CSS_USER, ORA_CSS_REQ_TYPE_CONSUMER
CDRM_943832,ORA_CSS_USER, ORA_CSS_REQ_TYPE_CONSUMER
Import the Self-Service Users
Before proceeding with the instructions in this section, you must have completed the steps in the previous sections:
-
Downloading the Self-Service Roles Template
-
Preparing the Import File
ZCA_STANDARD_IMPORT_COMMIT_SIZE to 1. If
SVC_CSS_USE_FA_AS_IDP is enabled (set to TRUE) you must set
the ZCA_STANDARD_IMPORT_COMMIT_SIZE value to 1. This must be done
for the following reasons. The default value for commit size is 100. This value also
influences the retry logic built into the import framework. An error in
any one import row will cause the entire batch to roll back. For self-service import
when IDCS is the IDP, the impact of rollback is severe because many users determined by
the commit size have been created and needs to be rolled back. With
retry the impact is even more severe because there could be more than 1
rollback for the same batch causing the import process to slow down considerably.To import the self-service users:
-
Sign in to Oracle Fusion Service as an administrator or a setup user.
-
From the Navigator menu, expand Tools, and then select Import Management.
-
In the Manage Imports work area, click the Create Import Activity button.
-
In the Create Import Activity workspace, enter the following import options:
-
In the required Name field, enter a name for the import activity.
-
In the optional Description field, enter a description of the import activity.
-
Click the Object drop-down list, and search for Self-Service Role.
-
Click the File Name Browse button and find the
SelfServiceRole.csvfile you downloaded.
-
-
Click Next.
-
Verify the mappings are as expected. If necessary, make your corrections.
-
Click Validate Data.
-
Click Next.
The Create Import Activity: Review and Submit screen is displayed.
-
Click the Submit button.
Your import job is listed in the Manage Import Activities list. The Status value of your job will change multiple times during processing, until it's Completed or Completed with Errors.
-
From the Manage Imports workspace, click the My Completed Imports tile and select the link for your import from the list and review the import details.
-
(Optional) Review errors. If the Status value is Completed with Errors, some users might not have been imported. Follow these steps to review the errors:
-
On the Import Status workspace, click the Actions menu and select Generate Diagnostics.
-
Download the generated
zipfile, to review the diagnostic messages .
-
Send Pending LDAP Requests
Perform this task after successfully importing the self-service user roles.
With the import of the self-service roles to associate with the contact records, the final step to enable a self-service user account is to create the user account in the Oracle Fusion Service identity management system. This is in turn synchronized with Oracle Identity Cloud Service, allowing users to sign in. To create the user account in the Oracle Fusion Service identity management system, the Send Pending LDAP Requests job needs to be run.
To send the pending LDAP requests:
-
Sign in to Oracle Fusion Service as an administrator or a setup user.
-
Navigate to the Scheduled Processes work area.
-
Click Schedule New Process.
The Schedule New Process dialog box appears.
-
Select the Job option.
-
Click the Name menu, then select Search.
-
Enter the following string in the Name text box, then click Search:
Send Pending LDAP Requests -
Click Send Pending LDAP Requests, then click OK.
-
Click OK on theSchedule New Process dialog box.
The Process Details dialog box appears.
-
Click Submit.
A Confirmation dialog is displayed.
-
Click OK.
Monitor the job. When it's complete, the newly imported self-service users are created in LDAP.
Removing Self-Service users through import
You can remove Self-Service users data using Self-Service Role import.
- Any contacts associated with the Self-Service user.
- The user account in the Identity Management System.
First you prepare the data file for the import process.
- Get the role ID using the the selfServiceUsers REST API
or selfServiceRoles REST API.
To use to selfServiceRoles REST API to get the Role ID of the user you can query by ContactPartyId and RelationshipTypeCd set to ORA_CSS_USER.
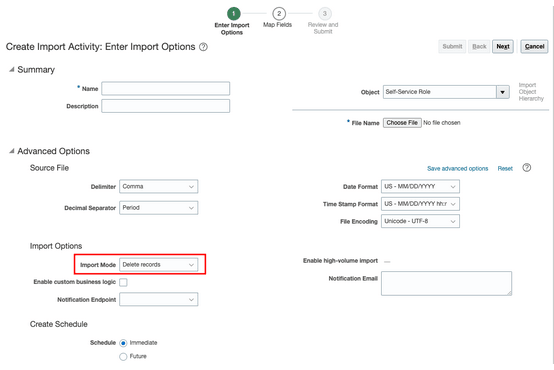
- When you start the import make sure the Import Mode is set
to Delete Records as shown in the following
example: