Overview of the Case Details Page
On the Case List page, if you click a Case Number, the Case Details page is displayed. This page displays detailed information about the selected case.
Here's an overview of the different sections of an individual case record and what you can do.
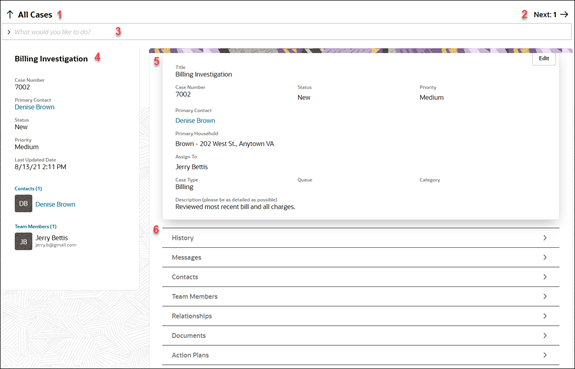
|
Callout No |
What It Is |
What You Can Do |
|---|---|---|
|
1. |
Name of the list |
Click to navigate back to the previously viewed case list page. |
|
2. |
Next |
Click to go to the next record in the case list you viewed most recently. |
|
3. |
Action Bar |
Enter keywords such as add and update, and select your intended action. To make suggestions, the Action Bar looks for key verbs and names of objects and fields. Tip:
As a shortcut, instead of clicking inside the bar, you can also use the keyboard shortcut Alt+A (for PC) or Control+A (for Mac) to put focus on the Action Bar and then start typing a keyword. |
|
4. |
Summary region |
Summary of key fields in the record. Only fields with values get displayed. For example, if you click the Contacts header, the Contact folder of the Case opens; if you click the Name of a Contact, it drills into the Contact Details page. |
|
5. |
Details region |
Shows the details of the case. If you want to edit this information, click Edit. |
|
6. |
Folders for different business objects |
Click the arrow icon to expand the folder to view or edit the related data in each folder. |
The Case Details page is organized into different folders for different business objects, which let you view or edit the corresponding data. All folders are collapsed by default, except the Details folder.
Here's an overview of these folders:
|
Folder |
Description |
|---|---|
|
History |
Read-only information that's automatically updated whenever the case is created, updated, or closed. |
|
Messages |
List of messages related to the case. Click Create Message to add a message. |
|
Contacts |
List of contacts added to the case, either through the Action Bar or the Primary Contact field in the Details folder. To remove a contact or make a contact a primary, click the Actions icon (vertical 3 dots icon). |
| Households | Household associated with the case. To add a household, click the Add Household button in the folder. To remove or make a household primary, use the Actions icon on the household row. |
|
Team Members |
List of team members added to the case, through the Assigned To field in the Details folder or by using the Action Bar. |
|
Relationships |
List of relationships this case has with other cases or service requests. You can add relationships by clicking Create Relationships. To update a relationship, click Update Relationships. To delete a relationship, click the More icon (vertical 3 dots icon) and select Delete Relationship. |
|
Documents |
Files or URLs added as attachments, through the Action Bar. You can download the attachments by clicking Download. To add a document, type Add Document in the Action Bar. |
|
Actions and Plans |
Action plan actions or action plans associated to the case. To add an action or action plan, type Add Action or Add Action Plan in the Action Bar. For more information, see the Actions and Plans chapter of this guide. |
| Tasks | Tasks associated with the case. To add a task, type Create Task in the Action Bar. |
| Appointments | Appointments associated with the case. To add an appointment, type Create Appointment in the Action Bar. |