Create a Service Request
Here's how you create a service request:
-
On the Service Request List page, click Create Service Request.
The Create Service Request page is displayed.
-
From the Account drop-down list, select the account associated with the service request.
-
You can type a few letters of the account name; the application filters the list and displays matching results.
-
To create a new account, click Create Account.
-
-
From the Primary Contact drop-down list, select the primary contact associated with the account.
-
To create a new contact, click Create Primary Contact.
The contact might or might not be associated with the account, based on the ORA_SVC_ALLOW_ANY_CONTACT_ON_SR profile option setting. If this profile option is set to Yes, contacts that aren't related to the service request can be added to the selected service request. This includes contacts of other accounts, consumer contacts, and partner contacts. The default value is No, which allows adding only those contacts that are associated with the account.
-
-
In the Title field, enter a title for the service request you're creating.
This is the only required field on this page.
-
In the Problem Description field, describe the issue.
You can insert SmartText by typing # to display a list of plain SmartText entries, and type-ahead to progressively search and filter this list.
-
From the Category drop-down list, select a service request category from the hierarchical list. Expand or collapse category groups to navigate through the hierarchies, and select a category.
-
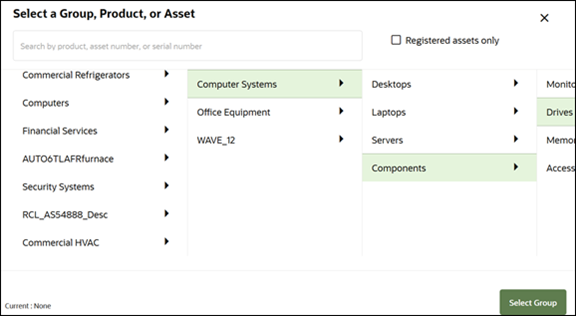
Click the Product field and select the product group or product that's associated with the service request. The Select a Group, Product, or Asset window is displayed.
-
You can enter a product, asset number, or serial number in the Search field to filter the list. The matching search results are displayed in a hierarchical list.
-
To display only registered assets in the list, select the Registered assets only checkbox.
-
Navigate through the hierarchies, select a product group or product, and then click Select Group or Select Product.
-
-
From the Severity drop-down list, select the service request severity.
-
From the Assign To drop-down list, select the agent you want to assign this service request.
-
In the Attachments section, select an attachment category from the Category drop-down list. Here's a description of the various categories:
- Miscellaneous means the attachment will be visible to a customer through the Customer Portal.
- Value Internal means the attachment is only visible through the Agent Portal.
- Inline Attachments is only used when the SR is created from an email message that contains an embedded image. Agents aren't advised to use this category.
Here you can attach files and URLs to the service request.
-
Drag the files to attach, or click the Drag and Drop section to browse the files to attach.
-
To attach a URL, enter the URL name and click Add URL.
-
Click Create.
The Service Request Overview page is displayed with the new service request you created.