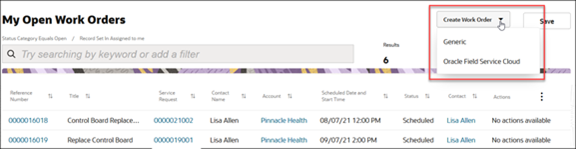
Create an Oracle Field Service Work Order
If your company is using work orders for both Oracle Field Service and generic work orders, the Create Work Order button is drop down where you can choose which of these work order types to create.
If you're using only one type of work order, the Create Work Order button appears with no drop down.
For this example, let's create an Oracle Field Service work order.
To learn how to create a generic work order, scroll to the previous next section of this chapter.
-
Click Create Work Order drop down and select Oracle Field Service Cloud.

-
Complete the work order form.
-
Title: Descriptive name for the work order.
-
Account: The Account for the Work Order
-
Contact: The contacts in the drop down are filtered by the selected account. You'll only see contact names for that account.
-
Phone and Email automatically populate for the contact.
-
Product: Opens a picker where you can select an associated group, product, or asset.
-
Type: The work order type.
-
Address: The address information including City, State, and Postal Code.
-
Time Zone: Time zone for the contact
-
Work Order Area: Automatically populates based on the selected time zone.
-
Resolution Due : The Date pickers in these fields let you select dates the work must be completed (if applicable).
-
Remind Customer Minutes Before: The amount of time the customer should be notified before the service technician arrives.
-
Requested Time Slot:
Opens the Oracle Field Service Scheduler in a new window.
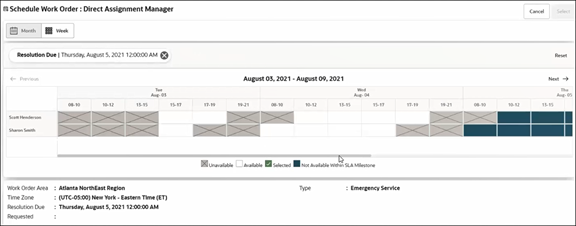 Note:
Note:If a Resolution Due was added to the work order, and for example the contact wants to schedule the work outside that time frame, you can remove the Resolution Due filter to open the blocked dates.
-
Case Note: Notes for the work order.
-
Service Request: Service Requests associated with this work order.
-
Assigned To: The work order will automatically be assigned to you when the work order is created. You can also use the drop down to select someone else.
-
-
Click Create.
The work order is created. The Edit Work Order page is displayed for the work order you just created.
Now, you can make changes to the work order or you can add attachments.
When you're done, you can click the arrow icon next to the work order number. This returns you to the My Open Work Orders list page. If you've made edits to the work order you just created, don't forget to click Save.
