Example: Submit Flow Data and File Attachments as a B2C Service Incident
Intelligent Advisor Flows was only made available to select customers, and will not be made Generally Available.
This example explains how to submit flow data and file attachments from a mobile application to a B2C Service incident.
Note: This example assumes that the flow project uses the Intelligent Advisor Mobile Scheme and that the Visual Builder application uses the Intelligent Advisor mobile application template. You can customize these for your own business use case.
To submit flow data and file attachments from a mobile application to a B2C Service incident:
-
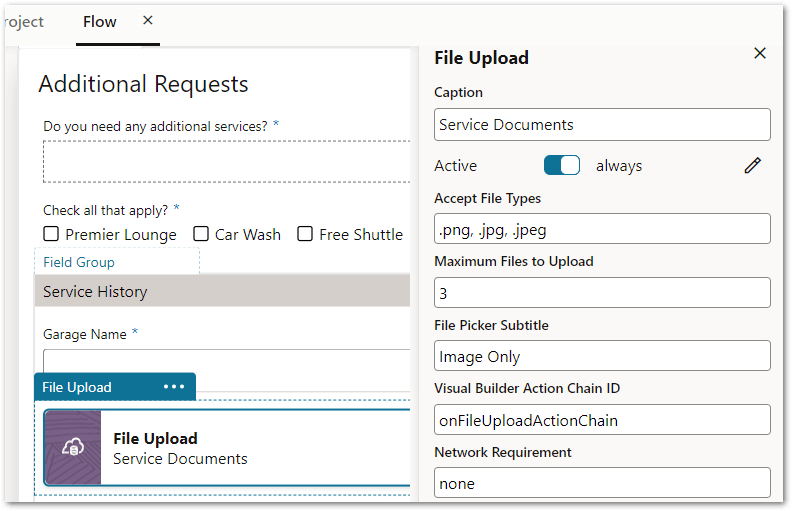
In Intelligent Advisor Hub, add the File Upload control to the flow (the File Upload is a special data action included in the Intelligent Advisor Mobile Scheme). To do this:
-
In the flow project, drag the File Upload data action from the Controls palette to your flow.
-
In the properties panel for the data action, specify the following settings:
-
Accept File Types - specify what file types are accepted (for example, .png, .jpg, .jpeg)
-
Maximum Files to Upload - enter the number of files that are allowed
-
File Picker Subtitle - enter the text to be displayed under the control's caption text in the file picker
-
Visual Builder Action Chain ID - specify onFileUploadActionChain. This is the default Visual Builder action chain that the Intelligent Advisor mobile application uses to handle the uploaded files). Alternatively, you can enter a different action chain ID here if you are using your own action chain to customize the processing logic of the uploaded files.
-
Network Requirement - should be none if the default onFileUploadActionChain action chain is used. The action chain does not directly upload file content to any remote resources.
-
Return data - by default, the onFileUploadActionChain action chain passes the file content and file name back to the flow model via the Return data of the data action. It is assigned to the files attribute with each file name assigned to name attribute and each file content assigned to content attribute. You can use different flow data attribute names if you would like.

Tip: For more details on defining data actions, see Add a Data Action to a Flow.
-
-
-
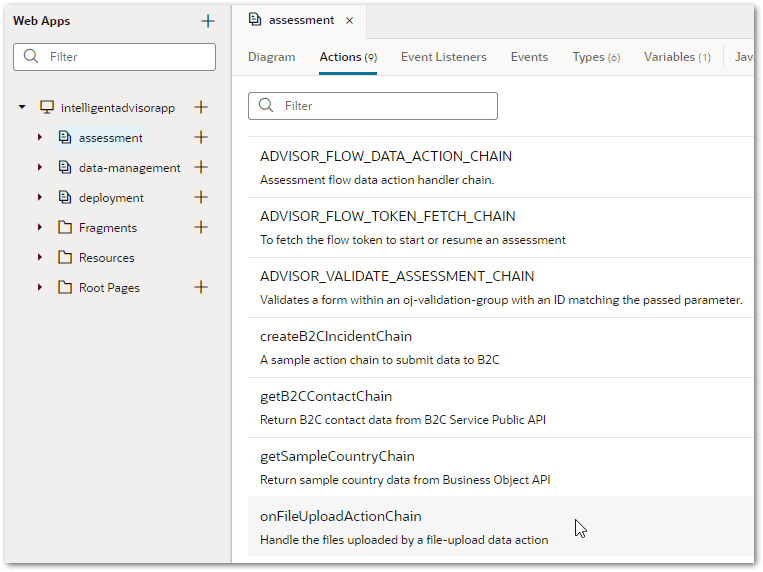
In Visual Builder, review the existing file upload action chain. To do this:
-
In the Visual Builder mobile application, go to the assessment page in the intelligentadvisorapp.
-
On the Actions tab, you will see the onFileUploadActionChain action chain.
-
Open the action chain. In the diagram you will see that a JavaScript call function is used to parse the fileList sent as part of the dataActionDetail parameter and returns the parsed array back to the flow. Tip: You can add more steps for other purposes in this default action chain, but remember to make sure it works for all file upload cases and for offline use cases.

-
-
Determine what fields are required for B2C incident creation. To do this:
-
Check the REST API for Oracle B2C Service for the request and response schema for B2C Service incident creation.
-
As noted on that page, the primaryContact (ID or LookupName) and subject fields are required for incidents.
-
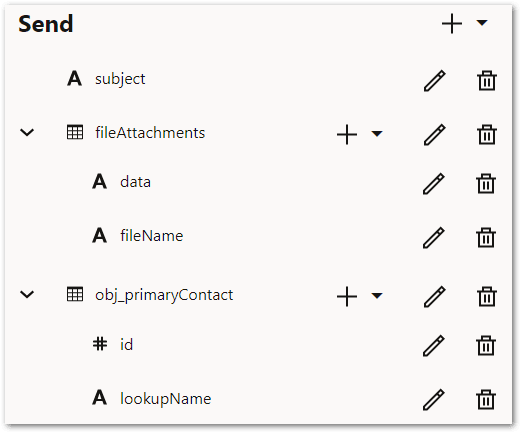
As we are going to add uploaded files as the attachment of the incident, we also need to have fileAttachments array included.
Tip: You can add more fields if other flow data should be included as part of the incident data.
-
-
-
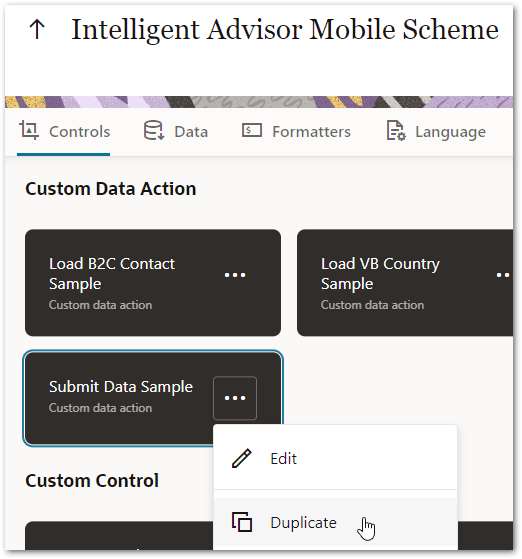
In Intelligent Advisor Hub, create a custom data action in the flow scheme. To do this:
-
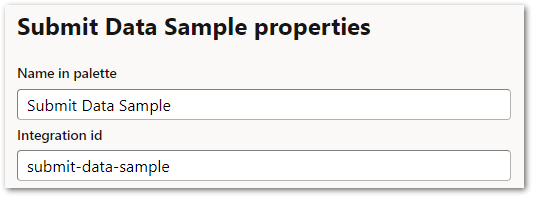
In the flow scheme project, duplicate the existing Submit Data Sample custom data action.
-
In the properties panel for the new data action:
-
Specify values for the Name in palette and Integration id settings.
-
Specify the send data required for your use case. Make sure that the Integration property names of the send data match the exact field names of the B2C Service incidents API request to avoid any additional manual field mapping.
-
Check that the primaryContact field has an "obj_" prefix (obj_primaryContact). This is needed because the primaryContact field in the B2C REST request is an object but the Intelligent Advisor flow does not have an object concept. In the flow scheme, if a flow data field is going to be mapped to an external object field through a Visual Builder application, it needs to have an obj_ prefix added to the field ID.
-
Check that that flow data field is defined as an array in the flow scheme. At runtime, the Intelligent Advisor Visual Builder application template has a built-in function to convert the array back to an object by parsing the first element in the array. For example:
{
    "obj_primaryContact": [
        {
            "id": 1,
            "lookupName": "test"
        },
        {
            "id": 2,
            "lookupName": "not_important_or_should_not_exist"
        }
    ]
}
is converted to:
{ "primaryContact": { "id": 1, "lookupName": "test" } } -
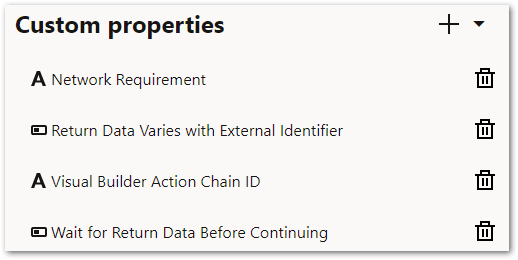
Check that the following custom properties are defined for the data action (they should have been copied from the duplicated data action):
-
Network Requirement (string)
-
Return Data Varies with External Identifier (boolean)
-
Visual Builder Action Chain ID (string)
-
Wait for Return Data Before Continuing (boolean)
Tip: For more details on defining custom data actions, see Add Or Edit a Custom Data Action In a Flow Scheme. -
-
-
-
Add the final submit data action to the flow. To do this:
-
In the flow project, drag the data action (created in step 4) from the Controls palette to the end of the flow, or right above the confirmation page group if there is one.
-
In the properties panel for the data action, specify the following settings:
-
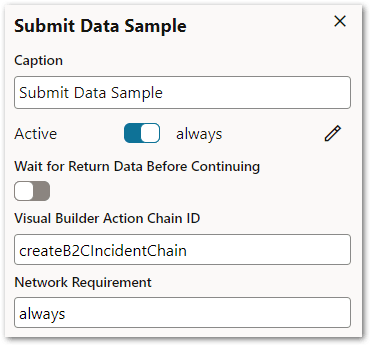
Wait for Return Data Before Continuing - specify false given this is the final data submit and it should be able to be cached-and-replayed later if the device is offline. For more information on this custom property, see Expose Custom Data Actions In an Intelligent Advisor Flow In a Visual Builder Application.
-
Visual Builder Action Chain ID - specify createB2CIncidentChain. This is the ID for the existing action chain in the Visual Builder application. Alternatively, if you are going to create your own action chain, enter a meaningful name for it here, and then create the actual action chain in Visual Builder (in step 7) with the exact same ID.
-
Network Requirement - specify always as we are submitting data to the external application. For more information on this custom property, see Configure Data Action Custom Properties for Offline Support.
-
Send data - enter values for the data fields. Note that:
-
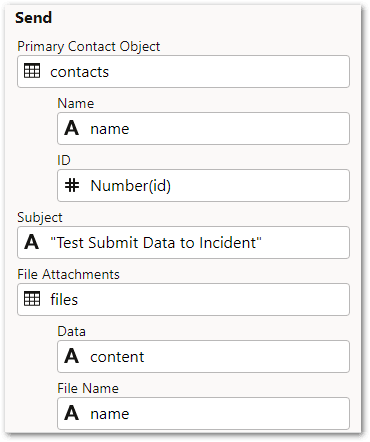
For Primary Contact Object, that the contacts should be obtained from the flow logic or from an initial data action load in the flow, for example, the B2C Contacts Load Sample.
-
For ID, you can use a rule function to convert the type if needed. For example, Number(id) converts a string to a number which is required by the B2C Service incident request ID field definition.
-
For Subject, that this short description of the incident is contained in double quotes. Tip: Another data attribute value can be used for the subject field if you do not like a hard-coded incident subject.
-
For File Attachments, the data attributes that hold the previously uploaded file content should be used.
-
-
-
-
In Visual Builder, review the existing service connection to the B2C Service Public API. To do this:
-
Click Services in the Navigator.
-
On the Backends tab, click Oracle B2C Service Backend.
-
On the Servers tab, verify that the B2C Service Site Server settings contains the username and password used for the connection. For more information, see Configure the Backends In the Mobile Application.
-
On the Service Connections tab, click b2cRestApi.
-
On the Endpoints tab, check that the /incidents endpoint is listed with a POST method createIncident.
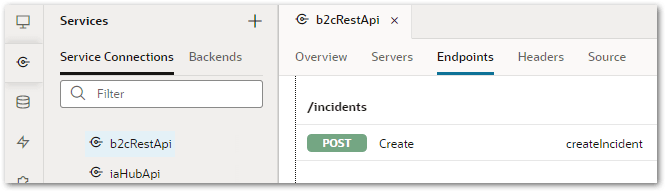
-
Click the createIncident endpoint.
-
On the Request tab, select the Body tab.
-
Provide an example JSON request if one is not already there. Visual Builder will generate a corresponding type structure.
-
Click Save Example.
Tip: Alternatively, if you would like to create a new service connection, follow the steps in Create a Service Connection from the Catalog.
-
-
-
Review the action chain to handle the incident creation data action. To do this:
-
In the Visual Builder mobile application, go to the assessment page in the intelligentadvisorapp.
-
On the Actions tab, you will see the createB2CIncidentChain action chain.
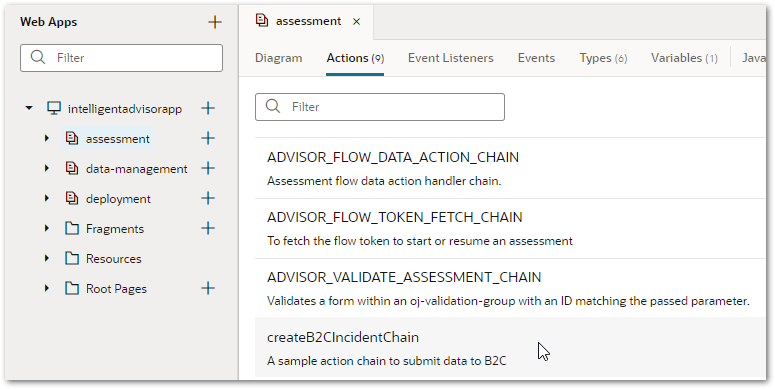
Tip: Alternatively, if you would like to create a new action chain, follow the steps in Create an action chain and make sure that the ID for the action chain matches the name you used as the value for the Visual Builder Action Chain ID in step 5 above. -
Open the action chain.
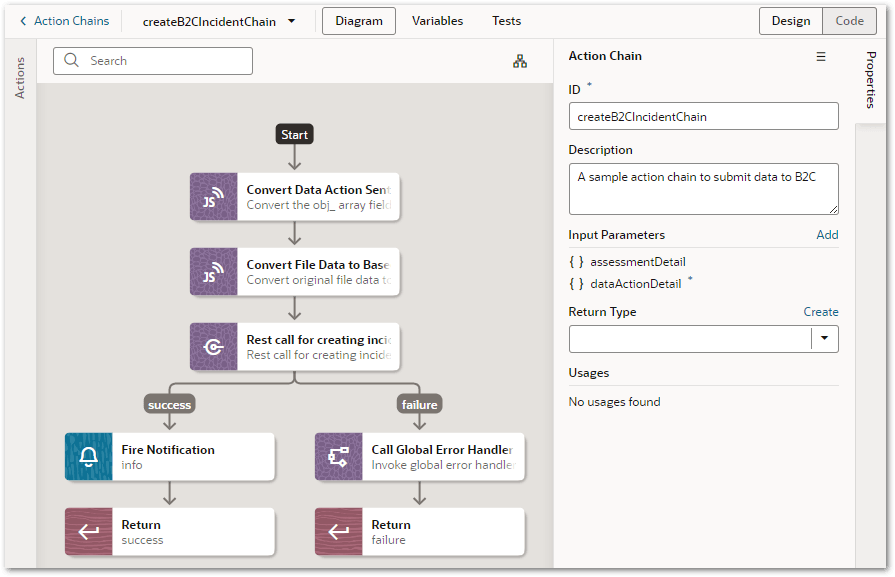
In the diagram you will see:-
a Convert Data Action Sent Data JavaScript call function - this calls a pre-defined JavaScript function convertDataObject that converts all "obj_" prefixed array fields in the sentData of dataActionDetail back to an object field. Tip: Click Go to Module Function in the Properties panel to check the actual function logic.
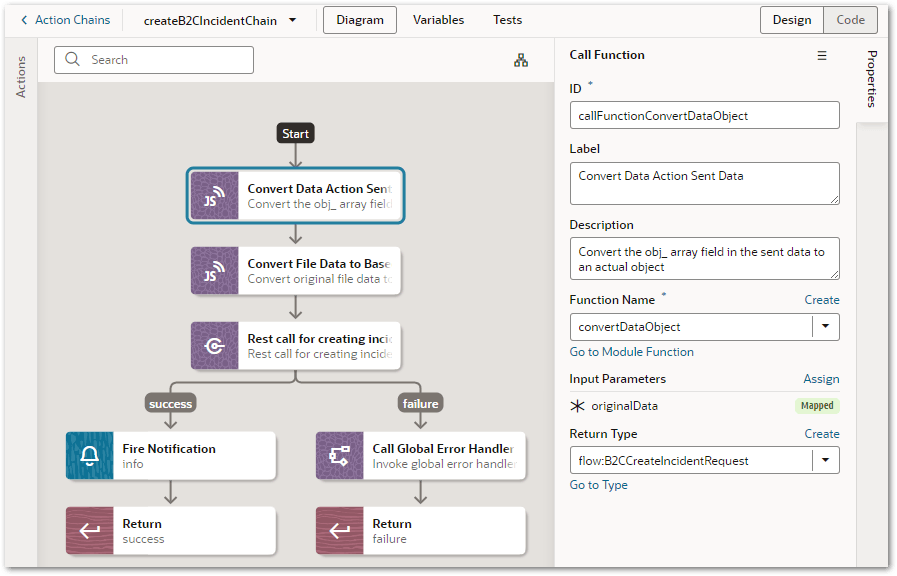
The function input parameter mapping needs to be specified so that the original sentData is passed into the function for processing.
-
a Convert File Data to Base64 JavaScript call function - this calls another JavaScript function convertFileData to remove the dataURI base64 prefix from the file content string. Tip: Click Go to Module Function in the Properties panel to check the actual function logic. The function input parameter mapping maps the outcome of the first step (that is, the return value of the first function call) to the convertFileData function input parameter createIncidentRequest.

-
a Rest call for creating incident action - this is the actual B2C REST call to create a new incident. The endpoint is the b2cRestAPI/createIncident endpoint defined in the b2cRestApi service connection (step 6). The response body format is JSON according to the B2C REST specification.

The body mapping directly uses the output of the second action chain step.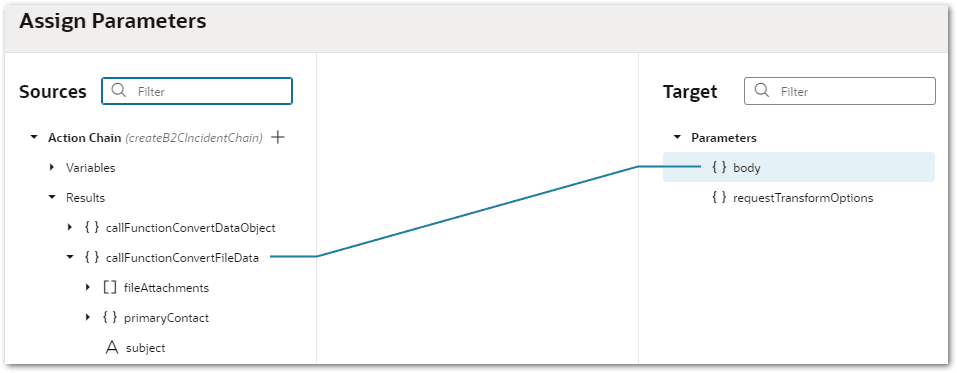
Note that the response type is optional. If the response body is to be further used in the following action steps, we recommend you define one based on the B2C Service API response schema. -
a success branch - in this branch there is a Fire Notification action. You can leverage this step to provide some information to the end user. There is also a Return action. This action has a success outcome specified. There is no need to map the payload because the data action does not return any data back to the flow model.

-
a failure branch - in the failure branch there is a Call Global Error Handler action. Note that this is calling the built-in global action chain for handling errors. The response and type input parameters are mapped. There is also a Return action. This action has a failure outcome specified. Tip: Alternatively, if you created your own action chain in step 7, you will need to define whether/how the end user should know about the failure.
-
-
-
Test the application. To do this:
-
Click the Preview button on the Visual Builder toolbar. The types of tests that you run on your mobile application will depend on your Visual Builder design time and Intelligent Advisor flow customizations, but could include:
-
Creating a new local assessment based on the flow deployment or synchronizing an Open assessment into the application based on that flow.
-
Uploading one image file via the file upload.
-
Running the assessment to the end and submitting.
-
Making sure there are no errors during the submit.
-
Going to the B2C Service incident report.
-
Checking the latest incident created and its attachment.
-
-