Configure the Screen List
Note: This feature is only available in Latest Version Interviews.
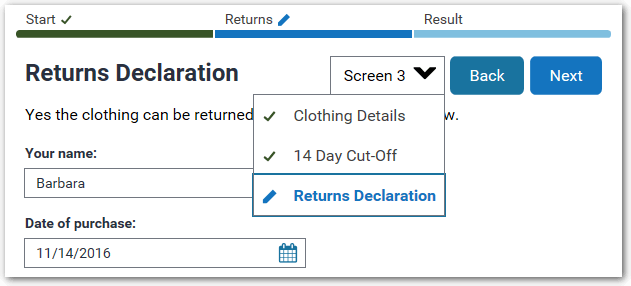
When the navigation strip is displayed on the top of the page, there is the option to also provide a screen list which shows the user which screen within a stage they are currently on. The screen list can also be used to navigate between screens within the stage.
Note that for interviews that allow free navigation, the screens list displays as "Screen <number> of <number of screens in stage>".

Tip: The text of the screen list label is configurable. For more information, see Built-in screen text settings. The applicable settings are screens-caption-single and screens-caption-multiple.
Show or hide the screen list
To show or hide the screen list:
- On the Interview tab, click the Styles button.
- In the Styles dialog box, select the Styling tab.
- In the Navigation Strip section, click the text Screen 1.
- In the pop-up window:
- select the Screen list check box to show the screen list, OR
- deselect the Screen list check box to hide the screen list.
- Click OK.
Note: Even if the option to show the screen list is selected, the screen list is only shown on a screen if there is more than one screen in a stage. If there is only one stage in the interview (even if contains more than one screen), then the screens are treated as stages and the screen list will not be shown.
Change the style of the screen list
To change the style of the screen list, including the font, font size, font style, text color, background color and icon color used for each screen type:
- On the Interview tab, click the Styles button.
- In the Styles dialog box, select the Styling tab.
- In the Navigation Strip section, click in the appropriate box in the screen list to change the style of that type of screen in the screen list:
- Screen 1
- Active Screen
- Complete Screen
- Incomplete Screen
-
In the pop-up window, change the style settings as required. The following screen list style changes are supported:
- Font (family)
- Font size (note that in the font Size field you can type in a specific font point size, for example, 15px)
- Bold text
- Italic text
- Text color
- Background color
- Color of icon (not available for Screen 1 setting)
- Click OK.
Show icons next to screen names in the screen list
To show an icon next to the screen name in the screen list:
- On the Interview tab, click the Styles button.
- In the Styles dialog box, select the Styling tab.
- In the Navigation Strip section, click on the following text in the screen list as needed:
- Active Screen - to show an icon next to the screen that the user is currently on
- Complete Screen - to show an icon next to any screens that the user has completed
- Incomplete Screen - to show an icon next to any screens that the user has not completed
- In the pop-up window, select the Icon check box.
- Click OK.
Change the icon used next to screen names in the screen list
To change the icon used next to the screen name:
- On the Interview tab, click the Styles button.
- In the Styles dialog box, select the Styling tab.
- In the Navigation Strip section, click on the following text in the screen list as needed:
- Active Screen - to change the icon used next to the screen that the user is currently on
- Complete Screen - to change the icon used next to any screens that the user has completed
- Incomplete Screen - to change the icon used next to any screens that the user has not completed
- In the pop-up window, click in the icon box.
- In the pop-up window:
- enter a URL for an image located on another server, or
- click Browse to locate an image stored locally, or
- click Clear to remove the image currently used in the screen list for that type of screen.
- Click OK.