- Using Oracle Internet of Things Asset Monitoring Cloud Service
- Work with Your Assets
- Create and Manage Assets
Create and Manage Assets
Creating asset entities for your business assets in Oracle IoT Asset Monitoring Cloud Service lets you track, monitor, maintain, and troubleshoot your assets.
When creating a new asset, you must assign an asset type to the asset. You can then associate the asset with sensor devices allowed by your asset type. Specifying an assigned place for your asset lets you trigger rules in case the asset leaves its assigned place. You can also specify a storage location for the asset, so that you can track whether or not the asset is not being utilized.
Create an Asset
Create asset entities in Oracle IoT Asset Monitoring Cloud Service to monitor and manage your business assets.
- Click Menu (
 ), and then click Design Center.
 - Select Asset Inventory from the Design Center sub-menu.
- Click the Asset Inventory Menu
 and select Create Assets.
 - To create a single asset, click Create Single Asset.
- Select the Entity Type (Asset Type) for the asset.The Asset Type must already exist in the application.
- Enter a Name for the asset.The application creates a default name for the new asset. You can choose to change this to a name meaningful for your environment. Default names are especially useful when creating assets in bulk.
- Select Create Optional Associated Assets, if the asset type has sub-assets that are optional, but you want all optional sub-assets to be created along with the asset.All required sub-assets are automatically created. You may need to specify any mandatory attributes that do not have default values.
- (Optional) Select the Data Source for the asset sensor attributes.If you are using direct data ingestion for your device, you can choose to specify the direct data source details here.
Note:
You can also choose to specify the data source for your sensor attributes in the asset editor after creating the asset.-
Direct: Use for devices that can directly connect with the application.
-
External ID: You can enter the external identifier for the device. This is usually the Hardware ID. If you do not enter a value, the default entity ID is used for authentication.
-
Authentication: Select between Client Certificate and Client ID/Secret.
Client certificate is the recommended option for increased security. The default Common Name used for client certificate is the entity ID. If you have specified an External ID, then this is used as the common name.
If using Client ID/Secret, specify a secure password in the Secret field. The default Client ID used for client certificate is the entity ID. If you have specified an External ID, then this is used as the client ID.
- Payload: Select Schema if you are using the standard schema format for data ingestion. Select Custom if the payload does not follow the schema. If choosing the custom option, you must specify a previously created Interpreter to interpret the payload.
-
-
Direct via Any Connector: Use for devices that connect using a connector.
External ID: You can enter the external identifier for the device. This is usually the Hardware ID. If you do not enter a value, the default entity ID is used for authentication.
-
Direct via Specific Connector: Use for devices that can connect using the specified connector.
-
Connector: Select a connector that you have previously created.
-
External ID: You can enter the external identifier for the device. This is usually the Hardware ID. If you do not enter a value, the default entity ID is used for authentication.
-
-
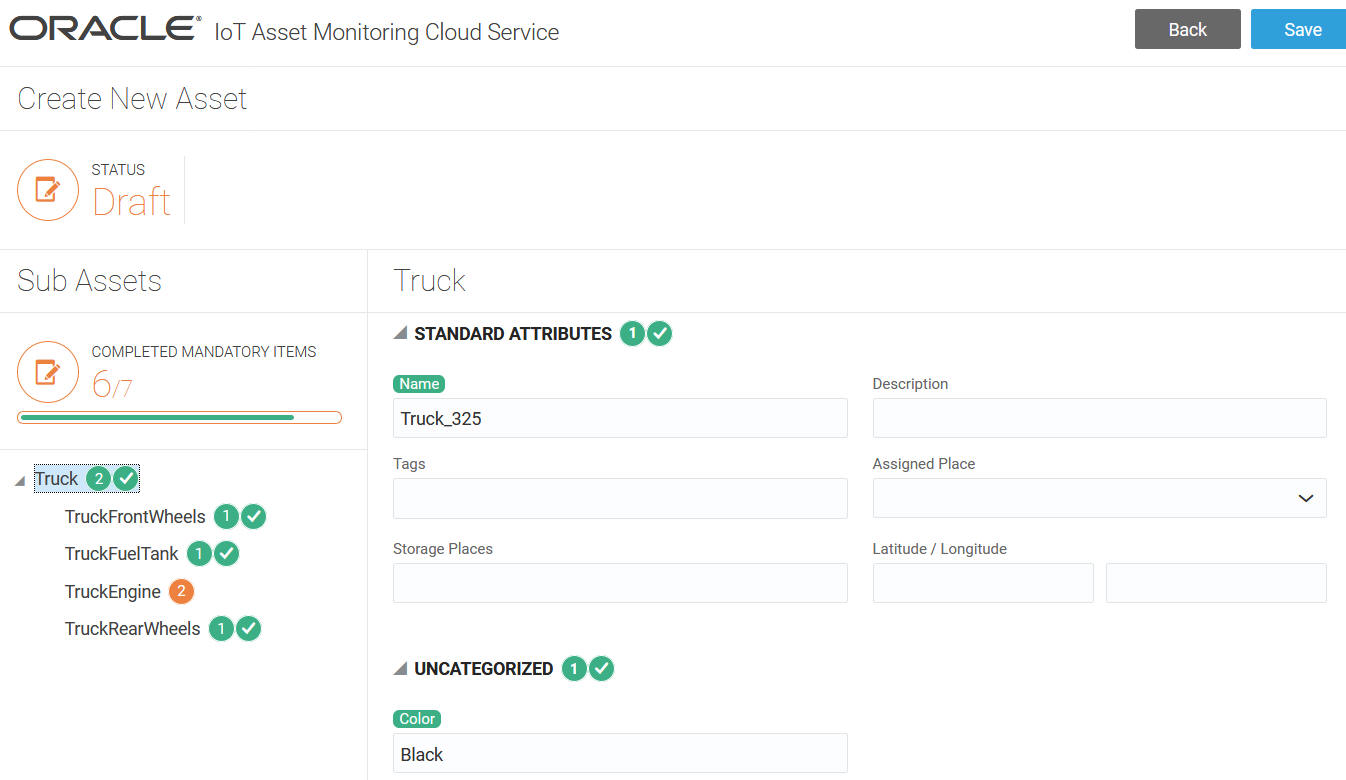
- Click Create to continue creating the asset and any specified sub-assets.The draft asset along with any mandatory and specified sub-assets is created. A progress bar indicates the mandatory items that were completed, and the ones that you must complete.In the following example, a Truck asset is created. The truck has the following associations:
- TruckFrontWheels
- TruckFuelTank
- TruckEngine
- TruckRearWheels

- Specify the Standard Attributes for the asset, and also for any associated sub-assets.
- Name: Enter a name for the asset or sub-asset.
- Description: Enter an optional description for the asset or sub-asset.
- Tags: Enter optional tags for the asset. Sub-assets don't require this, as the tags are specified for the parent asset.
- Assigned Place: Select an optional assigned location for the asset. Sub-assets don't require this, as the value is specified for the parent asset.
- Storage Place: Select an optional assigned storage location for the asset. Sub-assets don't require this, as the value is specified for the parent asset.
- Latitude/Longitude: (Optional) Enter latitude and longitude values for the asset, say for a fixed asset. Use the tab key to switch from the Latitude to the Longitude field. Sub-assets don't take these values, as the co-ordinates are specified for the parent asset.
You can alternatively click Asset Location
 to select the location in the map. Selecting a location automatically populates the latitude and longitude values.
- Select the Data Source for the asset sensor attributes.
- Direct:
Select if you are ingesting IoT data from directly connected devices, gateways, and network servers directly into your asset and machine sensor attributes. Choose direct ingestion to eliminate the need for registering devices and device models, and for creating IoT messages.
- Linked Device:
Select to link to an IoT device registered with Oracle Internet of Things Intelligent Applications Cloud.
- Direct:
- Depending on your choice in the preceding step, complete the direct data source settings, or complete linking the sensor attributes to your device attributes.
If you selected Direct under Data Source, complete the direct data source settings:
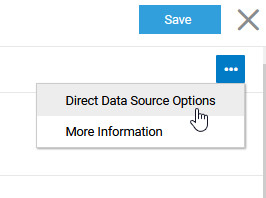
- Select Direct Data Source Options from the editor menu.

- Select the Data Source:
-
Direct: Use for devices that can directly connect with the application.
-
External ID: You can enter the external identifier for the device. This is usually the Hardware ID. If you do not enter a value, the default entity ID is used for authentication.
-
Authentication: Select between Client Certificate and Client ID/Secret.
Client certificate is the recommended option for increased security. The default Common Name used for client certificate is the entity ID. If you have specified an External ID, then this is used as the common name.
If using Client ID/Secret, specify a secure password in the Secret field. The default Client ID used for client certificate is the entity ID. If you have specified an External ID, then this is used as the client ID.
- Payload: Select Schema if you are using the standard schema format for data ingestion. Select Custom if the payload does not follow the schema. If choosing the custom option, you must specify a previously created Interpreter to interpret the payload.
-
-
Direct via Any Connector: Use for devices that connect using a connector.
External ID: You can enter the external identifier for the device. This is usually the Hardware ID. If you do not enter a value, the default entity ID is used for authentication.
-
Direct via Specific Connector: Use for devices that can connect using the specified connector.
-
Connector: Select a connector that you have previously created.
-
External ID: You can enter the external identifier for the device. This is usually the Hardware ID. If you do not enter a value, the default entity ID is used for authentication.
-
-
- Click OK in the Direct Data Source Options dialog.
See Use Direct Data Ingestion for Your Sensor Attributes for detailed information and examples on using direct data ingestion for your asset attributes.
If you selected Linked Device: under Data Source, complete linking the sensor attributes to the registered device attributes:
A sensor attribute lets you link to an IoT device sensor. For successful linking, the IoT device should be already present in Oracle Internet of Things Intelligent Applications Cloud, and the corresponding device model should have been selected for the Oracle IoT Asset Monitoring Cloud Service application.
- Click Link to Device (
 ) against a sensor attribute.
 - Select from the list of available devices. For successful linking, the IoT device should be already present in Oracle Internet of Things Intelligent Applications Cloud, and the corresponding device model should have been selected for the Oracle IoT Asset Monitoring Cloud Service application.You can use Select Filter to filter the available devices, say by device name or serial number.
- Under Sensor Attribute Binding, confirm that the correct Device Model/URN is displayed.
- Select the Device Attribute that corresponds to the sensor attribute.
- Click Select.The sensor attribute is now linked to your IoT device attribute.
- Select Direct Data Source Options from the editor menu.
- If your asset type contains actions, then link the Actions for the asset, and for any associated sub-assets, to their respective IoT sensor device actions.An asset action lets you trigger device actions from within Oracle IoT Asset Monitoring Cloud Service. For successful linking, the IoT device should be already present in Oracle Internet of Things Intelligent Applications Cloud, and the corresponding device model should have been selected for the Oracle IoT Asset Monitoring Cloud Service application.
- Click Link to Device (
 ) against an action name.
 - Select from the list of available devices. For successful linking, the IoT device should be already present in Oracle Internet of Things Intelligent Applications Cloud, and the corresponding device model should have been selected for the Oracle IoT Asset Monitoring Cloud Service application.You can use Select Filter to filter the available devices, say by device name or serial number.
- Under Sensor Attribute Binding, confirm that the correct Device Model/URN is displayed.
- Select the Device Action that corresponds to the asset action.
- Click Select.The asset action is now linked to your IoT device action.
- Click Link to Device (
- Specify any custom attributes for the asset, and also for any associated sub-assets.The custom attributes appear under the CategoryName section. The default category is Uncategorized.For example, an HVAC asset may include the serial number attribute.
- Click Save to save the asset along with any associated sub-assets.A Save Progress displays the status of the asset creation.The status for the newly-created asset changes to Active.
- Click OK after the asset is successfully created.
- Click Back to return to the All Assets list.The Asset Activity tab keeps track of all asset activity, such as asset creation, edits, and imports.
Create Multiple Assets in Bulk
You can create multiple assets in draft form with a single create operation.
Alternatively, you can export the newly-created assets to a .csv (comma separated value) file, bulk edit the attributes and device associations, and import back the assets to activate them.
- Click Menu (
 ), and then click Design Center.
 - Select Asset Inventory from the Design Center sub-menu.
- Click the Asset Inventory Menu
 and select Create Assets.
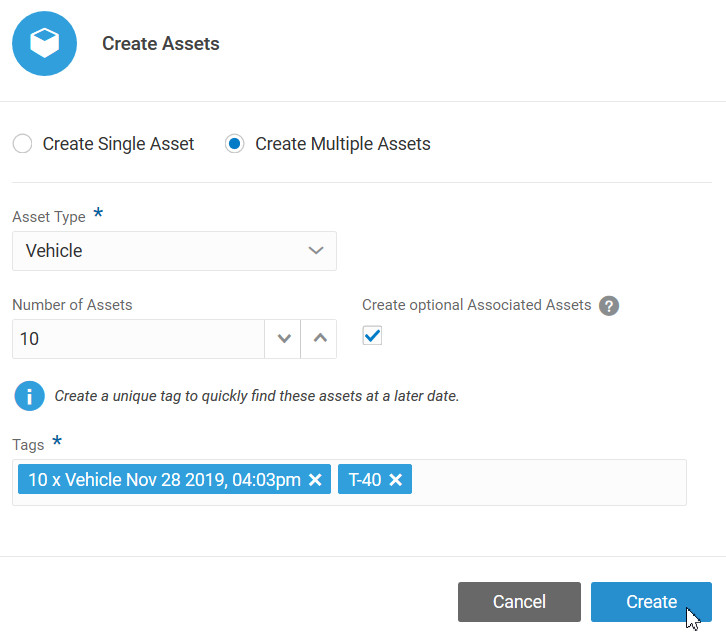
 - To create multiple assets, select Create Multiple Assets.
- Select the Asset Type for the assets.The Asset Type must already exist in the application.
- Enter the Number of Assets to be created.
- Select Create Optional Associated Assets, if the asset type has sub-assets that are optional, but you want all optional sub-assets to be created along with the assets.
- Optionally specify one or more Tags for your assets.Tags help identify and group assets. Tags are also useful when searching or filtering for assets, say for export.A default tag is automatically added, which specifies the number of assets that are being created, the asset type, and the date-time stamp.

- Click Create to continue creating the assets and any specified sub-assets.An information message appears confirming that the bulk asset creation has started.The application automatically creates default names for the new assets. You can choose to edit these later if required.
The Asset Activity tab keeps track of all asset activity, such as asset creation, edits, and imports.
After the assets are created, they appear under the All Assets tab. You can also refresh the page to check if the assets already appear under All Assets.
- To activate the newly created assets, choose one of the following:
- Individually edit the assets to specify attribute values and device links.
- Export the assets to a
.csv(comma separated value) file to bulk edit them.
Edit Asset Details
Edit an asset to modify the asset details and to replace or remove sensor devices.
- Click Menu (
 ), and then click Design Center.
 - Select Asset Inventory from the Design Center sub-menu.
- Select an asset in the Assets list.You can use the Filter
 to search for individual assets based on asset attributes such as name, description, location, and type.
You can also filter the assets in your view based on custom asset attributes set by your organization. For example, if your assets use attributes such as manufacturer name, model number, and warranty status, you can look for assets using the manufacturer, model, or warranty status value.
- Click the Edit (
 ) icon for the asset row.
 - Edit the standard attributes, any sensor attribute associations, any action associations, and any custom attributes, as required.For hierarchical assets, you can edit associated sub-assets along with the parent asset after selecting them in the hierarchy.
- Click Save.
- Click Back to return to the Assets list.