6 Customize Your Oracle IoT Asset Monitoring Cloud Service Application

Add a corporate logo or modify the application name to personalize yourOracle IoT Asset Monitoring Cloud Service application.

Show or Hide the Application Name

Show or hide the application name when business requirements change.

  1. In the Operations Center, click Menu (Menu icon), and then click Settings.
    If you are in the Design Center, you need to click Previous (Previous icon) before you see the Settings option in the menu.

    Note:

    If you wish to change the appearance for an individual organization only, navigate to Menu > Settings > IoT Organizations > Organization Name.
  2. Click Appearance on the Settings page.
  3. Select one of these options:.
    1. Select Show Application Name to display the application name on all application pages.
    2. Clear Show Application Name to remove the application name from all application pages.
  4. Click Save.

Add or Update an Application Logo

Add or update corporate logos when business requirements change or a new corporate logo is issued.

  1. In the Operations Center, click Menu (Menu icon), and then click Settings.
    If you are in the Design Center, you need to click Previous (Previous icon) before you see the Settings option in the menu.

    Note:

    If you wish to change the appearance for an individual organization only, navigate to Menu > Settings > IoT Organizations > Organization Name.
  2. Click Appearance on the Settings page.
  3. Under Title Bar Logo, select Custom.
    Under Image, click the Drag and Drop area to select an image file to upload. Alternatively, you can also drag and drop the image file to the Drag and Drop area in your browser window.
  4. Click Save.

Remove an Application Logo

Remove a logo when an application logo is no longer required.

  1. In the Operations Center, click Menu (Menu icon), and then click Settings.
    If you are in the Design Center, you need to click Previous (Previous icon) before you see the Settings option in the menu.

    Note:

    If you wish to change the appearance for an individual organization only, navigate to Menu > Settings > IoT Organizations > Organization Name.
  2. Click Appearance on the Settings page.
  3. Under Title Bar Logo, select None.
  4. Click Save.

Set Default Units of Measure

Set the default units of measurement for your application. You can select between the US Imperial and Metric unit systems.

  1. In the Operations Center, click Menu (Menu icon), and then click Settings.
    If you are in the Design Center, you need to click Previous (Previous icon) before you see the Settings option in the menu.

    Note:

    If you wish to change the measurement units for an individual organization only, navigate to Menu > Settings > IoT Organizations > Organization Name. For example, you may want to set different measurement units for your US and Europe organizations.
  2. Click Units and Measurement.
  3. Click Edit to change the unit system.
  4. Under Unit System, select between US Imperial and Metric.
    The US Imperial setting uses the following units for Distance, Speed, Temperature, and Volume respectively: Miles, Miles per Hour, Fahrenheit, and Gallons.
    The Metric setting uses the following units for Distance, Speed, Temperature, and Volume respectively: Kilometers, Kilometers per Hour, Celsius, and Liter.
  5. Click Save.

Customize Visualization Options

You can choose to customize the default view that appears when you log into your organization to access the Operations Center. You can also choose custom default views for your asset types.

The Map view is the default view for an organization, and the Digital Twin tab is the default view for your assets. You can choose to change the default tab behavior.

For example, if your organization has static HVAC assets that need constant monitoring, you may want to change the default organization view from the Map view to the Incidents view.

As another example, say you have created a custom performance dashboard for your forklifts and you wish this dashboard to appear when you click Show Details against a forklift asset. You can change the visualization option for the forklift asset type from Digital Twin to your dashboard.

Visualization options can be customized at the organization, group, and asset type levels.

Customize Visualization Options for Your Organization

When you log into your organization, or switch to your organization, to access the Operations Center, the Map view is the default view that appears. You can change this setting from the Visualization Options setting for the organization.

  1. Click Menu Menu iconand then click Design Center.
  2. Select Organization from the Design Center sub-menu.
  3. Click Edit Edit icon against Visualization Options.
  4. Select one of the available options for Default Operations Center Tab.
    The default option is Map.

    For example, if your organization has static HVAC assets that need constant monitoring, you may want to change the default organization view from the Map view to the Incidents view.

Customize Visualization Options for an Asset Type

When you access the details for an asset, the Digital Twin view is the default tab that appears. You can change this setting from the Visualization Options setting for an asset type.

  1. Click Menu (Menu icon), and then click Design Center.
  2. Select Asset Types from the Design Center sub-menu.
  3. Select the correct asset type from the left pane.
  4. Click Edit Edit icon against Visualization Options.
  5. Select one of the available options for Default Operations Center Tab.
    The default option is Digital Twin.

    For example, say you have created a custom performance dashboard for your forklifts and you wish this dashboard to appear when you click Show Details against a forklift asset. You can change the visualization option for the forklift asset type from Digital Twin to your dashboard.

Monitor Data Storage and Manage Capacity Usage

As an administrator, you can monitor the data storage for your Oracle IoT Intelligent Applications Cloud Service. Use the Storage Management page to review storage data in the system, to set up or adjust the time window for data retention, and to run data deletion jobs.

Note:

If you are using more than one application in Oracle IoT Intelligent Applications Cloud Service, then the data storage settings are shared between these applications. Also, any operations that you perform under data management, such as tweaking data life spans or creating deletion jobs, affects data in all these applications.

So, for example, if you are using the Asset Monitoring and Production Monitoring applications, the data usage includes usage across both these applications. Also, if you were to delete metric data older than, say, 30 days, then metric data that is older than 30 days is deleted in both your applications.

When you log in to your IoT application as an administrator, a notification appears with details on the storage capacity used. Notifications may also appear periodically for every 10% of capacity that is used up. High-priority notifications are sent after you have used up more than half of the storage capacity. You can use the Storage Management page to manage your storage capacity.

The Storage Management tile under application Settings lets you monitor and manage the data storage for your application. The Storage Management page has the following sections:
  • Summary: Shows you the total data storage capacity available for your account, and the currently used up capacity. Depending on your current usage, the status is indicated using one of the following colors:
    • Green: Indicates that more than 50% of the available capacity remains.
    • Orange: Indicates that between 25% and 50% of the available capacity remains. A recommendation on ways to manage your data is also included.
    • Red: Indicates that less than 25% of the available capacity remains, and you must take steps to manage your storage data.

    Data Storage Summary Section (described in text)

  • Data Management: Lets you manage data, change settings, and create data deletion jobs. The data capacity usage percentages are shown category-wise:
    • Raw Device Data: Raw time-series data from devices that is stored in a normalized JSON format. Comprises application messages, connector messages, integration-related messages, log messages, and other related messages.
      Oracle recommends a data life span of 7 Days, or less, for this category to avoid high storage consumption.

    • Sensor Data: Time-series data from devices and computed attributes used for machine-learning models and anomaly detection. Comprises incoming sensor data, visualization and training data.

      Set the data life span for this category to match your business requirements for data retention.

    • Custom Metric Data: Computed values of user-defined metrics. Comprises data specific to custom metrics or KPIs. Custom metrics are metrics that you create in the application for your production environment and scenarios.

      Set the data life span for this category to match your business requirements for data retention.

    • System Metric Data: Computed values of built-in system metrics that are automatically computed. Comprises data specific to system metrics or KPIs. System metrics are the built-in metrics that are calculated automatically in your application.

      Oracle recommends a data life span of 90 Days, or less, for this category to avoid high storage consumption.

    • Transaction Log Data: Comprises logs related to all shipment transactions that have occurred between Oracle IoT Fleet Monitoring Cloud and OTM or ITT.

      Set the data life span for this category to match your business requirements for data retention.

    You can select the data life span for each category. The data life span is the time period for which data is retained. If you set the data life span for a category to Delete Manually, then data for that category is never deleted, unless you manually run a data deletion job. Note that this setting may potentially lead to storage capacity issues, as stored data is never deleted.

    You can choose to create data deletion jobs to delete selective data. A data deletion job lets you select the data type and time span for which you wish to delete data.

Perform Data Management Tasks

Use the Data Management section to manage data storage settings for your application. You can select the data life span for the various data types. You can also create data deletion jobs to delete selective data.

  1. Click Menu (Menu icon) and then click Settings .
  2. Click Storage Management.
    The Storage Management page appears.
  3. To change the data life span, click Edit Edit icon under Data Life Span.
    The Data Life Span section appears under the Data Management section.
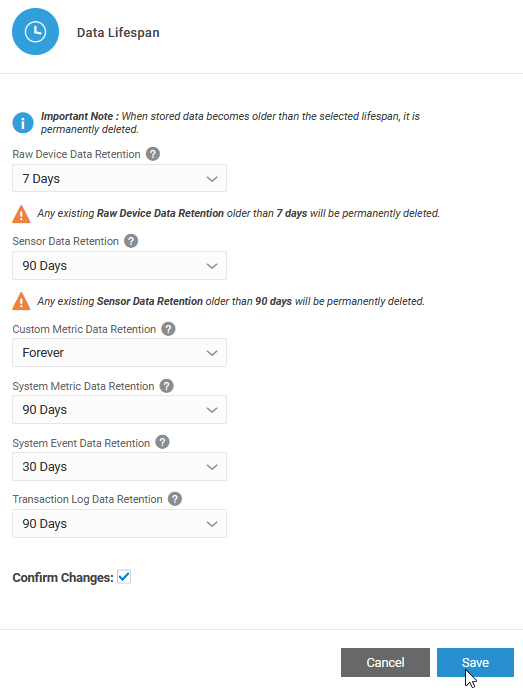
    1. Select the data life span for Raw Device Data, Sensor Data, Custom Metric Data, System Metric Data, and Transaction Log Data.

      Data lifespan

      If you select Forever for a category, then the data for that category is never deleted automatically. You would need to run a data deletion job, described in the subsequent steps, to select and delete any data for the category.
    2. Select Confirm Changes and click Save to save your settings.
  4. (Optional) To run a data deletion job, click the Create Data Deletion Job button.
    1. In the Create Data Deletion Job dialog box, select one or more data types for which you wish to delete data.
      The available choices are:
      • Device
      • System Metrics and Custom Metrics
      • Sensor
    2. Under Delete Data, choose the time period for which you wish to delete the data.
      For example, you may want to delete sensor data that is Older than 30 days.

      You can also choose a custom Time Range for which to delete data. For example, you may wish to delete data for a particular day or hour.

    3. Click Delete to create the delete job.
      You can monitor the job progress, and the number of records that were deleted, under the Data Deletion Jobs section. When the data delete job completes, its status changes from In Progress to Completed.
      You can also choose to delete a data deletion job. If the job is still running when you delete it, then the job is terminated and deleted. If the job has already failed or completed, then deleting the job simply removes it from the list of failed or completed jobs.

      Removing a Delete Job