 Connect a Wireless Device Having Location Sensors with Oracle IoT Asset Monitoring Cloud Service
 Before You Begin
This 20-minute tutorial shows you how to configure PixieBoard PRO PLUS to connect with Oracle IoT Asset Monitoring Cloud Service. PixieBoard PRO PLUS is a powerful but small wireless computer with location sensors that can help to track and monitor assets in Oracle IoT Asset Monitoring Cloud Service application.
Background
PixieBoard PRO PLUS, a tiny computer running on Arch Linux®, has an integrated 9-axis inertial measurement unit (IMU) comprising a gyroscope, an accelerometer, and a magnetometer. Its global positioning system (GPS) and Global Navigation Satellite System (GLONASS) digital unit are instrumental in location tracking, motion detection and shock monitoring.. It also has four 1GHz ARM® Cortex™ A9 cores, a 2D co-processor, a powerful Vivante™ GPU, video decoding acceleration, 4 GB of RAM, dual band MIMO WI-FI® for up to 866Mbps transfers, Bluetooth® 4.1 EDR, 4G/3G cellular modem, high quality analog audio, three USB ports, dual uSD card slots, several GPIO and expansion options and can take power from a battery or A/C power source.
Oracle IoT Asset Monitoring Cloud Service manages enterprise assets, track their real-time location, health and utilization. You can view your asset metrics on the dashboard and automate actions based on predictive insights.
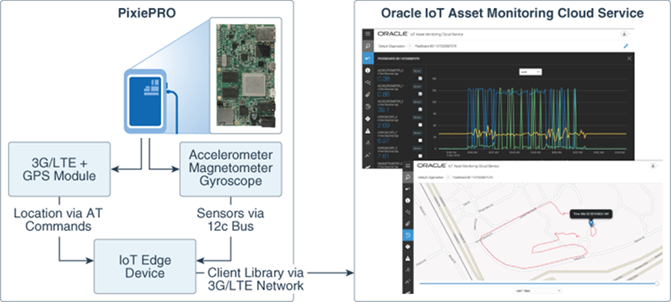
The following image displays the integration of a PixieBoard PRO Plus device with Oracle IoT Asset Monitoring Cloud Service.
What Do You Need?
- A PixieBoard PRO Plus device with the initial setup completed. (Skip the WiFi setup)
- Mobile broadband connection setup on the PixeBoard
- A computer running Linux that has the Gradle build tool installed
- Downloaded JDK 8 for 32-bit ARM (If the version is JDK 8 u211 then the name of the archive is j
dk-8u211-linux-arm32-vfp-hflt.tar.gz) - Downloaded and extracted the sample application
- Access to an Oracle IoT Asset Monitoring application instance version 19.1.x or above
 Configure the PixieBoard
After you've completed the one-time setup of the PixieBoard and its mobile broadband connection, configure the PixieBoard for location related measurements and Java installation.
- To access the integrated 9-axis IMU comprising a gyroscope, an accelerometer, and a magnetometer, install the i2c-tools package on the PixieBoard.
sudo pacman -S i2c-tools - Before you can access the GPS location of the device, you need to set the
ModemManagerservice to run in debug mode. Edit the/etc/systemd/system/dbus-org.freedesktop.ModemManager1.serviceunit file to add--debugoption toExecStartand then reload the services' unit:#reload
sudo systemctl daemon-reload - Transfer the JDK 8 archive that you downloaded to the PixieBoard at the
/home/pixieprodirectory. - Extract the archive, create a directory for the installations and change to that directory:
#extract
tar -xvzf jdk-8u211-linux-arm32-vfp-hflt.tar.gz
#create directory
sudo mkdir -p /usr/lib/jvm - Copy the extracted directory to the new folder location and then install
java-runtime-commonandjava-environment-commonpackages:#copy
sudo cp -r jdk1.8.0_202 /usr/lib/jvm/java-8-oracle #install
sudo pacman -S java-runtime-common java-environment-common - Run the
archlinux-javascript to select the default Java version and then reboot your PixieBoard:
#set default version
sudo archlinux-java set java-8-oracle/jdk1.8.0_211
#reboot
sudo reboot
 Initialize Broadband Connection
Enable the modem, wait until the mobile broadband connection gets started, and record the modem identifier.
- Enable the modem and monitor the modem status:
#enable
sudo enablePixieModem
# monitor status
sudo mmcli -L
Verify if the status displayed is as follows and note the modem identifier
that appears after the term
Modem.In this example the modem identifier is0./org/freedesktop/ModemManager1/Modem/0 [QUALCOMM INCORPORATED] QUECTEL Mobile Broadband Module
- Monitor the status of the mobile broadband connection by providing the connection name that you entered while setting up your PixieBoard:
sudo nmcli -f GENERAL.STATE c show
<connection name> Verify if the result of the previous command contains the following:
GENERAL.STATE: activated
 Obtain Readings from Sensors
Enable the 9-axis IMU on your PixieBoard and obtain readings from its accelerometer, magnetometer and gyroscope.
- Enable the gyroscope, accelerometer, and the magnetometer:
#enable gyroscope
sudo sh -c 'echo 1 > /sys/devices/virtual/misc/FreescaleGyroscope/enable'
#enable accelerometer
sudo sh -c 'echo 1 > /sys/devices/virtual/misc/FreescaleAccelerometer/enable'
#enable magnetometer sudo sh -c 'echo 1 > /sys/devices/virtual/misc/FreescaleMagnetometer/enable' - Review and note the addresses of the three sensors from this address file, before you read their values from the I2C bus registers.
- For each sensor, use the
i2cgetutility to obtain the raw values of each axis, which is a two byte big-endian value. Review the following example of reading raw values of accelerometer's in the X axis.:# 1.Read first value byte : sudo i2cget -f -y 1 <chip address> <data address>
sudo i2cget -f -y 1 0x1e 0x01 # 2.parse the hexadecimal value from the output
# value after parsing the output: 0xfa
#### # 3.Read second value byte : sudo i2cget -f -y 1 <chip address> <data address+1> sudo i2cget -f -y 1 0x1e 0x02 # 4.parse the hexadecimal value from the output
# value after parsing the output: 0xf0 #### # 5.Shift first value byte to the left by 8 bits and add the second value byte # The result will be: (0xfa << 8) + 0xf0 = 0xfaf0 - Use the multipliers data to convert the raw values into unit based values
for each sensor.
Sensor Target Unit Multiplier Gyroscope degrees/s 0.0078125 * 180.0 / π Accelerometer m/s2 9.80665 * 0.000244 Magnetometer μTesla 0.01
 Access GPS Measurements
Initialize the GPS module of your PixieBoard and access GPS location of the device by using AT commands.
- Enter the following command to check the status of the GPS module and repeat until you get the desired response:
# modem identifier is 0
sudo mmcli -m 0 --command=AT+QGPS?
Verify if you receive a result that displays:
response: AT+QGPS?: 0 - If the result displays a status of 1, then stop the ongoing GPS session:
sudo mmcli -m 0 --command=AT+QGPSEND
Repeat Step 1 until you get the status as 0.
- Initialize the GPS module :
sudo mmcli -m 0 --command= AT+QGPS=1,30,50,0,1
- Check the status of the GPS module by performing Step 1 and repeat until you get a response with a status as 1,
response: AT+QGPS?: 1. - Query the current GPS location of the PixieBoard:
sudo mmcli -m 0 --command= AT+QGPSLOC=2
If the command fails then an error message is displayed. If the command is successful then the following message is displayed:
response:+QGPSLOC:  <UTC>,<latitude>,<longitude>,<hdop>,<altitude>,<fix>,<cog>,
<spkm>,<spkn>,<date>,<nsat>
Note: You need to parse the response string to extract the current latitude and longitude values. In the response, the latitude and longitude are string representation of Double values with dot as the decimal separator.
 Register the PixieBoard in Oracle IoT Cloud Service
Register the PixieBoard device and add it to your Oracle IoT Asset Monitoring Cloud Service instance.
- Identify the attributes for the GPS module and 9-axis IMU sensors of the PixieBoard.
- Sign in to your Oracle IoT Asset Monitoring Cloud Service instance and navigate to the Oracle IoT Cloud Service URL.
- Click Menu
 , on the left navigation bar, click Devices, and then click Model.
 - On the Device Model page, click Add
 .
. - On the Create New Device Model page, enter or select the following
and then click Save.
- Name:
PixieBoardDeviceModel - Description:
Device model for the PixieBoard - URN:
urn:com:oracle:iot:device:pixieboard - System Attributes: select
ora_latitude andora_longitude - Custom Attributes: Click Add and create 9 custom attributes of type Number with the following names:
accelerometer_X, accelerometer_Y, accelerometer_Z, gyroscope_X, gyroscope_Y, gyroscope_Z, magnetometer_X,magnetometer_X, magnetometer_X
- Name:
- On the Device Model page, click Menu , and then on the left navigation bar, click Registration, and then click Register Single Device.
- On the Single Device Registration page, enter the details and click Register.
- On the Registration Successful page, enter the File Protection Password and click Download Provisioning File. Save the provisioning file into your system and copy it to your PixieBoard device.
- Click Menu , on the left navigation bar, click Devices, and click Applications. Click Oracle IoT Asset Monitoring Cloud Service and then click Device Model.
- On the Device Model page, click Choose Device Model
 and from the list, search your PixieBoard device model. Select it and click Done.
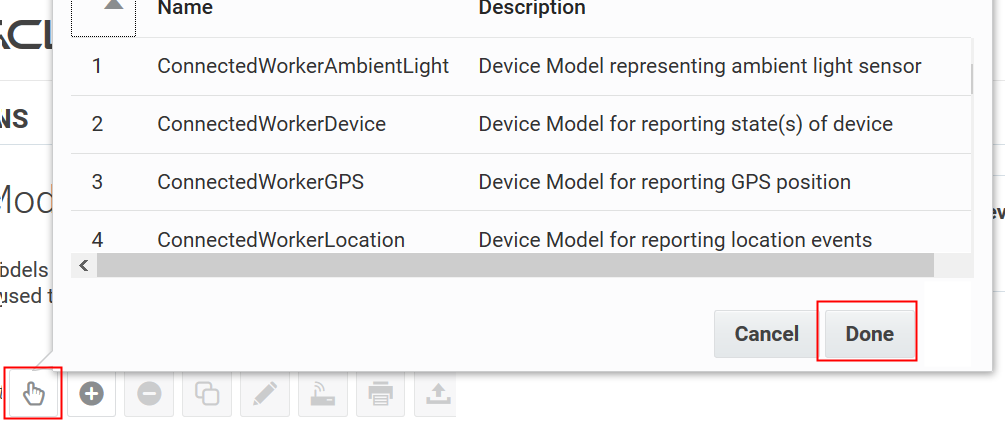
Description of the illustration select_device_model.png
 Run the Java Application on PixieBoard
Run the sample Java application that uses the Java Client Library to connect the PixieBoard device to Oracle IoT Asset Monitoring Cloud Service and sends GPS location and readings from the 9-x IMU sensors. The Java applicaton registers the required device model and the PixieBoard device in Oracle IoT Cloud Service
- To build the sample application, go to the folder where you extracted the Java application archive, and enter the following command:
./gradlew build
The output is stored in
./dist/pixie_iot.zip. - On your PixieBoard, create a folder and name it
sampleApp. Copy thepixie_iot.zipfile to your PixieBoard device and extract it to thesampleAppfolder. - Open and edit the
sampleApp/config/config.jsonfile to provide information about the Oracle IoT Cloud Service instance, messaging interval, and mobile broadband connection name. Optionally you can provide VPN configuration information.Note: To enable a VPN connection perform the following:
# Enable systemd-resolved service: sudo systemctl enable systemd-resolved.service sudo reboot
# Install openconnect package: sudo pacman -S openconnect - Install the sample application service:
chmod +x sampleApp/install/install-service.sh sudo
/install/install-service.sh - Reboot the PixieBoard:
sudo reboot
 Verify the Connectivity
- Navigate to your Oracle IoT Cloud Service instance. Click Menu , Applications and then click Oracle IoT Asset Monitoring Cloud Service.
- Click Data and Explorations.
- On the Data tab, for the Filter field, select Device, and then click Select Device.
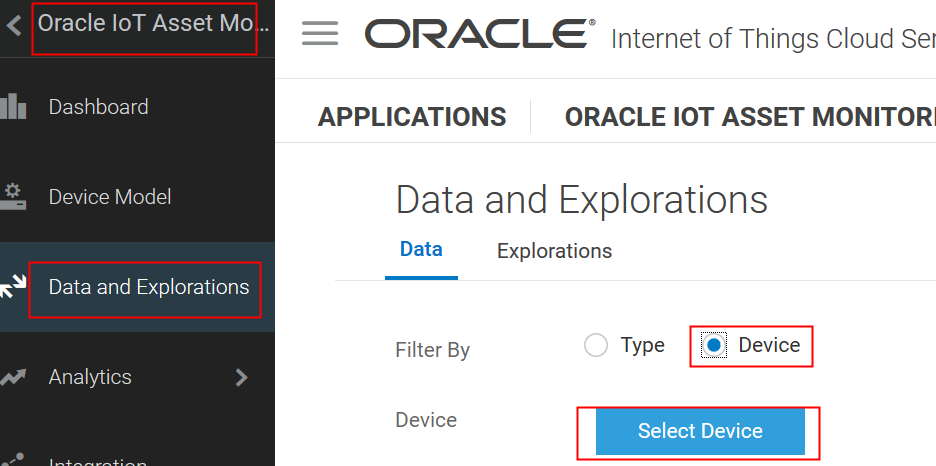
Description of the illustration select_device.png - From the list, select the PixieBoard Device that you had registered in Section 5, and then click Done.
- Verify that the GPS location values and messages from the gyroscope, accelerometer, and the magnetometer (9-axis IMU sensors) are displayed.