2Set Up Loyalty Programs
This chapter contains the following:
Overview of Oracle Loyalty Programs
Loyalty programs create opportunities to engage, delight, and reward customers. You can foster long-term customer loyalty as part of an overall business marketing strategy. To set up loyalty programs, you must be either a Loyalty Program Administrator or a Loyalty Program Manager.
Oracle Loyalty offers an enterprise class, comprehensive, cross-channel solution for managing the complete loyalty program lifecycle. Oracle Loyalty helps attract new customers, retain high-value customers, and move others into the high-value segment using promotion incentives. These incentives can increase how often customers visit, motivate customers to spend more, both in-store and online, and create influential brand advocates.
You can define and implement one or more loyalty programs, or reward strategies, as needed to represent an organization, line of business, brand, or customer segment. You can track, reward, and recognize customer behavior, including repeat purchases of products, referrals, social activities, and business with loyalty program partners. You can leverage business partnerships as an integral part of loyalty programs and promotions.
Loyalty programs and promotions give members points as rewards for their purchases or for other behavior, such as:
-
Airlines' frequent-flyer programs that give members bonus miles or discounts on hotel stays or car rentals
-
Hotels' frequent guest programs
-
Retailers' club programs that reward all purchases, or purchases of a particular manufacturer's products
-
Cruise lines' and railways' frequent traveler programs
-
Telecommunications firms' loyalty programs
-
Coalition loyalty programs
You define the products and services for redemption, along with the redemption value in points. Tiers create incentives to earn products and services, including those from redemption partners.
Members can enroll into a program using the customer application. Loyalty administrators can also enroll members individually or in a group. Members can also refer friends and family, where you set up a reward for the new enrollments and referrals.
Other types of promotions give members extra rewards for specific behavior, for example:
-
A promotion can give members bonus points for purchasing a specific product during a specific month.
-
A program can include promotions that grant a set number of points for completing a purchase, additional points for being part of a high-level tier, and more points after buying three items.
All key loyalty program, membership, and transaction functionality is also available using REST APIs for a consistent customer experience across multiple channels.
Oracle Loyalty Users and Roles
Many people connected to your business may use Oracle Loyalty.
Users can be:
-
The host organization's employees:
-
Loyalty managers, who define the programs, promotions, and metadata, and monitor loyalty transactions and other features.
-
Loyalty administrators, who handle the functional setup of the Oracle Loyalty application as well as its ongoing operation.
-
-
Users who aren't employees, including customers and members. You can use the REST API to set up a member portal where customers can use the Web to enroll as loyalty members, update membership details, check their point balance, perform accrual or redemption transactions, and perform other tasks.
All of these users share information stored in the same database, and can see information that the others entered where appropriate.
Here are the job roles defined for employee users, and the application areas that each can access and work in:
| Application Module | Loyalty Program Administrator | Loyalty Program Manager |
|---|---|---|
|
Programs |
Yes |
Yes |
|
Promotions |
Yes |
Yes |
|
Members |
Yes |
Yes |
|
Transactions |
Yes |
Yes |
|
Service Requests |
Yes |
Yes |
|
Group Administration |
Yes |
No |
|
Batch Administration |
Yes |
No |
Design a Loyalty Program
Loyalty programs let you target customers and provide incentives to increase business.
Depending on your business model, you might want to increase the frequency of a customer's interactions, the total dollars spent for each transaction, how often they use the member portal rather than a call center, or other behavior.
For example, if an airline finds that half its revenues come from 10 percent of its customers, then it would design the program to appeal to these frequent flyers.
A smaller research effort might just select the target customers, design the program, hold focus groups to get feedback, and then roll out the program. A more advanced effort can include simulations of customer segments, reward thresholds, and financial analysis to maximize the program's impact on customer behavior across the customer base.
To design a loyalty program:
-
Research and analyze your customer base to determine who your best customers are.
-
Determine how you want to affect their behavior.
Loyalty Points
Loyalty programs give members points for purchases or for other behavior.
Point Types
For each loyalty program, you create one or more loyalty currencies, called point types, and define point expiration rules. Use different point types to reward and recognize members based on their different activities, such as completing a flight or referring a friend to the program. Some point types could allow members to redeem points for a product or service, and others could track their behavior and grant rewards by assigning a new tier status. Point types allow for granular reporting on activities.
You can define eight point types, which can be used to track eight different types of member actions.
Multiple point types can also be used to differentiate the value of a purchase from the host company and from a partner. For example, an airline could say that in order to qualify for Silver tier status, a member has to earn either 25,000 points flying on the host airline or 35,000 points flying on partner airlines. In this example, points earned flying the host airline would be one point type, and points earned flying on partner airlines would be a second point type.
Programs can use loyalty point types to link specific actions more tightly with specific rewards. If a loyalty program tracks some member action, then you must create a specific point type for that action. For example, in the banking and credit card industry, you might create several different point types if you want to track how much your customers spend in several different areas, such as food, medicine, apparel, education, leisure, and travel.
A member may want to redeem a product, but has insufficient points to complete the redemption. Instead of the member forgoing the redemption, you can choose to allow negative points on the membership program. This facility is similar to a bank providing an overdraft facility on a customer's bank account. The next accrual activity pays back for the negative points. You can extend the negative points facility to members who have moved up to higher tiers of the program, or to all members of the program.
Point Subtypes
In addition to point types, you can also define point subtypes, which are used purely for administrative purposes.
For example, you might use different point subtypes to keep track of the different reasons that the points are given out. Points can be given out as an incentive with purchases or as a bonus, and you can create point subtypes named Incentive and Bonus to track these two different uses of points.
The point subtypes you create apply to all the available point types. For example, if you create point subtypes named Incentive and Bonus, then they can be used to track whether all your different Point Types are given out as an incentive or as a bonus.
When you define the point subtypes, you select one as the default that's given out if no subtype is specified when the promotion is defined.
Point Items
A transaction debits or credits a member with points. Multiple promotions can give a member points as the result of a single transaction. When a member earns points from a transaction, a point item is created for each promotion's action that gives a member points. Thus, a single accrual transaction often results in multiple point items being created.
When a redemption transaction is processed, its use of points is mapped back to point items. It uses the available points from the point items that are closest to expiring. Since a redemption usually requires more points than were earned from a single transaction or point item, most transactions use the points from multiple point items.
All of the points associated with a single point item don't have to be used at once. For example, if a redemption requires 500 points and the point item closest to expiring has 1,000 points, then 500 of those points are used for the redemption. The remaining 500 points either are used by a later redemption or expire.
Qualifying Points
Qualifying points are points that count toward a member's tier status.
For example, a member who needs to qualify for the Silver tier might require 25,000 qualifying points. Other points, often called bonus points, can be used for redemption, but are non-qualifying and don't count toward a member's tier status.
You can view how many qualifying points a member has on the member page. For details, see View a Member's Qualifying Points.
Members earn tier upgrades in real time. The Loyalty Batch Engine Main Job, when configured for the tier attribute, handles tier re-qualify or tier downgrades, using tier end dates. For details, see Overview of Batch Processing.
For information on how different tier assessment models use qualifying periods, tier start and end dates, and so on, see Types of Tier Assessment Models.
Point Roll-up to a Household
In any program, you can set up a Household type of member and roll-up, or accrue, qualifying points earned by the associated individual members to the household. This enables a family or other community to manage points and use them according to the needs of the group.
An individual member can belong to only one household, and all members of a household must be existing program members.
Individual members can control whether they belong to a household, and whether points earned accrue to the household at any given time. The household member can also specify an end date to cease an individual member's association.
Expiration of Points
Points that are given to members might or might not have an expiration date depending on how the points are defined. You define point expiration for the point type, and base it on one of the following:
-
Member account activity
-
A fixed period of time
If an accrual transaction is canceled, then the points that were given for that transaction are taken back from the member. Expired points can no longer be used, just as if the member had used them for a redemption award.
General point expiration is handled by the batch engine, which regularly monitors members' point expiration dates. If the expiration date is in the past, then the batch job expires the points and reduces the member's available point balance.
If an accrual transaction is canceled, then the points that were given for that transaction are taken back from the member.
Future Point Accrual
By default, points granted begin accruing on the transaction date. You can override this date and set an accrual date in the future. This is useful where you want to wait for travel to be taken before points accrue, or where products are returnable and you want to avoid redemptions against such purchases. For example, if a product has a 30-day return period, you might specify that the points accrue 31 days after the transaction date. For a flight purchase, you might want the points to accrue one day after the travel date.
This helps avoid fraud and helps manage point liability. By showing the points accrued as future points, the member can still receive instant gratification even though the points can't be redeemed immediately.
A member's available point balance excludes points that have a future accrual date. The lifetime point balance includes points with a future accrual date at the time the points are assigned.
A future accrual date applies only to non-qualifying points. The qualifying point balance doesn't depend on the future accrual date.
When setting up the promotion rule action, you can specify an accrual start date or create an attribute and date operation to calculate a future date.
CAUTION: Be sure to set the expiration date after the calculated accrual start date. If the accrual start date is later than the point expiration date, then any points granted in the promotion won't be available for the member to use.
If Oracle Loyalty receives an old transaction (from a partner, for example) where the return period is already over, then it sets the transaction processing date as the accrual start date.
Types of Tier Assessment Models
You can define different types of tier assessment models to use in combination with the tier class. When setting up a tier assessment model, you define the tier end date, and the qualifying start and end date, and other attributes for a tier record. General member tier assessment is handled by the batch engine, which regularly monitors members' tier end dates and processes them against the tier promotions configured.
Tier assessment can be based on one of the following models:
-
Anniversary
-
Fixed Date
-
Rolling Period
If you assign a tier assessment model to a tier class, it creates a link on the tier name once you save and activate the tier class. Clicking on the link navigates to the Edit Promotion page for the tier.
Anniversary Tier Assessment Model
In the Anniversary tier assessment model, the qualifying period starts on the date when a member joins the loyalty program. A member's qualifying point balance is always set to zero every year on an end date determined by the member's anniversary date plus a snap-to date specified in the model's attributes.
The following attributes are required when a loyalty manager associates an Anniversary tier assessment model type with a tier class:
-
Minimum Tier Length in Months. The minimum length of time that the tier is assigned to the member.
-
Qualifying Period Length in Months. The length of the period for members to earn qualifying points to reach the tier.
-
Tier End Date Snapped To. The point in time Oracle Loyalty uses to calculate the tier end date. The tier end date calculation is determined as the minimum tier length, extended from that date to the point specified in this field: the first day of the next month, the first day of the next quarter, or the first day of the next year.
Note: Monthly tier end dates mean the batch engine only needs to run twelve times a year for tier model processing.
Fixed Date Tier Assessment Model
The Fixed Date tier assessment model, the qualifying period starts on a fixed date each year for all qualifying loyalty program members. Tier end dates are also fixed for all members. The members' qualifying point balance is always set to zero at the end of the qualifying period.
The following attributes are required when a loyalty manager associates a Fixed Date tier assessment model type with a tier class:
-
Tier Period Start. The fixed date on which the tier period starts. All members will use the fixed date. However, for newly enrolled members, the tier period start date is the date of enrollment, and in subsequent years it will be the fixed date specified in this attribute.
-
Qualifying Period Start. The fixed date on which the qualification period starts.
-
Tier Length in Months. The number of months the tier period will last. The tier end for all the members will be on a fixed date, determined by the Tier Period Start plus the length of the tier, specified in this field.
-
Qualifying Period Length in Months. The length of the period for members to earn qualifying points to reach the tier.
-
Minimum Tier Length in Months. The minimum length of time that the tier will be assigned to the member.
Rolling Period Assessment Model
In the Rolling Tier assessment model, the qualifying period starts when a member enrolls in the program. The member isn't assigned a qualifying period. The Rolling Period model creates an incentive for customers to make frequent purchases so they can stay in a higher tier.
Once the member attains a higher tier, the member's tier is effective for a specified period from the date of attaining the new tier, even if the rolling balance isn't sufficient for the member to remain in the current tier.
In the Rolling Period model, the member's qualifying point balance is never reset to zero at the end of the qualifying period. Instead, the qualifying balance is calculated as the total number of points earned during the past qualifying period. The qualifying period moves forward one day every day. If the qualifying period is two months, for example, then the qualifying period always begins two months prior to today's date, inclusive.
The points earned today and during the prior two months count toward the tier. Every day, Oracle Loyalty subtracts from the qualifying point total the points earned on the day before the qualifying period began.
The following attributes are required when a loyalty manager associates a Rolling Tier assessment model type with a tier class:
-
Recurring Period. The recurring period unit, either years or months, used to measure the tier period length.
-
Assessment Month. The month when tier assessment occurs if the recurring period is years. The value can be a month from January to December.
-
Qualifying Period Length in Months. The length of the rolling period for members to earn qualifying points.
-
Assessment Day. The day of the month, a value from 1 to 31, when tier assessment occurs.
Example of Tier Assessment Using the Anniversary Model
Let's look at an example of how a member might move in and out of various tiers over a three-year period.
In this example, events that impact a member include:
-
Accrual of tier-qualifying points to automatically upgrade a member's tier
-
Reaching the member's anniversary date
-
Tier end dates
-
Tier assessments
The example uses the following tier point requirements:
-
Base: 0 to 24,999
-
Silver: 25,000 to 49,000
-
Gold: 50,000 and up
Also, for the required attributes we use:
-
Tier period: 12 months
-
Qualifying period: 12 months
-
Minimum tier period: 4 months
Here is our example of tier assessment using the Anniversary model.
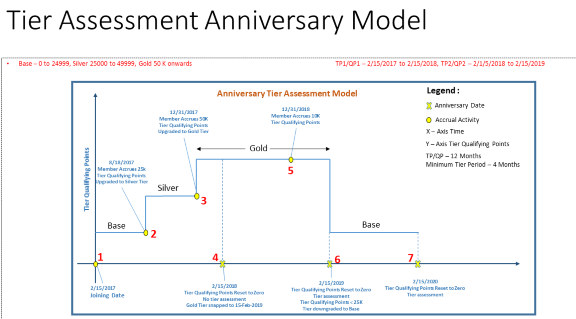
The sequence of activities and events, including how Oracle Loyalty recalculates the tier end dates across this example, are described here.
Event 1. A member enrolls in the loyalty program on February 15th, 2017, automatically entering the base tier.
| Event Sequence | Tier | Tier Start Date | Tier End Date Calculation (Tier Start Date + Tier Length + SnapTo) | Qualifying Start Date | Qualifying End Date Calculation (Aligned with the Calculated Base Tier End Date) |
|---|---|---|---|---|---|
|
1 |
Base |
2/15/2017 |
2/15/2017 + 12 Months = 2/15/2018 |
2/15/2017 |
2/15/2018 |
Event 2. On 8/18/2017, the member accrues 25,000 qualifying points and upgrades to the Silver tier.
| Event Sequence | Tier | Tier Start Date | Tier End Date Calculation (Tier Start Date + Tier Length + SnapTo) | Qualifying Start Date | Qualifying End Date Calculation (Aligned with the Calculated Base Tier End Date) |
|---|---|---|---|---|---|
|
1 |
Base |
2/15/2017 |
Changes from 2/15/2018 to 8/18/2017 |
2/15/2017 |
2/15/2018 |
|
2 |
Silver |
8/18/2017 |
8/18/2017 + 4 months (minimum tier length) = 12/18/2017 However, since 12/18/2017 < 2/15/2018 (end of the tier period), the new tier end date snaps to 2/15/2018. |
2/15/2017 |
2/15/2018 |
Event 3. On 12/31/2017, the member accrues 50,000 additional qualifying points and upgrades to the Gold tier.
| Event Sequence | Tier | Tier Start Date | Tier End Date Calculation (Tier Start Date + Tier Length + SnapTo) | Qualifying Start Date | Qualifying End Date Calculation (Aligned with the Calculated Base Tier End Date) |
|---|---|---|---|---|---|
|
1 |
Base |
2/15/2017 |
8/18/2017 |
2/15/2017 |
2/15/2018 |
|
2 |
Silver |
8/18/2017 |
Changes from 2/15/2018 to 12/31/2017 |
2/15/2017 |
2/15/2018 |
|
3 |
Gold |
12/31/2017 |
12/31/2017 + 4 months (minimum tier length) = 4/31/2018 However, since 4/31/2018 > 2/15/2018, it snaps to 2/15/2019 (the next tier period end date) |
2/15/2017 |
2/15/2019 |
Event 4. On the member's first anniversary, 2/15/2018, Oracle Loyalty resets the tier qualifying point balance to zero. However, because the tier end date is in the future, there's no tier assessment and they remain in the Gold tier.
| Event Sequence | Tier | Tier Start Date | Tier End Date Calculation (Tier Start Date + Tier Length + SnapTo) | Qualifying Start Date | Qualifying End Date Calculation (Aligned with the Calculated Base Tier End Date) |
|---|---|---|---|---|---|
|
1 |
Base |
2/15/2017 |
8/18/2017 |
2/15/2017 |
2/15/2018 |
|
2 |
Silver |
8/18/2017 |
12/31/2017 |
2/15/2017 |
2/15/2018 |
|
3 |
Gold |
12/31/2017 |
2/15/2019 |
2/15/2017 |
2/15/2019 |
|
4 |
Gold |
12/31/2017 |
2/15/2019 |
2/15/2017 |
2/15/2019 |
Event 5. The member accrues 10,000 qualifying points.
| Event Sequence | Tier | Tier Start Date | Tier End Date Calculation (Tier Start Date + Tier Length + SnapTo) | Qualifying Start Date | Qualifying End Date Calculation (Aligned with the Calculated Base Tier End Date) |
|---|---|---|---|---|---|
|
1 |
Base |
2/15/2017 |
8/18/2017 |
2/15/2017 |
2/15/2018 |
|
2 |
Silver |
8/18/2017 |
12/31/2017 |
2/15/2017 |
2/15/2018 |
|
3 |
Gold |
12/31/2017 |
2/15/2019 |
2/15/2017 |
2/15/2019 |
|
4 |
Gold |
12/31/2017 |
2/15/2019 |
2/15/2017 |
2/15/2019 |
|
5 |
Gold |
12/31/2017 |
2/15/2019 |
2/15/2017 |
2/15/2019 |
Event 6. On the member's second anniversary, 2/15/2019, Loyalty resets the member's qualifying point balance to zero. Because the tier ends, Oracle Loyalty does a tier assessment and downgrades the member to the Base tier since they have no qualifying points.
| Event Sequence | Tier | Tier Start Date | Tier End Date Calculation (Tier Start Date + Tier Length + SnapTo) | Qualifying Start Date | Qualifying End Date Calculation (Aligned with the Calculated Base Tier End Date) |
|---|---|---|---|---|---|
|
1 |
Base |
2/15/2017 |
8/18/2017 |
2/15/2017 |
2/15/2018 |
|
2 |
Silver |
8/18/2017 |
12/31/2017 |
2/15/2017 |
2/15/2018 |
|
3 |
Gold |
12/31/2017 |
2/15/2019 |
2/15/2017 |
2/15/2019 |
|
4 |
Gold |
12/31/2017 |
2/15/2019 |
2/15/2017 |
2/15/2019 |
|
5 |
Gold |
12/31/2017 |
2/15/2019 |
2/15/2017 |
2/15/2019 |
|
6 |
Base |
2/15/2019 |
2/15/2020 |
2/15/2017 |
2/15/2020 |
Event 7. On the member's third anniversary, 2/15/2020, Oracle Loyalty resets the member's qualifying point balance to zero (no change). Because the tier ends, Loyalty does a tier assessment and the member remains in the Base tier.
| Event Sequence | Tier | Tier Start Date | Tier End Date Calculation (Tier Start Date + Tier Length + SnapTo) | Qualifying Start Date | Qualifying End Date Calculation (Aligned with the Calculated Base Tier End Date) |
|---|---|---|---|---|---|
|
1 |
Base |
2/15/2017 |
8/18/2017 |
2/15/2017 |
2/15/2018 |
|
2 |
Silver |
8/18/2017 |
12/31/2017 |
2/15/2017 |
2/15/2018 |
|
3 |
Gold |
12/31/2017 |
2/15/2019 |
2/15/2017 |
2/15/2019 |
|
4 |
Gold |
12/31/2017 |
2/15/2019 |
2/15/2017 |
2/15/2019 |
|
5 |
Gold |
12/31/2017 |
2/15/2019 |
2/15/2017 |
2/15/2019 |
|
6 |
Base |
2/15/2019 |
2/15/2020 |
2/15/2017 |
2/15/2020 |
|
7 |
Base |
2/15/2019 |
2/15/2020 |
2/15/2017 |
2/15/2020 |
Event-Driven Rewards
Recognize your customers with automatic rewards for birthdays and anniversaries, or other date-related events. For example, you could reward all customers who made a purchase in the past month. Rewards could include points, vouchers, gift products, or early access on special occasions such as birthdays, loyalty anniversaries, or marriage anniversaries.
Event-driven rewards can earn your program members' emotional loyalty by making them feel special and valued apart from making transactions. The customer doesn't have to do anything to earn the reward.
Establishing an emotional connection enhances a member's preference to support the company. This is especially helpful when your offerings are comparable to that of your competitors.
You can base events on any member date field, such as the date of birth. Or, create custom dynamic date attributes such as a member's wedding date, and give customers a reward on that occasion.
Bonuses
Loyalty programs can give members bonuses, which give extra points to encourage certain behavior.
Bonus Types
There are two types of Oracle Loyalty bonuses:
-
Enrollment bonus. Given to a member on enrolling in a loyalty program. A member can get an enrollment bonus only once.
-
Referral bonus. Given to a member who refers a new individual who becomes a member of the program. A member can get multiple referral bonus by referring many individuals to the program.
To give members these bonuses, you must select the Enable Enrollment Bonus and Enable Referral Bonus check boxes in the Program record. However, these check boxes just enable the bonuses, and you must also create promotions to award the bonuses.
Partners
Partners are other companies that work with the host company that runs the loyalty program. For example, an airline's loyalty program might allow members to earn frequent-flyer points by doing business with partners that are hotels, car rental companies, financial institutions, and retailers.
The host company usually has an agreement with the partner. Under this agreement, the host company can charge the partner fees for various transactions and services that a partner requests for a given loyalty program. Fees include monetary fees and points.
You can create a new partner or select an existing partner and associate it with the loyalty program.
You can also use partner billing to track points assigned to each program member by partner transactions. For more information, see the Partner Billing topic.
Partner Billing
To track total points assigned by a business partner to program members, you can activate billing for the partner.
You must assign a billing type for the partner: prepaid or postpaid. You define partner term attributes and specify the conversion rates to apply to point types for partner transactions.
Prepaid Billing Partners
Prepaid partners purchase point blocks in advance. Then, as members earn points from qualifying partner transactions, Oracle Loyalty applies the conversion rate for the point type and deducts that number of points from the block point total. The partner must have sufficient points remaining in the point block to assign points to members.
Loyalty administrators or managers can add point blocks on behalf of the partner.
For cancellation transactions, Oracle Loyalty reverts the appropriate number of points to the point block.
If a partner has multiple point blocks created for the same point type, then Loyalty deducts the points from the block with the earliest start date first.
You use the Partner Debit Main Job to process the debits and credits to partner point blocks. This job queries all accrual transactions that involve partners whose billing type is Prepaid. For each prepaid partner transaction, the job debits the appropriate number of points from the partner's point block. For details on how to schedule jobs, see the Create a Batch Process topic.
Postpaid Billing Partners
For postpaid billing, you generate a bill at the end of each month using Oracle Loyalty partner billing analytics. Each time a member earns points for a qualifying partner transaction, Oracle Loyalty applies the conversion rate for the point type and includes those points in the billing.
Partner Term Attributes and Conversion Rates
For each point type you use with a billing partner, you must specify the conversion rate. Loyalty applies the conversion rate to determine the number of points to deduct from a partner's point block or to include in their billing.
For example, for a prepaid partner:
-
If the conversion rate is 1 and 100 points are assigned to a member, then 100 points get deducted from the partner's point block.
-
If the conversion rate is 2 and 100 points are assigned to a member, then 100 is multiplied by two, and 200 points get deducted from the partner's point block.
Time Zones
Each loyalty program can use the time zone that's best for your company and customers.
When you create a new program, be sure to set the time zone so that you capture all date and time data using your company's time zone. Otherwise, Oracle Loyalty uses the time zone of the Oracle Loyalty application server. You don't want to be operating in a different time zone from your time-effective data.
Point expiration dates, point balances, and so on are all dependent on the date and time of the time zone in effect when the data is created.
For a loyalty program already in use, setting up a time zone is effective only on data created after the setup. Historical, time-stamped data remains unchanged.
Set Up Programs
How You Set Up Programs
Let's look at the general steps involved in setting up loyalty programs.
| Step | Description | Topic Where You Can Find More Information |
|---|---|---|
|
1 |
Create a new loyalty program and enter general information about it. |
Create a Program |
|
2 |
Add any participating partners. Later, when transactions are created that use the program, you can choose the business for the transaction from partners you added here. |
Add Partners to Programs |
|
3 |
Define one or more point types available for the program. You can also define point subtypes. |
Define Point Types and Subtypes for Programs |
|
4 |
Define tier classes and tiers for the program. |
Define a Tier Class and Tiers for Programs |
|
5 |
Define program-level attributes to use for creating promotion rules. Attributes you create at the program level are available for all promotions in the program. Note: You can also create attributes for use in individual
promotions.
|
Create Program-Level Attributes |
|
6 |
Define promotions to reward customers for purchases. |
How You Create a Promotion |
|
7 |
Set up the redemption products that customers can buy with points. |
Set Up Redemption Products |
|
8 |
(Optional) Set up event-driven rewards to give customers points on special dates, such as their birthday. |
How You Set Up Event-Driven Rewards |
Create a Program
Here's how you create a loyalty program:
-
Open Loyalty Programs.
-
Click Create Program, and complete the necessary fields:
-
Enter the program name, description, and start date.
-
Depending on your business model, you can also enable enrollment bonuses, referral bonuses, and negative points.
-
Click Save and Continue.
-
Choose a primary point type and a time zone.
Note: If you want to know more about enable enrollment bonuses and enable referral bonuses, see the topic Bonuses. For more information on negative points, see the topic Redemptions. -
-
Click Save.
-
Add other program features using the icons.
Add Partners to Loyalty Programs
After defining the program, add partners who participate in this program. Later, when you create new transactions, you can choose the business for the transaction from partners you added here. If you create a transaction and don't choose a partner, Loyalty uses the host company.
To associate an existing partner with a loyalty program:
-
Open Loyalty Programs.
-
Choose the loyalty program.
-
Click Partners.
-
Click Add Partners.
-
Use the Add Partners page to search for and select the partners to associate with the program. You can search by partner details.
-
Enable partner billing:
-
Enable the partner billing option.
-
Choose the partner billing type.
-
Specify the point type and conversion rate for the partner term attribute. You can optionally add more attributes.
-
To create a new partner:
-
On the partners screen, click Add Partners.
-
Click the Create Partner button.
-
Complete the necessary fields.
To add a point block for a prepaid billing partner:
-
Open Loyalty Programs, and then open your program.
-
On the program screen, click Point Blocks.
-
Click the Add button.
-
Complete the necessary fields, including the original number of points for the block.
Define Point Types and Subtypes for Programs
When you set up a loyalty program, you must define the point types available for the program, whether there are multiple types or just one. You can also define point subtypes.
If the Active field for a point type is selected, then all other fields of this point type are read-only. You must deselect the Active check box before you can edit the other fields.
You can create a maximum of 8 point types, both active and inactive.
To define point types and subtypes:
-
Open your program and click the Point Types icon.
-
Add a new record to the Point Types list for each point type, then complete the necessary fields.
-
Click the Point Subtypes icon.
-
Add a new record to the Point Subtypes list for each point subtype, and complete the necessary fields.
Define a Tier Class and Tiers for Programs
While creating a new program, the loyalty manager defines the tier class and tiers for the program:
-
Tier Class. A tier category for business or program purposes. The loyalty manager can edit the default tier class that's created when defining a new loyalty program. This release doesn't support creating additional tier classes for a program.
-
Tiers. Point levels in a loyalty program that members earn the right to join, such as Gold Member or Platinum Member, based on how much they purchase. Members get rewards for being in higher tiers, so tiers are an important incentive in loyalty programs.
You can optionally associate a membership card type with a tier, which generates membership cards automatically whenever:
-
A member enrolls in a loyalty program
-
At tier changes, including upgrades, requalification, and downgrades
You can also generate membership cards manually.
CAUTION: Don't change the name of a tier class after you have activated it.
To edit the default tier class:
-
Open the loyalty program, and click the Tier Management icon.
-
You can edit the Tier Class Name, Primary Tier, Qualifying Point Type, and Tier Assessment Model.
-
You can activate the tier class.
For details about tier assessment model types and attributes, see the Types of Tier Assessment Models topic.
To define tiers:
-
Open the loyalty program, and click the Tier Management icon.
-
Click the Add button to add a new Tier, and complete the necessary fields.
You can set the default tier option for one of these tiers, making it the default tier that customers are automatically associated with then they become members of this loyalty program.
Define Negative Point Limits for Tiers
When you set loan limits based on tier, the limit is based on the member's primary tier. If no tier or tier class is selected, then the negative point limit is applicable for all the tiers and all members in the loyalty program.
You set the limit in two ways:
-
Percentage. Specify the percentage of point balance that's the limit for members in this tier to use as negative points.
-
Absolute value. Specify the maximum number of allowed negative points that members in this tier can borrow.
You use the Basis field to specify whether the negative points allowed is the maximum or the minimum of these two limits. You can select the maximum so members with a very low point balance or no point balance can still be in negative points to the amount specified as the absolute value. Or you can select the minimum so members with a high point balance can't borrow a large number of points.
For example, you specify the absolute value of the negative point limit for the gold tier at 3,000 points. You also set the loan limit for the gold tier at 20% of the point balance, so a member who has accumulated 10,000 points can borrow 2,000 points. If you choose Maximum in the Basis field, then the member with 10,000 points can borrow up to 3,000 points, and if you choose Minimum in the Basis field, then the member with 10,000 points can borrow up to 2,000 points.
To set negative point limits for tiers, do the following:
-
Open your loyalty program and clear the Active check box to edit the program.
-
Click the Negative Points icon.
-
Click Add to add a new record for each combination of point type and tier that allows negative points.
-
Complete the following fields:
-
Tier Class. Select the tier class whose members are allowed negative points. This field is optional.
-
Tier. Select the tier whose members are allowed negative points. This field is optional.
-
Point Type. Select the point type that members can use as negative points.
-
Percentage. Enter the percentage of point balance that's the limit for members in this tier to use as negative points.
-
Absolute Value. Enter the maximum number of allowed negative points that members in this tier can borrow.
-
Basis. This field determines whether the member can borrow the greater or lesser of the values specified in the % Point Balance and Absolute Loan Value fields. Select Maximum to allow members to borrow the greater of the two values, or select Minimum to allow the lesser of the two values.
-
-
Select the Active check box to activate the program again.
Set Up Redemption Products
Use this procedure to enable members to obtain products by redeeming loyalty points.
To set up a product for redemption with loyalty points:
-
Create the products:
-
Open Sales, and then click Products.
-
Click Create Product, and complete the necessary fields.
-
Repeat the previous step to create all the products you want.
-
-
If you haven't already done so, assign the root Product Group so it can be used by Oracle Loyalty and assign its usage to Oracle Loyalty:
-
Open Manage Product Group Usage.
The easiest way to do this is to search for "manage product groups" and click the link in the search results.
-
Select the record that has the Loyalty Usage, and associate the Product Group with this usage.
-
In the Loyalty Details list, add a record and select the root product group.
-
-
Associate the redemption products that you created with the product group you use to hold redemption products:
-
Open Manage Product Groups.
-
Select the root product group, and click Lock.
-
Click the Products tab.
-
Add new records to the list products list and select the redemption products that you created.
-
Click Save.
-
Click Publish to allow Oracle Loyalty to use the updated product group.
-
-
Associate the products created earlier with a loyalty program as redemption products:
-
Open Loyalty Programs.
-
Select the program.
-
Click the Redemption Products icon.
-
In the Redemption Products screen, click Add to add a new record, select the redemption product in the Product field, and complete the other necessary fields.
This product is available to select here because it is in the root product group, which is associated with the loyalty usage.
-
How You Set Up Event-Driven Rewards
Let's look at the general steps involved in setting up event-driven rewards.
| Step | Description | Guide or Topic Where You Can Find More Information |
|---|---|---|
|
1 |
Create a member attribute on a member date field such as date of birth, or on a dynamic attribute such as member wedding date. You use this attribute when creating the event |
Create Program-Level Attributes |
|
2 |
Create an event-driven reward specifying the event parameters described in this topic. |
Example of an Event Driven Reward |
|
3 |
Create an event transaction attribute with the Comment transaction type. You use this attribute when setting up the related promotion. |
Create Program-Level Attributes |
|
4 |
Create a promotion with the condition for the event-driven reward. Use promotion type Accrual, and sub-type Event Reward. |
How You Create a Promotion |
|
5 |
Run the Loyalty Event-Driven Rewards Main Job to generate event reward transactions and place them in the queue. This job checks events against the member date attribute for each member to create transactions of type Accrual-Event. |
Create a Batch Process |
|
6 |
Run the Loyalty Batch Engine Main Job. Event reward transactions automatically process along with all other transactions when you run this job. The job checks event promotions and issues rewards to members with qualifying data. |
Create a Batch Process |
Event Parameters
Here are the event parameters you set when creating an event using REST.
| Event Parameter | Description |
|---|---|
|
Event Name |
A name for the event, such as Member Birthday. |
|
Member Attribute |
The name of the member attribute you defined for the event, such as Date of Birth. |
|
Subtracted Days |
The number of days to subtract from today's date to begin the event trigger. For example, if the value is 5, the Loyalty Event-Driven Rewards Main Job creates transactions for all members with qualifying dates that are up to 5 days earlier than the event date. |
|
Added Days |
The number of days to add to today's date to end the event trigger. For example, if the value is 2, the Loyalty Event-Driven Rewards Main Job creates transactions for all members with qualifying dates that are up to 2 days later than the event date. |
|
Cooling Period (Weeks) |
The period, in weeks, during which the reward won't repeat if the Loyalty Event-Driven Rewards Main Job runs again. Once a job creates an event transaction for a particular member, it waits until the cooling off period is complete before it can generate another. For a birthday, for instance, you might set the cooling off period to 48 so that a member can't be rewarded again until their next birthday. For a monthly event-driven reward, the cooling off period could be 4 weeks. Coordinate this parameter with how frequently you run the Loyalty Event-Driven Rewards Main Job. |
|
Ignore Year |
Indicates whether the event trigger considers the year (Y or N). If an event is repeatable, such as a birthday, set the value to Y. This event doesn't consider the year, just the day and month. For one-time events where you want to take the year into consideration, such as the date of last purchase, set the value to N. |
|
Active |
Indicates whether the event is active (Y or N). |
Example of an Event-Driven Reward
Here's an example of how to reward 1000 points to members with October birthdays:
-
Open your loyalty program and click Program Level Attributes.
-
Create a member attribute called Date of Birth on the member date of birth field, and activate the attribute.
-
Click the Event Driven Reward icon. Click Create Event Driven Reward. and specify these values:
-
Event Name: Member Birthday
-
Member Attribute: Date of Birth
This is the member attribute you created in the Step 1.
-
Subtracted Days: 0
-
Added Days: 31
-
Cooling Period (Weeks): 44
-
Ignore Year: Y
-
Active: Y
Note: You can optionally do this step using REST. -
-
With the event inactive, click Add to create an event transaction attribute with the Comment transaction type, and the name TxnEvent.
Note: You can optionally do this step using REST. -
Create a promotion of type Accrual and subtype Event Reward.
-
Create a rule, where if TxnEvent equals Member Birthday, then you assign 1000 points.
-
Run the Loyalty Event-Driven Rewards Main Job on October 1st to generate an event transaction for each program member with a birthday within 31 days (the month of October).
-
Run the Loyalty Batch Engine Main Job, which processes the event transactions and rewards 1000 points to each member with qualifying data.
Modify Programs
Before you can modify a loyalty program, you must deactivate it. Changes in the program become available to users after you reactivate the program.
To modify a loyalty program:
-
Open Loyalty Programs.
-
Click the name of the program you want to modify to display the edit program screen.
-
Clear the Active check box to edit program.
-
Modify the program as needed.
-
When you have made all needed changes, select the Active check box to activate the program again.
Measure Programs
Once a loyalty program has been in use for a period of time, you measure how effective it has been in reaching your marketing objectives by setting up and administering Oracle Loyalty Analytics.
For more information on creating, modifying, and administering analytics within Loyalty Cloud, see the Creating and Administering Analytics and Reports for Loyalty guide.