4Getting Ready to Create Oracle Loyalty Users
This chapter contains the following:
-
Designating an Organization as the Top of the Oracle Loyalty Hierarchy
-
Creating Rules to Automatically Provision Job Roles to Oracle Loyalty Users
Creating a Resource Organization for Oracle Loyalty
You must create a resource organization for every manager in your organization, including the top manager, usually the CEO. Use the procedure in this topic if you want to create your resource organization hierarchy before you create users. Alternatively, you can create resource organizations while creating manager users in the UI or by importing them. When you import users from a file, you can create the resource organizations automatically from the information you include in the file itself.
Creating the Resource Organization
To create a resource organization:
-
Sign in as a setup user.
-
Open Setup and Maintenance and search for the Manage Internal Resource Organizations task.
-
Select the Manage Internal Resource Organizations task from the search results list.
The Manage Internal Resource Organizations page is displayed.
-
Click the Create icon.
The Create Organization: Select Creation Method page is displayed.
-
Select Option 2: Create New Organization.
-
Click Next.
-
Enter the name of the resource organization in the Name field, for example, Vision Corp. This name will be visible in the resource directory.
Note the following points:
-
Each resource organization name you enter must be unique.
-
The names don't have to correspond to any formal organization in your enterprise. The names are there solely to create a resource directory.
-
Don't use the name of a manager as the organization name as you might want to reassign the organization to someone else later.
-
-
In the Organization Usages region, click the Add icon and select Loyalty Organization.
-
Click Finish.
Designating an Organization as the Top of the Oracle Loyalty Hierarchy
After you have created the resource organization for the top person in the organization hierarchy, designate that resource organization as the top of the hierarchy in the application. If you don't explicitly designate specify the top organization, the application automatically builds the resource organization hierarchy based on the management hierarchy you specify when you create users. You must enter a manager for each user you create, except for the manager at the top of the resource hierarchy.
Designating the Top of the Hierarchy
To designate a resource organization as the top of the hierarchy:
-
Sign in as a setup user.
-
Open Setup and Maintenance and search for the Manage Resource Organization Hierarchies task.
-
Select the Manage Resource Organization Hierarchies task from the search results list.
The Manage Resource Organization Hierarchies page appears.
-
Click Search.
-
In the search results, click the Internal Resource Organization Hierarchy link.
This value is supplied by Oracle. The View Organization Hierarchy: Internal Resource Organization Hierarchy page appears.
-
From the Action menu, select Edit This Hierarchy Version.
The Edit Organization Hierarchy Version page appears.
-
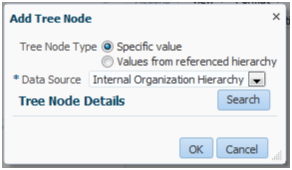
Click Add in the Internal Resource Organization Hierarchy region.
The Add Tree Node window appears.
The following figure shows the Add Tree Node window.
-
Click Search.
The Search Node window appears.
-
Click Search again in the Search Node window.
-
In the Search Results list, select the resource organization that you created for the top person in the hierarchy.
-
Click OK.
The application returns you to the Edit Organization Hierarchy Version page.
-
Click Save and Close.
-
When a warning appears, click Yes.
Creating Additional Resource Roles for Oracle Loyalty
This topic describes how to create additional resource roles. After you create a resource role, you must create the appropriate provisioning rules to provision the user with the required job and abstract roles. The resource role by itself is only a title.
Creating a Resource Role
To create a resource role:
-
Sign in as a setup user.
-
Open Setup and Maintenance and search for the Manage Resource Roles task.
-
Select the Manage Resource Roles task from the search results list.
The Manage Resource Roles page appears.
-
If you want to review all the existing resource roles to verify that it is necessary to create a new role, then click Search without entering search criteria.
All the available resource roles are listed. Roles that are predefined by Oracle are labeled System.
-
Click the Create icon to create a new resource role.
The Create Role page appears.
-
In the Role Name field, enter the name of the resource role as it will appear in the application UI, for example,
CEO. -
In the Role Code field, enter a unique internal name. No spaces are permitted. If you're importing users from a file then you must include this code in your file rather than the name.
-
Select the Manager option if the resource role belongs to a manager, or select the Member option if the resource role belongs to an individual contributor.
-
From the Role Type list, select Marketing to classify the role that you're creating.
-
Click Save and Close.
Creating Rules to Automatically Provision Job Roles to Oracle Loyalty Users
Before you create users, review the predefined role provisioning rules used to automatically assign job and abstract roles to users, and create any additional rules you require. For example, you have to create role provisioning rules for any additional resource roles you create, such as a CEO resource role. The provisioning rules use the resource role that you assign to each user as the trigger condition for provisioning job roles. Create a separate rule to provision each resource role.
For internal users, including administrators, map the Resource abstract role in addition to the required job roles in the provisioning rule. The Resource abstract role permits users to access the Resource Directory.
Creating a Provisioning Rule
Perform the steps in the following procedure to review the predefined provisioning rules, and to create new rules:
-
Sign in as a setup user.
-
Open Setup and Maintenance and search for the Manage HCM Role Provisioning Rules task.
-
Select the Manage HCM Role Provisioning Rules task from the search results list.
The Manage Role Mappings page appears.
-
If you want to review the predefined provisioning rules, do the following:
-
Search for a role mapping using one of the search fields. For example, to determine if a provisioning rule exists for a resource role, in the Resource Role field, enter the name of a resource role, such as CEO.
-
Click Search.
If a role provisioning rule exists for the resource role (either a predefined rule or a company-specific rule you created), it is displayed in the Search Results area.
-
To view or edit a provisioning rule, select the rule from the Search Results area.
The Edit Role Mapping page is displayed listing details for the rule.
-
-
To create a new provisioning rule, on the Manage Role Mappings page, click Create.
The Create Role Mapping page appears.
-
In the Mapping Name field, enter a name that will help you identify the mapping, for example,
CEO. -
In the Conditions region, select the resource role you want to provision from the Resource Role list. For example, if you have created a CEO resource role, select CEO.
The following figure shows the Create Role Mapping page.

-
Select Active from the HR Assignment Status list.
This additional condition ensures that the provisioned roles are automatically removed if the user is terminated in Global Human Resources.
-
In the Associated Roles region, click Add to add the job roles you want to provision. For the CEO, for example, add the VP job role.
-
For internal users, including the CEO, add the Resource abstract role.
-
Make sure the Autoprovision option is selected for all the roles.
-
Click Save and Close.
Automatic and Manual Role Provisioning for Oracle Loyalty
Roles provide user access to data and functions. Roles are assigned to users by defining a relationship, called a role mapping or provisioning rule, between the role and some conditions. Users who satisfy the conditions specified in the mapping are eligible to acquire the role specified in the mapping. This topic describes role mapping options for automatic and manual role provisioning. Predefined provisioning rules are provided with the application but if you need to create new role mappings, you can do so using the Manage HCM Role Provisioning Rules task in the Setup and Maintenance work area.
Automatic Provisioning of Roles to Users
Role provisioning occurs automatically if:
-
The user meets the conditions defined in the role-mapping.
-
You select the Autoprovision option for the role specified in the role mapping.
For example, to create a role mapping rule that autoprovisions the Resource abstract role and VP job role to users assigned a company-specific resource role you created, CEO, do the following:
-
Specify the conditions.
The following table describes the condition attributes to creating a role mapping rule for automatic provisioning.
Attribute Value Resource Role
CEO
HR Assignment Status
Active
-
Specify the Resource abstract role and the VP job role for the mapping, and select the Autoprovision option for each.
This mapping rule is applied when the user is first created or when the user's status or resource role is modified by clicking the Autoprovision Roles option on the Create User or Edit User page.
Manual Provisioning of Roles to Users
Users, such as managers or administrators, can provision roles manually to other users if:
-
The user meets the conditions defined in the role-mapping.
-
You select the Requestable option for the role in the role mapping.
Users can also request a role when managing their own accounts if:
-
The user meets the conditions defined in the role-mapping conditions.
-
You select the Self-requestable option for the role in the role mapping.
For example, you can create a role mapping to assign roles to each active employee who has been assigned a company-specific Loyalty Operations Manager resource role as follows:
-
Specify the conditions.
The following table describes the condition attributes to creating a role mapping for manual provisioning.
Attribute Value Resource Role
Loyalty Operations Manager
HR Assignment Status
Active
-
Specify the roles.
The following table describes the roles to specify for manual provisioning.
Role Option Resource
Autoprovision
Loyalty Administrator
Autoprovision
Customer Data Steward
Requestable
Loyalty Representative
Self-requestable
In this example, any user assigned the Loyalty Operations Manager company-specific resource role:
-
Is automatically provisioned with the Resource and Loyalty Administrator roles when the Autoprovision Roles option is clicked on the Create User or Edit User page
-
Can grant the Customer Data Steward role to other users
-
Can request the Loyalty Representative job role
Users keep manually provisioned roles until the user is terminated or the role is deprovisioned manually.
Role-Mapping Names
Role mapping names must be unique in the enterprise. Devise a naming scheme that shows the scope of each role mapping. For example, a role mapping named CEO Autoprovisioned Roles could include all roles provisioned automatically to resources assigned the CEO resource role.
Provisioning Oracle Loyalty Roles for Customization Testing
Enabling the Testing of Role-Specific Configurations in Oracle Loyalty
Administrators who create role-specific configurations in either Application Composer or Page Composer must be provisioned with the same job role to test their work in the sandbox. For example, an administrator creating a company-specific page layout for the Loyalty Manager job role must have the Loyalty Manager job role to test the configuration.
To enable testing of role-specific configurations:
-
A user with security privileges, such as the setup user or the initial user you received when you signed up with Oracle Loyalty, creates a provisioning rule that make it possible for administrators to request all the job roles they need for testing.
You create the provisioning rule using the Manage HCM Role Provisioning Rules task from the Setup and Maintenance work area. For each job role you add to the rule, enable the self-requestable option and deselect the autoprovision option.
For details, see Creating the Provisioning Rule for the Job Roles Used in Testing.
-
The administrator who's creating the configurations in the sandbox and requests the additional job roles they need to test their configurations in Resource Directory.
For more information, see Assigning Yourself an Additional Oracle Loyalty Job Role: Procedure.
Tip: If administrators are creating company-specific objects in Application Composer but can't see them at run time, then they can review and manage the company-specific object's security policy by opening that company-specific object's Security node in Application Composer. Administrators should ensure that the required roles are granted access to each company-specific object. Additionally, they should ensure that they themselves are granted those same roles so that they can successfully complete their testing.
Creating the Provisioning Rule for the Job Roles Used in Oracle Loyalty Testing
Use this procedure to create a provisioning rule which makes it possible for the Loyalty administrator to request additional job roles for use in configuration testing.
To create the provisioning rule:
-
Sign in as a setup user or the initial user you received when you signed up with Oracle CX.
-
Open Setup and Maintenance and search for the Manage HCM Role Provisioning Rules task..
-
Click the task name link in the search results.
The Manage Role Mappings page appears.
-
Click the Create icon.
The Create Role Mapping page appears.
-
In the Mapping Name field, enter Requestable Job Roles for Loyalty Administrator, or another name that will help you identify this mapping in the future.
-
In the Conditions region, select the resource role assigned to the Loyalty administrator from the Resource Roles list.
-
Enter Active for HR Assignment Status.
This additional condition ensures that the provisioned enterprise roles are automatically removed if the user is terminated.
-
In the Associated Roles region, click Add to add the job roles you want to make requestable by the Loyalty administrator. If you're creating configuration updates for Loyalty managers, for example, then you add the Loyalty Manager job role.
-
For each job role you added:
-
Select the Requestable and Self-Requestable options.
-
Deselect the Autoprovision option.
-
-
Click Save and Close.
Assigning Yourself an Additional Oracle Loyalty Job Role
Administrators can use this procedure to assign themselves the role they need to test role-specific configurations in the sandbox. For example, an administrator testing configurations for loyalty managers, requests the Loyalty Manager job role.
To assign yourself an additional job role:
-
Open the Resource Directory.
-
Select View Resource Details from the Actions menu in your record.
-
Select the Roles tab.
-
Click Add Role.
The Add Role window appears.
-
Search for the role you want to use for testing by name or partial name, select it, and click OK.