Configure URL endpoint
Service Instance configuration is requested from the CX product to the app through AMS. This is a two fold process:
Requirements:
- The app must provide an HTML configuration page that will be embedded within an iframe in AMS and will be displayed in the product.
- The app must implement two endpoints for service instance configuration: Configuration URL and Save Configuration URL.
Configuration Workflow
The following diagram illustrates the configuration workflow.
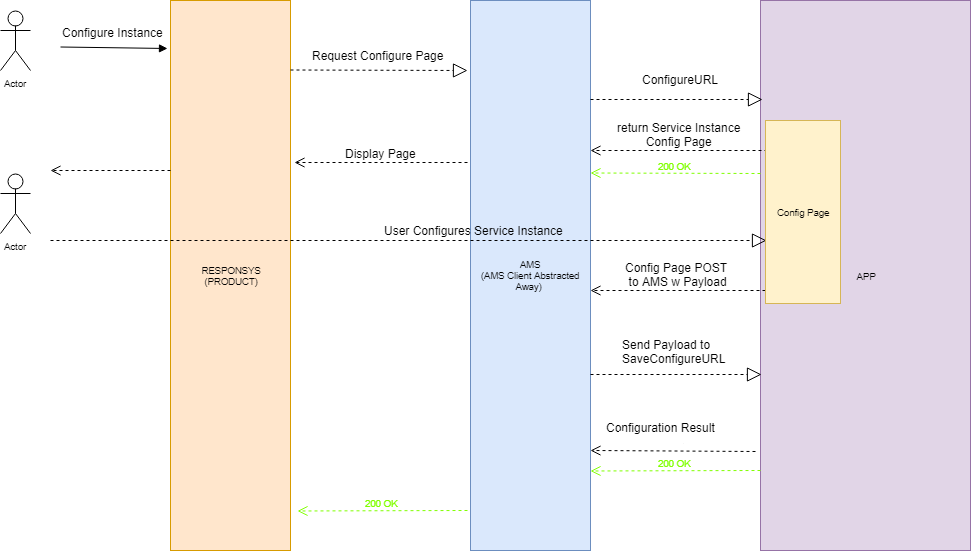
When a marketer configures a service instance, the Configuration URL is called. The workflow resembles these steps:
-
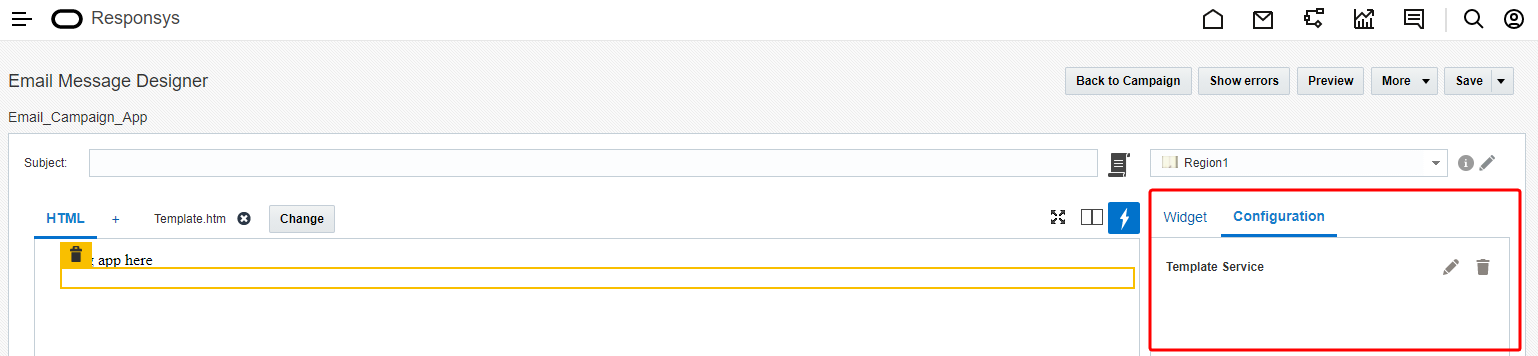
A marketer drags the template service from the widget panel into the Email Message Designer. The service's configuration is displayed within the widget panel.

- Responsys calls AMS requesting the service configuration page.
- AMS calls the service's Configuration URL to display the configuration page in Responsys.
- Marketer completes configuration and clicks save.
- AMS calls the service's Save Configuration URL.
-
The app can respond to AMS.
- AMS will display success or failure to the marketer.
Configuration URL request
AMS calls the service's Configuration URL endpoint with the following request:
POST <service-base-url><service-configuration-url>
Authorization: Bearer <JWT>
{
  "uuid": "6ea036bb-8cfb-46c5-a826-d001d3a0349b",
  "status": "CREATED",
  "locale": "en-US",
  "assetId": "23",
  "assetType": "some asset"
}
Tip: The JWT Token in the Authorization Header is generated by following the AMS to App token generation. For more information about this call, including authentication details, see the endpoint API reference.
The payload will contain assetType, assetId, locale, and service instance uuid. The most important is the service instance UUID because this identifies the service instance that needs to be configured.
Apps' response to the Configuration URL request
The Configuration URL should return an HTML page that can be embedded in a iframe to be viewed from the product. It is up to the developer on the actual contents of the configuration page. There is a contract for the configuration page to postMessage to back to AMS with the results of the configuration.
When apps are loading the Configuration page there are generally two flows:
-
Apps can retrieve fields from the product (for example from Profile lists) to use during execution time for personalization
-
Apps can load a default, static page for every configuration where the user will be presented the same options for every configuration
We will walk through sample implementations for both flows.
Personalization flow - Configuration URL Sample App Code
Below is a possible implementation of the Configuration URL endpoint. Mustache templates are used to generate HTML pages.
// ServiceInstanceController.java
@RequestMapping(value = "/configure", method=RequestMethod.POST)
public ModelAndView configureAppInstall(
      @RequestBody ServiceInstanceConfigurationBodyDTO serviceInstance,
      Map<String, Object> model) {

    ServiceInstance instance = serviceInstanceService.getEntity(serviceInstance.getUuid());
    if(instance == null) {
       throw new EntityNotFoundException("Service Instance Not Found => " + serviceInstance.getUuid());
    }
	// Pull data from backend and use it to populate a configure template to be sent to the Product.
	// The following parameters may be used by the app for future requests (ie. the Summary call or Get Template call)
    model.put("appHostName", hostname + port);
    model.put("Params1",FIELDS);
    model.put("Params2",FIELDS);
    return new ModelAndView("configure", model); //populates configure.html
}
// configure.html - populated from java code and sent back to AMS.
// creates something like Customer ID -> Customer Name (Product Field)
<h4 id="input-map-title">Select Fields</h4><ul>
{{#appInputParams}}
<div class="row">
    <h4>{{.}} => </h4>
    <select id="{{.}}" name="{{.}}">
        <option value="" selected disabled hidden>Choose a Product Field</option>
    </select>
</div>
{{/appInputParams}}</ul>
Field Metadata Endpoint (fieldMetadataEndpoint)
The contract between the product and the app regarding the fields available on the product is defined by a product's fieldMetadataEndpoint. i.e. In order to find the fields for an entity (ie. a contact), the product must provide a public endpoint that the app can query to find the fields for an entity such as a contact. This endpoint is sent to AMS by the product and is saved as METADATA.fieldMetadataEndpoint.url in the AMS iframe. To get this, the configuration page can request the metadata via postMessage with an amsAction="metadata".
The metadata postMessage should resemble:
{
  amsAction: 'metadata'
}
The metadata postMessage returns a payload in the AMS iframe. This payload resembles:
{
  metadata: {
    fieldMetadataEndpoint: {
      url: "https://www.rsys.com/somethingvalid",
      method: "GET"
    }
  }
}
Using the information from this payload, the app can now request for the fields for each service instance via the product postMessage (amsAction="product").
The product postMessage should resemble:
{
    amsAction: 'product',
    requestId: 'dfd33125-6923-4467-b659-97a174de5801'
    destinationUrl: metadata.fieldMetadataEndpoint.url,
    requestType: metadata.fieldMetadataEndpoint.method,
    payload: {}
}
The response payload resembles:
{
    statusCode: 200,
    requestId: "dfd33125-6923-4467-b659-97a174de5801",
    payload: "{
        "objects": [
        {
            "name": "!!!!DM630",
            "type": "Standard",
            "fields": [
                {
                    "name": "RIID_",
                    "dataType": "Text",
                    "width": 0,
                    "readOnly": true,
                    "format": null
                },
                {
                    "name": "CREATED_SOURCE_IP_",
                    "dataType": "Text",
                    "width": 255,
                    "readOnly": true,
                    "format": null
                },
                {
                    "name": "CUSTOMER_ID_",
                    "dataType": "Text",
                    "width": 255,
                    "readOnly": true,
                    "format": null
                }
            ]
        }]
    }"
}
Static flow - Configuration URL Sample App Code
Alternatively apps may want to display a static configuration page for marketers to configure specific fields. The fields could then be configured and used throughout the app's lifecycle for subsequent calls such as the Get Template URL.
Example: Apps could ask the user to specify an image URL and link URL during configuration. Later in the app's lifecycle when the Get Template URL is called, the response could return HTML where a clicking an image takes marketers to a web page.
Configure Page postMessage to AMS
Once the user has finished entering input (ie. the customer ID) and clicks save, the app should listen to the postMessage from the parent iframe, which would be AMS. Refer to Configuration iframes to learn more about how you can save the configuration or close the configuration window.
Configure Page postMessage listener for Save Configuration URL
The configure page must also implement a listener for the response of the Save Configuration URL. This is to display configuration success or failure to the user.
Sample Implementation: Configure page postMessage listener
attachMessageListener() {
    var messageHandlerFunction = this.handleMessage.bind(this);
    window.addEventListener("message", messageHandlerFunction, false);
}


handleMessage(event) {
    if(event && event.data) {
        console.log("Received Event From AMS", event);
        var data = event.data;
        if(data.requestId == this.amsAction || data.configurationStatus){
            this.receivedMessage = true;
            var response = this.parseResponse ? this.parseResponse(data) : data;
            this.handleMessageResponse(response);
        }
    }
}