Step 1: Activate your Oracle Public Cloud Services account and log in to Oracle Cloud Dashboard
Before you begin: Ensure that you are using an Oracle Cloud supported web browser.
Activate your Oracle Public Cloud Services account
After the product is purchased, you should receive an email from Oracle Cloud services. This email has the subject line "Welcome to Oracle Cloud. Setup your account." It provides instructions about how to activate your Oracle Public Cloud Service account.
NOTE: The Oracle Public Cloud Service account is not for Oracle Responsys itself, but for the administrative portal for the Oracle Public Cloud Services to which you have subscribed. You will use the Oracle Cloud portal to activate Oracle Responsys.
To activate your account:
- Click the Activate My Services button in the email that you received. The Activate My Services! page opens in a web browser window.
- In the Cloud Account Name - Create New Account field, enter the name you would like to use for your Oracle Public Cloud account.
- Account names must be unique, must start with a letter, and can have up to 15 lower case letters and numbers. You cannot use spaces and special characters.
- Oracle recommends that the account name indicate your organization and/or division name. (This name is used only in your Oracle Public Cloud Services account and will also be used as your identity domain name.)
- Optionally, edit the Administrator's First Name and Last Name, as needed.
- Click Activate Account. The Review Summary page informs you that you will receive a Welcome email when the activation is completed. Click Close to dismiss the window.
Log in to Cloud Portal using the My Services URL
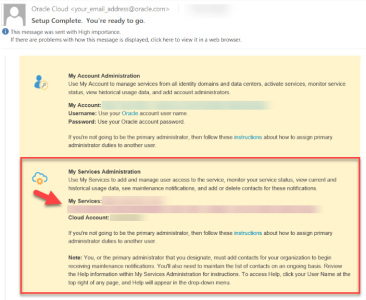
After your Oracle Public Cloud Service account is activated, you will receive an email with the subject line "Setup Complete. You're ready to go."
To log in to Oracle Cloud:
- Open the "Setup Complete" email, scroll to the My Services Administration section, and then click the My Services link.
The link opens the Oracle Cloud Account Sign In page.
- To log in, enter the Username and Temporary Password provided in the email. The Set a new password for your user account page is displayed. (Identity Cloud Service manages user access to Oracle Public Cloud Services.)
- Following the instructions on the page, change the temporary password to your new password. When you enter the new password, the Password Criteria checklist icons change to green when you have entered a valid new password. The Submit button becomes available when the New Password and Confirm New Password fields match.
IMPORTANT: Keep the new password in a secure location, because you will need it later if you need to add new Responsys service environments or modify active service environments.
- Click Submit to continue.
After your password is changed successfully in the system, the Oracle Cloud Dashboard is displayed in your web browser. (Oracle.com also sends a confirmation email, which contains a link to the Account Login page.)
The Oracle Cloud Dashboard appearance may vary, depending on the subscriptions you have with Oracle.
By default, the Oracle Cloud Dashboard will not show Oracle Responsys until you create at least one service environment.
Continue to Step 2: Create Oracle Responsys service environments.
