Integrating with Oracle Responsys
When you integrate CX Audience with Oracle Responsys, you will have access to campaign behavioral data for your Responsys-integrated Customer Data List. You will also be able to quickly and easily publish Audiences to Responsys, so that you can use them in your marketing campaigns and programs.
Integrating with Oracle Responsys involves three main tasks, and they must be completed in the following order:
- Set up the integration from Responsys to CX Audience
- Set up the integration from CX Audience to Responsys
- Import your profile list from Responsys
Important: Before you begin, you must create a service request (SR) in the My Oracle Support portal to enable the Audience Designer controlled feature. You will need this to see audiences in Responsys that you created in CX Audience. When you enable Audience Designer, your account will also have access to the simple filter designer in Responsys. If your account has existing classic filters, those classic filters can still be executed, edited, and saved as another classic filter. But any brand new classic filter cannot be created in the Filter Designer.
Set up the integration from Responsys to CX Audience
First, create a CX Audience-specific user in Responsys:
- Log in to Oracle Responsys using your Account Administrator login credentials.
- From the Oracle Responsys home page, click the navigation menu (
 ), and then click Account.
 - Select User identity management, and then select Add user.
- Complete the following fields:
- Login name: Enter the name for the CX Audience integration user. It must be a unique name in the Responsys pod on which your account is located. For example, you could use CXAudienceIntegration<your_account_name>, where <your_account_name> is your unique account name. This would identify the user as being specific to the integration, and your unique account name would ensure that the username is unique across the Responsys pod.
- Email address: User's email address. This email address should belong to your point of contact for CX Audience. Responsys will send the new user "welcome" email to this address. The email recipient sets the password, and performs password management tasks for this Responsys user.
- User display name: Enter a meaningful user name here. It can be the same as the login name.
- User status: Leave this set to Active.
- User locale: Leave this set to English. The user you care creating will not use the Responsys user interface.
- Leave Can create Programs / Campaigns without Org. Scope for targeting unselected.
- On the Role Assignment tab, select the following functional roles. Do not select other roles for this user.
- List Web Services Manager
- Table Web Services Manager
- Click the Organization Assignment tab (if present), and then select Root. Objects created through the API inherit the organizational membership of the API user.
- Return to the top of the page, and then click the Create button.
After you create the user, Responsys sends a new user “welcome” email to the email address you entered when creating the user. The email address should belong to your point of contact for the CX Audience integration. This email provides instructions for logging in to Responsys and for changing the password.
- Follow the instructions in the email to change the temporary password for the CX Audience integration user. Make note of this password: you will need it when you set up the integration in CX Audience.
Notes:
- Before using the CX Audience integration user, the person who received the email must log in and change the temporary password.
- The CX Audience integration user, if configured purely as such, will not have access to the Responsys user interface. Attempting to log in by using the Responsys user login results in the following error message: ui.authentication.login.browserLoginNotAllowed
Note: The person resetting the password for the CX Audience integration user may receive the ui.authentication.login.browserLoginNotAllowed error. If this occurs, the workaround is for a Responsys Account Administrator to reset the CX Audience integration user's password. This triggers an email to the user that will enable the user to reset the password without logging in to Responsys. Whenever you change the CX Audience integration user's password in Responsys, you must also change it in CX Audience.
Next, verify that the CX Audience integration is enabled:
- From the Responsys home page, click the Navigation menu , and then choose Account.
- From the menu of account management options, choose CX Audience settings.
- Confirm that the check box for Enable Responsys and CX Audience Integration is checked. Select it if it is not checked.
- Click Save.
Set up the integration from CX Audience to Responsys
Important: Please note that you need to enable the integration in Responsys before you perform these steps. If you are not sure if that is done, please log in to Responsys and verify.
To set up the integration in CX Audience:
- Log in to CX Audience using your Account Administration credentials.
- From the CX Audience home page, click the navigation menu (
 ), and then click Account.
 - On the Account Management page, click Integration settings and click the Responsys tab.
- On the resulting page, complete the following fields:
- Account Name: Enter the Responsys account name.
Important: This must be the exact name of the Responsys account. If you're not sure of your account name, you can find it in Oracle Responsys. Log in as an Account Administrator user, and then choose Account from the navigation menu. The Account summary page shows your account name.
- Account URL: Enter the login URL.
- Username for Responsys integration: Enter the username of the CX Audience integration user that you created in Responsys (see Set up the integration from Responsys to CX Audience).
- Username email: Use the email address associated with the CX Audience integration user.
- Password: Enter the password for the CX Audience integration user.
- Profile List in CX Audience that Responsys behavioral data should be available in: Choose the customer data list that will be matched to the Email, SMS, and Mobile App behavioral data from Responsys.
- Select a column from Responsys that will be used to match records to the CX Audience customer list:Record match columns can be CUSTOMER_ID_, EMAIL_ADDRESS_, MOBILE_NUMBER_, EMAIL_MD5_HASH_, EMAIL_SHA256_HASH_.
- List record handling: Click the checkbox for Insert new profile list records from Responsys to enable this option. Before you turn on this setting, you need to know the following:
- The insert uses the match column defined in the Responsys integration settings to identify profile records that exist in Responsys but not in CX Audience.
- CX Audience only inserts values from columns that have the same properties in both Responsys profile lists and the Responsys-integrated list in CX Audience. For example, if a Responsys profile list has a column called AGE_RANGE and the CX Audience list does not, then the AGE_RANGE data is not synced.
- If two Responsys profile lists have a column with the same name, the insert uses the value in the latest updated row. For example, you have a customer with customer ID 1001 in two Responsys profile lists. The two records for customer ID 1001 show a different city. The city of the latest updated record will be inserted to the CX Audience list record for that customer.
- Responsys maintains Permission and Deliverability Status for the profile records. These values are not synced to CX Audience. Learn more about Responsys Data Privacy and Security Features.
- Learn more about Profile inserts.
Warning: You can't change the Yes setting after you click Save on the Responsys integration page. You must contact Oracle Support if you have issues.
- Account Name: Enter the Responsys account name.
- Click Save.
- Continue to the next section to complete the integration setup.
Import your profile list from Responsys
CX Audience brings your behavioral data over from Responsys automatically, but you need to set up Connect jobs to get the profile list data from Responsys to CX Audience. Setting this up involves four main steps, and they must be completed in the following order:
- Step 1: Create key pair on CX Audience and download the public key
- Step 2: Upload the public key into Responsys
- Step 3: Export the profile list from Responsys using a Connect job
- Step 4: Import customer profile data into CX Audience using a Connect job
Before you begin: Make sure that you have completed the integration steps in the previous sections in this topic.
Step 1: Create key pair on CX Audience and download the public key
- Log in to CX Audience.
- From the navigation menu (
 ), select Data, and then select Connect.
 - From the Manage Connect page, click Create job.
- Select Import Profile Data as the type of job you want to create, and then click Create. The Connect wizard opens.
- Navigate to the Source Specification step, and then click Select or generate key.
- On the Select or generate key dialog, enter a name and email address, and then click Generate key pair. The key pair is added to the list.
- From the Select key pair list, click the radio button to select the key pair, and then click the download button for the selected key pair. Save the key on your local computer.
Step 2: Upload the public key into Responsys
- Log in to Responsys.
- From the navigation menu (
 ), select Data, and then select Connect.
 - From the Manage Connect page, click Create job.
- Select Import Profile Data as the type of job you want to create, and then click Done. The Connect wizard opens.
- Navigate to the Source Specification step, and then click Select or import key.
- On the Select or import key dialog, locate the Import public key section, and enter a new public key name.
- Click Choose file. Browse to the location where you downloaded the public key file from CX Audience, and select that key.
- Click Import. The public key from CX Audience is added to the page.
- Exit the Connect job.
Step 3: Export the profile list from Responsys using a Connect job
- From the Manage Connect page, click Create job.
- Select Export Data from the drop-down list and provide a name and description of the export job, and then click Create. The Connect wizard opens.
- On the Select object step, select List. In the List drop-down, select the profile list you want to use in CX Audience.
- Click the Destination Connectivity step. Use the default location, the Responsys file server. Click Change to select the desired path for the file export.
- Click the Destination Specification step. Complete the fields as follows (use the field's default value if the field is omitted below):
- File to be created: Enter the file name and suffix.
- Field enclosure: Select None.
- Encryption/compression: Select Compress and encrypt file with PGP/GPG key. Click Select or import key. Select the public key you configured in Step 2: Upload the public key into Responsys.
- Click the Notification step. For the Send notification to prompt, enter the desired email address. Select On success or failure.
- Click the Schedule step. You have two options:
- Select Run once. Select the desired date, and enter the time.
- For the recurring option, you can choose Recurring, and then choose Daily. Profile the date and time (per the account time zone), and select the recurring days from the Every _ days field. You can set the required end date or select No end date.
- Click Activate, and then click Save & Close.
- To verify that the job has run, wait until after the scheduled date and time, and then go to the Manage Connect page and click the Completed Jobs tab.
- Navigate to the Responsys file server and verify that the exported file is available in the specified path/folder.
Step 4: Import customer profile data into CX Audience using a Connect job
In the previous steps, you've exported the profile list from Responsys using a Connect job. The Connect job has placed the data on the Responsys file server. But to CX Audience, the Responsys file server is like any other external SFTP server. Before you can import the data, you must set up the Responsys file server as an external SFTP server in CX Audience.
Set up SFTP server in Responsys
- Log in to Responsys.
- From the navigation menu (
 ), select Data, and then select Connect.
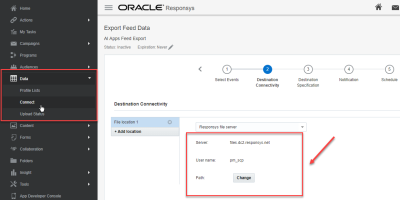
 - Locate and open a Connect export job. On Destination Connectivity, locate a file location set to Repsonsys file server. Note the (SFTP) Server and (SCP) User name from Connect Screen. You will need these values for the next step.
- Open a Service request (SR) with My Oracle Support and request to add the above "Responsys SFTP Server" as "External SFTP Server" in CX Audience.
Once the request is completed, you can download the SSH2 key from CX Audience.
Download SSH2 key from CX Audience
- Log in to CX Audience.
- Click
 , and select Connect from the Data menu.
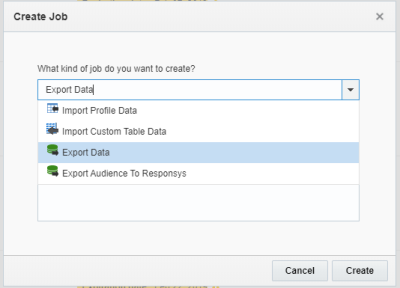
 - Click Create Job. The Create Job dialog will display.
- Use the drop-down list to select Export Data.
- Enter a name and description for the job and click Create. The Export Data page will display.
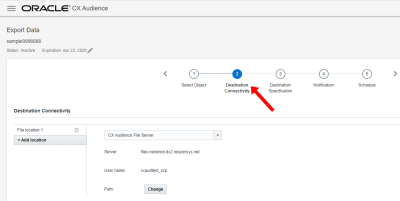
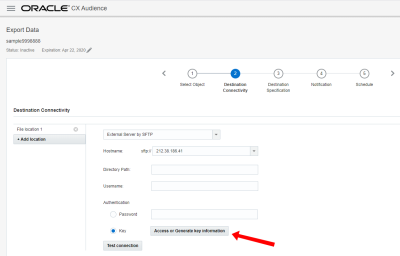
- Click Destination Connectivity.
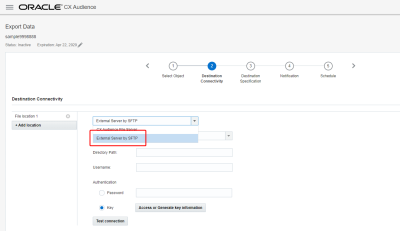
- Use the drop-down list to select External Server by SFTP.
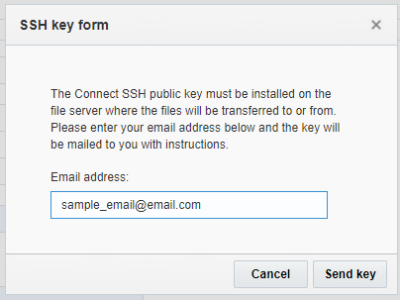
- Click Access or Generate key information. The SSH key form dialog will display.
- Enter your email address and click Send key.
- Once you receive the SSH2 key in your email, you can upload it to Responsys. Learn more about Managing SSH2 Keys topic in the Responsys Help Center.
- Wait for Oracle to complete the addition of the above key. This typically takes a couple of days.
Important: While Oracle completes the addition of the SSH key, Connect jobs will show a “failed” status. This is normal and it will resolve once the task is completed by Oracle.
After the SSH2 key from CX Audience is added in Responsys, the Connect job in CX Audience can use the Responsys file server as an external SFTP server.
You can now set up a Connect job to import the data into CX Audience. See Creating import jobs for the basic instructions for importing a file.
When importing the profile list exported from Responsys:
- On the Source connectivity step, select the path from where the file needs to be imported (the Responsys export location).
- On the Source specification step:
- Ensure that you use the same file name and extension of the file that you exported from Responsys.
- Select the First line contains column names check box.
- Select the File is encrypted with PGP/GPG key check box. Click Select or generate key, and on the Select or generate key dialog, choose the public key that you created in CX Audience in Step 1 and imported to Responsys in Step 2. Click Done to confirm the selection.
- On the Target definition step, click Target Tables and select the list into which you want to import the profile list from Responsys. Choose the same column mapping that you configured on the Responsys Integration page (described in Set up the integration from CX Audience to Responsys). Ensure that the the incoming field is matched to the correct list and system system field in CX Audience.
- Configure the Notification and Schedule steps as described in the Creating import jobs topic.
After you activate the job and it finishes running, go to the Completed Jobs tab and verify the run status and job execution logs. When the job has run successfully, the Responsys profile list data will be present in the CX Audience customer data list that is matched with Responsys.
Responsys, Oracle Responsys, integrate, integration, integrate with Responsys, Responsys integration
Responsys Help Center topics:
