Audiences in Oracle Guided Campaigns
Important: Oracle Guided Campaigns is only available if you have purchased licenses. For Standard and Enterprise Eloqua trims, you are entitled to 5 and 10 free licenses respectively. If you require additional licenses, or are on Eloqua Basic, please contact your account representative for more information.
To create a campaign in Oracle Guided Campaigns, you must start with audience preparation. You can choose from an existing segment from Oracle Eloqua, or you can upload one directly to Oracle Guided Campaigns.
Getting ready for audience preparation
While the contact schema can be flexible, the fields in the imported list must include: email address, company and industry. Email address and company values must be mapped to the out of the box email and company fields provided by Oracle Eloqua.
Using an existing Eloqua segment
In the Audiences step of a guided process, you will see a list of available segments within your connected Oracle Eloqua instance.
You can search for your desired segment by adding search terms into the search box and pressing Enter, which will filter your search results to just the matching search terms.
To choose the appropriate segment, select it and press Add to Campaign.
Uploading your audience
Tip: If your administrator has granted you permission to upload contacts, you will see the upload audiences option. If they have not, you won't be able to see the upload button. Learn more.
On the Audience step of tactics, the ability is there to upload an audience in .csv or .xls format.
Preparing contacts file for upload
If you are uploading your audience to Oracle Guided Campaigns, prepare the upload file and use the following steps to upload.
-
Before uploading, create your upload file. The upload file should only contain the field headings and the contacts for the audience.
-
On the Audience step, click Upload Audience.
-
Choose to create a brand new audience, or add your .csv/.xls list to an existing audience (that is, Eloqua segment), click Next to confirm.
-
Name your new audience, or select the existing one you wish to add to.
-
Drag your .csv file into the upload widget, or click the widget to browse your computer for the file.
-
After your file is selected, review your preview for accuracy. Then click Next to proceed.
-
Using the drop-downs on the right for each row, choose the Oracle Eloqua field that you are mapping your upload data into.
-
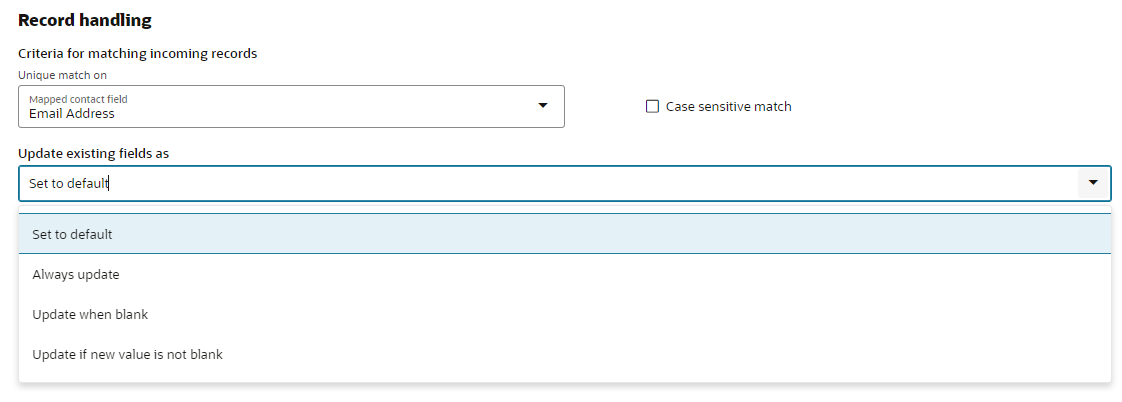
In the Record Handling section, leave Email Address as the uniquely match in field. Only change this if you have a different unique identifier.
-
In the Update Existing fields as, choose the overwrite method that should be used if a record already exists with your unique identifier. See below for details.
-
Then click Next and enter your email if you want an upload notification sent to you.
-
Click Finish to complete your upload.
Record handling explained
Record handling is how Oracle Eloqua will react if a record already exists with your unique identifier. The following describes the options:
-
Set as Default - use your Oracle Eloqua system's default (recommended).
-
Always update - always update your Oracle Eloqua record's field with your new data.
-
Update when blank - only add data to a field if no data is present in the field for that record.
-
Update if new value is not blank - overwrite data in all situations where data is present in your new upload file
Your upload will process and be selectable in the Audiences step of a tactic once it has completed.
Previewing your audience
Before you choose an audience, you can preview the contacts within your audiences.
To preview the contacts within an audience, choose the Preview Contacts icon from the right side of the audience selector.

Contact Label Security
Oracle Eloqua's CLS (Contact Label Security) also applies within Guided Campaigns, so your users will only be able to see the contacts to which they are granted access to see, as controlled by your CLS labels.
Oracle Guided Campaigns Tactics