Adding the Twitter Timeline service to your landing pages
Important: Twitter recently discontinued the creation of Widget IDs, which were previously used to embed timelines in Oracle Eloqua. Any existing timelines, which use Widget IDs, continue to function normally. For new timelines (profiles, likes, lists, collections), use the timeline URL.
The Twitter Timeline service allows you to embed a X (Twitter) timeline in your landing page to display relevant posts.
Below are examples of supported timeline URLs:
| Timeline | Example | Tips |
|---|---|---|
| Profiles | https://twitter.com/OracleMktgCloud | |
| Likes | https://twitter.com/OracleMktgCloud/likes | |
| Lists | https://twitter.com/OracleMktgCloud/lists/top-marketing-influencers | Only public lists are shareable. |
| Collections | https://twitter.com/OracleMktgCloud/timelines/923912489670193152 | Use https://tweetdeck.twitter.com to create collections. |
In order to use the Twitter Timeline service, the X (Twitter) Widgets app must be installed by a customer administrator.
To add the Twitter Timeline service to a landing page:
-
Open or create a landing page in which you want to embed a X (Twitter) timeline.
-
Click Cloud Content to open the Cloud Content menu, which lists all available content services.
-
Locate the Twitter Timeline service, either by scrolling through the list or searching with the search box.
-
Drag the Twitter Timeline service onto the asset, and place it where you want it to appear.
-
Double-click the element to open the configuration screen.
-
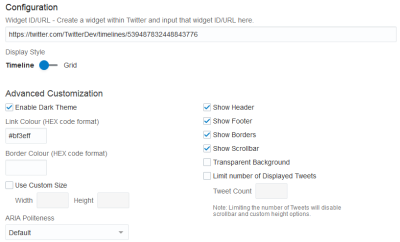
Widget ID/URL: Enter your X (Twitter) timeline URL. Refer to the table above for example URLs.
- Display Style: Select Timeline or Grid. The grid option is only available when a collection URL is entered. This option is disabled for Widget IDs.
-
Advanced Customization:
-
Enable Dark Theme: Check this box to use display your timeline using a darker look and feel.
-
Link Color: Enter a hexadecimal color code to be used for the link color. Example: #bf3eff.
-
Border Color: Enter a hexadecimal color code to be used for the timeline border. Example: #98d72c.
-
Use Custom Size: Select a custom width and height.
-
Show Header, Footer, Borders, Scrollbar: Check the boxes if you wish to show these fields.
- Transparent Background: Check this box to remove the timeline background and view the background of your landing page.
-
Limit number of Displayed tweets: Enter the number of posts you want to display in the timeline. (Maximum 20 posts can be displayed.)
Note: If this option is selected, the height and Show Scrollbar options will be disabled.
-
Aria Politeness: Select either Polite or Assertive from the drop-down. For additional information about Aria Politeness, please see Twitter's documentation on increasing accessibility priority of a timeline region.
-
- Click Preview to see what your timeline will look like.
- Click Save. When it is finished saving, you see a green Success! bar.
-
Click the X icon to exit the screen.
-
-
Click Save to save the asset.
The Twitter Timeline is now available on your landing page.
