Creating custom native CRM integration auto synchs
To create a custom auto synch:
- Click Settings
 .
. - Click Integration under Platform Extensions.
- Click the Inbound tab.
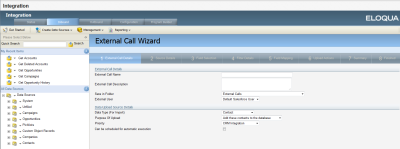
- From the Create Data Sources menu, select Create Data Source with External Call. The External Call Wizard opens, displaying step 1 of 8.
- Configure the settings in the External Call Details area.
- External Call Name - Enter the name of the call, such as Get Accountsor Get Leads.
- External Call Description - Add a description for the call (Optional).
- Save in Folder - Identify the folder you want to save the call to.
- External User - Default CRM integration users (for example, Default Salesforce User).
- Configure the settings in the Data Upload Source Details area.
Data Type (for Import) - Select the data type. The auto synchs for this integration synchronize either contact or company data.
Purpose of Upload - Set the purpose as Add these contacts (or companies) to the database.
- Priority - Select the priority for this data upload.
- Enable Can be scheduled for automatic execution.
- Click Next.
- In the Source Details step, select the appropriate Action and Entity type from the picklist.
- Enable Retrieve 18 character IDs if applicable (15 character IDs are typical when integrating with Oracle Eloqua). Click Next.
- In the Field Selection step, check off the CRM fields that you want to synchronize with auto synch. Click Next.
- In the Filter Details step, configure the criteria for the information you are synching into Oracle Eloqua.
To specify the date parameter of Last Successful Upload, click
 next to the empty expression and select Add Date.
 - In the Add Date window, select Use the start date of the last successful upload.
- Click Save and Close.
The expression now says Last Successful Upload in blue italics.
- Click Next.
- In the Field Mapping step, configure the following:
- Set the Oracle Eloqua field to uniquely match the records on.
- Select Perform a case sensitive match (if using 15 character IDs).
- Map the Source Field to the Target Eloqua Field, based on your fields and synchronization requirements.
There are now four fields for each CRM User ID for Target Eloqua Field.
- For the Deleted and Converted entity auto synchs, click Advanced Options, then update the records with a set value by selecting the Oracle Eloqua field for the auto synch.
- Click Next.
- In the Upload Actions step, select the upload actions.
- Click Next.
- In the Summary step, review the details. Click Previous to make changes.
- To make the data upload a scheduled auto synch, in the After Uploading area of the Summary page, select Schedule automatic data imports using these settings.
- In the Details area, enter an Auto Synch Name and Description (if required).
- Select Send email on success and Send email on failure if you want to receive notifications in these cases.
- The default setting is for the Auto Synch to run nightly at 10pm EST. Select No. A specified schedule governs Auto-Synch to customize the schedule.
- Set the auto synch schedule. For Salesforce CRM integrations, it is recommended to run the auto synch every 2 hours.
- Click No next to Auto-Synch proceeds by Standard Business Schedule?
- Select the Custom Schedule Derived From Preset : Monday – Sunday (full week) and 8am-8pm.
- Modify the Start times to 00:00 and the End times to 24:00, so the auto synch runs every 2 hours, every-day, all-day.
- Click Finish.
- Ensure the auto synch was created by selecting Auto Synchs on the Management menu. Confirm that it has been added to the list. Enable the auto synch if required.
