Deleting custom object records
You can manually delete one or up to 50,000 custom object records at a time from a custom object, or up to 20 million by using the Delete Custom Object Records upload.
Tip: You can automate the deletion of custom object records using the Delete Custom Object Record action step available on the program canvas for custom object programs. You can push changed records to a program and evaluate the record before deleting it. Use decision steps like Compare Custom Object Fields, Has Linked Contact, or Compare Date to evaluate the record. If the record needs to be deleted, then use the Delete Custom Object Record action step.
The following tasks describe each available method and when to use it:
Delete an individual custom object record
- Navigate to Audience
 , then click Custom Objects.
 - Open the custom object.
- Click View Custom Object Record.

- Click the drop-down next to the record and then click Delete Custom Object Record.
Delete multiple records
- Navigate to Audience , then click Custom Objects.
- Open the custom object.
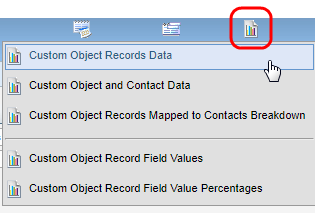
- Click Reporting, then click Custom Object Records Data.
- Select all the records that you want to delete.

- Click Actions and then click Delete Custom Object Records.
Delete all custom object records
- Navigate to Audience , then click Custom Objects.
- Open the custom object.
- Click View Custom Object Record.
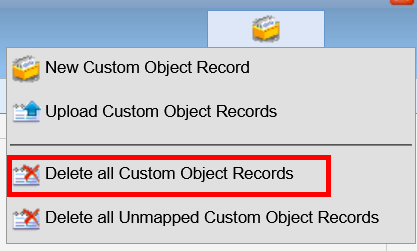
- Click the Custom Data drop-down, then click Delete All Custom Object Records.
- Chose an option:
- To delete all records, choose All Records.
- To delete all records based on the created date of the record, choose Select Condition and set a date or range that will cover the date created the records you want to delete.
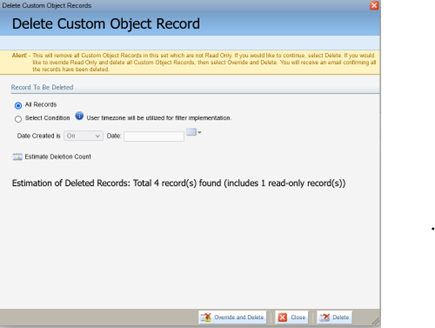
- Click Estimate Deletion Count to return the number of records that currently meet the criteria for deletion, including read only records. This is an estimation, any changes to records or records created after the estimation has been triggered may still be deleted.
- Choose what records to delete:
To delete all custom object records that meet the selected condition in this custom object and that are not read-only, click Delete.
To delete all custom object records that meet the selected condition including read-only records, click Override and Delete.
Delete all custom object records not mapped to any contact or account
- Navigate to Audience , then click Custom Objects.
- Open the custom object.
- Click View Custom Object Record.
- Click the Custom Data drop-down, then click Delete All Unmapped Custom Object Records.
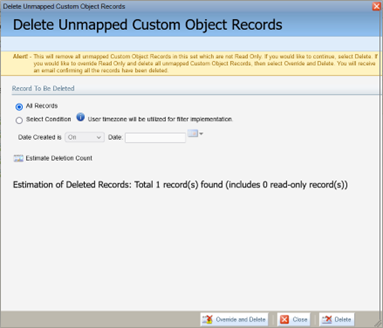
- Chose an option:
- To delete all unmapped records select, choose All Records.
- To delete all records based on the created date of the record, choose Select Condition and set a date or range that will cover the date created the records you want to delete.
-
Click Estimate Deletion Count will return the number of records that currently meet the criteria for deletion, including read only records. This is an estimation, any changes to records or records created after the estimation has been triggered may still be deleted.
- Choose what records to delete:
To delete all custom object records that meet the selected condition in this custom object and that are not read-only, click Delete.
To delete all custom object records that meet the selected condition including read-only records, click Override and Delete.
Delete linked custom object records upon contact deletion
Custom objects can be configured to delete a custom object record when the linked contact record is deleted.
To delete a custom object record when the linked contact is deleted:
-
Navigate to Audience
> Custom Objects. -
Open the custom object that require records to be deleted when the linked contacts are deleted.
-
Under the heading Custom Object Record Deletion check the box Deleted Linked Custom Object Records upon Contact Deletion.

-
Save the custom object
Going forward any time a contact is deleted linked custom object records in the custom object where the checkbox is enabled will also be deleted. The setting is per custom object, so only records custom objects where the checkbox is enabled will delete the linked records on contact deletion. Custom object records that were linked to a deleted contact prior to enabling the feature will not be deleted.
Delete custom object records using an upload
You can delete up to 20 million custom object records using the Delete Custom Object Records upload.
Before you begin:
Warning: There is no undo for deleting custom object records, so carefully select the custom object records in the file.
-
Create your upload file (.txt, .csv, .xls, .xlsx). The upload file should only contain the custom object records that you want to delete.
-
The first line or row of the file must be the source field, which will be the unique identifier.
-
Any field may be quoted (with double quotes).
-
Fields containing a line-break, double-quote or the selected delimiter must be quoted.
-
Make sure that custom object records in your upload file have a unique identifier, such as the record's
Unique Codefield. Only the field being used as the unique identifier is needed for delete uploads.Warning: If the field selected as the unique identifier has more than one match all matches will be deleted.
-
If using the the
Unique Codefield, note that it has a limit of 100 characters. Values with more than 100 characters will be cut off at 100 characters.Important: This may result in values that are no longer unique within the upload. If this occurs, only one of the "duplicate" records will be deleted, and that is only if there is an existing record with the shortened
Unique Code. Avoid this by keeping the unique code within the 100-character limit.
To delete custom object records with an upload:
-
Click Custom Object, then click Delete Custom Object Records.
-
Complete the Upload Details and select the Source of Custom Object Record data. Click Next.
-
Click Browse and select file to upload then click Open. Click Upload and Preview Data.
-
Review preview data then click Next when you're ready.
-
Select the custom object field to match custom object records on from the Uniquely Match On options. Click Next.
-
Confirm Upload Settings, then set Notification Email and After Uploading.
-
Enter the email address to be notified when the upload completes. If you are using multiple email addresses, separate each with a comma.
-
To use these upload settings in another upload, select Save these settings for re-use. Otherwise, select Run the upload once using these settings.
-
-
Click Finish to begin the upload.
Managing custom object record services