Embedding Engage in Microsoft Dynamics 2013
You can embed Engage in Microsoft Dynamics 2013.
Prerequisites:
-
Build an allowlist of the domains that will be hosting embedded Engage pages. Learn more in the Configuring Engage topic.
- Determine the Oracle Eloqua login URL you want to use. You can use the simplified login URL or a specific legacy URL based on the desired login method. Learn more.
To install Engage in Dynamics 2013:
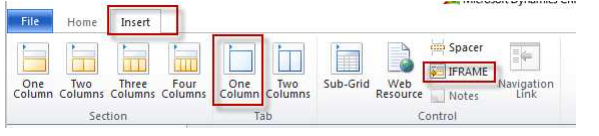
- Navigate to Settings > Customization > Customizations > Customize the System.
- Select Entities > Contact > Forms.
- Double-click the form you want to add Engage to, such as Main.
- Click Insert in the top menu.
- Add a One Column Tab. Name it whatever you like.
- Add an IFRAME to this tab.
- Name: IFRAME_Engage
- URL: http://about:blank
- Label: Eloqua Engage
- Ensure that Restrict cross-frame scripting is unchecked
- Select the Formatting tab. Modify the height by setting the number of rows (try 20).
- Select the Dependencies tab. Add email as a dependent field.
- Click OK to close the IFRAME window.
- On the Form model, click Form Properties.
- Click the Events tab.
- In the Form Libraries section, click Add and then click New.
- Name: new_EPPOnLoad
- Type: Script (JScript)
- Click Save and Close
- Now double-click on the newly created Form Library new_EPPOnLoad.
- In the Text Editor copy and paste one of the following code snippets (depending on your login choice).
Simplified login URL
var newUrl = "https://login.eloqua.com/siteLogin?SiteName={CompanyName}&ReturnUrl=/apps/embed/salesTools/engage/compose
Xrm.Page.ui.controls.get("IFRAME_Engage").setSrc(newUrl);To use the legacy URLs, replace the
newURLin the code above with the Legacy login URLs.
-
Customize the Engage URL with parameters that support the desired experience for your sales users. Learn more.
Tip: To pass the email address of the contact or lead add the following parameter to the URL
emailAddress="+ document.getElementById("{emailaddress1}").title;. - Click Save and click on the newly created library.
- Click OK
- Click Save

- Click Publish.
- Repeat for the Leads entity, if desired.