Creating the Get Campaigns auto synch
As part of closed-loop reporting, the Get Campaigns auto synch imports campaigns to Oracle Eloqua from Salesforce. The auto sync described here will only import those campaigns created by Oracle Eloqua. This means that campaigns created in Salesforce will not be imported. Campaigns in the systems are matched using the CRM campaign ID.
Before you begin:
- This task relates to setting up closed-loop reporting with Salesforce. Refer to Configuring auto synchs for closed-loop reporting for an overview of importing campaigns and opportunities to Oracle Eloqua.
- Before setting up a new auto synch, check to see if it already exists. If the auto synch does exist, you can use the steps below to help configure the auto synch.
- To ensure that only campaigns created by Oracle Eloqua are importing, you will filter for campaigns created by the Oracle Eloqua integration user. To create this filter, you will require the user ID.
- Click Settings
 .
. - Click Integration under Platform Extensions.
- Click the Configuration tab.
- Click Manage System CRM Users in the Configuration menu.
- In the CRM System Users area, click
 next to Default Salesforce User, then click Edit User.
- In the Login Credentials area of the CRM System User window, copy the text in the User ID box.
- Click Close.
- Click the Inbound tab to return to step 4 of the External Call Wizard.
To configure the Get Campaigns auto synch:
- Click Settings .
- Click Integration under Platform Extensions.
- Click the Inbound tab.
- Click Create Data Source with External Call in the Create Data Sources menu. The External Call Wizard opens displaying step 1 of 8.
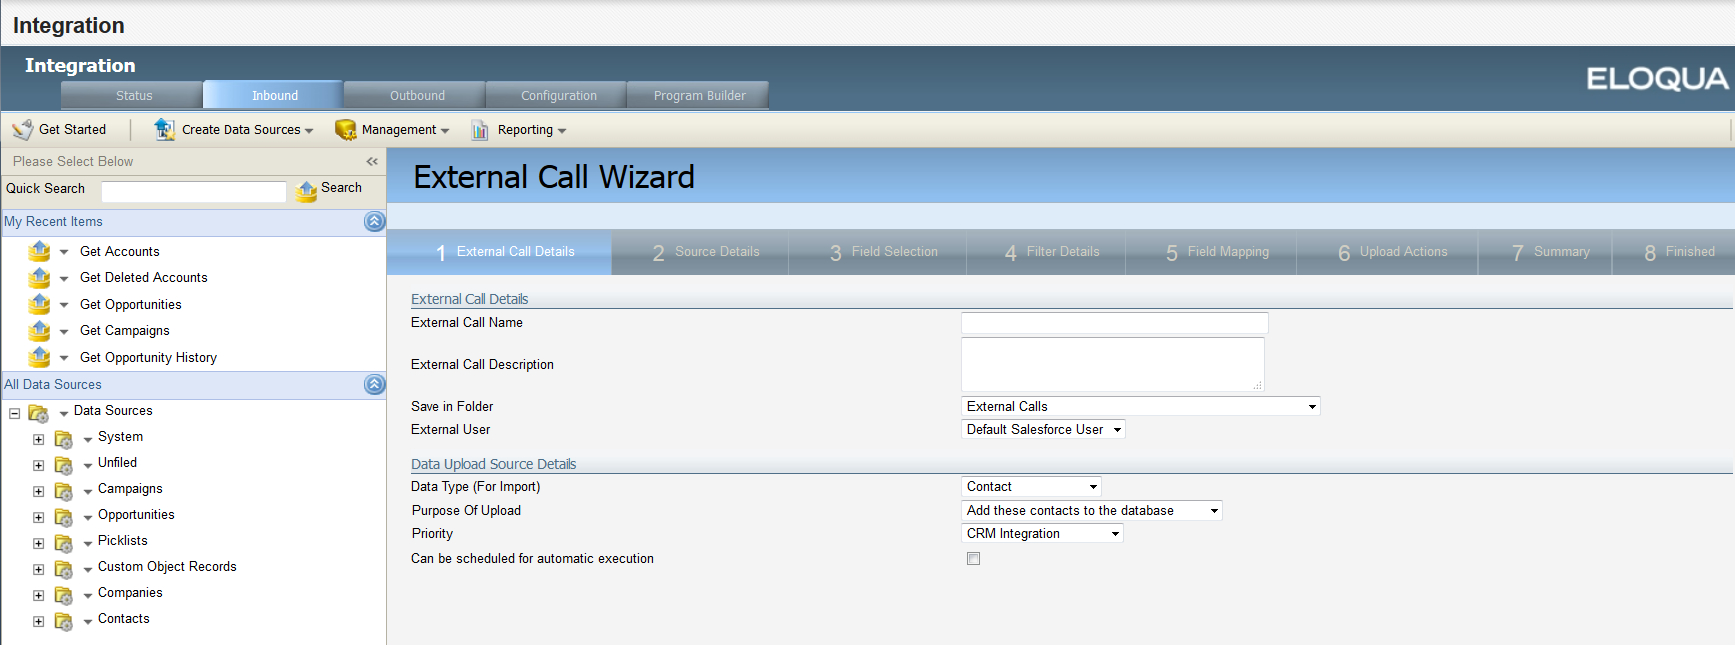
- Configure the settings in the External Call Details step.
- External Call Name: Get Campaigns
- External Call Description: Get Salesforce Campaigns
- Save in Folder: Retrieve Data - Campaigns
- External User: Default Salesforce User
- Data Type (for Import): Campaign
- Purpose of Upload: Add New or Update Existing Campaigns
- Can be scheduled for automatic execution: Enabled
- Click Next.
- Configure the settings in the Source Details step.
- Action: Retrieve
- Entity: Campaign (Campaign)
- Retrieve 18 character IDs: Enable if applicable (15 character IDs are typical when integrating with Oracle Eloqua)
Note: If you do enable this setting, you must ensure that all auto synchs are set up to retrieve 18 character IDs.
- Click Next.
- In the Field Selection step, select the Salesforce campaign fields that you want to populate in Oracle Eloqua when importing campaigns. For example, fields associated to campaign costs or fields that you might want to use for segmentation. You must select the Campaign ID as this will be used to uniquely match campaigns.
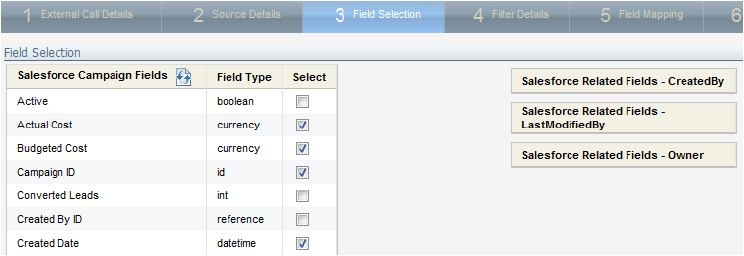
- Click Next.
- In the Filter Details step, create a filter that looks for those campaigns created by Oracle Eloqua. Configure the first filter row as follows:
- Salesforce Campaign Fields: Created By ID
- Operator: Equals
- Expression:The Salesforce ID of the Oracle Eloqua Integration User.
- Click Next.
- Configure the settings in the Field Mapping step to map the fields you selected in the Field Selection to the Oracle Eloqua campaign fields. The Uniquely Match On field should be set to External Campaign ID.

- Click Next until you get to the Summary step.
- In the Summary step, review the details. If no changes are required, select Schedule automatic data imports using these settings. Additional settings appear.
- Set up the notification details and schedule the auto sync. We recommend:
- Auto Synch Name: Get Campaigns
- Execute after: No change
- Send email on success: Enabled
- Send email on failure: Enabled
- Scheduling: Leave as default
Note: Set a schedule that makes sense for your business process. The default schedule is runs every night at 10 PM EST.
Here is an example summary of the Get Campaigns auto synch.
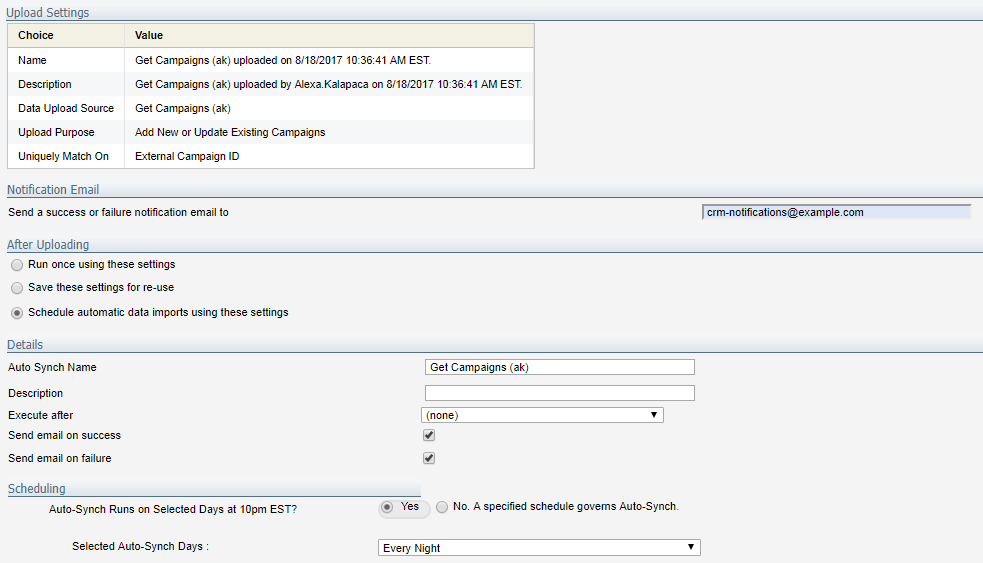
- Click Finish.
Note: Use additional filter criteria if you want only certain Salesforce campaigns to be pulled into Oracle Eloqua. For example, Record Type ID could be used to filter for only those campaigns related to specific business unites.
To verify that the auto synch was created, on the Inbound tab, click Management > Auto Synchs.
After you finish: The next integration task is Creating the Get Opportunities auto synch.
Configuring auto synchs for closed-loop reporting
Creating the Get Opportunities auto synch
Creating the Get Opportunities auto synch to associate opportunities with contacts