Standard
This Quick Start guide will show you how to get up and running with data collection on your website using the Oracle CX Tag without using a tag manager. Once you’re collecting data you can move on to leveraging your data in the Infinity platform.
See the CX Tag Quick Start for specific guides for populate tag managers.
Want to learn about the CX Tag by video?
See the Oracle CX Tag Tracking Reference - Single Page Applications for tips on how to implement the Oracle CX Tag in a Single Page Application.
In this topic:
Steps
1. Create a Tag
You will now need your code snippet so you can implement the CX Tag on your website:
1.1 Generate Tag
Can’t see Data Collection? You will need to speak to someone within your company who has Oracle Infinity Administrator access within your internal team to ensure you have the correct permissions to access this.
-
In the Oracle Infinity User Interface, visit the Data Collection application (you can access this from the menu button in the top-left hand side).
-
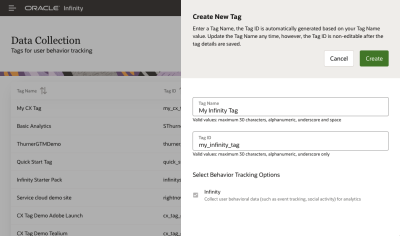
Click Create Tag:
Create Your Tag
-
Follow the on-screen instructions (ensuring the Infinity Behavior Tracking Option is selected) then click Create.
On-Screen Instructions
Tag Name can be named anything you like. It allows you to assign access rights to your Oracle Infinity Tags and put them into a hierarchical format. Typically, it’s best to have a separate tag name per website but for this Quick Start you can just give it any name you like.
The Tag ID is your ID for the tag (and is joined to Tag Name). It will be suggested for you but can override if you like. This will be what is implemented on your website so it cannot be changed once generated.
-
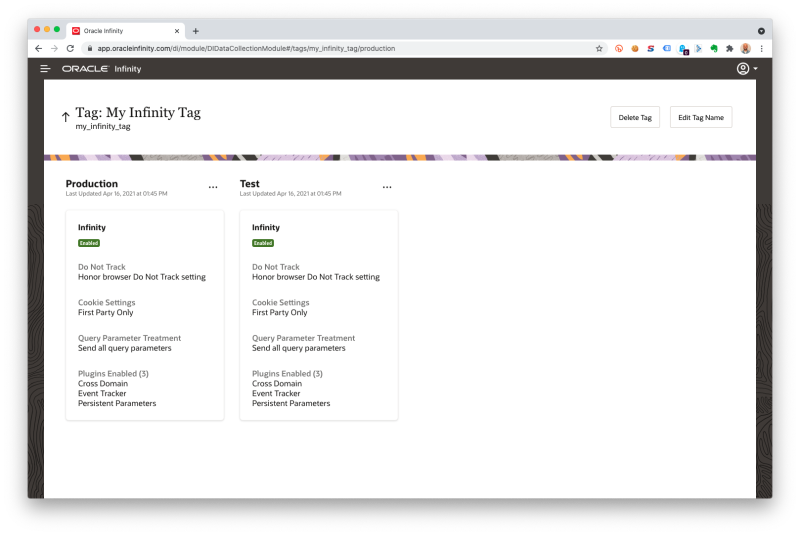
You will now see two boxes are available, representing tags for your Test and Production environments:
Your Tag Environments
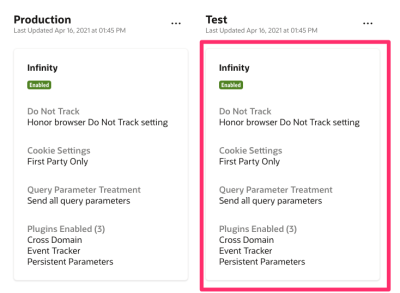
Environments allow you to run your tag in multiple configurations. In this example, you can have one version of a tag for a Test environment, where you can test and tag configurations you have in a test environment, and then another environment for your live site (Production), where you would promote your Test configuration to if working as you expected in the Test environment.
See Data Collection Application - Tag Containers and Publishing for more information.
1.2 Enable Tag Management Plugin
Why am I using a Tag Management Plugin when I’m not using a Tag Manager? By default, when the Oracle CX Tag Library loads on a page it will send a Page View request to Oracle Infinity. The Tag Management Plugin allows us to stop this behavior as we are going to fire our View calls ourselves so that we choose the Parameters we want to send to Oracle Infinity on each page view.
By default, the CX Tag will trigger page views upon page load for us. However, we want to stop this behavior as we will be firing these page views ourselves. To do this, we’re going to enable the Tag Management System Plugin:
-
Scroll through the list to find Tag Management System and click on it to select it then click Add Selected Plugins
-
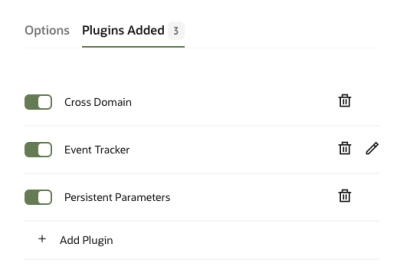
Ensure you click on the Tag Management System plugin to toggle it on:
Toggling the Plugin
-
Click Save.
When you add the plugin, it won’t be on by default so ensure you toggle it on before you save:
Toggling the Plugin
If you don’t, the CX Tag may not fire any calls/may fire multiple calls.
2. Get your CX Tag URL for your Test Environment
In this quick start, we will be implementing the Test environment version of your CX Tag Library (ideally on a test website you have).
We would also recommend you implement the Production environment version of the tag on your live website as well so that you can optionally promote the test configuration from this guide to your live website as per Publishing your Configuration to your Live Site.
You will now need your endpoint URL so you can implement the CX Tag on a test website:
-
Go back to the Data Collection application.
-
Look for your tag then click on it to open your tag configuration.
Finding Your Tag
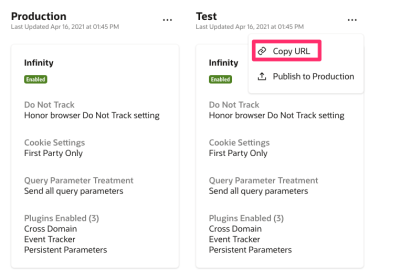
Click on the … in the Test configuration to retrieve your endpoint URL for the Test environment:
Finding Your Tag
-
Your Oracle CX Tag Library location should now be copied to your clipboard (for example,
//d.oracleinfinity.io/infy/acs/account/{Account GUID}/js/{Tag ID}/odc.js?_ora.config=analytics:test, where{Account GUID }is your Account GUID,{Tag ID}is your Tag ID and_ora.config=analytics:testdenotes this is for your Test environment):Your Test Environment URL
Account GUID identifies your account. All your tags will use the same account GUID so that all data collected for your account is stored together.
Tag ID allows you to assign access rights to your Oracle Infinity Tags and put them into a hierarchical format.
_ora.config denotes which Environment the tag is pointing towards (to allow you to point towards different tag configurations per Environment, for example, Test and Production)
3. Generate Code Snippet
-
Generate your code snippet using the following template by using the CX Tag URL from the previous step:
<!-- CX Tag - Library Load --> <script type="text/JavaScript" src="//d.oracleinfinity.io/infy/acs/account/{Account GUID}/js/{Tag ID}/odc.js?_ora.config=analytics:test"></script>
4. Implement the Oracle CX Tag Library
The Oracle CX Tag Library provides the necessary features your browser will need to deploy the modules you wish to use on the page (for example, the Infinity Module - used to track users on your website).
In this example, we will first be ensuring the Oracle CX Tag Library is implemented on the page so that we can fire View Calls to send tracking calls to Infinity so you can track visitors landing on your page (you can also fire Event Calls to track further interactions on the page).
You’re now ready to implement the Test environment version of your Oracle CX Tag Library on your website.
Implement the following code block within the <head> of your website:
CX Library Loader Template
Implement this in the <head> synchronously as per above to ensure the page content can be manipulated before it is visible to the user. However, this can be asynchronous and not necessarily in the <head>.
If this is not feasible, contact Oracle Consulting about an engagement to support you with your tagging requirements.
5. Implement View Calls
View Calls send tracking calls to Oracle Infinity to declare that a visitor has viewed the page (it will capture information about the page such as the URL, Page Title, and anything else you wish to declare).
Want to fire Event calls?
If you wish to fire event data for additional interactions on the page (for example, clicking on buttons), see Send Event Calls below.
You can pass in your own variables as Parameters within your calls (for example, Customer ID, product ID etc.). Please see Sending Parameters within your Calls in Next Steps.
Now that the Oracle CX Tag Library is available on the page, we can add a View call to declare that the visitor has landed on the page (and optional details about the page/user as well).
-
Implement the following code block in the
<body>of your page:
CX Tag - Page View
6. Validate Tracking in your Browser
See Testing the CX Tag within the Streams (Legacy) user interface.
See Verifying and Debugging the CX Tag.
When you trigger the CX tag, you can validate this is working by Inspecting the Network Activity in your browser and filtering for the dcs.gif for any requests.
Inspect the Network in your browser for dcs.gif:
Debugging your Infinity Requests
If you have declared parameters, you’ll be able to see these later in the request as query-string parameters:
Seeing Your Parameters in the CX Tag Request
Have you:
Added the Tag Management Plugin and turned it on?
7. (Optional) Publish your Configuration to your Live Site
7.1 Ensure your Live Website is using the Production Environment Tag
If you haven’t implemented a production environment version of your CX Tag on your live site then follow these steps to publish this on your live website.
This is as simple as changing the endpoint URL for your CX Tag on your site from the Test environment endpoint to your Production environment endpoint:
-
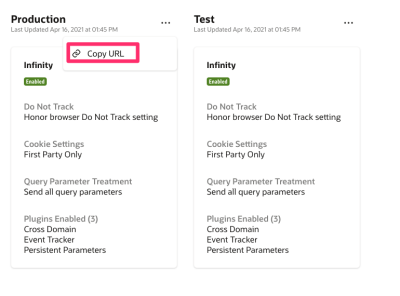
Go to your Tag and click to retrieve your Production Environment endpoint:
Retrieving your Production Environment Endpoint
This will look like //d.oracleinfinity.io/infy/acs/account/{Account GUID}/js/{Tag ID}/odc.js?_ora.config=analytics:production
Publish this to your live website as per Implement the Oracle CX Tag Library above.
7.2 Promote your Test Configuration to Production
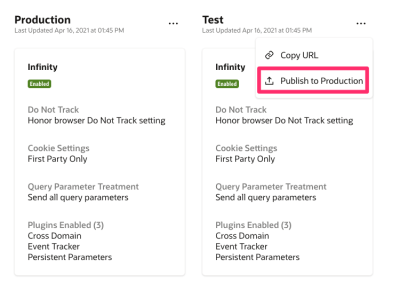
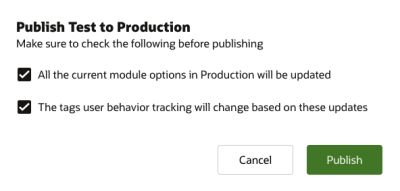
Now that we have successfully tested your Test configuration, we can promote this to Production as follows:
Your Tag Configuration (for example, plugins and settings) is now live in the Production environment for your tag so we now need to make sure your live website is pointing towards the production environment for your tag.
When you promote your Test Configuration to Production you will immediately push the exact Test tag configuration (for example, plugins and their settings) to your Production environment - that is, your live website.
You must be very careful this is exactly as you required as it will overwrite the Production Tag Configuration you already had - including plugins and their settings. Once you promote to Production you cannot retrieve the previous Production configuration.
8. You’re Ready
You have successfully sent data from your website into Oracle Infinity and validated it both in your browser and in the platform itself. You’re ready to move onto the Next Steps below.
Next Steps
In this topic:
Watch other CX Tag Quick Start Videos
See below for a full list of video playlists:
Fundamentals
Advanced
Data Collection Application - Managing Modules
Now that you have the CX Tag live on your website, you can enable different CX products from the tag.
See Data Collection Application - Managing Modules for how to enable these products on your website.
Send Parameters within your Calls
Which Parameters Should I Use? For help with choosing parameter names and syntax formats, please see Parameters
Mapping Variables within the CX Tag
You may wish to map Parameters in your View tracking request to enrich your data collection and targeting capabilities (for example, the product ID someone was viewing). To do this, just modify your code snippet to declare these as attributes within the cxDataObject ensuring you use the correct Parameter Syntax.
Mapping Parameters - Example Product View
Send Event Calls
Triggering Events with the CX Tag
You can also trigger Click/Event calls when users interact with your content and declare parameters (ensuring you use the correct Parameter Syntax). For example, adding an item to your shopping cart. To do this, you can trigger the following code:
Sample Event- Add To Cart
Which Parameters Should I Use? For help with choosing parameter names and syntax formats, see Parameters.

