Generating a Development PEM
NOTE: For security reasons - never e-mail PEM files. Unauthorized PEM access can leave your app(s) vulnerable. Use of secure file transferring is preferred.
Development .PEM Overview:
In order to send Push Notifications to your iOS device, you must generate a .PEM file for your application and upload it to the Mobile App Developer Console.
The .PEM file is a certificate that gives us permission to communicate with Apple’s servers, which ultimately communicate with your application.
It is assumed in these instructions that you have added an application and created an iOS Development platform for your application. This guide is going to show you how to configure .PEM files for iOS Development/Sandbox Provisions. With Apple's introduction of its new Provisioning Portal, development push requirements must be completed for your production builds to work.
The PEM steps will involve three applications on your computer:
- The iOS Provisioning Portal (Web Browser)
- Keychain Access
- Terminal
Development .PEM - Step By Step Guide:
[1] To begin, head to the Apple Provisioning Portal and log into your Apple developers account in the top right corner.
[2] Once logged in, you should see a tab: Certificates, Identifiers & Profiles. Enter this section. Under iOS Apps, click any one of the four folders (certificates, identifiers, devices, or provisioning profiles) to open Apple’s Provisioning Portal.
[3] If you’re a seasoned developer, there’s a good chance you already have devices configured for testing on the Provisioning Portal. If not, use the device section to attach your device(s) UDIDs to your developer’s account.
[4] The next step is to create an App ID for your account (Identifiers --> App IDs) by clicking the “+” at the top right corner of the page.

For these sections:
-
App ID Description – Enter a descriptive name for your application so that you can easily identify the application.
-
App Services – Check any services that apply, for the sake of this tutorial, ensure that “Push Notifications” are enabled in this section.
-
App ID Prefix – This is a value assigned by Apple. Remember this value, as it can be helpful for properly code signing your provisioning profiles later on.
-
App ID Suffix – This is one of the most important steps. Configuring the correct Bundle ID will ensure that our servers know which application to communicate with later on.
NOTE: The Bundle Identifier is case sensitive – be sure to input the Bundle ID on the Provisioning Portal exactly as it reads in Xcode (see screenshot below on where to find the Bundle ID in Xcode). Furthermore, there are best practices/naming conventions for Bundle ID’s as well – Apple recommends using a reverse-domain name style string.

Bundle ID Examples:
-
Bad ID:
com.yourcompany.* -
Good ID:
com.yourcompany.yourapp
[5] Once you’ve filled out the App ID page, click Continue. Review your App ID (making sure it is Push Enabled) and click Submit.
[6] Now that you have configured your Application ID and associated devices with your account, it is time to create permission certificates for your applications.
To begin, under the Certificates section in the portal, click All and create an iOS App Development certificate. This takes you to a CSR (Certificate Signing Request) creation page. Using the steps on the CSR page as a guide: within the Keychain Access drop down menu, select Keychain Access > Certificate Assistant > Request a Certificate from a Certificate Authority.
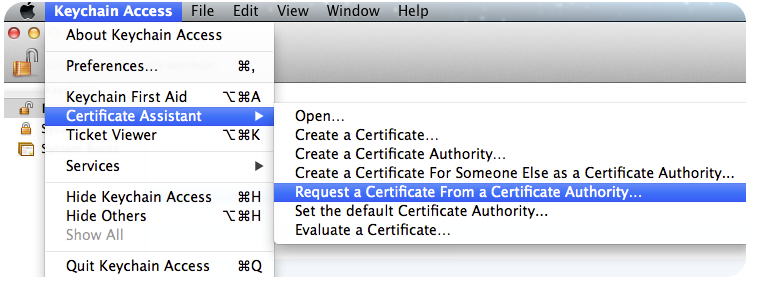
NOTE: It is possible that you have already created an iOS App Development certificate for previous projects - this is fine. Proceed through the guide as you normally would.
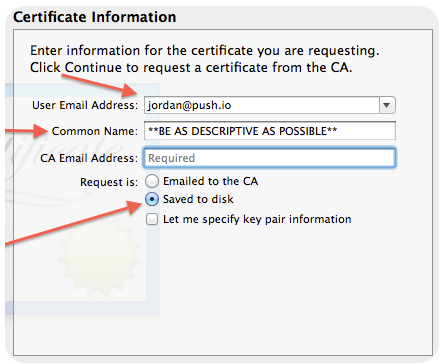
Under Certificate Information:
- User Email Address – Enter the e-mail address associated with the Apple developer account.
- Common Name – This is the name that will be displayed in your Keychain Access under certificates. Be as descriptive as possible in this section to be able to discern one certificate from the next. This is especially true for developers who have many projects involving multiple certificates.
- CA Email Address – Ignore this section.
- Request Is – “Saved to disk” – we recommend saving this file to your Desktop.
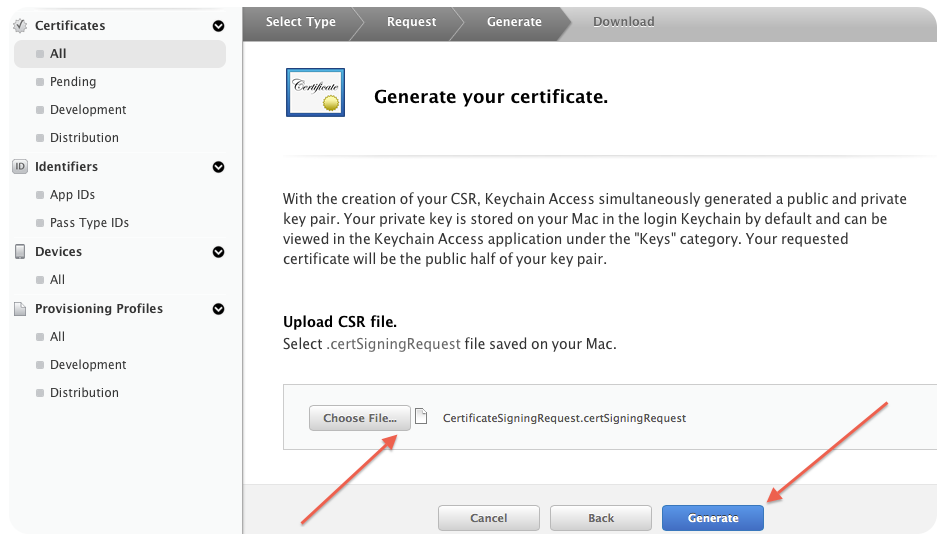
[7] Once your CertificateSigningRequest (CSR) file has been saved to the Desktop, return to the CSR webpage on the Provisioning Portal and upload that CSR file. Select Generate and then click Download the .CER file presented on the following page and double click the file to install it.
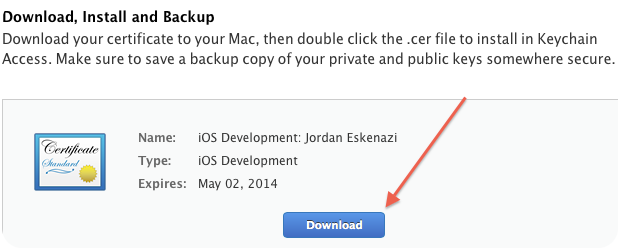
NOTE: Once the .CER file has been installed, you should be able to visibly see the certificate under the “My Certificates” section of the Keychain Access Application:

[8] Next, we’re going to generate a .PEM permissions file that will allow us to speak to Apple’s Development (Sandbox) servers.
Head back to Identifiers --> App ID --> The App ID you recently created and click Settings. On the bottom of this page you will see a section for Push Notifications with Development and Production subsections. You will want to click Create Certificate under the Development SSL Certificate subsection.
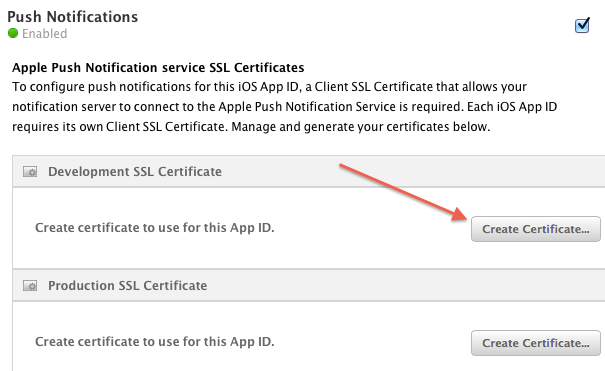
For this section, regenerate an entirely new Certificate Signing Request (CSR) file and follow the same steps as we did for the “iOS App Development” certificate. Like last time, download the certificate file, and install it.

Again, it’s best to verify that these certificates were successfully added to your Keychain:

In the above screenshot, notice that the Bundle ID matches the one in the Xcode project, and that the Development SSL Certification is present for the example "Sports Application".
[9] In the Keychain, right click the Apple Development iOS Push Services certificate you just added and export the file to the desktop as a .p12 file. Name it whatever you wish (the default “Certificates” name is fine), however, do not create a password for the .p12 file. Before finally saving, Keychain Access will ask you to type in the password to the computer you are using.

[10] The next step is to convert this .p12 file into a .PEM file that you will upload for your mobile app.
Using Terminal, run the following command, changing "Certificates.p12" to the name of the .p12 file you created in the previous steps (in our example, "SportsApp", but substitute with a name appropriate for your app when you perform this step):
`openssl pkcs12 -in Certificates.p12 -out SportsApp.pem -nodes -clcerts`

In this example, "Certificates.p12" was converted to "SportsApp.pem" using the command line script above.
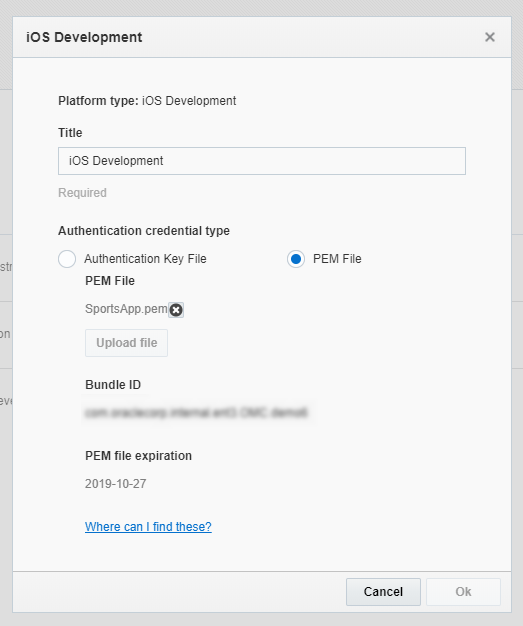
Once this .PEM has been generated, head to your application in the Mobile App Developer Console. On the Platforms tab, choose Edit on the iOS Development Platform row, and then upload your .PEM file. (If you are updating an expired .PEM file, you must first delete the old one before you can upload the new one.)
After a successful upload, you should see the Bundle ID and PEM file expiration date displayed:
[11] The final step is to generate a Development Provisioning Profile for your application. Under the provisioning profile tab, click the "+" sign and follow the steps for creating the profile. Once generated, download and install this provisioning profile. If installed properly, you should be able to see the provision in Xcode's Organizer under both the general library and the device you are using to test/develop with.
-
This concludes the Development PEM guide for iOS. The next step is to add project files and implement code/registration calls explained in the iOS Step-By-Step Guide.
-
If you are ready for push enabled distribution/ad-hoc builds, please head to this link: Generating A .PEM File for iOS [Part 2] -- Distribution PEMs.