App with Multiple Responsys accounts
App developers can associate a single app with multiple Responsys accounts. If you have multiple Responsys accounts (each possibly corresponding to a separate brand, organization, or geographic region), but have a single app, you can configure and use the same app for each of your Responsys accounts.
To enable this feature::
-
This feature is available under our Controlled Availability program. To request access to this feature, please contact your Customer Success Manager or log in to My Oracle Support and create a service request.
-
Your organization's mobile apps must be built with the 19B Responsys Push SDK (version 6.41.0) or greater.
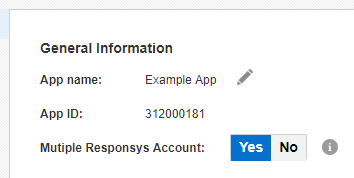
Step 1: Add your app to each Responsys account
Your app needs to be associated with each Responsys account. Ensure that the same iOS credentials are configured for the app in each account.
[1.1] Log in to your Responsys account and navigate to the Mobile App Console.
[1.2] Find your app and click Edit. If you are creating the app for the first time, see Manage Apps and Platforms for instructions.
[1.3] Under Multiple Responsys Account, select Yes.
[1.4] Repeat these steps for each Responsys account for which you want to associate with the app.
Step 2: Download configuration files
You must download and bundle the configuration files from each Responsys account with your app.
[2.1] Log in to your Responsys account and navigate to the Mobile App Console.
[2.2] Find your app and click Edit. If you are creating the app for the first time, see Manage Apps and Platforms for instructions.
[2.3] Click the Platform link on the left-side navigation bar. The Platform page is displayed.
[2.4] Locate the platform for which you want to download the files, and then click Download > pushio_config.json. The file will download. Your Responsys account name will be prefixed to the filename.

[2.5] Bundle the file with your app. The configuration file contains an account attribute which you can use to understand which Responsys account each app configuration belongs to.
[2.6] Repeat these steps for each Responsys account for which you want to associate with the app.
Step 3: Changing configuration
When an app user installs the app, the app must use the configure API to initialise the app configuration to a specific geography, brand, or organization.
Whenever an app user switches the app's configuration (geography, brand, or organization) the app must use the configure APIs to re-configure the app to a new configuration, thereby unregistering the app from the current account and registering the app to a new Responsys account. The Responsys SDK provides several APIs to configure the Responsys account. The following APIs are used to configure Responsys accounts:
[3.1] Configure with filename
This API configures accounts by filename. The xxx_pushio_config.json file must be available in your app bundle. This API reads the content of the xxx_pushio_config.json file and configures the SDK. Whenever the app needs to switch accounts the new configuration file name must be provided. The configuration file should contain the details of that account.
The API returns response or error (if errors occur while sending the event to Responsys server).
    [[PushIOManager sharedInstance] configureWithFileName:@"accountname_pushio_config.json" completionHandler:^(NSError *error, NSString *response) {
        if (error) {
            NSLog(@"Not able to configure the sdk :%@", error);
        } else {
            NSLog(@"SDK configured successfully");
        }
    }];
        PushIOManager.sharedInstance().configure(withFileName: "accountname_pushio_config.json", completionHandler: { (error, response) in
            if let error = error {
                print("Not able to configure the sdk \(error)")
            } else {
                print("SDK configured successfully")
            }
        })
This is the recommended method to configure the SDK.
[3.2] Configure with parameters
This API configures accounts with parameters provided in xxx_pushio_config.json. If you are using this API you need to read the xxx_pushio_config.json file for specific account and provide all the parmaeters to the API. It is recommended you use configureWithFileName API to avoid any mistakes.
The API returns response or error (if errors occur while sending the event to Responsys server).
    [[PushIOManager sharedInstance] configureWithAPIKey:apiKey accountToken:accountToken conversionUrl:conversionUrl riAppId:riAppId accountName:accountName completionHandler:^(NSError *error, NSString *response) {
        if (error) {
            NSLog(@"Not able to configure the sdk :%@", error);
        } else {
            NSLog(@"SDK configured successfully");
        }
    }];
        PushIOManager.sharedInstance()?.configure(withAPIKey: apiKey, accountToken: accountToken, conversionUrl: conversionUrl, riAppId: riAppId, accountName: accountName, completionHandler: { (error, response) in
            if let error = error {
                print("Not able to configure the sdk \(error)")
            } else {
                print("SDK configured successfully")
            }
        })
Step 4: Clear old data
This step is optional if you want to delete the data when an app's configuration switches (geography, brand, or organization). There are several APIs available in the Responsys SDK to clean up old data if required. Ensure that you call these APIs if configure API call is successful. In the event the configure API call fails, an error will be returned in callback.
Upon successful SDK reset, the device installation / record / device ID will be marked as "Undeliverable" in the old Responsys account.
     //Reset the user id.
        [[PushIOManager sharedInstance] registerUserID:nil];

        //Reset Message center messages.
        [[PushIOManager sharedInstance] clearMessageCenterMessages];

        //Reset InApp messages.
        [[PushIOManager sharedInstance] clearInAppMessages];

        //Reset Notification Prefrences
        [[PushIOManager sharedInstance] clearAllPreferences];

        //Reset All categories
        [[PushIOManager sharedInstance] unregisterAllCategories];
        //Reset the user id.
        PushIOManager.sharedInstance().registerUserID(nil)

        //Reset Message center messages.
        PushIOManager.sharedInstance().clearMessageCenterMessages()

        //Reset InApp messages.
        PushIOManager.sharedInstance().clearInAppMessages()

        //Reset Notification Prefrences
        PushIOManager.sharedInstance().clearAllPreferences()

        //Reset All categories
        PushIOManager.sharedInstance().unregisterAllCategories()
Excluded from SDK Resets
The PIOConfigurationManager maintains a list of excluded items that are not to be removed during a SDK reset.
installed_at          // Install Time
uuid                  // Device ID
pushio_data_migrated  // Data migration flag
user_id               // User ID
// Push permission and other related (pmr) values
In addition to the above keys, the SDK will also not reset:
-
Message Center messages
-
Preferences
Step 5: Registration
You need to call the register API to register the SDK with the Responsys Platform after a successful configuration and data clean up. Responsys SDK provides several APIs to register the SDK.