Creating a Project Budget or Modifying Project Budget Properties
You can create any number of budgets for your project using the Project Budget feature. You can also edit the properties of existing project budgets that are not submitted for approval or approved.
To create a Project Budget or modifying project budget properties
-
Go to Projects > Projects > [Select a project].
-
Do one of the following:
-
To create a new project budget, click the Create button, then Project budget.
-
To modify the properties of an existing project budget, click Financials > Project budget in the project record header, and click the Edit icon
 under the Action column for the budget you want to modify.
The project budget properties form appears.
-
-
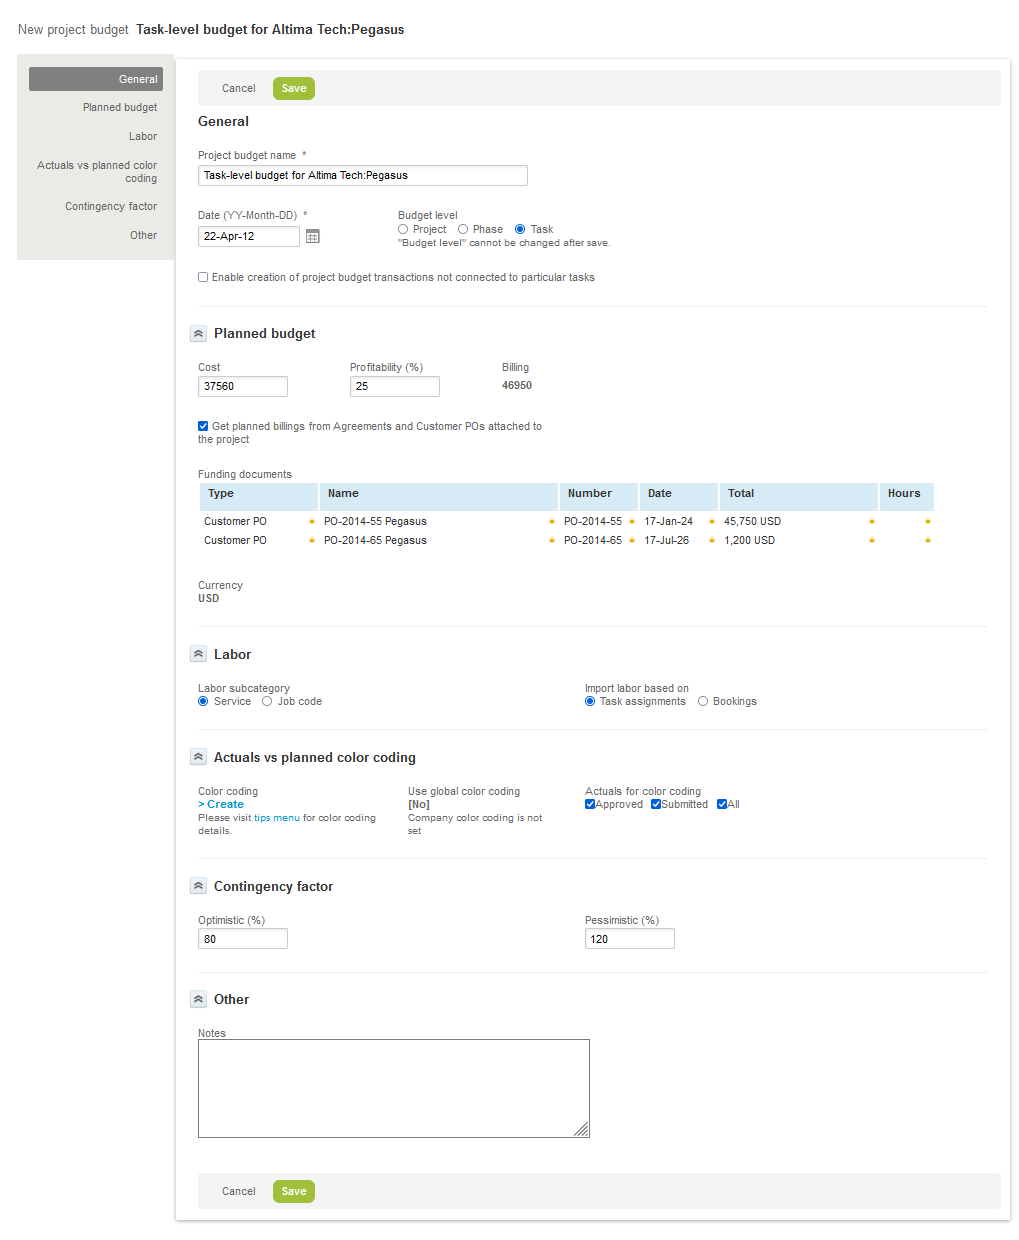
Enter all required information on the project budget properties form. The form includes the following information:
-
Project budget name
-
Date
-
Budget level — Choose whether to budget at the project, phase, or task level. The budget level cannot be changed for existing budgets.
-
Check Enable creation of project budget entries not connected to particular tasks box, if applicable. This lets you add budget entries at the project level when Budget level is task, for example.
-
Planned budget — Define the cost (for cost budgets) or cost and profitability (%) (for billing budgets).
-
Cost — Total project cost (used for all budgets, whether based on cost or profitability).
-
Profitability (%) — The target profitability percentage (used for budgets based on billing).
-
Billing — Read-only value used for budgets based on billing, and calculated automatically based on:
-
The sum of all agreements and customer purchase orders attached to the project, if the Get planned billings from Agreements and Customer POs attached to the project box is checked.
Note:If the Get planned billings from Agreements and Customer POs attached to the project box is checked, changing either one of the Cost or Profitability (%) value, changes the value of the other based on the Billing value.
-
The Cost and Profitability (%) values, otherwise.
-
-
Funding — If the Get planned billings from Agreements and Customer POs attached to the project box is checked, the form shows the list of agreements and customer POs associated with the project including the following information: Document type, name, number, date, monetary total, total number of hours.
-
Currency — The currency set on the project properties form.
-
-
Labor — Set the labor subcategory and imported labor information settings
-
Labor subcategory — Budget entries for labor can be broken down either by Service or by Job code.
-
Import labor based on — Budget entries for labor can be imported from either task assignments or bookings.
-
-
Actuals vs planned color coding — Add color coding for budget actuals in the Compare view to identify budget entries that are on or off target.
-
Color coding — Click Create to set ranges for color coding in the Compare view, based on the percentage of actual values compared to planned values.
-
Use global color coding — Check this box to use the color coding preferences set for your account.
-
Actuals for color coding — Select which actual values that will be color coded, based on item statuses (Approved, Submitted, or All).
-
-
Contingency factor — Set Optimistic (%) and Pessimistic (%) scenarios for your project. Default values are 80% and 120%, respectively, and can be changed in Administration > Application Settings > Projects > Project Budget Options.
Note:The Contingency factor form section shows only if your account is configured to allow for a simplified contingency factor on project budgets. To change this configuration setting, contact OpenAir Customer Support.
-
Notes
-
-
Click Save.