Project Budget Page
The project budget page lets you view and edit budgeted project costs over the span of the project, view actual incurred costs, and compare multiple budgets.
To view a project budget, go to Projects > Projects > [Select a project] > Financials > Project Budget and click Budget or Actuals under Quick links.
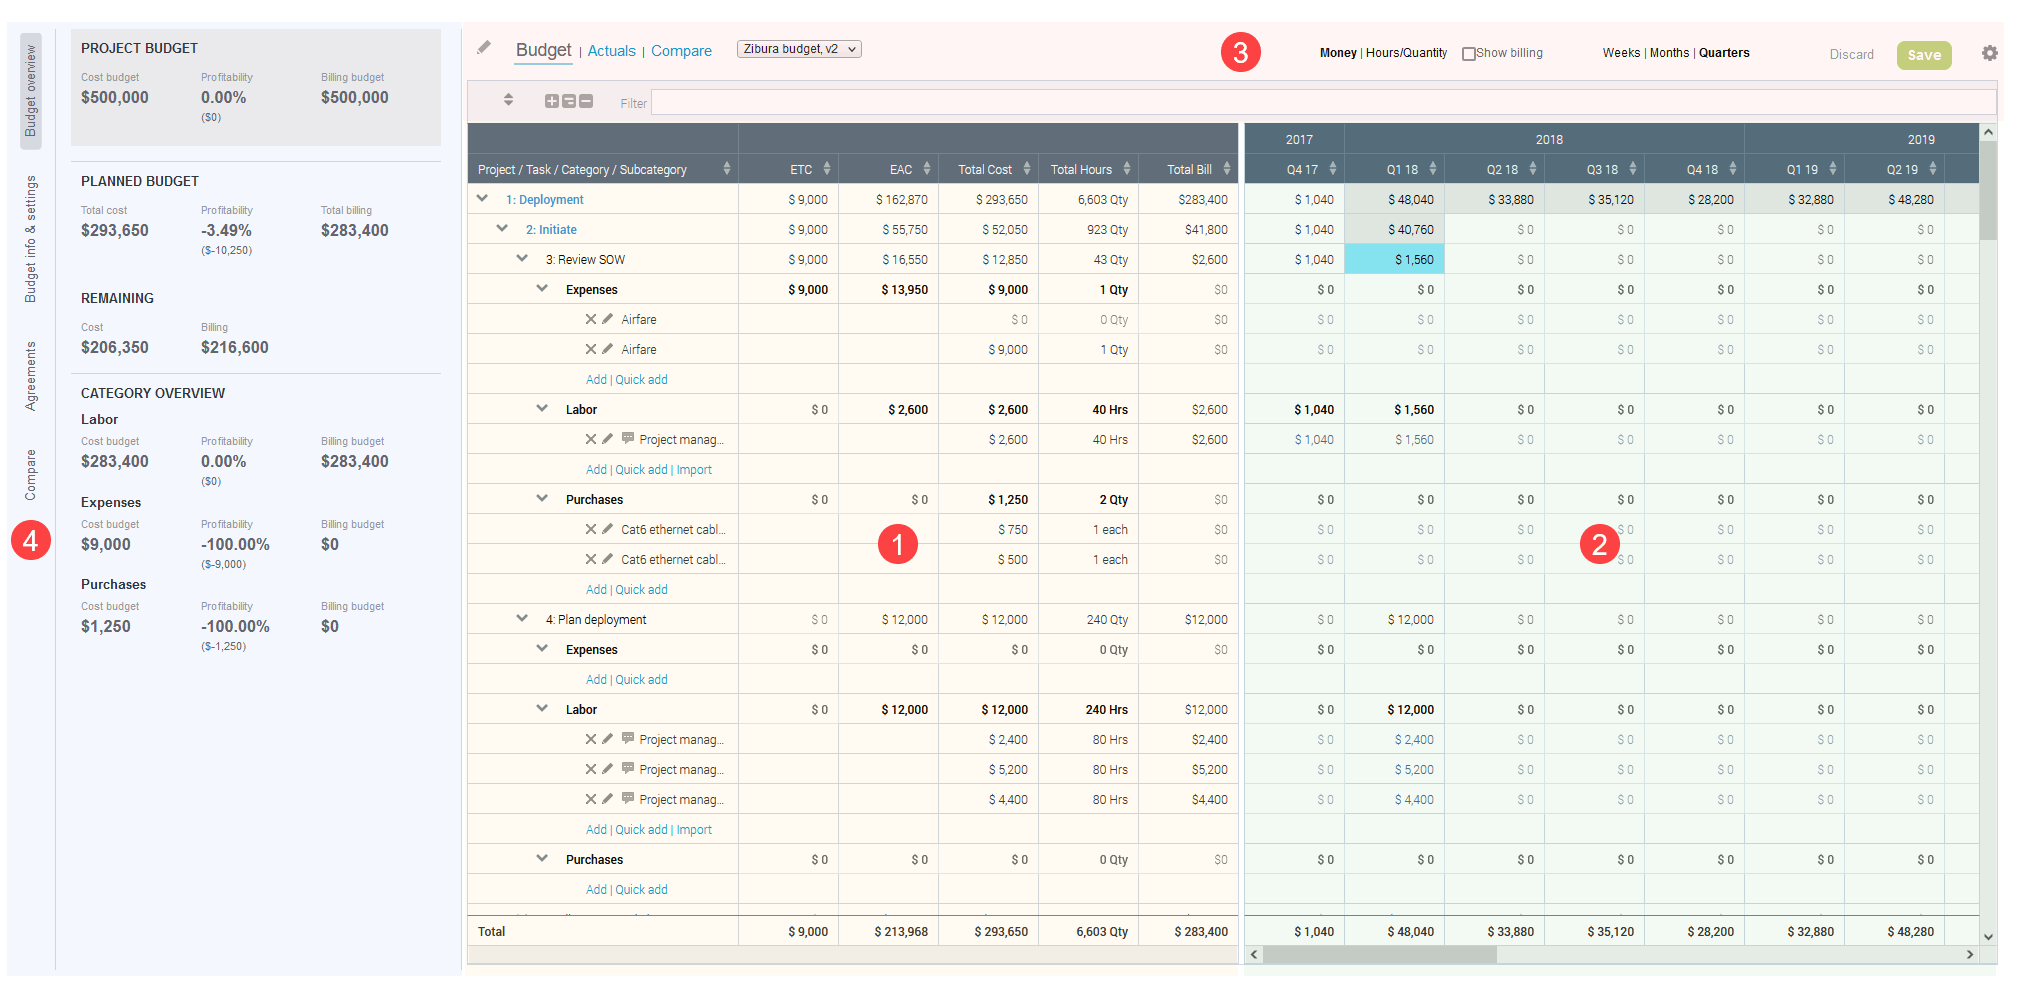
The project budget page includes the following elements:
-
Summary grid - The left side of the budget grid shows the work breakdown structure for your project, the project costs under Expenses, Labor and Purchases categories, totals and other summary fields. You can add entries under all three categories directly from the grid and import labor entries from task assignments or bookings.
-
Time grid - The right side of the budget grid shows a detailed breakdown of your budget per week, month or quarter over the span of the project.
-
Toolbar - Switch between a view showing the budgeted costs, a view showing actual incurred costs, or a view comparing multiple budgets (see Budget, Actuals and Compare Views). Control view options such as the time granularity, the type of values shown (monetary or time and quantity, cost-based or billing-based, along with other list tools (See Project Budget Toolbar).
-
Information and Settings panel - Vertical tabs include summary information related to your budget and additional settings and controls. See Information and Settings Panel.
Budget, Actuals and Compare Views
The project budget page lets you switch between a view showing the budgeted costs, a view showing actual incurred costs, or a view comparing multiple budgets.
-
Budget View - Click Budget in the toolbar to show budgeted costs. You can add or modify budget items directly from the summary grid, and edit values for each item in the time grid.

-
Click Add under the expenses, labor or purchases category to add a budget item. A form appears and lets you enter information for each budget item, including the periodicity for repeat costs.

-
Click Quick Add under the expenses, labor or purchases category and select a cost item subcategory to add a cost row on the project grid. You can then add cost information directly in the grid using inline-editing.
-
Click Import to import labor cost items from task assignments or bookings.
-
Click the delete icon
 to delete the budget item.
 -
Click the edit icon
 to edit budget item information.
 -
Point to the tooltip icon
 to view a tooltip with information about the imported budget item.
 -
Double click a cell on a budget item row in the time grid to enter the budgeted cost, quantity, or number of hours for that budget item in that week. The schedule for each task and phase is indicated on the task or phase row by cells with a blue color background (task) or gray color background (phase).
-
-
Actuals View - Click Actuals in the toolbar to compare incurred project costs against the planned budget (for cost-based budgets), or actual values from charges and invoices against the planned budget (for billing-based budgets). The summary grid and time grid include columns showing planned and actual values. Actual values are either Approved, Approved excluding taxes, Open, or All.

-
Compare View - Click Compare in the toolbar to compare up to 5 budgets on the same page. Click the Compare vertical tab in the Information and Settings panel, then select a base budget and the budgets you want to compare. To remove a budget from the compare view select Select ... from the corresponding dropdown field.

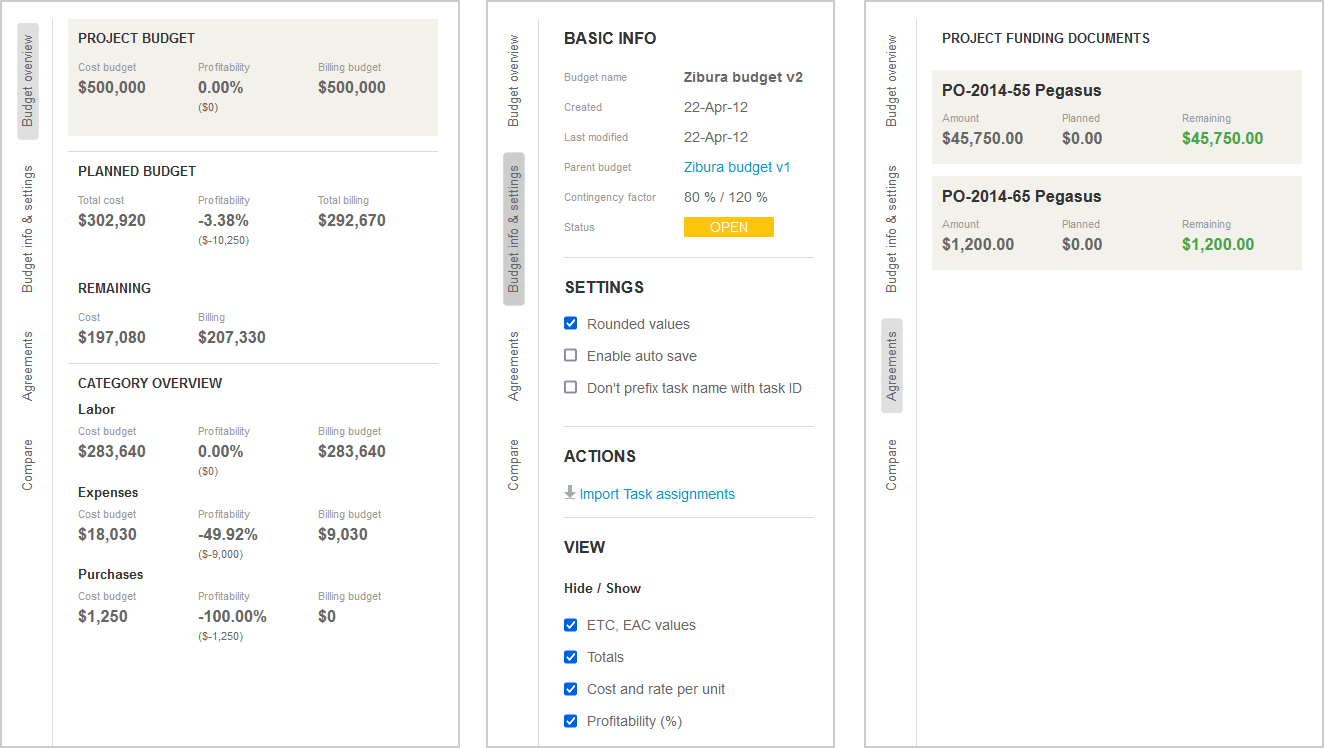
Information and Settings Panel
-
The Budget overview tab lets you view the budget totals and remaining funds.
-
The Budget info & settings tab lets you:
-
View basic budget information, including the budget name, created and modified dates, the parent budget it was created from, and its status.
-
Control view settings.
-
Check the Rounded values box to show monetary values rounded to the nearest integer value.
-
Check the Enable autosave box to save changes to your budget automatically on a regular basis (Budget view online).
-
Check the Don't prefix task name with task ID box to show task names only in the project budget grid and remove the task IDs.
-
Check or clear a box under the View section to show or hide the corresponding project budget grid columns. On the Actuals view you can also:
-
Select to show actual costs at the task level or cumulatively at the phase or project level.
-
Select which loaded cost to show.
-
Choose which budget scenario (normal, pessimistic, optimistic, most likely) to compare actual project costs against.
-
-
-
Perform certain actions, such as importing labor item information from task assignments or bookings.
-
-
The Agreements tab lists the agreements and Customer POs associated with the project. The list shows summary information for each funding document, including the document name, total amount, total planned costs, and remaining funds. Billing budget entries are deducted from agreements and customer POs in chronological order.
-
The Compare tab lets you select a base budget and other budgets you want to compare. To remove a budget from the compare view select Select ... from the corresponding dropdown field. You can compare up to 5 budgets at the same time.
Project Budget Toolbar

The toolbar includes the following controls from left to right:
-
Edit icon
 - Click the icon to edit the budget properties.
 -
Budget | Actuals | Compare - Choose Budget to show budgeted costs. Choose Actuals to show actual incurred costs. Choose Compare to show multiple budgets side by side on the same view.
-
Budget dropdown - A dropdown field lets you select the budget you would like to view for the currently selected project.
-
Money |Hours/Quantity - Choose Money to show only monetary values in the time grid. Choose Hours/Quantity to show time in hours and quantities instead of monetary values where relevant.
-
Show billing - Check the Show billing box to view billing-based budget figures in the time grid. When checked, the values in the time grid. Clear Show billing to view the cost-based budget.
-
Weeks | Months | Quarters - Choose the granularity for the time grid to show a detailed breakdown of your budget per week, month or quarter.
-
Settings icon
 - Click the icon to show a menu with additional options. You can download the project budget grid data as a CSV, HTML, or PDF file, enable column resize, or reset columns to their default width.
 -
Click the Expand All icon
 or Collapse All icon
  to expand or collapse all nodes in the project budget. Click the Expand Work Breakdown Structure icon
  to expand all phase and task nodes but not the category and subcategory nodes.
 -
Filter - Enter the name of a cost category to show only matching cost items in the project budget grid.
Sorting Options
You can sort the project budget data by column using the sort icons in the summary grid and time grid column headers.
This feature supports ascending and descending sort orders and multi-level sorting up to three levels. The arrows in the column header indicate the sort order and sorting levels:
-
Sorting levels are color-coded:
-
White color arrow - Primary level
-
Yellow color arrow - Secondary level
-
Green color arrow- Tertiary level
-
-
The colored arrow indicates the sort order for each sorting level:
-
Arrow pointing up - Ascending sort order
-
Arrow pointing down - Descending sort order
-
Click a column header to select that column as your primary sort field. Click the same column header again to change the sort order. If you click a different column header, this column becomes your primary sorting level, the previous primary level becomes the new secondary level and the previous secondary becomes the new tertiary level.
To reset the sort order to the default one, click the sort icon ![]() in the toolbar.
in the toolbar.