Enabling Access to SuiteProjects Pro From Within NetSuite
The SuiteProjects Pro Within NetSuite (SuiteProjects Pro NetSuite Single Sign-On Integration) feature can be used to integrate NetSuite with SuiteProjects Pro seamlessly through outbound single sign-on. You can give users of both NetSuite and SuiteProjects Pro access to SuiteProjects Pro directly from the NetSuite user interface without them having to sign in to SuiteProjects Pro.
For an overview of the feature, see SuiteProjects Pro Within NetSuite.
The steps in this help topic describe how to enable and set up the upgraded version of the SuiteProjects Pro Within NetSuite feature, which uses NetSuite as OIDC Provider as outbound single sign-on method instead of SuiteSignOn. For more information about NetSuite as OIDC Provider, see NetSuite as OIDC Provider (External link to NetSuite SuiteAnswer | Answer ID: 98241).
Until the SuiteProjects Pro 2023.2 release, SuiteProjects Pro Within NetSuite relied on the NetSuite Outbound Single Sign-On (SuiteSignOn) feature as outbound single sign-on method. NetSuite plans to end support for SuiteSignOn with the NetSuite 2025.1 for production accounts. The functionality relying on SuiteSignOn may stop working at any time after its end-of-support date.
Upgrade before the NetSuite 2025.1 release to ensure service continuity. For upgrade instructions, see Upgrading NetSuite Integration Features to Remove the Dependency on SuiteSignOn.
You should test all integration configuration changes on sandbox NetSuite and SuiteProjects Pro accounts before implementing them in your production accounts.
To enable access to SuiteProjects Pro from within NetSuite:
-
In NetSuite, enable the OAuth 2.0 and NetSuite as OIDC feature. See Enable the NetSuite as OIDC Provider Feature (External link to NetSuite SuiteAnswers | Answer ID: 98270).
-
Install or update the following bundles. See Installing a Bundle (external link to NetSuite SuiteAnswers | Answer ID: 10223).
-
SuiteProjects Pro SRP Integration (Bundle ID: 369637) to version 4.0 or later.
This bundle version:
-
Adds fields to the
SuiteProjects Pro: Integration Settingscustom record type. Some of the fields are required to enable the NetSuite <> SuiteProjects Pro integration to use NetSuite as OIDC Provider for outbound single sign-on. -
Adds the following permission to the
SuiteProjects Pro Integration Administratorrole:-
OIDC Provider Setup (Full)
-
OAuth 2.0 Authorized Applications Management (Full)
-
Log in using OAuth 2.0 Access Tokens (Full)
-
Certificate management (Full)
-
-
-
SuiteProjects Pro Single Sign-on (Bundle ID: 369619) to version 7.0 or later.
This bundle version:
-
Updates SuiteScript 2 versions of Suitelet scripts to enable access to SuiteProjects Pro modules in the PSA center tab using NetSuite as OIDC Provider.
-
Updates the
SuiteProjects Pro: Home module 2.0Portlet script to enable access to the SuiteProjects Pro dashboard as a custom portlet on the NetSuite dashboard using NetSuite as OIDC Provider. -
Adds the script
SuiteProjects Pro: Load Subtabto enable access to the SuiteProjects Pro record as a subtab on the matching record in NetSuite for selected NetSuite record types using NetSuite as OIDC Provider. -
Switches to using SuiteScript 2 versions of all scripts in the bundle automatically.
Important:Update SuiteProjects Pro SRP Integration bundle (Bundle ID 369637) to Version 4.0 or later before you update SuiteProjects Pro Single Sign-on (Bundle ID 369619) to this version. SuiteProjects Pro SRP Integration bundle (Bundle ID 369637) 4.0 updates the
SuiteProjects Pro: Integration Settingscustom record type with settings required for using the NetSuite as OIDC Provider for the SuiteProjects Pro within NetSuite feature.Both bundles include SuiteScript 2 and SuiteScript 1.0 versions of all scripts.
-
After you install or update the SuiteProjects Pro SRP Integration (Bundle ID: 369637) bundle from a previous version, SuiteScript 1.0 version of scripts are deployed by default, unless you switched to SuiteScript 2 versions before the update. You can switch to the SuiteScript 2 versions, or continue to use the updated SuiteScript 1.0 versions. See Switching to SuiteScript 2 Versions of Integration Bundle Scripts.
-
SuiteScript 1.0 versions of scripts in the SuiteProjects Pro Single Sign-on (Bundle ID: 369619) bundle support only the SuiteSignOn method. SuiteProjects Pro will end support for SuiteScript 1.0 versions of scripts in the SuiteProjects Pro Single Sign-on (Bundle ID: 369619) bundle some time after the NetSuite 2025.1 release, when support for the SuiteSignOn feature ends (date to be confirmed).
-
-
-
If you are using your own custom role for the SuiteProjects Pro integration instead of the 'SuiteProjects Pro Integration Administrator' role created by the SuiteProjects Pro SRP Integration (Bundle ID 369637) bundle, make sure that this custom role includes the following permissions and permission levels in the Setup secondary subtab. For more information, see Creating a Custom Role for the Integration in NetSuite.
-
OIDC Provider Setup (Full)
-
OAuth 2.0 Authorized Applications Management (Full)
-
Log in using OAuth 2.0 Access Tokens (Full)
-
-
Create a custom integration record for the SuiteProjects Pro Within NetSuite feature and set it up for the NetSuite <> SuiteProjects Pro integration to use NetSuite as OIDC Provider for outbound single sign-on. See Create Integration Records for Applications that Use NetSuite as OIDC Provider for Outbound Single Sign-on (External link to NetSuite SuiteAnswers | Answer ID: 98323).
-
Use the following settings under the OAuth 2.0 section of the integration record:
-
Authorization code grant - Check the box. This is required for the NetSuite as OIDC Provider integration to work.
-
Redirect URI - Enter one of the following URIs, depending on the type of SuiteProjects Pro account type you are setting up for the integration:
-
Production account -
https://auth.openair.com/oidc/callback/internal_netsuite_<netsuite_account_id> -
Sandbox account -
https://auth.sandbox.openair.com/oidc/callback/internal_netsuite_<netsuite_account_id>
where
<netsuite_account_id>is your NetSuite Account IDImportant:Review the following guidelines:
-
You should use separate integration records for the SuiteProjects Pro Within NetSuite feature and the main integration features.
-
All alphabetical characters in
<netsuite_account_id>must be lowercase. If your NetSuite Account ID includes uppercase alphabetical characters, replace them with the lowercase equivalent. If your NetSuite Account ID includes any dashes (-), replace them with underscores (_). When setting up the integration between SuiteProjects Pro and NetSuite sandbox accounts, the NetSuite sandbox account ID typically includes the charactersSBand should be replaced with the lowercase equivalentsb. For example, if your NetSuite Account ID is345678_SB2, the Redirect URI ishttps://auth.sandbox.openair.com/oidc/callback/internal_netsuite_345678_sb2. -
Leave the Redirect URI unchanged when updating service URLs in your integrations to use the rebranded
netsuitesuiteprojectspro.comdomain name. Replacing the Redirect URI with the new domain name equivalent would cause the SuiteProjects Pro Within NetSuite feature to stop working.
Note:OpenAir is now SuiteProjects Pro. As of February 15, 2025, service URLs with the
netsuitesuiteprojectspro.comdomain name replace URLs with theopenair.comdomain name for all accounts.For your production account, the sign-in page URL now is
https://auth.netsuitesuiteprojectspro.com/loginand the account-specific domain is<company-id>.app.netsuitesuiteprojectspro.com. After signing in, you are redirected to an account URL with thenetsuitesuiteprojectspro.comdomain name. Any links or bookmarks to sign-in page or account URLs with theopenair.comdomain name redirect to the SuiteProjects Pro sign-in page, even if you have an active SuiteProjects Pro session in a different browser tab.For backward compatibility, service URLs with the
openair.comdomain name continue to be supported until further notice for API requests, BI Connector requests, WSDL, and the NetSuite integration setup for real-time record import and single sign-on. -
-
OAuth2.0 consent policy - You should select
Never Askso that the integration is autoapproved by an administrator. With other settings, users need to authorize the integration before being able to view SuiteProjects Pro within the NetSuite UI.
-
-
Clear all boxes under the Token-based Authentication section and under the User Credentials section.
-
Copy the Consumer key / Client ID and Consumer secret / Client secret and store the information in a safe place. You will need to enter this information in the NetSuite Connector credentials form in SuiteProjects Pro for the NetSuite as OIDC Provider integration to work. See Enabling the SuiteProjects Pro Within NetSuite Feature in SuiteProjects Pro - Step 7.
Important:NetSuite sandbox creation or refresh impact on integration records
After you create or refresh a NetSuite sandbox account, systematically change any integration records for the NetSuite <> SuiteProjects Pro integration. Each NetSuite sandbox creation or refresh copies the integration records from your NetSuite production account to the newly created or refreshed NetSuite sandbox account. If you are using the SuiteProjects Pro Within NetSuite integration feature, your NetSuite sandbox account will let users view and change the information in your SuiteProjects Pro production account unless you change the custom integration record for the SuiteProjects Pro Within NetSuite feature.
For more information, see Using Integration Records in Sandbox Accounts (NetSuite SuiteAnswers Answer ID 68771).
-
-
Give users access to the NetSuite as OIDC Provider integration for the SuiteProjects Pro Within NetSuite feature.
-
Go to Setup > Integration > NetSuite as OIDC Provider Setup.
-
Click the name of the custom integration record you created for the SuiteProjects Pro Within NetSuite feature (Step 4).
The Application Settings: <
Integration Name> window appears. -
On the Entities tab and Employees subtab, check the Select All box to give all users access to the NetSuite as OIDC Provider integration for the SuiteProjects Pro Within NetSuite feature.
-
On the Roles tab, check the Select All box to give all roles access to the NetSuite as OIDC Provider integration for the SuiteProjects Pro Within NetSuite feature.
-
Click Save.
-
-
Add the Custom Record Entries permission with View permission level or higher to the relevant roles in NetSuite. Without this permission, users cannot access SuiteProjects Pro from the NetSuite UI.
For each role, do the following:
-
Go to Setup > Users/Roles > User Management > Manage Roles > [Select a role].
-
Click Edit.
-
In the Permissions subtab, click the Lists secondary subtab.
-
Add a row and select
Custom Record Entriesunder Permission, andViewunder Level. -
Click Add.
-
Click Save.
Note:If you are using standard roles, you will need to customize standard roles, and assign these new custom roles to users to let these users access SuiteProjects Pro from the NetSuite UI. For more information about managing roles in NetSuite, see Customizing or Creating NetSuite Roles (External link to NetSuite SuiteAnswers | Answer ID: 9896).
-
-
Update the preferences for the NetSuite <> SuiteProjects Pro integration.
-
Go to Customization > Lists, Records and Fields > Record Types.
-
Click List for the custom record type
SuiteProjects Pro: Integration Settings.The
SuiteProjects Pro: Integration Settingsrecord list appears and should include one record only (SuiteProjects Pro Integration Settings Record). -
Click Edit for the record
SuiteProjects Pro Integration Settings Record. -
Enter the following information:
-
SuiteProjects Pro URL - The URL for your SuiteProjects Pro account. The URL must include the account-specific domain name for your SuiteProjects Pro account. For more information about your account-specific domain name, see Your Account URLs.
-
SuiteProjects Pro Database ID - Your unique SuiteProjects Pro account number. See Finding the Database ID for Your Account.
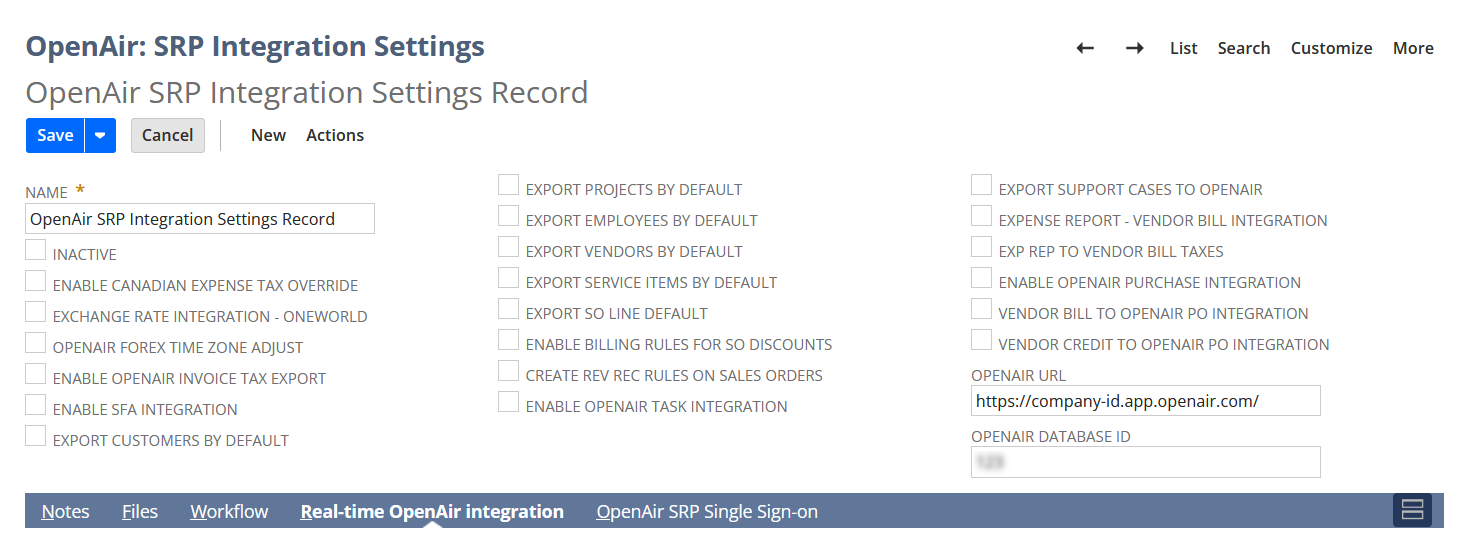
-
-
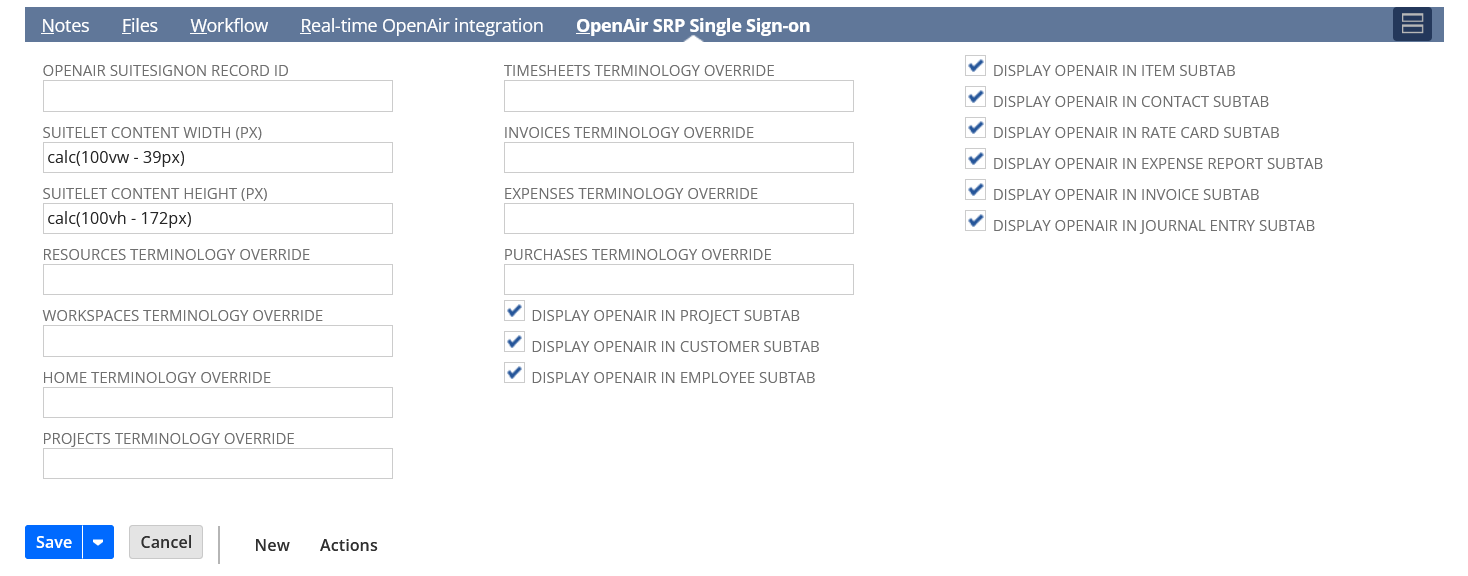
In the SuiteProjects Pro Single Sign-on subtab.
-
(Optional) Change the default Suitelet content height (px) and Suitelet content width (px). These values determine the size of the iFrame showing the SuiteProjects Pro content in NetSuite for all users.
Tip:To use the whole of the available page space, set Suitelet content height (px) and Suitelet content width (px) in function of the browser window height and width. For example, if you have enabled the Redwood experience in NetSuite (Home > Settings > Set Preferences > Appearance), set Suitelet content height (px) to
calc(100vh - 236px)and Suitelet content width (px) tocalc(100vw - 50px). -
(Optional) Enter any terminology overrides for SuiteProjects Pro module names to match any custom terminology defined in SuiteProjects Pro.
-
Check any of the boxes listed in the following table to show the SuiteProjects Pro record as a subtab on the matching record in NetSuite. The table lists the integrations settings for each of the supported NetSuite record types and the corresponding types of SuiteProjects Pro record shown in the SuiteProjects Pro subtab.
Setting
NetSuite record type
SuiteProjects Pro record type
Display SuiteProjects Pro in Contact subtab
Contact
Contact
Display SuiteProjects Pro in Customer subtab
Customer
Customer
Display SuiteProjects Pro in Employee subtab
Employee
Employee
Display SuiteProjects Pro in Expense report subtab
Expense Report
Expense Report
Display SuiteProjects Pro in Invoice subtab
Invoice
Invoice
Display SuiteProjects Pro in Journal entry subtab
Journal Entry
Revenue Recognition Transaction
Display SuiteProjects Pro in Rate card subtab
SuiteProjects Pro: Project Rate Card(custom record type)Rate Card
Display SuiteProjects Pro in Project subtab
Project
Project
Display SuiteProjects Pro in Item subtab
Service Item
Category
Note:Some of the configuration-based customization available when using the SuiteSignOn feature is not currently available when using the NetSuite as OIDC Provider feature. You would need to deploy custom SuiteScripts to achieve the following functionality.
-
Ability to show the Timesheets module on Support Case records as a SuiteProjects Pro: Timesheets subtab in NetSuite when using the Tasks (Support Cases) Import Workflow.
-
Ability to set up custom SuiteProjects Pro subtabs on NetSuite records and displaying SuiteProjects Pro content other than those listed in the table above. With the SuiteSignOn feature, you could set up custom subtabs and use connection points to associate each custom subtab with a NetSuite record type and use integration variables to specify the SuiteProjects Pro content shown in this subtab.
If you want to deploy custom SuiteScripts to add support for custom subtabs and portlets, you can do the following:
-
Use the SuiteScripts included in the bundle as examples. Go to Customization > Scripting > Scripts, filter the list by bundle ID 369619 and review the script records.
-
Use the list of available integration parameters as reference. See Custom Subtabs and Portlets Integration Parameters.
-
-
-
Click Save.
-
-
Control which SuiteProjects Pro modules are available from the PSA tab center submenu. See Managing SuiteProjects Pro Modules Available from the PSA Center Tab.
-
Control who can access SuiteProjects Pro from within NetSuite. See Controlling Access to the PSA Center Tab.
-
Enable the SuiteProjects Pro Within NetSuite (SuiteProjects Pro NetSuite Single Sign-On Integration) feature in SuiteProjects Pro and allow NetSuite outbound single sign-on access for users. See Enabling the SuiteProjects Pro Within NetSuite Feature in SuiteProjects Pro.
Important:You must import user records from NetSuite into SuiteProjects Pro in addition to explicitly allowing them to use the SuiteProjects Pro Within NetSuite (SuiteProjects Pro NetSuite Single Sign-On Integration) feature on the user demographic form in SuiteProjects Pro.
Custom Subtabs and Portlets Integration Parameters
If you want to deploy custom SuiteScripts to add support for custom subtabs and portlets, you can do the following:
-
Use the SuiteScripts included in the bundle as examples. Go to Customization > Scripting > Scripts, filter the list by bundle ID 369619 and review the script records.
-
Use the following list of available integration parameters as reference.
|
Integration Parameters |
Value |
Required by |
|---|---|---|
|
|
To show the default view for a SuiteProjects Pro module in portlets or subtabs, set this variable to the two-letter code for that module.
To show the item or transaction record on a subtab for a NetSuite record, set this variable to the two-letter code for the relevant module.
|
Custom subtabs and portlets |
|
Additional integration parametes for specific record types:
|
Integration parameter for specific record type. Set the value for the record ID in NetSuite:
Note:
A contact can be associated with more than one company in NetSuite. To refer to a specific contact, set both the company and contact IDs using the integration variables - |
Custom subtabs |