Installing, Updating and Uninstalling Exchange Integration Manager
Support for Exchange Integration Manager (EIM) ended on January 13, 2026. You may no longer receive any updates, issue fixes or customer support for EIM after this date.
Effective October 1, 2026, you may not be able to use EIM to integrate SuiteProjects Pro with Exchange Online. The EIM installer and all access to SuiteProjects Pro from EIM may be removed in future.
If your organization uses the EIM desktop application to integrate SuiteProjects Pro with Exchange Online or Exchange Server, switch to an alternative solution before October 1, 2026. For more information, see End of Support for Exchange Integration Manager.
SuiteProjects Pro Professional Services provide you with a link to download the Exchange Integration Manager installer EXE file as part of the initial setup. You use this link to download and install the latest version of Exchange Integration Manager.
Before you install Exchange Integration Manager, review the system requirements and technical considerations - see System Requirements and Technical Considerations.
You must disable access to SuiteProjects Pro Outlook Connector for all users on your SuiteProjects Pro account before you start using Exchange Integration Manager. These two add-on services cannot run simultaneously for the same SuiteProjects Pro account.
You should review SuiteProjects Pro Release Notes regularly and update Exchange Integration Manager to the latest available version to take advantage of new features, product enhancements and defect fixes.
You can uninstall Exchange Integration Manager at any time. For more information, see Uninstalling Exchange Integration Manager.
Installing or Updating Exchange Integration Manager
Use the following steps to install or update Exchange Integration Manager. You do not need to uninstall the current version to update Exchange Integration Manager to the latest version.
OpenAir Exchange Integration Manager became Exchange Integration Manager with version 5.3.1, released on February 19, 2025, following the rebranding of NetSuite OpenAir to NetSuite SuiteProjects Pro. If you are updating Exchange Integration Manager from version 5.3.0 or earlier, the latest version changes the default location of the installation folder as well as some of the application file locations and names.
After you update Exchange Integration Manager from version 5.3.0 or earlier to the latest version and you verify that the latest version works as expected, you should delete any remaining files from the following locations:
-
OpenAir Exchange Integration Manager Program files (typically,
C:\Program Files (x86)\OpenAir\ExchangeManager\unless you chose a different location during installation). -
OpenAir Exchange Integration Manager shortcut on your desktop.
-
OpenAir Exchange Integration Manager shortcut in Windows start menu
C:\ProgramData\Microsoft\Windows\Start Menu\Programs\OpenAir Exchange Manager\.
The following steps are given for Windows 11.
To install or update Exchange Integration Manager:
-
Download the installer EXE file using the link provided by SuiteProjects Pro Professional Services.
-
Run the Exchange Integration Manager installer file. You must have administrator rights for the computer on which you are installing Exchange Integration Manager and run the installer as and administrator.
If Microsoft .NET framework 4.7.2 is not installed on your computer, a popup window appears prompting you to download and install an update supplied by Microsoft.
-
Click Yes.
Note:Microsoft .NET framework 4.7.2 is required to run Exchange Integration Manager 5.0 or later version. If you click No, the installer will close and Exchange Integration Manager will not install.
-
A new window or tab opens in your default browser and the following message displays. Click Run.
 Important:
You should exit all applications that are using the .NET framework before you install this update. You may have to restart your computer after installing the Microsoft .NET framework 4.7.2 update.
-
After the installation Microsoft .NET framework 4.7.2 completes, restart your computer if required and run the Exchange Integration Manager installer file again.
The Exchange Integration Manager installation wizard appears.
-
-
Click Next.
-
Read and accept the License Agreement then click Next.
-
Choose the location to install Exchange Integration Manager then click Next.
The default location is
C:\Program Files (x86)\SuiteProjectsPro\ExchangeManager. -
Review your installation settings, then click Install.
The wizard shows the installation progress. After the installation completes, the wizard shows information about the application (the content of the
README.TXTfile). -
Review the content of
README.TXT, then click Next. -
Check the View readme.txt box if you want to open
README.TXTautomatically in you default text editor after you exit the installation wizard. -
Check the Start tray monitor now box if you want to launch Exchange Integration Tray Monitor automatically and make it available in the Taskbar System Tray after you exit the installation wizard.

-
Click Finish.
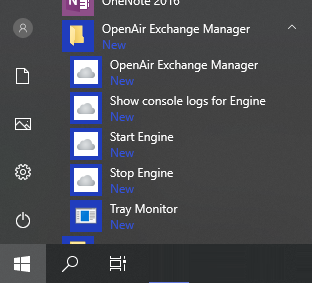
Five shortcuts are available from the Windows Start menu under the SuiteProjects Pro Exchange Manager program folder:
-
SuiteProjects Pro Exchange Manager - Use this shortcut to launch SuiteProjects Pro Exchange Integration Setup and set up the integration. See Setting Up the SuiteProjects Pro Exchange Integration
-
Start Engine, Stop Engine, and Show console logs for Engine - Use these shortcuts to run, stop the integration and show logs for the integration, respectively. See Running the SuiteProjects Pro <> Exchange Integration.
-
Tray Monitor - Use this shortcut to launch Exchange Integration Tray Monitor and make it available in the Taskbar System Tray.
-
Uninstalling Exchange Integration Manager
You can uninstall Exchange Integration Manager at any time if you no longer plan to use Exchange Integration Manager or if you want to install it on a different computer.
OpenAir Exchange Integration Manager became Exchange Integration Manager with version 5.3.1, released on February 19, 2025, following the rebranding of NetSuite OpenAir to NetSuite SuiteProjects Pro. If Exchange Integration Manager version 5.3.0 or earlier is installed on your computer, the app name and location paths should read OpenAir instead of SuiteProjectsPro in the following steps.
The following steps are given for Windows 11.
To uninstall Exchange Integration Manager:
-
On your computer, go to the Windows Start menu > Settings > Apps > Installed Apps.
A list of programs installed on your computer appears.
-
Find SuiteProjects Pro Exchange Manager in the list.
-
Select More and Uninstall.
A confirmation dialog appears.
-
Click Uninstall.
The SuiteProjects Pro Exchange Manager Uninstall dialog appears.
-
Click Yes.
A confirmation dialog appears.
-
Click OK.
-
Uninstalling Exchange Integration Manager does not delete the configuration settings and SuiteProjects Pro user <> Exchange user mailbox mapping information.
To remove all settings completely, go to the program files location (typically,
C:\Program Files (x86)\SuiteProjectsPro\ExchangeManagerunless you chose a different location during installation) and delete the folder manually.