Personal Settings
Click Personal settings in the User Menu to configure your personal settings and optional features. Personal settings override any corresponding settings set by your company.
The options which you see in your Personal settings depend on your user role and your company's settings. Some options may not be available to you.
General
Allow support log in
When checked, SuiteProjects Pro Support representatives can sign in to a copy of your company's SuiteProjects Pro account in a test environment for investigation, if required. This setting is used for troubleshooting and support.
This setting is used for troubleshooting and support. It does not authorize SuiteProjects Pro Support to access your production, sandbox or release preview account.
Optional Features
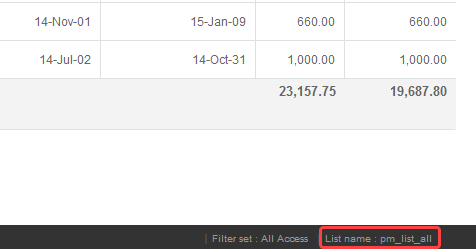
Show the list name in page footer
Displays the list name in the bottom right corner of the screen when viewing a list.
Show currently active module name in the browser title bar
Check this box to show the name of the active module in the browser bar or tab. When this box is cleared, the browser bar or tab shows 'SuiteProjects Pro' only.
Show company name in the browser title bar
Check this box to show the company name in the browser bar or tab. When this box is cleared, the browser bar or tab shows 'SuiteProjects Pro' only. The company name which appears is the same as the Company ID used on the SuiteProjects Pro sign-in page.
Disable shortcut
Check to hide the navigation shortcuts functionality. For more information about navigation shortcuts, see Shortcuts.
This preference is available only if the Navigation Shortcuts feature is enabled for your company's SuiteProjects Pro account.
Time Settings
Time zone
Controls which time zone is used in SuiteProjects Pro.
Use 24-hour clock for time entry and display
When selected, SuiteProjects Pro uses 24-hour time (for example, 1:00 p.m. will appear as 13:00) for displaying time in SuiteProjects Pro. When cleared, SuiteProjects Pro will display time using the 12-hour clock with 'AM/PM' notation.
Regional Settings
Language
Controls the language used in SuiteProjects Pro.
Date format
Controls how dates are displayed in SuiteProjects Pro.
Number format
Controls how numbers and decimals are displayed throughout SuiteProjects Pro, including whether a decimal is represented by a period (.) or comma (,), and which delimiter SuiteProjects Pro uses for digit grouping in numbers larger than 999.
List separator for CSV output files
Controls which list separator (for example, a comma (,) or a semi-colon (;)) is used to separate values in CSV output files.
Print Settings
Page size for generating PDF pages
Controls whether SuiteProjects Pro generates PDF files in Letter or A4 size.
Dashboard Options
Display zero items on dashboard
Displays the entire array of reminder and status options available in the dashboard tab, even if there are no active items requiring attention. This option is disabled by default because the full set of items may be long if you have access to all service modules.
Timesheet Options
Sort timesheets alphabetically by customer and project
This setting re-sorts time entries by customer and project after saving. As time entries are input into the timesheet and submitted, the customer:project entries are sorted alphabetically within each day instead of the order they are entered.
Enable start and end time entry on timesheets
When checked, you can enter a start time and end time for each time entry. It can be used to record start and end time for a portion of the day when you worked on a particular project or task. You can also add a start time column and end time column to the time entry list.
Display all weeks for timesheets containing multiple weeks
When this feature is enabled, you can work with all the weeks of a multi-week timesheet in the same grid view.

Enable Approvals on Mobile apps for Timesheets
Check this box to be able to view timesheets awaiting your approval in SuiteProjects Pro Mobile.
Expenses Options
Default to expense worksheet when viewing an expense report
Automatically displays the expense worksheet when you create an expense report instead of displaying the receipts form.
Enable Approvals on Mobile apps for Expenses
Check this box to be able to view expense reports awaiting your approval in SuiteProjects Pro Mobile.
Invoices Options
Disable confirmation when using the 'Generate New Revenue container' section on invoices.
When this box is cleared, an 'Automatically Generate New Revenue container' confirmation dialog appears when you click 'Generate Revenue Container' or 'Submit and Generate Revenue Container' in an invoice. Check this box to disable this confirmation dialog. You can also set this preference in the confirmation dialog when it appears.
Projects Options
Preferred landing page for projects
Controls which page opens when a project is opened, for example, the Task List or Properties.
Scripting Studio Options
Enable script deployment editor content assist auto activation
When selected, when you type the text 'NSOA' into the Scripting Studio editor, and then type a period (.), the Auto List window appears with all available options which can follow 'NSOA.' in a script.

The user has the following options:
-
Click on the required item with the mouse and double-click to select it.
-
Use the up and down arrow keys to select the required item and then hit 'Enter' to select it.
-
Type the first character of the required item (e.g. 'm') to highlight it and then hit 'Enter' to select it. If more than one item starts with the same letter then the first item will be highlighted and the list of options filtered.
-
Hit 'Esc' to close the Auto List window and type as normal. Clicking outside of the editor window will also close the Auto List window.
Tip:Press <Ctrl> + <Space> to show the Auto List window at any point in the editor.
After selecting an item from the Auto List window, the value will be copied into the editor and typing continues after the inserted value.
Script deployment editor content assist auto activation delay (milliseconds)
Controls the amount of time it takes for the Content Assist Auto Activation to appear after 'NSOA.' has been typed in the Scripting Studio editor. The default value is 500 milliseconds, and the field accepts any positive number. This setting has no effect if 'Enable script deployment editor content assist auto activation' is not selected.
Entering a value below 200 milliseconds may cause performance issues.
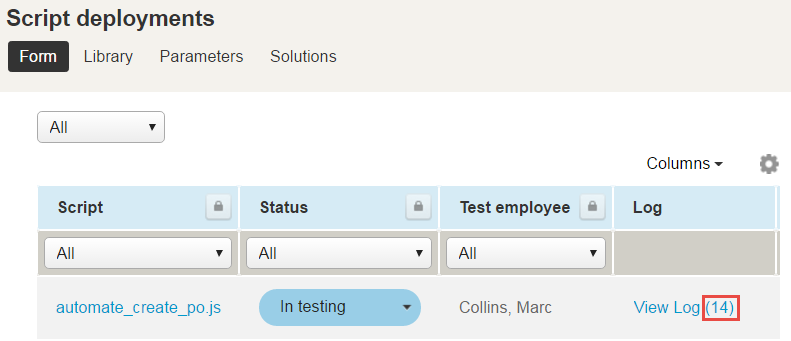
Display the number of logs at 'View logs' link
Displays the number of included logs next the View Log link in Script Deployments lists.
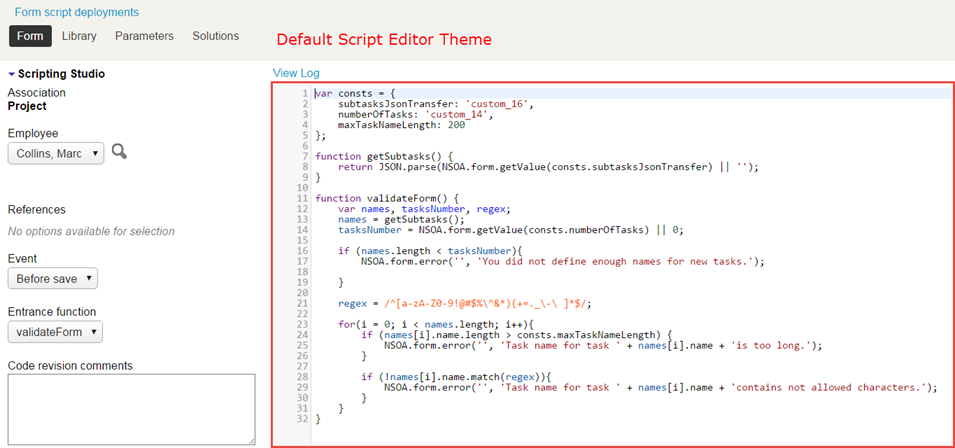
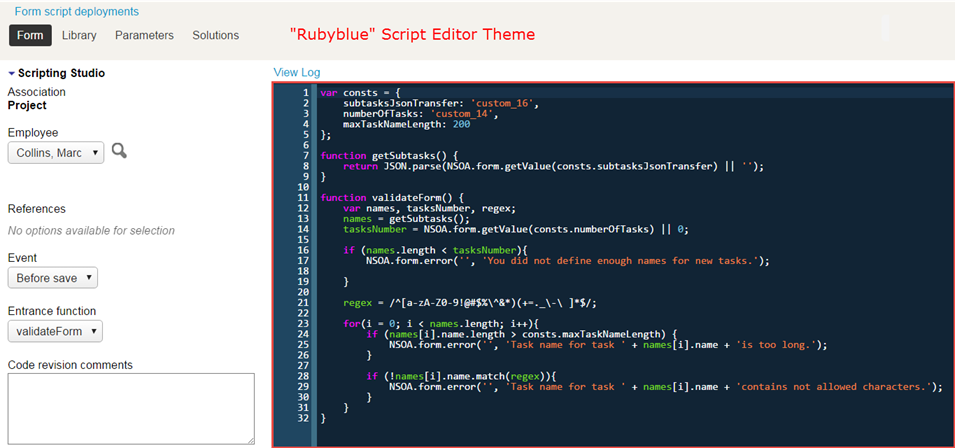
Editor Theme
Customize the script editor with a variety of selectable color schemes.
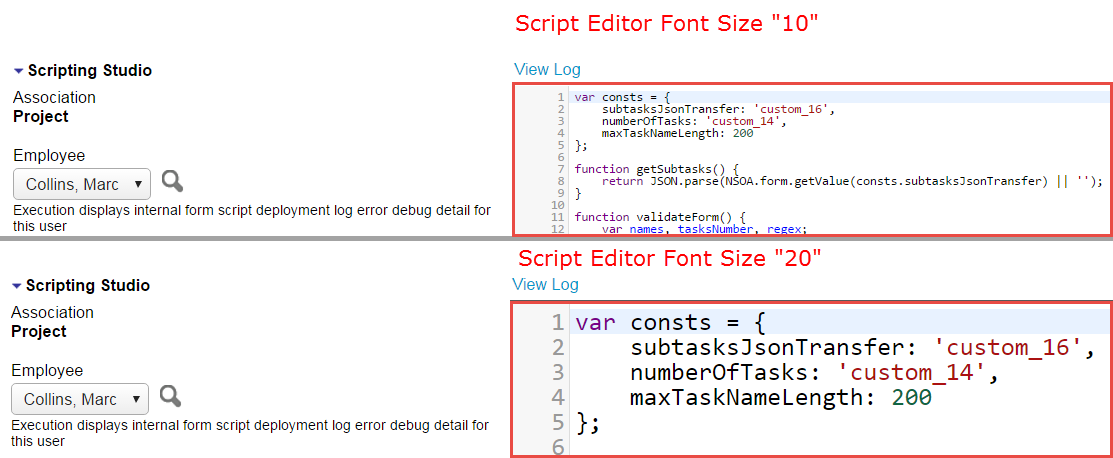
Font Size
Customize the size of the text font in the script editor. This setting only affects the text within the Script Editor. All other text uses the 'Text size' User Menu setting.
Indent Unit
Select whether an indent unit is a space or a tab in the script editor.
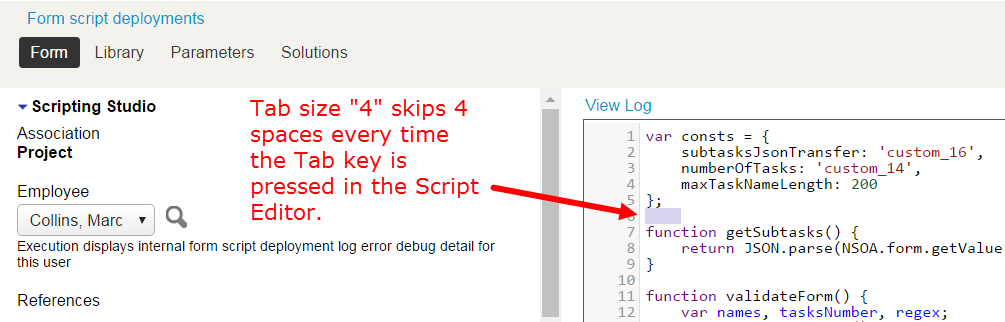
Tab Size
Set how many spaces a tab equals in the script editor.
Display Options
The following 'Number of entries to display...' settings control how many entries appear in dropdowns throughout SuiteProjects Pro.
For example, if creating a charge, you may only want to see those customers and projects which you use most frequently when selecting from the drop-down list in the "New charge" dialog. If you limit the number of customer:project combinations which are displayed in these drop-downs, the drop-downs will display only those customers and projects which you have used most recently, up to the limit specified in these settings.
For the best performance, do not use the 'All' option for the 'Number of entries' settings.
-
Number of entries to display in customer:project drop-downs
-
Number of entries to display in customer/prospect:deal drop-downs
-
Number of entries to display in customer drop-downs
-
Number of entries to display in expense item drop-downs
-
Number of entries to display in product drop-downs
-
Number of entries to display in employee drop-downs
-
Number of entries to display in vendor drop-downs
-
Number of entries to display in approver drop-downs
-
Number of entries to display in cost center drop-downs
-
Number of entries to display in workspace drop-downs
-
Number of entries to display in job code drop-downs
Each of the following setting is available only if you have access to more than 30 objects of the relevant type:
-
Number of entries to display in cost center drop-downs
-
Number of entries to display in workspace drop-downs
-
Number of entries to display in job code drop-downs
The Number of entries to display in employee drop-downs setting also impacts the number of resources available when you:
-
Add a booking and select a resource in the project center. See Adding Resource Bookings to Your Project Plan.
-
Search and select a resource to reassign bookings in the resource center. See Reassign Bookings.
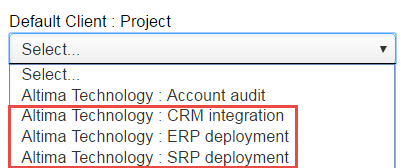
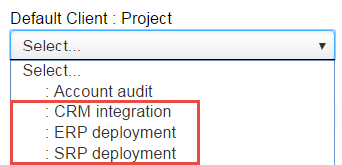
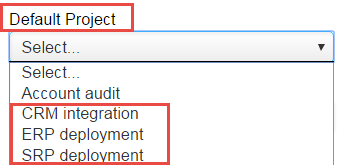
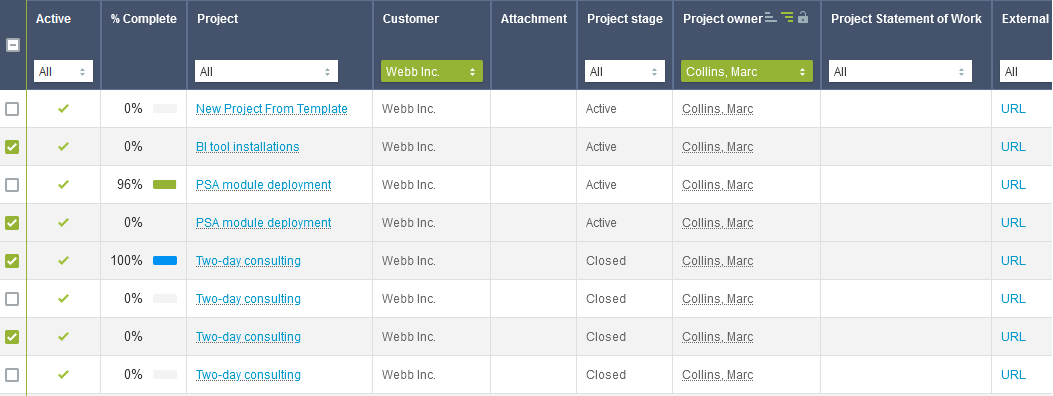
Shorten customer:project drop-downs
Controls how text appears within 'customer:project' drop-downs. It contains three settings:
-
Do not shorten - The drop-down displays both customer and project
-
Remove customer name, leave project name indented - The drop-down displays a colon (:) and project name, but does not include the customer name
-
Remove customer name and indentation of project name - Only displays the project name, and renames the 'customer:project' drop-down to 'project'.
Sort the customer:project drop-downs by project
Sorts customer:project drop-downs alphabetically by project instead of by customer. The display order in the drop-down will still be 'customer:project'.

Sort the task drop-downs by name and omit the ID number prefix
Displays tasks in task drop-downs in alphabetical order and removes the tasks' number prefixes.

Maximum number of rows to display per day in 'My Calendar' monthly view
Controls how many rows are displayed for each day in the monthly 'My Calendar' view.
Show 'My Calendar' tab in all modules.
Displays the 'My Calendar' tab in all modules. When disabled, the 'My Calendar' tab only appears in 'Home'.
If you have been assigned the 'View calendars for other users' role permission, you will always see the 'Calendars' instead of the 'My Calendar' link in 'Home'. When 'Show 'My Calendar' tab in all modules.' is enabled in this situation, you will see 'Calendars' in 'Home' and 'My Calendar' in all other modules.
Show Account tab in 'My Account' module only.
This setting is no longer supported, and has no effect.
Remember the size of popup windows
This setting is no longer supported, and has no effect.
Disable automatic resizing of popup windows
This setting is no longer supported, and has no effect.
Add the save or run button to the top right of forms
This setting is no longer supported, and has no effect.
Add 'Save & create another' button to the top right of forms
This setting is no longer supported, and has no effect.
Add approval buttons to the bottom of reports
Adds an Approve/Reject Items to the bottom of Timesheet reports, as well as at the top of the report.
Anchor column titles at top of page when scrolling vertically
Column titles in lists and reports will remain in view when scrolling down the page.
Preserve row highlighting when checking boxes to select a row in list views
This setting has no effect on redesigned lists.
For lists using the previous UI layout, when you check a box to select a row in the list, the row is highlighted in yellow to indicate the selected rows. Several rows can be highlighted at once to show all selections made before saving the list.
Enable anchoring of left columns when scrolling horizontally
This setting has no effect on redesigned list views.
Row titles in lists and reports will remain in view when scrolling across the page.
Hovering over menu links reveals menu options
This setting has no effect on redesigned list views.
Drop-down menus open automatically when pointing to a menu. When this setting is disabled, click the menu link to open the drop-down.
Open popups as panels instead of windows.
Opens popups as in-form panels, instead of new windows. In-form popups have all of the advantages of conventional popup windows, but appear as part of the form. This allows you to block popup windows in your browser and still use all SuiteProjects Pro functionality.
Using popup panels is best practice. You should check this box.
Use in-line multiple selection interface
Uses an in-line picker selection interface in various modules.

Disable QuickView
Disables QuickViews, preventing them from appearing when pointing to fields which open them.
QuickView popup activation delay
Sets the time it takes for a QuickView window to open when pointing to a field which opens a QuickView. The options available in the drop-down are time in seconds. This setting has no effect if 'Disable QuickView' is selected.
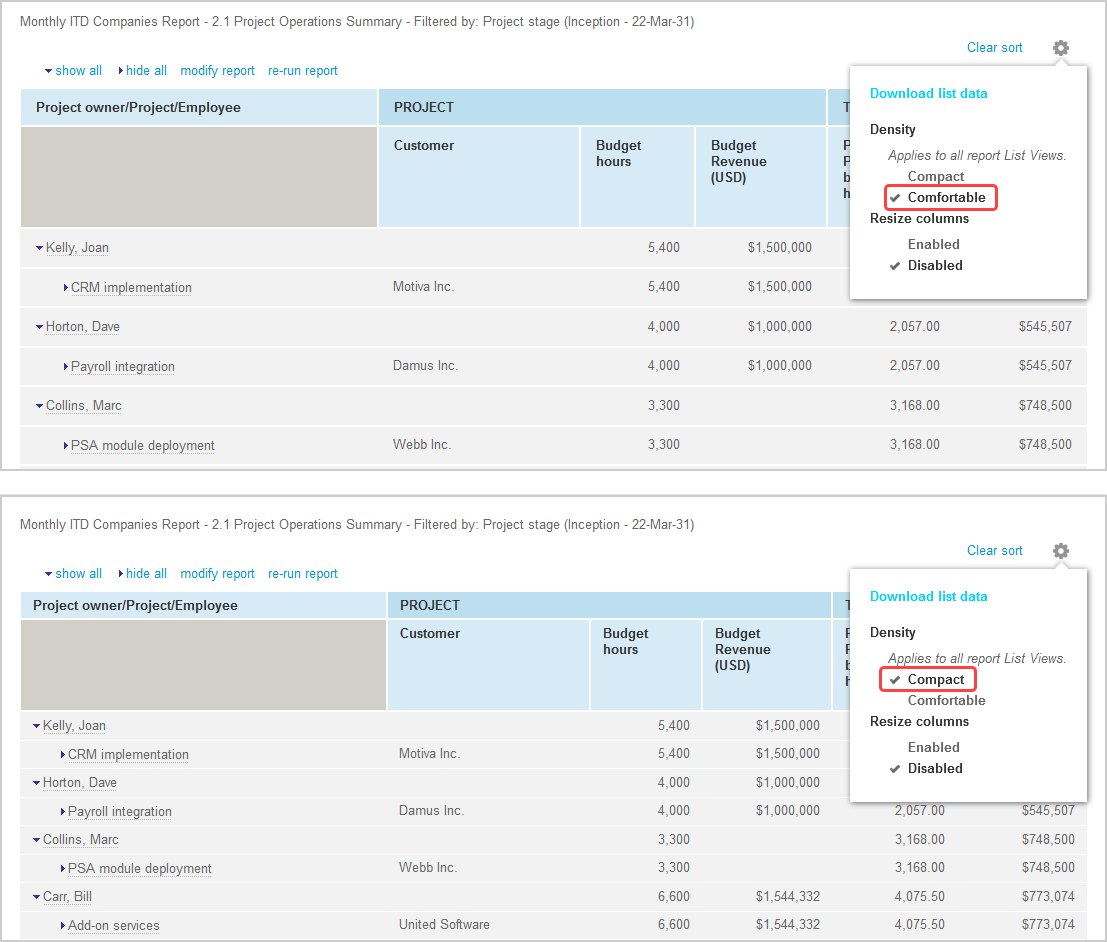
Data Density
Control the data density displayed in list views with selected mode
This setting has no effect on redesigned list views.
Controls the appearance of data in lists. In 'Compact' mode, the margins are trimmed and headings wrap to make more data visible. 'Comfortable' mode provides more spacing.
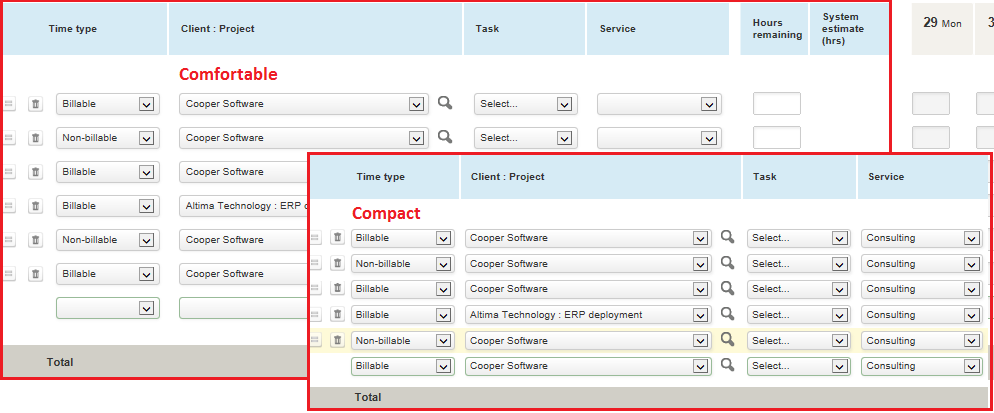
Control the data density displayed in timesheet grid with selected mode
Controls the appearance of data in timesheet grids. In 'Compact' mode, the margins are trimmed and headings wrapped to make more data visible. 'Comfortable' mode provides more spacing.
Starting Application
Controls which module is opened by default when signing in to SuiteProjects Pro.
Email Settings
Bcc me on all emails
Includes you as a Bcc recipient (i.e. other recipients do not see you on the recipient list) on all emails you send from SuiteProjects Pro, including from actions which trigger emails. For example, if you approve a timesheet, and the person who submitted the timesheet receives an automatic email notification of the approval, you will also receive a copy of the notification.