Advanced Booking Worksheet
The Advanced Booking Worksheet is a more streamlined, detailed, and visually-appealing worksheet for creating and managing bookings. The worksheet has the following features:
-
Bookings appear under each resource.
-
Bookings that cannot be edited because of their approval status show in light grey color.
-
See resource utilization at a glance. Green, yellow, and red color-coded cells highlight underutilized, fully utilized, and overutilized resources.
-
Point to a resource's name to open a resource QuickView.
-
Display and edit booking information in daily, weekly, monthly, or many other more time periods.
-
Drill down to greater levels of detail.
-
Filter the worksheet by department, job code, project, or skills.
-
Column and row totals showing total number of hours or percentages across all visible resources and all visible time periods.
-
Resource utilization subtotals showing total number of hours or percentages for both the filtered set and all resource bookings when filters are applied.
If the ability to edit bookings of a certain type is restricted by role, users whose role is selected in Administration > Application Settings > Resources > Booking Types > [Booking Type] > Restrict booking editing by role will not be able to see bookings of that type in the Advanced Booking Worksheet.
To enable the Advanced Booking Worksheet:
-
Contact SuiteProjects Pro Support and request the 'Advanced Booking Worksheet' feature.
-
Confirm that you have enabled the Resource Planner feature. If not, contact SuiteProjects Pro Support and request the 'Resource Planner' feature.
-
Assign role permissions for non-administrators who will use the Advanced Booking Worksheet. The necessary role permissions are:
-
View and modify bookings
-
View resource planner
You can also use the following role permissions to control which booking period options are available to users in the advanced booking worksheet settings. At least one of the booking period options must be available for the role.
-
Disable Daily option in Advanced Booking Worksheet
-
Disable Weekly option in Advanced Booking Worksheet
-
Disable Biweekly option in Advanced Booking Worksheet
-
Disable Semimonthly option in Advanced Booking Worksheet
-
Disable Monthly option in Advanced Booking Worksheet
-
Disable Quarterly option in Advanced Booking Worksheet
-
Disable Annually option in Advanced Booking Worksheet
-
To open the Advanced Booking Worksheet:
-
After the required features are enabled, go to Resources > Bookings > Worksheet.
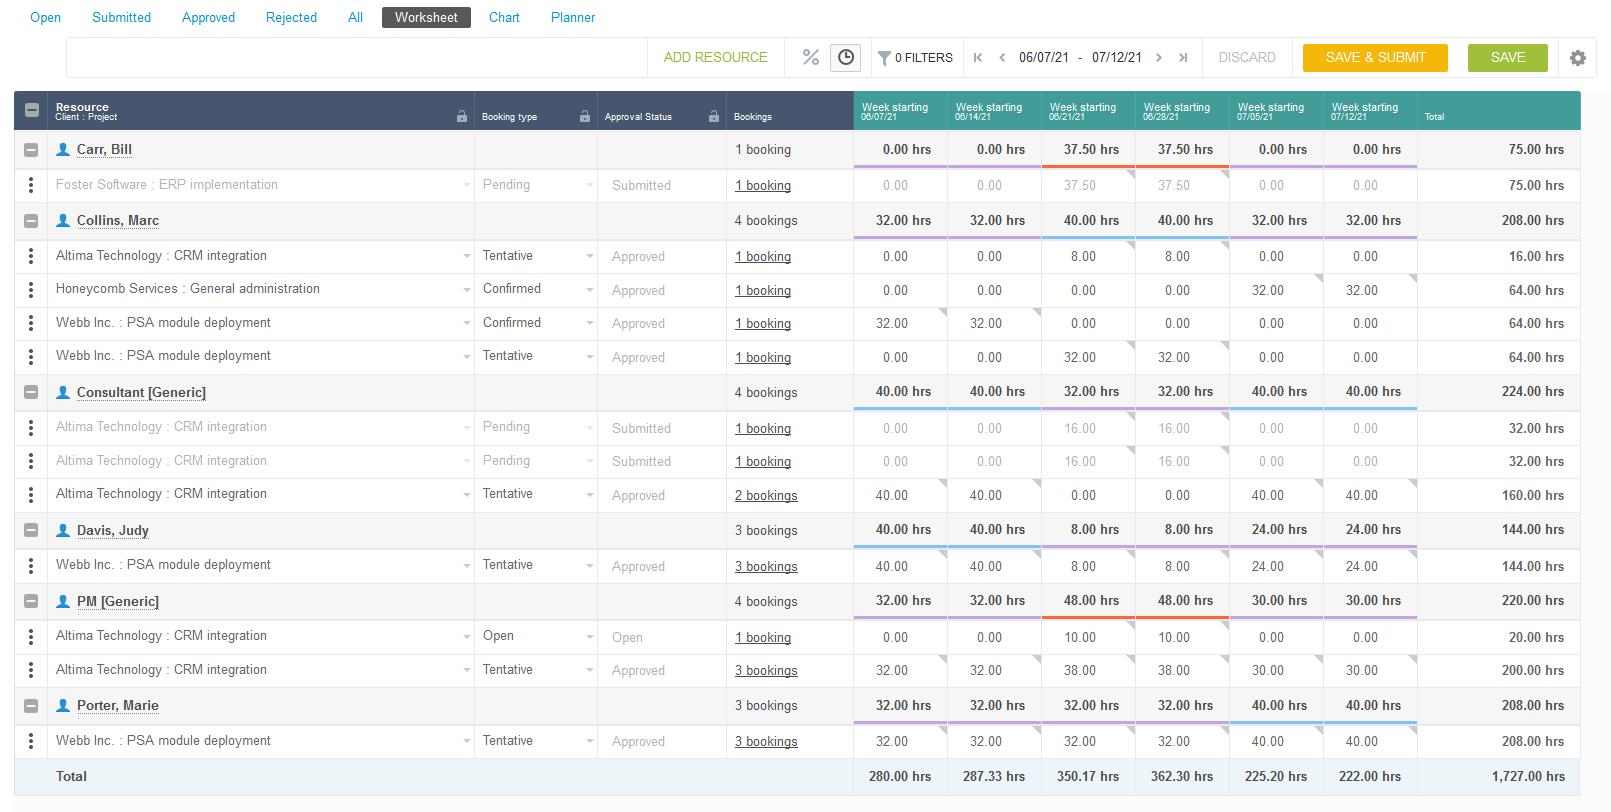
Using the Advanced Booking Worksheet
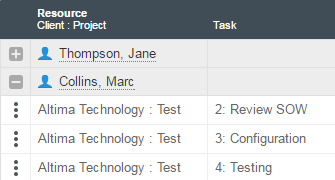
The Booking Worksheet appears as a table with each resource listed in the leftmost column. Point to a resource name to open a QuickView window with various booking-related actions you can perform. You can expand each resource's worksheet rows by clicking the  icon next to their name, or collapse the details by clicking the
  icon.
icon.
The Bookings column shows the total number of visible bookings for a resource or per each worksheet row. To see which bookings are visible in the row and their status, click the worksheet row's bookings cell link.
Each period cell contains a colored bar along the top to indicate the resource's utilization. The colored utilization bars use the same color scheme as in the Booking Planner.
Utilization over 100% is always colored red.

In addition, period cells may contain a triangular icon with more information.
-
Green icon - Cell includes a note
-
Yellow icon - Cell includes multiple consolidated bookings
-
Grey icon - There is one booking with no note
Consolidated booking by day totals in each cell are hard-coded. Multiple bookings may be totaled in each period cell, and bookings may be reconfigured or created when any change is submitted.
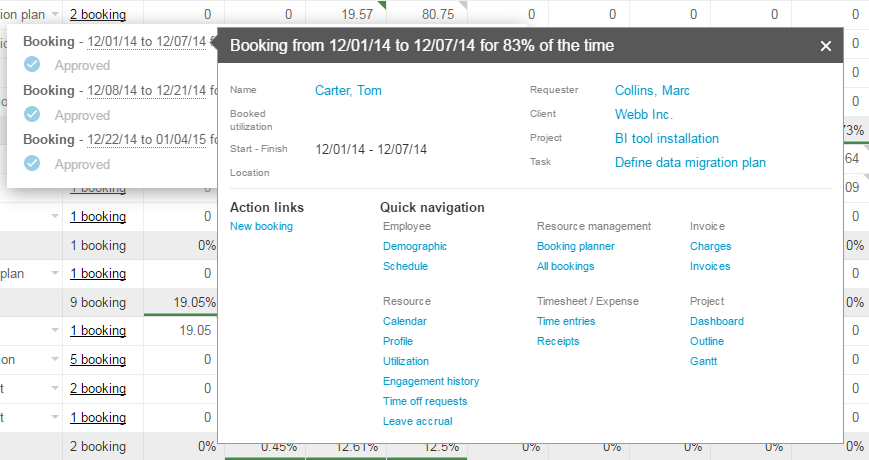
Click the triangular icon to open a dialog with details about the bookings within that period cell. Point to the booking name in the dialog to open a booking QuickView. Click the edit icon in the dialog to add or edit a note for the booking.
Select a date range to display using the date selector at the top of the worksheet. You can also choose to display and enter bookings per time period as a percentage of utilization or number of hours.

Resource utilization subtotals are visible for both the filtered set and all resource bookings when filters are applied in the advanced booking worksheet.
When filters are applied, resource utilization subtotals show two values :
-
The value for all resource bookings, without any filters applied, shown in bold.
-
The value for the current set of resource bookings, with the filters applied, if different from the value for all resource bookings, is shown immediately underneath the subtotal for all resource bookings .
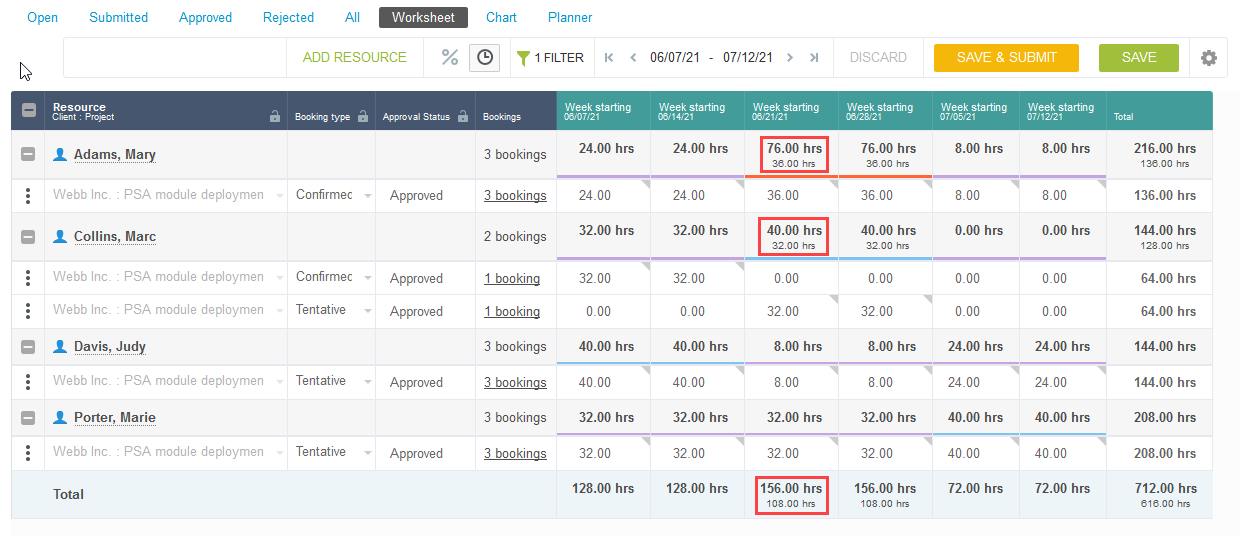
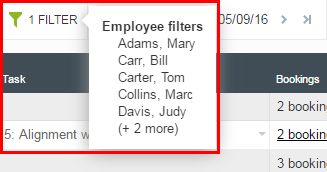
A filter indicator at the top of the worksheet shows how many filters you currently have applied. Click the indicator to open a tooltip with a description of the filters.
The worksheet respects switch settings which prevent you from editing period cells which contain submitted bookings.
You can edit settings for the Booking Worksheet by clicking the  icon.
icon.
The  icon contains a menu from which you can add, copy, or delete worksheet rows.

To add worksheet rows in the Advanced Booking Worksheet:
-
Click the
icon and click 'Add row'.Note:If a resource was booked but did not appear on the worksheet because an applied filter hid them, their name will appear in the "Add resource" list. When you add these resources, define the worksheet row, save the changes, and refresh the page, they will be immediately filtered out from the worksheet.
To copy worksheet rows in the Advanced Booking Worksheet:
-
Click the
icon next to the row to copy, and click 'Copy'.
To delete worksheet rows in the Advanced Booking Worksheet:
-
Click the
icon next to the row to copy, and click 'Delete'.
To edit worksheet rows in the Advanced Booking Worksheet:
-
Click the cells which you would like to change and enter or select your changes. For example, click a booking type cell to change the booking type from "Open" to "Pending" for that booking.
-
To change a worksheet row's Customer and Project, click a customer and project in the Customer : Project column to open a drop-down list where you can select different projects. Use the "Find more…" option to perform a search for a specific customer or project.
To customize columns in the Advanced Booking Worksheet:
-
Go to the Advanced Booking Worksheet and click the
 icon in the upper right corner of the worksheet. The 'Booking worksheet settings' appears.
 -
Select which columns you want to display in the 'All' tab of the 'Columns' section.
-
Clear selected columns in the 'All' or 'Selected' tab of the 'Columns' section by clicking the name of the column.
Note:Columns which are currently being displayed in the Advanced Booking Worksheet are highlighted green and appear with a check mark next to them.
-
Reorder columns by clicking and dragging the 'Drag to reorder item'
 icon at the right side of the column name
 -
Click Save.
The booking details column can be hidden by clearing the 'Show booking details column' option under 'Options' in the 'Booking worksheet settings' page.
To Lock Toolbars, Headers, and Columns in the Advanced Booking Worksheet:
-
Go to Projects > Bookings > Worksheet.
-
Click the Column Lock icon at the top of the column which you want to keep in view when scrolling.
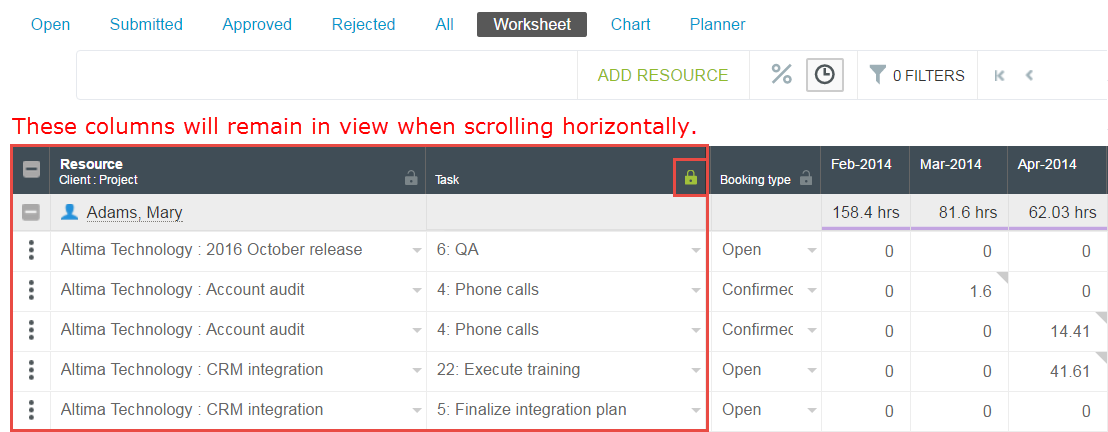 Note:
Note:All columns on the left side of the locked column will remain in view when scrolling horizontally.
To save changes and submit visible Open bookings to the next approval workflow status in the Advanced Booking Worksheet:
-
Click Save to save all modified data on the page, or click Save and submit to submit all visible Open bookings to the next booking approval workflow status.
Important:In some cases, the data displayed on the Advanced Booking Worksheet after you save your changes may not show the changes made. This is because SuiteProjects Pro is still recalculating the resource utilization for the resources shown on the worksheet. A warning message appears after you save your changes to confirm that your changes have been saved but that the recalculation is still in progress. To view the updated booking worksheet data, allow some time before reloading the page. To view the last on-screen 'booking(s) saved' or 'recalculation pending' notification, click the Tips button then click Review last notification.
To set filters in Advanced Booking Worksheet:
-
Go to Resources > Bookings > Worksheet and click the Settings icon
 .
. -
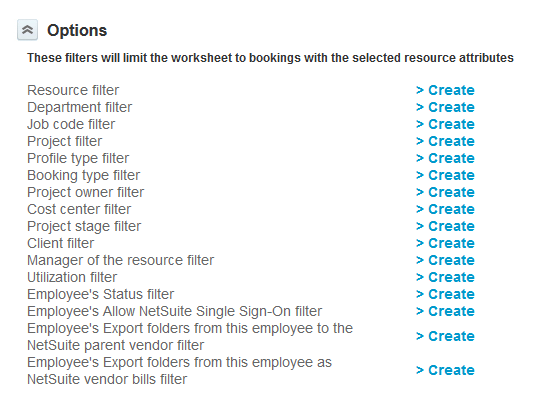
Click the > Create link next to the filters you want to set.
-
Select the filter settings and click OK.
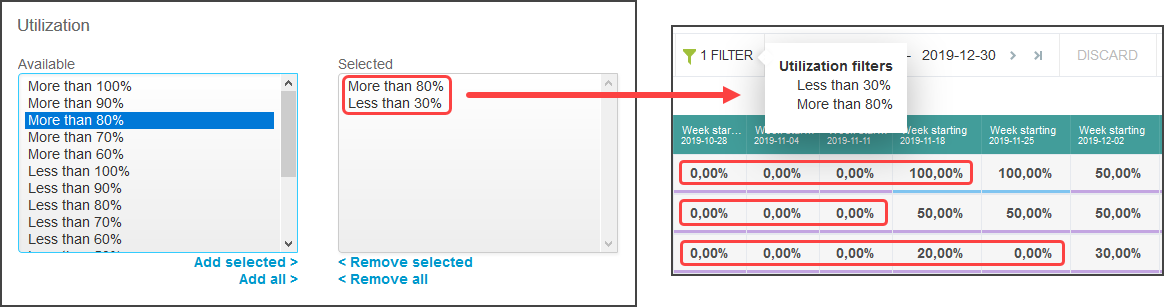
The utilization filter lets you filter for resources with more or less than a certain utilization percentage in any of the visible booking periods. For example, select More than 80% and Less than 30% to list only those resources with more than 80% utilization or less than 30% utilization in any of the booking periods in the selected date range.
Advanced Booking Worksheet Optional Functionality and Settings
The following optional features modify the default Advanced Booking Worksheet functionality:
-
Detailed booking groups - When this feature is enabled, bookings grouped under a single row have the same values for all fields except the note, start date and end date fields, even if the columns are not shown on the worksheet. By default bookings grouped under the same worksheet row have the same values in the visible worksheet columns but may have different values in the hidden columns. See Detailed Booking Groupings in the Advanced Booking Worksheet.
-
Restrict utilization calculation to resources impacted by changes - With this feature enabled, the utilization is recalculated only for the resources that are impacted by these changes instead of all shown resources. Labels indicate when the calculation is in progress, completed or if changes have been made by another user. See Restrict Utilization Recalculation to Resources Impacted by the Changes on the Advanced Booking Worksheet.
-
Require a job code - When this feature is enabled, a job code is required when you create or modify a booking using the Advanced Booking Worksheet. See 'Require Job Code' Setting for Dynamic and Advanced Booking Worksheets.
-
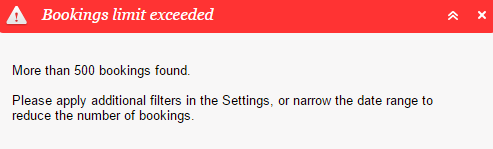
Maximum number of bookings displayed - By default, the Advanced Booking Worksheet displays up to 500 bookings. A warning appears when you reach the maximum number of bookings that can be displayed. You can use the date range and filters to reduce the number of bookings.
To change the maximum number of bookings displayed, contact SuiteProjects Pro Support and request to increase the maximum number of bookings to
1,000,1,500, or2,000. Note there is always a trade off between the number of items shown and the page performance.