Getting Started
With an account in OpenAir and exchange access enabled for OpenAir OffLine, you can download OpenAir OffLine and use it to capture information that you can later transfer to your OpenAir account. When you send information to and receive information from your OpenAir account, you connect to the Internet to do so. But, you can enter information in OpenAir OffLine without an Internet connection. Later, click Update to connect to your OpenAir account and transfer that information from OpenAir OffLine to your OpenAir account.
-
If you create or modify charges, expenses, or time in OpenAir OffLine, when you Update, the records are sent to OpenAir and display in your OpenAir account.
-
If you create or modify charges, expenses, or time in OpenAir, when you Update, the records are downloaded to OpenAir OffLine if you have configured Advanced Update Settings to do so. See Data Transfer and Advanced Update Settings.
-
If you add time to a timesheet in OpenAir and save it, once you Update, it appears in OpenAir OffLine. When you add time to the same timesheet in OpenAir OffLine and Update, that new time transfers to the same record in your OpenAir account. All time entries are saved in both accounts.
-
If you add receipts to an expense report in OpenAir and save it, once you Update, it appears in OpenAir OffLine. When you add more receipts to the same expense report in OpenAir OffLine and Update, those receipts transfer to the same expense report in your OpenAir account. All receipts are saved in both accounts.
-
If you have saved reports in OpenAir, you can select them and then run them when you Update. A PDF of the report results is sent to the email address specified in your OpenAir account.
System Requirements
OpenAir OffLine can be installed on the following platforms:
-
Microsoft ® Windows 7, 8 and 10.
Microsoft Windows Server 2008/2008 R2 and Microsoft Windows 7 will no longer be supported from January 14, 2020. Microsoft will be ending support for both products on that date. To continue working with any OpenAir desktop application, you will need to:
-
For Microsoft Windows Server 2008 and 2008 R2, upgrade to MS Windows Server 2012, 2012 R2, 2016 or 2019.
-
For Microsoft Windows 7, upgrade to MS Windows 8, 8.1 or 10.
Download OpenAir OffLine
To use OpenAir OffLine, you need to download it. Sign in to your OpenAir account and go to Administration > Integration: Add-on Services. See Installing OpenAir OffLine. In addition, you need exchange access to OpenAir OffLine. This is handled by your system administrator. Refer to Administration.
Preferences
Launch OpenAir OffLine and go to Edit > Preferences. There are several general preferences you can edit. They include:
-
Show splash screen at startup - If you select the check box, the splash screen appears at startup.
-
Hide when minimized - If you select the check box, you hide OffLine's task bar in Windows when you minimize it. However, OffLine keeps running and if you double-click on the icon or use a Keyboard shortcut as described below, it restores to where it was when it was minimized.
-
Escape key minimizes - If you select the check box, the Esc key minimizes OpenAir OffLine.
-
Keyboard shortcut - Enter a keyboard shortcut. The default is Ctrl + Shift + O. This restores OffLine to your screen when it has been minimized or hidden from view.
Select a check box to enable a preference. Clear a check box to disable a preference. Click OK. You can make changes to these preferences at any time.
Customize the Interface
There are a number of ways that you can customize the interface. Use the following techniques to help you maximize your efficiency when you use OpenAir OffLine. You can:
-
Change the size of any window or form. Drag your cursor to the edge of the window and the cursor changes. Click and drag the edge of the window to resize the window.
-
Move column width to display additional information. Put your cursor on a column boundary and the cursor changes. Click and drag the boundary to the new location. The form automatically adjusts to the new width.
-
Change the display order within a column list by double-clicking a column heading. The date column changes from the most recent date to least recent date and alpha columns re-order alphabetically.
-
Display a drop-down list of options. Click on Select... and a drop-down list from your OpenAir account appears.
-
Double-click on a row with an entry. The Edit window for that entry appears. Make changes and click OK. This is especially helpful when you want to stop a timer.
-
Double-click on a row that is blank. The New window appears. Create the new record and click OK.
-
Change the date and time used in OpenAir OffLine. Exit OpenAir OffLine and go to Start > Settings > Control Panel > Date and Time. Change the date and time on your personal computer and click OK. Restart OpenAir OffLine. It uses your computer's system settings for its date and time and you must restart it to allow it to capture the new date and time.
Note:Changes you make to window size, column width, and display order remain until you change them at a later time.
Data Transfer
To transfer data between OpenAir OffLine and your OpenAir account, you initially download your OpenAir account information and then subsequently update it. Each time you connect with OpenAir, it sends and receives information between the two systems. You can update information at any time and there are Advanced Update Settings that help handle situations where a conflict exists between records or when you want to limit the transactions downloaded. See Advanced Update Settings.
Downloading Account Information
Before you use OpenAir OffLine, you must download your account information from OpenAir. After the initial download, you can exchange information with your OpenAir account using the Update function. In OpenAir OffLine, go to File > Update.
To download OpenAir Account information:
-
Click the OpenAir OffLine icon.
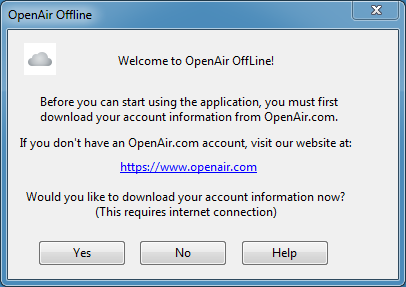
The following message prompts you to download account information.

-
Click Yes.
The Update window appears.

-
Type your sign-in information. If you select the check box to Remember Password, you do not have to enter it again.
-
Server — Enter the URL for your OpenAir Account. The server URL includes the domain name for your OpenAir account
<account-domain>. For more information about your account-specific domain name, see Your OpenAir Account URLs. -
Click OK.
Note:By clicking the OK button, you understand and agree that the use of Oracle's application is subject to the Oracle.com Terms of Use. Additional details regarding Oracle’s collection and use of your personal information, including information about access, retention, rectification, deletion, security, cross-border transfers and other topics, is available in the Oracle Privacy Policy.
The Update Progress dialog box appears and shows download information. Click Close or select the check box to close the dialog box when update is complete.
Note:Once you enter your account information in the Update window, it appears automatically when you select Update in the future. However, you can change it at any time to reflect changes in your OpenAir account sign-in.
Update
After you have downloaded your OpenAir account information to OpenAir OffLine, use the Update function to send information to your OpenAir account and receive information from your OpenAir account. You may do this as often as you wish.
To Update account information:
-
Click the
 button located on the bottom left of the OffLine user interface or go to File > Update.
The Update window appears.
-
Click OK.
The Update Progress dialog box appears and shows information as it is exchanged.
Advanced Update Settings
Use the Advanced Update Settings functions for two major purposes.
-
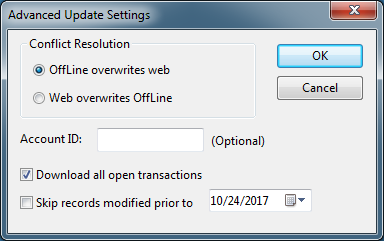
Specify how to handle conflicts between OpenAir records and OpenAir OffLine records. The application uses the Advanced Update Settings when your OpenAir account and your OpenAir OffLine account contain different records or different versions of the same record. This can occur when you modify a record in both applications prior to doing an Update. It can also occur when you delete a record in one location, and modify the same record in the other location.
-
Download all open transactions to OpenAir OffLine or limit downloaded records to those modified prior to a specific date. After you download transactions to OpenAir OffLine, you can edit them. When you are ready, upload them back to your OpenAir account.
You can change the Advanced Update Settings at any time to meet your needs. OpenAir OffLine follows the configuration settings you set.
To configure Advanced Update Settings:
-
File > Update Click the button or go to File > Update. Click the Advanced button.

-
Select a Conflict Resolution setting.
Note:In conflict resolution settings, Web refers to your OpenAir account. When you select OffLine overwrites Web, you designate OffLine as the primary account. In the event there is a discrepancy between an OffLine record and an OpenAir Web record, this setting allows OpenAir OffLine to make both records identical using the OffLine account as the basis. If you select Web overwrites OffLine, the same action occurs except that the record is copied from your OpenAir account to OpenAir OffLine.
-
Type the Account ID if your Account ID number displayed on the Add-On Services tab when you downloaded OpenAir OffLine. If the Account ID did not display in your Web account n the Add-On Services tab, leave this text box blank.
-
Select the option for downloading transactions: download all open transactions or skip records modified prior to a specific date you select. Default date is the date you downloaded OpenAir OffLine.
-
Click OK.
Administration
Administrators provide users with permission to exchange information between the OpenAir OffLine and an OpenAir account. Once you enable Exchange Access to OpenAir OffLine for a user and that user downloads and installs the OpenAir OffLine program, the user can communicate with their OpenAir account to transfer information using OpenAir OffLine. Remember, as with the user's OpenAir account, the features that are available depend on a variety of factors such as the OpenAir account configuration, module access, and role settings and filter sets.
To provide users with exchange access:
-
Navigate to Administration > Users > Users and select a User ID.
-
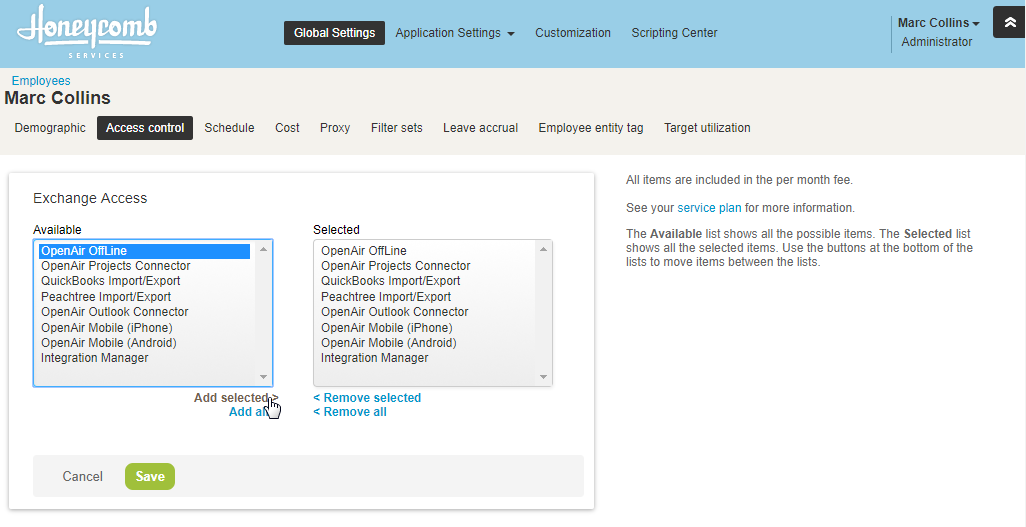
Click Access control > Exchange Access.
The Exchange Access form appears.

-
Select OpenAir OffLine, click Add selected items and Save.
Exchange Access is enabled for the user account.