Mapping Account Group Codes Through CSV
Upon creation of a Mexican subsidiary in NetSuite OneWorld, the system automatically adds default Mexican accounts to your chart of accounts. You must map the accounts assigned to your Mexico subsidiary to SAT-defined group codes.
To map only a few accounts, you can use the Mexico Field Mapping feature. To map the whole Chart of Accounts, you should use CSV import.
Accounts without an assigned SAT group code are not included in the Mexico Electronic Accounting Files.
To map group codes for Mexico accounts using CSV import:
-
For the list of valid SAT group code values, download the CSV template for Mexico SAT Account Grouping from the NetSuite File Cabinet. You can also use the template as a reference when you format the CSV file for import.
-
Go to Documents > Files > File Cabinet.
-
On the file cabinet, go to SuiteBundles > Bundle 373485 > Mexico Localization CSV Templates.
-
Click MX Account Group Codes template.csv to download the file.
-
Open the template and check that special characters (Latin script) are shown correctly. If they are not showing properly, perform the following steps to set the proper character encoding for Latin script.
-
Open a new Excel file.
-
Go to Data.
-
Click on Get Data > From File > From Text/CSV.
-
Choose the MX Account Group Codes template.csv that you have downloaded from the system.
-
Under File Origin, select 65001: Unicode ( UTF-8).
-
Click Load.
-
Save the file.
-
-
-
Create a saved search of the subsidiary's accounts. You can export the results to a CSV file, which you can edit and use for Mexico Account Group Code CSV import.
-
Go to Lists > Search > Saved Searches > New.
-
Click Account.
-
On the Criteria subtab, set the filter for subsidiary and select your Mexico subsidiary.
-
On the Results subtab, set the results to only include the Internal ID and Name columns.
-
Click Preview.
-
On the results page, click the icon for Export - CSV.
-
Save the CSV file with account search results.
-
-
Open the CSV file of the account search from Step 2. For automatic field mapping during CSV import, edit the file so that the column headers match the columns in the CSV template (from Step 1).
-
Add three columns: one for Mapping Category, one for Mapping Record Type, and one for Mapping Value (A, B, and C).
-
Replace the column header for Internal ID with Mapping Key.
-
Leave the column Name as it is.

-
-
Using the same CSV file above, specify values for the Mapping Category, Mapping Record Type, and Mapping Value cells for each account. To make sure that you are entering the correct values, copy the SAT group code values listed in the template that you downloaded in Step 1, and paste the exact value in the Mapping Value column of the CSV file.
-
Mapping Category - Enter SAT Código Agrupador.
Important:Make sure that you enter the values for the Mapping Category column in the same language as your NetSuite account. This is required for a successful CSV import. If you are not using Español (Latinoamérica), you can find the corresponding translated values in the Category list of the Mexico Localization Field Mapping page.
-
Mapping Record Type - Enter account.
-
Mapping Value - Enter the group code value.
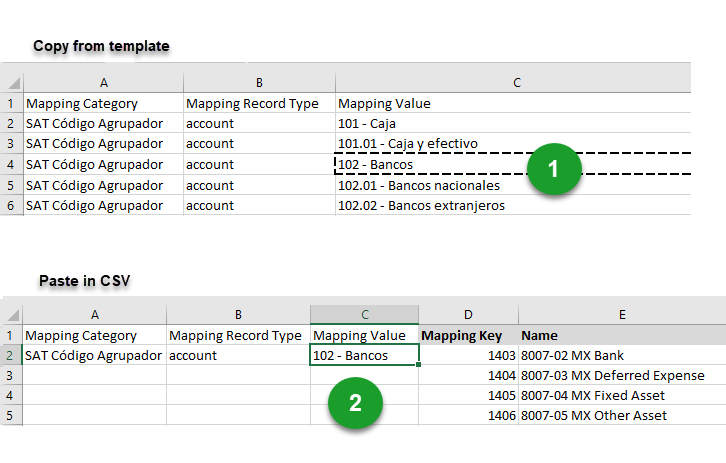
1
The SAT group codes are listed in the template that you downloaded in Step 1. Look for the appropriate group code in the Mapping Value column of the template and copy the value.
2
In the CSV file with account internal IDs, paste the exact value copied from the template in the appropriate cell in the Mapping Value column.
-
-
Save the CSV file with accounts and group code information.
-
Import the saved CSV file to NetSuite. Go to Setup > Import/Export > Import CSV Records. Select the following options for CSV import:
-
Import Type = Custom Records
-
Record Type = Mexico Mapping
-
Character Encoding = Unicode (UTF-8)
For more information about importing CSV files, see Importing CSV Files with the Import Assistant.
-
-
Important:
Do not miss the following step, or the record entries will not be successfully generated.
On the Import Options page, expand the Advance Options pane and check the Run Server SuiteScript and Trigger Workflows box.
-
Verify if the record submitted using CSV import is mapped correctly.
-
Go to Setup > Mexico Localization > Mexico Field Mapping.
-
Select SAT Account Grouping in the Category field.
-
In the Subsidiary field, select your Mexico subsidiary.
-
In the Account Type field, select an account type. Verify the accounts under each account type.
-
Important:
Do not miss the following step, or the record entries will not be successfully generated.
On the Import Options page, expand the Advance Options pane and check the Run Server SuiteScript and Trigger Workflows box.
-