Build a New Theme
The following tutorial describes how to begin building a new theme using the SuiteCommerce Base Theme as a starting point. If you have a custom theme that you want to use as the basis for a new theme, the steps in this tutorial still apply but some of the customization details will be different.
Before starting the following procedure, complete the list of tasks in Theme Tutorial Prerequisites.
To build a new theme:
-
From a command line, go to your top-level theme development directory . The top-level theme development directory is the directory where you set up the theme developer tools, for example: ThemeDevelopmentTools-20.2.1.
-
Create a Record of the New Theme in NetSuite.
Now you're ready to start customizing. The following steps describe how to make several small changes, which you can then build on to develop your own custom theme.
-
The first change to make is to Display a Large Banner Image on the Home Page.
-
Add the Exposed Variable to Skin Files so the editable color can be manipulated by site administrators.
-
Before testing out your custom theme, Update the Theme Version and Deploy.
-
Now you can build on the changes from the preceding steps to further customize your new theme. Set a new version in the manifest file for each set of changes you deploy and activate in case you want to return to a previous version.
Fetch the Active Theme
-
Run the following command to fetch the active theme.
Note:Remember that this command overwrites the files in your workspace so be sure you don't need any of the existing files.
gulp theme:fetchWhen the fetch is complete, your local workspace directory should look like this example:
                Workspace/
   SuiteCommerceBaseTheme/
      assets/
      Modules/
      Overrides/
      Skins
      manifest.json
Create a Record of the New Theme in NetSuite
When building a new theme, you need to create a record of it in NetSuite as described in the following steps.
-
Enter the following command from your top-level theme development directory:
gulp theme:deploy --create -
When prompted, enter information about your theme such as the name you want to give it. For detailed information about each prompt, see Deploy a Theme to NetSuite.
At this stage, you don't want to activate the theme or take any other action in NetSuite because your new theme is just a simple copy of the active theme.
-
Notice that in addition to creating a record of the theme in NetSuite, the gulp create command has updated the files in your local workspace directory to match the theme name you specified. For example, if you named your theme My Awesome Theme, your workspace directory looks like this:
                Workspace/
   My_Awesome_Theme/
      assets/
      Modules/
      Overrides/
      Skins
      manifest.json
Display a Large Banner Image on the Home Page
Follow these steps to display a banner image on the home page:
-
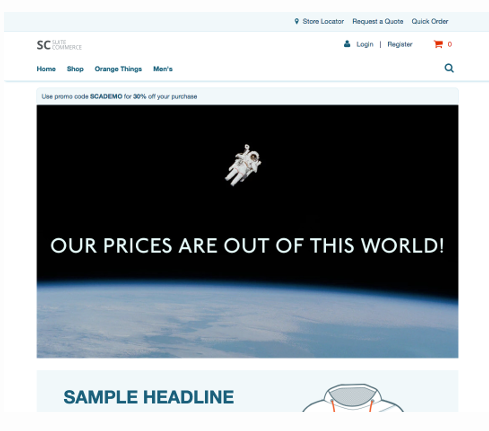
Prepare the image you want to use and save it as a .jpg with the following name:
prices.jpg.If you don't have an image, you can use a screen capture of the following image:

-
Add the
prices.jpgfile to your local workspace directory inassests/img. -
Edit the homepage template by opening
Modules/Home@sc-<release>/Templates/home.tpland adding the following HTML near the top of the file (for example, above the slider):<div class="home-banner-prices"> <img class="home-banner-prices-image" src="{{getThemeAssetsPath (resizeImage 'img/themepricesoutofthisworld.jpg' homeslider)}}"> </div> -
Save the changes to the home.tpl file and then run the following command:
gulp theme:localGulp adds the new image file to the manifest and starts up the server. You can open your local homepage in a browser to see the changes. For example, if you used the preceding prices.jpg file for your banner, you should see a homepage like this:
The image is working, but the homepage looks cluttered. The banner top message is too close to the image.
-
Add some styling to increase the space between the image and the banner top message. In your local workspace directory, open the
Modules/Home@sc-<release>/Sass/_home.scssfile and then add the following lines:.home-banner-prices { margin-top: $sc-margin-lv4; font-size: 0; } -
Save the changes to the _home.scss file. The local server is still running and so it recompiles the site's files when you save. When the recompile is complete, refresh the homepage to see the improvement.
Add a Glowing Color Around the Banner Image
Follow these steps to add the glowing color and to make the color customizable so site administrators can change the color.
-
To make the color customizable, you need to expose a variable for customization. In this case, you need to add the variable to the Sass file and then place a special comment next to it. The comment must contain a properly configured
editable()function to get picked up by the preprocessor. -
Following recommended best practices, add a new module for this customization. In your local Workspace/Modules directory, create the following folder and subfolder:
GlowyModule@1.0.0/ Sass/ -
In the Sass folder, create a file named _glowy.scss and add the following code to the file:
                $color-glowy: #3bfbfd; /* editable({
    "type": "color",
    "label": "Glowy Color",
    "description": "For when you want extra glowy stuff"
})*/

@keyframes glowy {
  0% {box-shadow: 0 0 -10px $color-glowy;}
  20% {box-shadow: 0 0 100px $color-glowy;}
  40% {box-shadow: 0 0 200px $color-glowy;}
  60% {box-shadow: 0 0 200px $color-glowy;}
  80% {box-shadow: 0 0 100px $color-glowy;}
  100% {box-shadow: 0 0 -10px $color-glowy;}
}

.glowy {
  animation: glowy 1500ms infinite;
}
The first part of the _glowy.scss file creates the variable for the editable color. The code sets an initial value for the color, includes an
editable()state function to establish the variable, and also sets some metadata (type, label, and description) for the variable. Note that while this seems like a regular comment, theeditable()state function within it makes the variable editable in Site Management Tools (SMT).The second part of the _glowy.scss file is the keyframes of the animation that make the color glow. And, finally, the
.glowyclass is what you will use to attach the animation to an element.
Import the New Sass File Into Application Entry Points
Import the new _glowy.scss Sass file into the entry point Sass files for the applications you want to use it in. Doing so ensure that the Sass you have written gets rolled into the master Sass file for the application.
-
In this example, you want to use the new Sass in the Shopping application. In your local workspace directory, open the Modules/Shopping@sc-<release>/shopping.scss file and add the following line:
@import "../Glowy@custom-1.0.0/Sass/glowy"; -
Modify the homepage Sass so your element uses the new styles. In the
Modules/Home@sc-<release>/Sass/ _home.scssfile, add the following lines:.home-banner-prices-image { @extend .glowy; width: 90%; margin: 5%; } -
Save these changes and then start and stop your local server. Because you added new files, they need to be tracked and require a restart. When the local server is back up, refresh your homepage to see the changes.
The banner image should now be outlined in a glowing color.
Add the Exposed Variable to Skin Files
Add your work from the previous steps to a skin so that the editable color can be manipulated by site administrators.
-
In your local workspace directory, open the
Skins/skin1.jsonfile, scroll to the end of the file, and, after the last entry, add the following line. Be sure you also add a comma to the end of the preceding line."$color-glowy": "red" -
Now open the
Skins/skin2.jsonfile, and add the following line to the end of the file. Again, be sure you also add a comma to the end of the preceding line."$color-glowy": "green"
By completing these steps, you have added new values, red and green, that can be activated if an administrator selects them in the Theme Customizer in SMT.
Update the Theme Version and Deploy
Before testing your custom theme, update the theme version in the manifest file to record your work so far, and then deploy the current version of your new custom theme.
-
In your working directory, open the manifest.json file at the top level of your custom theme directory.
-
Change the value of the version field to 1.0.1 and then save the file.
-
To deploy your theme, run the following command from the top-level theme development directory. Remember, the top-level theme development directory is the directory where you set up the theme developer tools, for example: ThemeDevelopmentTools-20.2.1.
gulp theme:deploy -
When prompted, enter information about the theme you are deploying. For detailed information about each prompt, see Deploy a Theme to NetSuite.
Activate the Current Version of Your Theme
Activate the current version of your new custom theme:
-
In NetSuite, go to Commerce > Extensions > Extension Manager.
-
Click Create Activation to start a new activation.
-
On the Activate Themes and Extensions page, select the Themes tab.
-
Check the Active box next to your custom theme and then click Activate.
Test Your Theme Customizations
To test your customizations, open your site's homepage and load SMT.
-
You should see that the glowy color around the new banner image is light blue, which is the default you set in the theme.
-
Click the SMT cog icon and select themes.
-
Scroll to the bottom of the Theme Customizer, and you should see the new option for Glowy Color that you added.
-
Change the value for the Glowy Color option and notice that the color changes in real time on your homepage.
-
Because you added new variables for each skin, you can change the skin for your site, here, in the Theme Customizer. If you want to keep one of the skins, save the change and it will take effect on your site right away.