Using SuiteScript to Apply Advanced Templates to Non-Transaction Records
You must use SuiteScript to apply advanced print templates to non-transaction record types. This topic provides an example of how to use an advanced template with the Employee record type. For general information about print templates in SuiteScript 2.x, see render.TemplateRenderer.
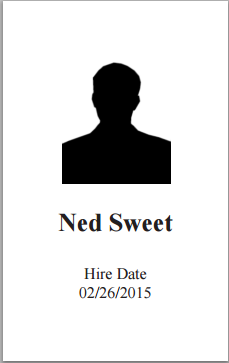
In this example, the goal is to print employee access cards that include name, hire date, and a photo. Before you create a script for this purpose, you need to:
-
Use HTML to create a basic print template. Your template code should:
-
Conform to FreeMarker syntax. For more information, see the FreeMarker documentation at http://freemarker.apache.org/docs/index.html.
-
Reference BFO (Big Faceless Organization), a set of third party libraries used by NetSuite for generating PDF documents. BFO documentation is available at http://bfo.com/products/report/docs/userguide.pdf.
-
-
Understand the data model for the record to determine the fields that you need to include in your template. You can get the IDs of these fields in the NetSuite UI.
-
To make field IDs available, go to Home > Set Preferences and ensure that the Show Internal IDs option is enabled on the General subtab, Defaults area.
-
Select an Employee record and for each field that you want to add to the template, click the field label to see the field level help text. You'll find the field ID in the bottom right corner.
-
Sample Template for Employee Access Card
The following sample template code shows some basic formatting and references three field IDs from the employee record: entityId, hiredate, and image.
            <?xml version="1.0"?>
<!DOCTYPE pdf PUBLIC "-//big.faceless.org//report" "report-1.1.dtd">
<pdf>
    <head>
    </head>
    <body width="2.35in" height="3.75in">
        <img align="center" "width="100px" height="125px" src="${employee.image?html}"></img>
        <p align="center" style="font-size:24px;font-weight:bold;">${employee.entityId}</p>
        <p align="center">${employee.hiredate@label}<br />${employee.hiredate}</p>
    </body>
</pdf>
Sample SuiteScript for Printing Employee Access Card
When you have your template code, you need to write the SuiteScript script. For SuiteScript 2.x, use the N/render Module module as shown in the following Suitelet example:
            /** * @NApiVersion 2.x * @NScriptType Suitelet **/
define(['N/render', 'N/file'],
function (render, file) { function generate(context)
{
    var employee = record.load ({ type: record.Type.EMPLOYEE, id: 1074 });
    var renderer = render.create();
    var template = '<?xml version="1.0"?>

<!DOCTYPE pdf PUBLIC "-//big.faceless.org//report" "report-1.1.dtd">'
    + '<pdf>'
    + '<head>'
    + '</head>'
    + '<body width="2.35in" height="3.75in">'
    + '<img align="center" width="100px" height="125px" src="${employee.image?html}">'
    + '</img>'
    + '<p align="center" style="font-size:24px;font-weight:bold;">${employee.entityId}</p>'
    + '<p align="center">${employee.hiredate@label}<br />${employee.hiredate}</p>'
    + '</body>'
    + '</pdf>'

renderer.templateContent = template; // Raw string of template to be transformed by FreeMarker
renderer.addRecord({ // Binds the employee record object to the variable used in the template
templateName: 'employee', record: employee });
var xml = renderer.renderAsString(); // Returns template content interpreted by FreeMarker as XML string that can be passed to the xmlToPdf function.
var file = render.xmlToPdf(xml); // Produces PDF output.
context.response.write({ output: file.getContents() }); } return { onRequest: generate };
});
Save your script as a .JS file, upload it to the File Cabinet, and create a script record. The saved script deployment record provides a URL that you can click to see the PDF after the script is run.
Sample Employee Access Card PDF
The following screenshot shows a printed employee access card: