Template Features
Templates include several features that enhance their formatting and layout.
The template features are described in the following topics:
Insert Page Breaks
You can create a page break in a few ways. Page breaks are supported for PDF, RTF, and PPT output. Page breaks aren't supported for HTML output.
To create a page break after the occurrence of a specific element use the "split-by-page-break" alias. This causes the report output to insert a hard page break between every instance of a specific element.
To insert a page break between each occurrence of a group, insert the "split-by-page-break" form field within the group immediately before the <?end for-each?> tag that closes the group. In the Help Text of this form field enter the syntax:
<?split-by-page-break:?>
For the following XML, assume you want to create a page break for each new supplier:
<SUPPLIER>
 <NAME>My Supplier</NAME>
 <INVOICES>
  <INVOICE>
   <INVNUM>10001-1</INVNUM>
   <INVDATE>1-Jan-2005</INVDATE>
   <INVAMT>100</INVOICEAMT>
  </INVOICE>
  <INVOICE>
   <INVNUM>10001-2</INVNUM>
   <INVDATE>10-Jan-2005</INVDATE>
   <INVAMT>200</INVOICEAMT>
  </INVOICE>
 </INVOICES>
</SUPPLIER>
<SUPPLIER>
 <NAME>My Second Supplier</NAME>
 <INVOICES>
  <INVOICE>
   <INVNUM>10001-1</INVNUM>
   <INVDATE>11-Jan-2005</INVDATE>
   <INVAMT>150</INVOICEAMT>
  </INVOICE>
…
In the template sample shown in the following illustration, the field called PageBreak contains the split-by-page-break syntax:
Place the PageBreak field with the <?split-by-page-break:?> syntax immediately before the <?end for-each?> field. The PageBreak field sits inside the end of the SUPPLIER loop. This ensures that a page break is inserted before the occurrence of each new supplier. This method avoids the ejection of an extra page at the end of the group when using the native Microsoft Word page break after the group.
An Excel output generated using a direct FO file created by analytics or by using an RTF template can have page breaks (break-before="page") in the rows of nested tables. This enables you to export an analysis report with sections to an Excel file. For example, in a dashboard page with sections, if you have set the Insert Page Break section property to Outermost Column, when you export the dashboard page to an Excel file, the Excel file stores information of each section in separate tab.
Insert an Initial Page Number
Some reports require that the initial page number be set at a specified number. For example, monthly reports may be required to continue numbering from month to month. You can set the initial page number for the PDF and PPT output, but not for the HTML or RTF output.
Use the following syntax in the template to set the initial page number:
<?initial-page-number:pagenumber?>
where pagenumber is the XML element or parameter that holds the numeric value.
Also, you can continue the page number from a previous section. The default behavior of a new section in a document is to reset the page numbering. However, if the report requires that the page numbering continue into the next section, use the following command:
<?initial-page-number:'auto'?>
This command allows the continuation of the page numbering from the previous section.
Example 1 - Set page number from XML data element
If the XML data contains an element to carry the initial page number, for example:
<REPORT>
  <PAGESTART>200<\PAGESTART>
  ....
</REPORT>
Enter the following in the template:
<?initial-page-number:PAGESTART?>The initial page number is the value of the PAGESTART element, which in this case is 200.
Example 2 - Set page number by passing a parameter value
If you define a parameter called PAGESTART, then you can pass the initial value by calling the parameter.
Enter the following in the template:
<?initial-page-number:$PAGESTART?>You must first declare the parameter in the template. See Set Parameters.
Specify Last Page Only Content
Use the Microsoft Word functionality to specify a different page layout for the first page, odd pages, and even pages. This feature is supported only for the PDF and PPT output.
To implement these options, simply select Page Setup from the File menu, then select the Layout tab.
However, Microsoft Word doesn't provide settings for a different last page only. This is useful for documents such as checks, invoices, or purchase orders on which you may want the content such as the check or the summary in a specific place only on the last page.
To specify last page only content:
Any content on the page that occurs above or below these two tags is displayed only on the last page of the report. Also, note that because this command explicitly specifies the content of the final page, any desired headers or footers previously defined for the report must be reinserted on the last page.
This example uses the last page only feature for a report that generates an invoice listing with a summary to appear at the bottom of the last page.
Assume the following XML:
<?xml version="1.0" encoding="WINDOWS-1252"?>
<INVOICELIST>
 <VENDOR>
  <VENDOR_NAME>Nuts and Bolts Limited</VENDOR_NAME>
  <ADDRESS>1 El Camino Real, Redwood City, CA 94065</ADDRESS>
  <INVOICE>
   <INV_TYPE>Standard</INV_TYPE>
   <INVOICE_NUM>981110</INVOICE_NUM>
   <INVOICE_DATE>10-NOV-04</INVOICE_DATE>
   <INVOICE_CURRENCY_CODE>EUR</INVOICE_CURRENCY_CODE>
   <ENT_AMT>122</ENT_AMT>
   <ACCTD_AMT>122</ACCTD_AMT>
   <VAT_CODE>VAT22%</VAT_CODE>
  </INVOICE>
  <INVOICE>
   <INV_TYPE>Standard</INV_TYPE>
   <INVOICE_NUM>100000</INVOICE_NUM>
   <INVOICE_DATE>28-MAY-04</INVOICE_DATE>
   <INVOICE_CURRENCY_CODE>FIM</INVOICE_CURRENCY_CODE>
   <ENT_AMT>122</ENT_AMT>
   <ACCTD_AMT>20.33</ACCTD_AMT>
   <VAT_CODE>VAT22%</VAT_CODE>
  </INVOICE>
 </VENDOR>
 <VENDOR>
  ...
<INVOICE>
 ...
  </INVOICE>
 </VENDOR>
 <SUMMARY>
  <SUM_ENT_AMT>61435</SUM_ENT_AMT>
  <SUM_ACCTD_AMT>58264.68</SUM_ACCTD_AMT>
  <TAX_CODE>EU22%</TAX_CODE>
 </SUMMARY>
</INVOICELIST>
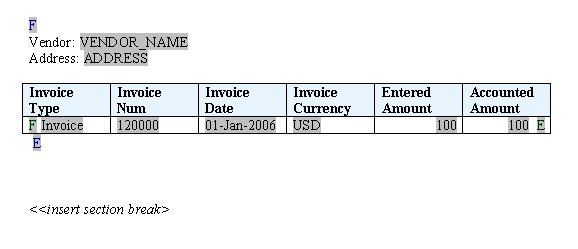
The report should show each VENDOR and their INVOICE data with a SUMMARY section that appears only on the last page, placed at the bottom of the page. The template for this is shown in this figure.
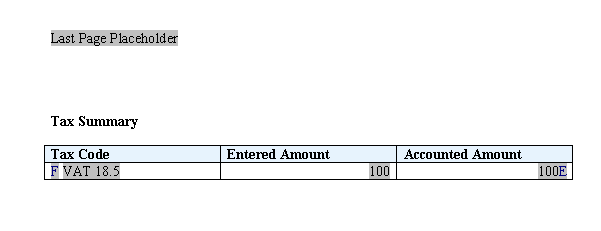
Insert a Microsoft Word section break (type: next page) on the first page of the template. For the final page, insert new line characters to position the summary table at the bottom of the page. The summary table is shown in the following illustration.
In this example:
-
The F and E components contain the for-each grouping statements.
-
The grayed report fields are placeholders for the XML elements.
-
The "Last Page Placeholder" field contains the syntax:
<?start@last-page:body?> <?end body?>to declare the last page layout. Any content above or below this statement is displayed on the last page only. The content above the statement is regarded as the header and the content below the statement is regarded as the footer.
If the reports contains headers and footers that you want to carry over onto the last page, you must reinsert them on the last page.
You must insert a section break (type: next page) into the document to specify the last page layout. This example is available in the samples folder of the Template Builder for Word installation.
Because the default behavior of a new section in a document is to reset the page numbering the page number on the last page is reset. To continue the page numbering from the previous section, use the following command:
<?initial-page-number:'auto'?>
This command allows the continuation of the page numbering from the previous section.
If the report is only one page in length, the first page layout is used. If the report requires that a single page report should default to the last page layout (such as in a check printing implementation), then you can use the following alternate syntax for the "Last Page Placeholder" on the last page:
<?start@last-page-first:body?> <?end body?>
Substituting this syntax results in the last page layout for reports that are only one page long.
End on Even or Odd Pages
If the report has different odd and even page layouts, then you might want to force the report to end specifically on an odd or even page by following these steps. This feature is supported for the PDF and PDF output, but not for the RTF or HTML output.
For example, you may include the terms and conditions of a purchase order in the footer of the report using the different odd/even footer functionality and you want to ensure that the terms and conditions are printed on the final page.
Or, you may have binding requirements to have the report end on an even page, without specific layout.
To end on an even page with layout:
-
Insert the following syntax in a form field in the template:
<?section:force-page-count;'end-on-even-layout'?>
If you do not have layout requirements for the final page, but would like a blank page ejected to force the page count to the preferred odd or even, then use the following syntax:
<?section:force-page-count;'end-on-even'?>
or
<?section:force-page-count;'end-on-odd'?>
Insert Blank Page
You can insert blank pages and skip page numbers in the first page, even pages, or odd pages of the report.
The fo:page-sequence object is used as a container for page output elements. The xdofo:blank-on attribute of fo:page-sequence can specify whether to:
-
Leave the first page, even pages, or odd pages blank.
-
Skip the page numbers in the first page, even pages, or odd pages.
If you specify to skip the page count, the page number counter isn't displayed when the page renders. The internal page number counter increments irrespective of the setting.
| Attribute Name | Values | Default |
|---|---|---|
| xdofo:blank-on |
|
none |
The tags for RTF Template are:
<?section:xdofo:blank-on;'even'?>
<?section:xdofo:blank-on;'odd'?>
<?section:xdofo:blank-on;'first'?>
<?section:xdofo:blank-on;'even-skip-page-count'?>
<?section:xdofo:blank-on;'odd-skip-page-count'?>
 <?section:xdofo:blank-on;'first-skip-page-count'?>
Examples
To leave the odd pages blank in a report, specify the following code in a form field at the beginning of the template:
<?section:xdofo:blank-on;'odd'?>To skip the page count on the even pages of an order report, specify the following code in a form field at the beginning of the template:
<?section:xdofo:blank-on;'even-skip-page-count'?>Insert Hyperlinks
You can add hyperlinks for the PDF, RTF, HTML, PPT, and Excel output.
The hyperlinks can be fixed or dynamic and can link to either internal or external destinations. Hyperlinks can also be added to shapes.
-
To insert static hyperlinks to either text or a shape, use the word processor's insert hyperlink feature.
To insert a static hyperlink to a text or a shape:
-
Select the text or shape.
-
Use the right-mouse menu to select Hyperlink; or, select Hyperlink from the Insert menu.
-
Enter the URL using any of the methods provided on the Insert Hyperlink dialog box.
-
-
If the input XML data includes an element that contains a hyperlink or part of one, then you can create dynamic hyperlinks at runtime. In the Type the file or Web page name field of the Insert Hyperlink dialog, enter the following syntax:
{URL_LINK}where URL_LINK is the incoming data element name.
If you have a fixed URL that you want to add elements from the XML data file to construct the URL, enter the following syntax:
http://www.example.com?product={PRODUCT_NAME}where PRODUCT_NAME is the incoming data element name.
In both these cases, at runtime the dynamic URL is constructed.
-
You can also pass parameters at runtime to construct a dynamic URL.
Enter the parameter and element names surrounded by braces to build up the URL as follows:
{$SERVER_URL}{$REPORT}/cstid={CUSTOMER_ID}where SERVER_URL and REPORT are parameters passed to the template at runtime (note the $ sign) and CUSTOMER_ID is an XML data element. This link may render as:
http://myserver.domain:8888/CustomerReport/cstid=1234
To add the target attribute to a URL, add the following to the URL string:
??target=_target_value
For example:
http://www.example.com??target=_top
Values for the target attribute are:
-
_top
-
_blank
-
_self
-
_parent
-
framename
You can pass in the value of target dynamically, using the following syntax:
http://www.example.com/index.html??target={$myTarget}
where myTarget is the name of the parameter that holds the value.
Insert Internal Links
Internal links point to a section within a document.
Insert internal links into the template using Microsoft Word's Bookmark feature.
- Position the cursor in the desired destination in the document.
- From the Insert menu, select Bookmark.
- In the Bookmark dialog, enter a name for this bookmark, and select Add.
- Select the text or shape in the document that you want to link back to the Bookmark target.
- Use the right-mouse menu to select Hyperlink; or select Hyperlink from the Insert menu.
- On the Insert Hyperlink dialog, select Bookmark.
- Select the bookmark that you created from the list.
At runtime, the link is maintained in the generated report.
Include a Table of Contents
Follow the word processor's procedures for inserting a table of contents.
Publisher supports the Table of contents feature for PDF and PPT output. RTF support is limited: After report generation, the user must press F9 to reset the page numbers.
Publisher also provides the ability to create dynamic section headings in the document from the XML data. You can then incorporate these into a table of contents.
Perform these steps to create dynamic headings:
At run time, the TOC placeholders and heading text are substituted.
Generate Bookmarks in PDF Output
If you define a table of contents in the RTF template, then you can use the table of contents definition to generate links in the Bookmarks tab in the navigation pane of the output PDF.
The bookmarks can be either static or dynamically generated.
The support for bookmark in RTF templates is limited to a single-point bookmark to allow link (Goto) functionality within the document. Arrays in bookmarks aren't supported.
-
To create links for a static table of contents:
Enter the syntax:
<?copy-to-bookmark:?>directly above the table of contents and
<?end copy-to-bookmark:?>directly below the table of contents.
-
To create links for a dynamic table of contents:
Enter the syntax:
<?convert-to-bookmark:?>directly above the table of contents and
<?end convert-to-bookmark:?>directly below the table of contents.
To control the initial state of the bookmark when the PDF file is opened, use the following command:
<?collapse-bookmark:state;level?>
where
the state can have the following values:
-
hide - Collapses the table of contents entries
-
show - Expands the table of contents entries
and
level sets the table of contents collapse level. For example:1 collapses the first level of entries in the table of contents; 2 collapses the first and second level entries.
Use this command with <?copy-to-bookmark:?> and <?convert-to-bookmark:?> as shown in the following examples:
-
To create a static table of contents that hides level 1 and level 2 of the table of contents entries, enter the following:
<?copy-to-bookmark:?>
<?collapse-bookmark:hide;2?>
directly above the table of contents and
<?end copy-to-bookmark:?>directly below the table of contents.
-
To create links for a dynamic table of contents that shows levels 1 and 2 of the table of contents expanded, enter the following:
<?convert-to-bookmark:>
<?collapse-bookmark:show;2?>
directly above the table of contents and
<?end convert-to-bookmark:?>directly below the table of contents.
Insert Check Boxes
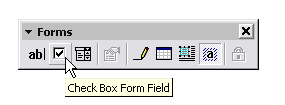
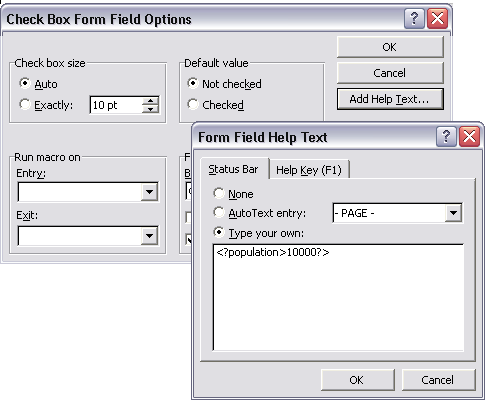
You can include a check box in the report template that you can define to display as checked or unchecked based on a value from the incoming data.
Check boxes are supported in the PDF output only.
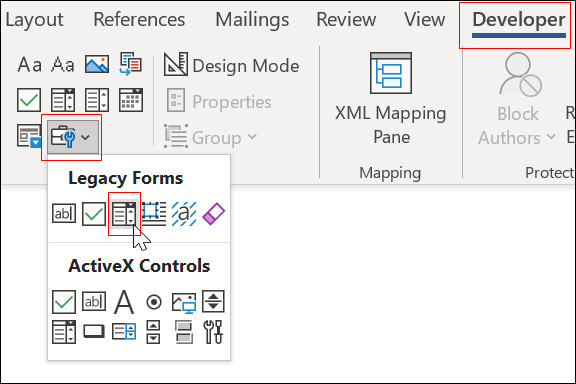
Insert Drop-Down Lists
You can use the drop-down form field to create a cross-reference in the template from the XML data to some other value that you define in the drop-down form field.
For example, suppose you've the following XML:
<countries>
 <country>
  <name>Chad</name>
  <population>7360000</population>
  <continentIndex>5</continentIndex>
 </country>
 <country>
  <name>China</name>
  <population>1265530000</population>
  <continentIndex>1</continentIndex>
 </country>
 <country>
  <name>Chile</name>
  <population>14677000</population>
  <continentIndex>3</continentIndex>
 </country>
. . .
</countries>
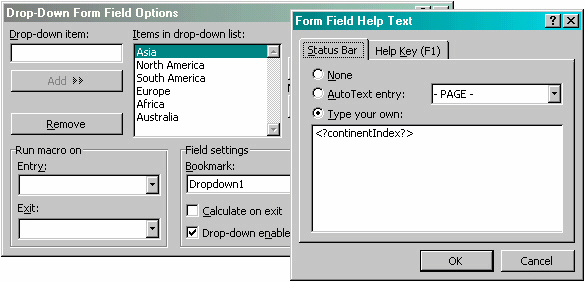
Notice that each <country> entry has a <continentindex> entry, which is a numeric value to represent the continent. Using the drop-down form field, you can create an index in the template that cross-references the <continentindex> value to the actual continent name. You can then display the name in the published report.
Using the check box and drop-down list features, you can create a report to display population data with check boxes to demonstrate figures that reach a certain limit. An example illustrating a report of population data with check boxes is shown in the following figure:
The template to create this report is shown in the below figure and the fields have the values shown in the table below.
Description of the fields for drop-down list:
- FE - Form field entry:
<?for-each:country?>- Begins the country repeating group. - China - Form field entry:
<?name?>- Placeholder for the name element. - 1,000,000 - Form field entry:
<?population?>- Placeholder for the population element. - (check box) - Form field entry:
<?population>1000000?>- Establishes the condition for the check box. If the value for the population element is greater than 1,000,000, the check box is displayed as checked. - Asia - Form field entry:
<?contintentIndex?>- The drop-down form field for the continentIndex element. See the preceding description for its contents. At runtime, the value of the XML element is replaced with the value it's cross-referenced to in the drop-down form field. - EFE - Form field entry:
<?end for-each?>- Ends the country group.
Repeat Row Headers After Page Break
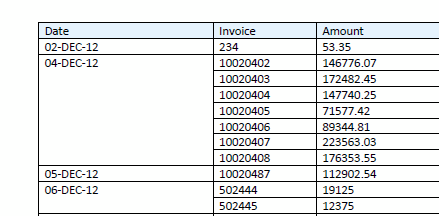
If your report includes a row header that spans multiple rows, for example in a group-left construction, you can specify that the content in the initial cell repeats on the next page.
See the example shown in the following table.
In the preceding example, if the report breaks across the 04-Dec-12 group, you would most likely prefer that the cell contents "04-Dec-12" repeat on the next page. To specify that the cell contents repeat, insert the following code in a form field in the table data cell that is to repeat:
<?attribute@block:xdofo:rowspancell-repeat-nextpage;'true'?>
This feature is only useful when number-rows-spanned for the table-cell is greater than one.

