Introduction
This tutorial shows you how to set up budget revisions in Oracle Enterprise Performance Management (EPM) Planning Financials and integrate it with Oracle Enterprise Resource Planning (ERP) Cloud Budgetary Control. The sections build on each other and should be completed sequentially.
Background
With Budget Revisions, planners can make revisions to an approved budget in Oracle Enterprise Performance Management (EPM) Planning Financials.
When you integrate Planning Financials with the Budgetary Control module in Oracle Enterprise Resource Planning (ERP) Cloud, you can view current consumption, check that proposed budget changes do not go below what has already been consumed, and update budget changes to impact funds available. After budget changes are reserved and approved, planners can review the budget revision details in Budgetary Control by drilling down on the current approved budget balances.
You use Data Integration to push data between EPM Planning Financials and Budgetary Control. You can configure and extend these integrations, for example, by applying other mappings as needed to meet your business requirements.
With this integration, the complete planning and revision cycle is integrated between EPM Planning Financials and Budgetary Control:
- Build your original budget in EPM Planning Financials using the planning and forecasting process, and then push the original budget to Budgetary Control.
- Create budget revisions and check funds in the adopted budget within EPM Planning Financials to ensure that the budget revisions you are proposing meet the controls set in Budgetary Control.
- Reserve funds in Budgetary Control within EPM Planning Financials to update budget balance in Budgetary Control.
- Drill through at the cell level from an approved budget in the Current Approved Budget form in EPM Planning Financials to Budgetary Control to review the budget revision transactions that make up the balance.
In this tutorial, you set up EPM Planning Financials Budget Revisions and integrate it with Oracle ERP Cloud Budgetary Control.
Configuration and Integration Considerations
- The Budgetary Control module in Oracle ERP Cloud must be enabled before you begin.
- In Budgetary Control:
- You must create a control budget with Source Budget Type of EPM Financials module (Not Hyperion Planning) for this integration.
- The currency must match the currency used in EPM Planning.
- The calendar may differ from the calendar in EPM Planning. However, you must map calendar dimensions (Year and Period) in Data Integration and set default values for Budget Segments when setting up the Control Budget Structure of a Control Budget.
- Budget Revisions is available to these Oracle EPM Cloud customers with the Planning Financials module enabled:
- Legacy Enterprise Planning and Budgeting Cloud Services customers and Planning and Budgeting Cloud Service Plus One (PBCS +1) customers with Financials enabled, when the Essbase version is upgraded to the version that supports Hybrid Essbase and Hybrid Essbase is enabled.
- EPM Standard Cloud and EPM Enterprise Cloud customers with Module application type when Hybrid Essbase is enabled.
Tip:
If your application is not enabled for Hybrid, you must enable Hybrid before you can enable Budget Revisions. - The EPM Planning application must be set to use single currency.
The currency in EPM Planning Financials must match the currency in Budgetary Control. Only single currency applications are supported.
- Only monthly, quarterly, and yearly planning is supported. Both 12 month and 13 period calendars are supported. Weekly planning is not supported.
- You must enable Expense planning.
- You must use your own chart of accounts in EPM Planning Financials rather than using the provided chart of accounts. Learn more from these tutorials: Configuring Financials to Bring In Your Own Chart of Accounts in Planning and Leveraging Best Practice Planning in Financials using your COA.
- If you incrementally enable Budget Revisions, and if you have customized the Trend Based Calculation rule, see the Updating Financials Artifacts section in the Administering Planning Modules documentation.
- If you have detailed data in other EPM Planning modules (Workforce, Projects, or Capital), you must pull this data into EPM Planning Financials before you can integrate the data with Budgetary Control.
- Create a budget scenario in EPM Planning Financials with the same name as the control budget in Budgetary Control to avoid errors in budget synchronization.
- Define a Category mapping to map your EPM Planning Financials budget scenario with your Oracle ERP Cloud budget scenario. See the Defining Category Mappings section of the Administering Data Management documentation.
- Verify that the default Period Mappings in Data Integration includes periods used in your budgets. See the Managing Period Mappings section of the Administering Data Integration documentation.
- Load EPM Planning Financials budgets to the control budget with lowest level of detail account and calendar. Use summary control budgets to control at summary account and periods.
Prerequisites
An EPM Cloud Service instance allows you to deploy and use one of the supported business processes. To deploy another business process, you must request another EPM Enterprise Cloud Service instance or remove the current business process.
- Have Service Administrator access to an EPM Enterprise Cloud Service instance. The instance should not have a business process created.
- Have Service Administrator access to Oracle ERP Cloud and Budgetary Control.
- Have access to a ledger you can enable for Budgetary Control.
- Have access to EPM Planning Financials metadata and data load files that map to your own chart of accounts.
Note:
See the Configuration and Integration Considerations section of this tutorial for a list of other requirements.Enabling Budgetary Control
Oracle ERP Cloud Budgetary Control:
- Orchestrates the spending control process by validating if transactions have sufficient funds and if they're subject to spending control.
- Stores the budget, performs funds check and funds reservation when transactions are submitted or approved.
- Maintains budgetary control balances for expense accounts, including budget, funds reserved (commitments, obligations, and expenditures), and funds available balances based on the budget calendar and control budget structure (chart of account segments), without any journal entries. Revenue, liability, and equity account types aren't supported.
In this section, you enable budgetary control for a ledger or project in Oracle ERP Cloud.
- In Oracle ERP Cloud, on the upper-right, click the arrow to display Settings and Actions.
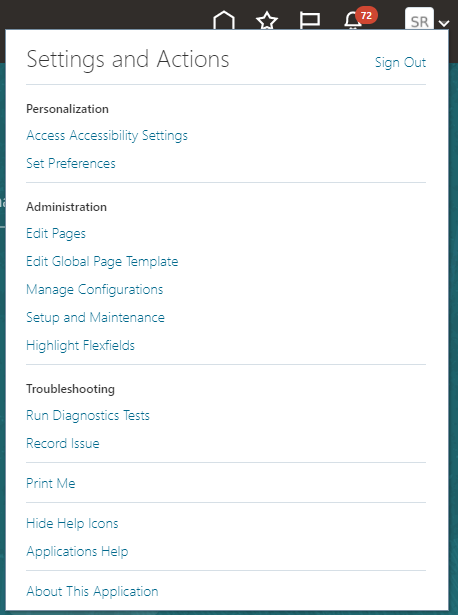
- Click Setup and Maintenance.
- In Functional Setup Manager, on the right, click Tasks.
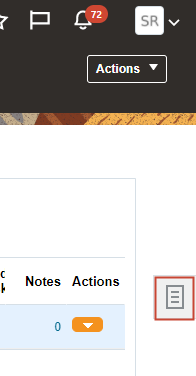
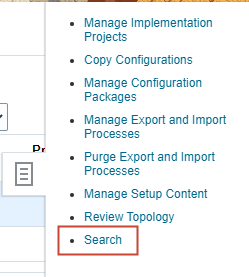
- In Tasks, click Search.
- In the Search box, type budgetary control and click
 (Search).
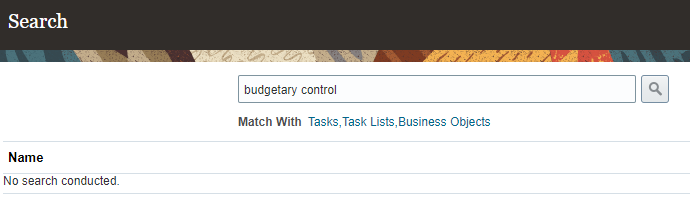
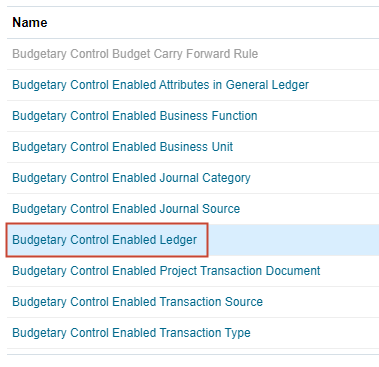
- From the list, click Budgetary Control Enabled Ledger.
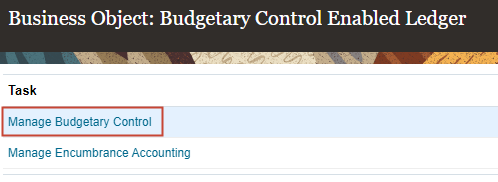
- In Budgetary Control Enabled Ledger, click Manage Budgetary Control.
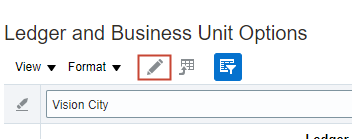
- In Manage Budgetary Control and Encumbrance Accounting, under Ledger and Business Unit Options, search for your ledger and click
 (Edit).
In this example, the Vision City ledger will be edited.
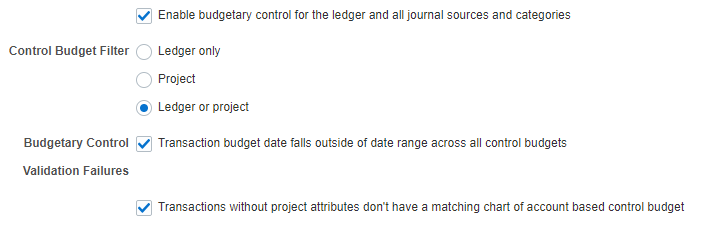
- In Edit Budgetary Control and Encumbrance Accounting, select Enable budgetary control for the ledger and all journal sources and categories.

After selecting this option, the page is updated.
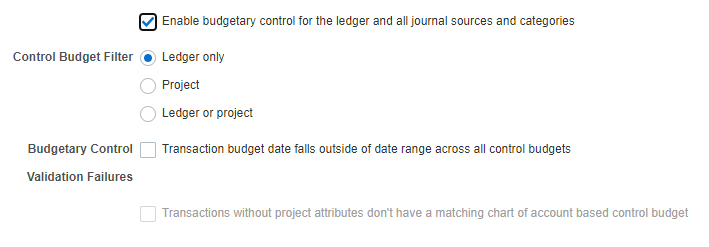
You enable budgetary control for ledgers, business units assigned to a ledger, projects, transaction types, and journal sources and categories. The options you select can have critical implications in the way Oracle Fusion Budgetary Control handles your transactions.
When you enable budgetary control, you must consider these options:
- Control Budget Filter
- Fail Budgetary Control for Budget Dates Not in Valid Budget Date Range
- Default Date Rule
- For Control Budget Filter, select Ledger or Project.
- For Budgetary Control, select Transaction budget date falls outside of date range across all control budgets.
- For Validation Failures, select Transactions without project attributes don't have a matching chart of account based control budget.
- Verify your selections.
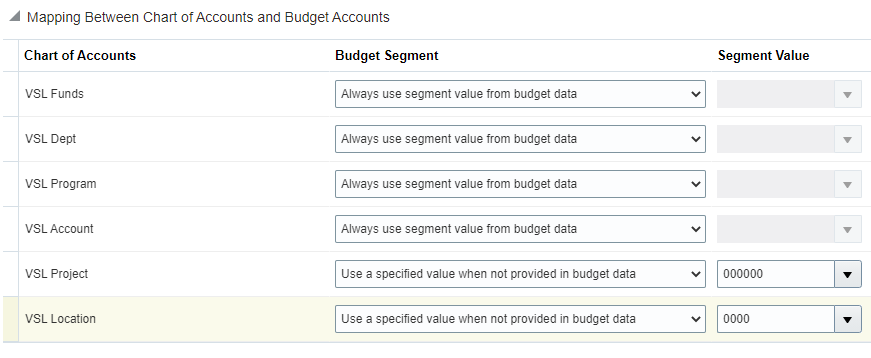
- In Mapping Between Chart of Accounts and Budget Accounts, set default values to chart of account dimensions.
Here's an example:
- On the upper right, click Save and Close.
- In Manage Budgetary Control and Encumbrance Accounting, click Save and Close.
- In Budgetary Control Enabled Ledger, click Done.
Managing Control Budgets for Integration
You use control budgets to check the spending against a ledger, project, or both, and apply validations during budgetary control. You can specify the segments, budget periods, currency, control level and tolerance.
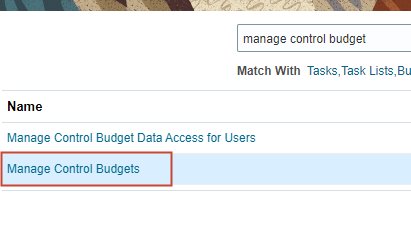
- In the Search box, type manage control budget and click (Search).

- From the list, click Manage Control Budgets.
- In Manage Control Budgets, click
 (Create).
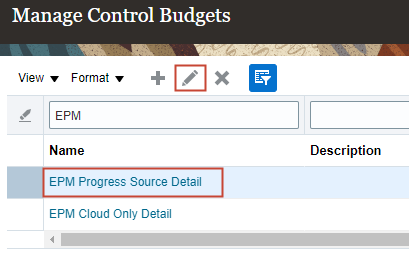
 - In Create Control Budget, enter a Control Budget name.
In this example, the control budget is named EPM Progress Source Detail.
Tip:
Note down the names of the Control Budgets you plan to use in the integration. You will be adding these as Smart List entries later.
- Select a Budget Calendar.
In this example, the Vision City Cal budget calendar is selected.

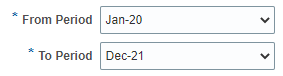
- Select a budget period.
In this example, the period ranges from Jan-20 to Dec-21.
- For Source Budget Type, make sure that you select EPM Financials module.
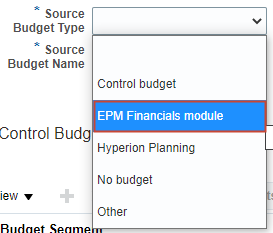
- When prompted, click Yes.
Once selected, you cannot change the source budget type.

- Accept or rename the Source Budget Name.
The Source Budget Name defaults to the Control Budget Name.

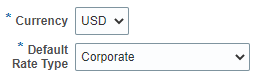
- Select a currency and rate type.
In this example USD and Corporate are selected.
- Select the ledger you enabled for budgetary control.

- Assign a Budget Manager.
In this example, the Budget Manager also has Service Administrator access.
Tip:
Note down this user. You will be using the same user to configure EPM connections later.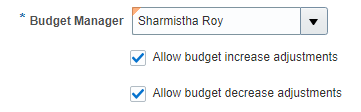
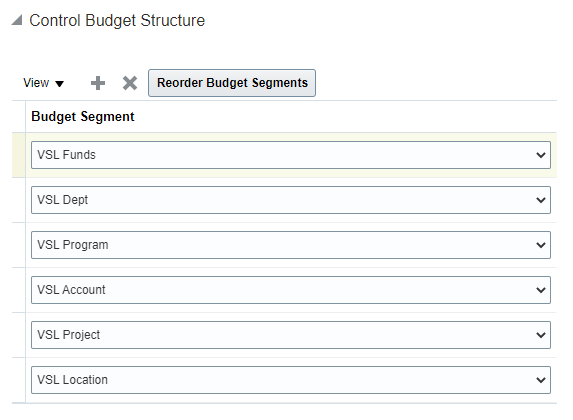
- Select chart of account segments for the Control Budget Structure.
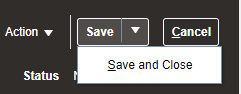
- On the upper-right, click the arrow next to Save and select Save and Close.
- In Manage Control Budgets, above the name field, search for your control budget.
- From the search results, select your control budget row and click (Edit.)
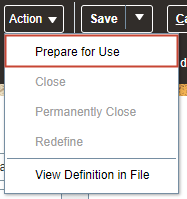
- In Edit Control Budget, click Action and select Prepare for Use.
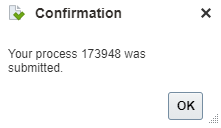
- In the warning message, click Yes.

- At the confirmation message, click OK.
- To update the status in Manage Control Budgets, above the name field, search for your control budget.
- From the search results, verify that your control budget status displays as In Use, select your control budget row and click (Edit.)
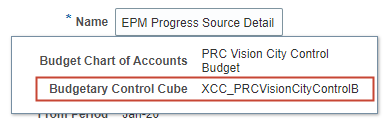
- In Edit Control Budget, hover your mouse cursor over the name. Take note of the Budgetary Control Cube name. You will need this later when setting up data integration.
Here's an example:
- Click Cancel.
- In Manage Control Budgets, click Done.
- In Functional Setup Manager (Search), click Done.
Creating the Application
In this section, you create a Module-based Planning application in Oracle EPM Enterprise Cloud.
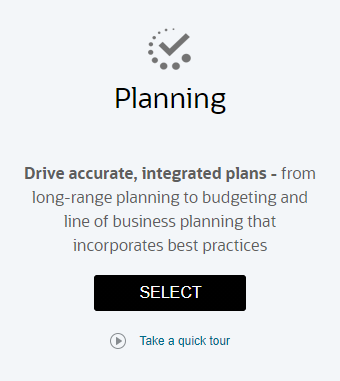
- In Oracle EPM Cloud, under Planning, click SELECT.
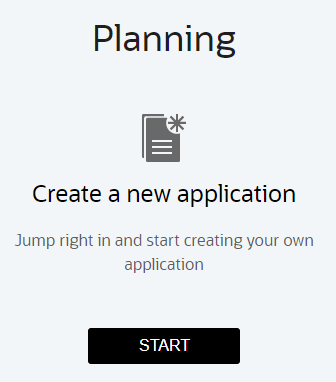
- Under Create a new application, click START.
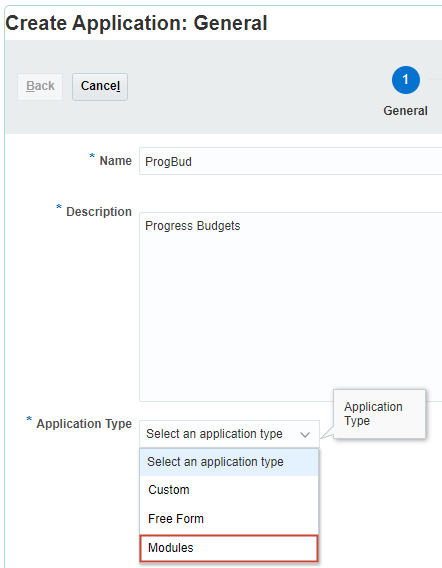
- In General properties, enter a Name and Description, and select Modules as the Application Type.
Here's an example:
Property Value Name ProgBud Description Progress Budgets Application Type Modules
- Click Next.
- Select Time Period properties.
In this example, the default time period, 12 Months is selected, alongside the following properties:
Property Value Start and End Year 2022 and 2028 First Month of Fiscal Year July Fiscal Year Start Date Same Calendar Year Weekly Distribution Even Distribution
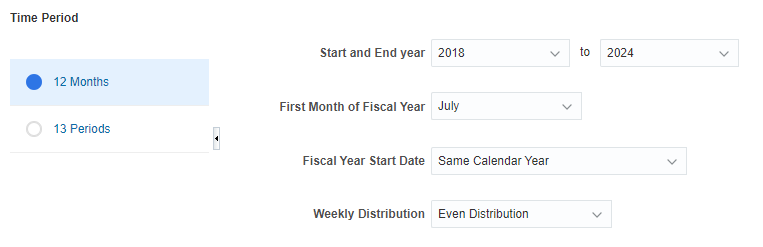
Note:
Only monthly, quarterly, and yearly planning is supported. Both 12 month and 13 period calendars are supported. Weekly planning is not supported. - For Currency settings, make sure to clear the checkbox for Multicurrency.
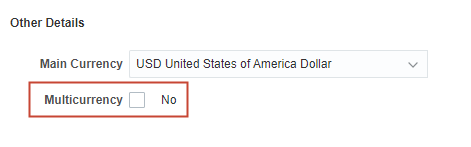
Note:
Budget Revisions requires that the application is single currency. - Accept all other default selections and click Next.
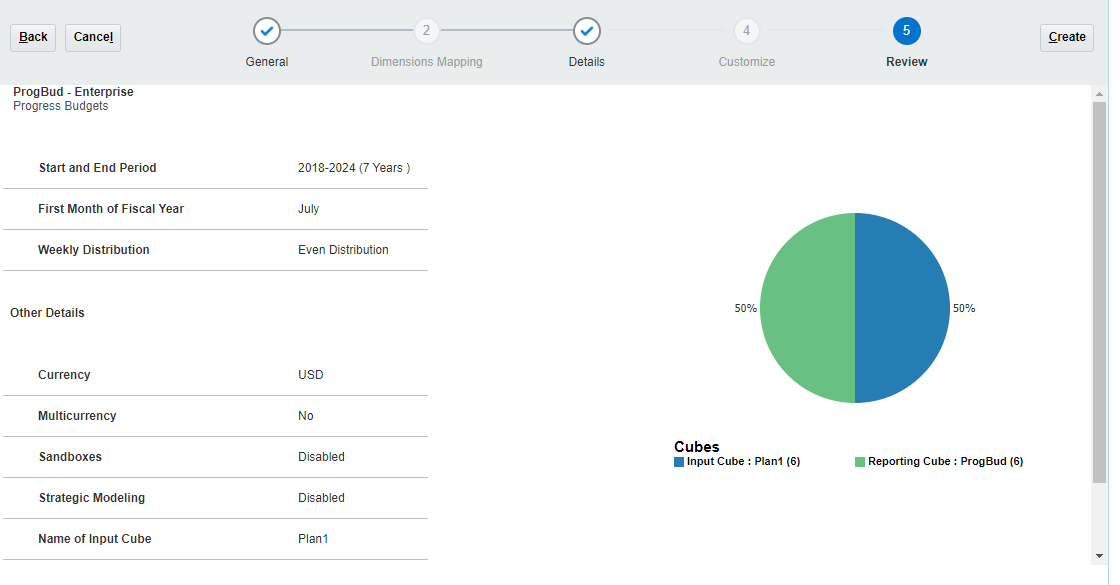
- Review the application properties you selected and click Create.
The application creation status takes a moment to complete.

When the application creation process completes, an information message displays.
You can click OK to proceed to the home page, or click Configure to proceed to the Configure page for modules.
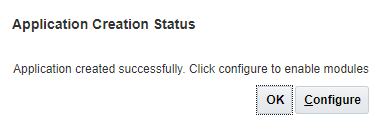
- Click OK.
Applying Display Preferences
In this section, you set display preferences in EPM Planning.
Specifying Application Settings
Note:
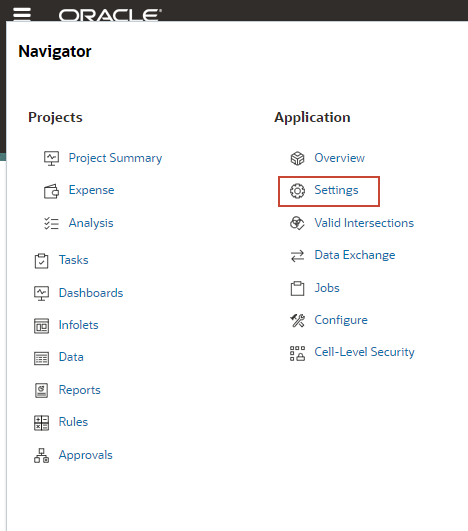
By default the Redwood Experience should be displayed in your environment. You can Enable Redwood Appearance under Tools >> Appearance.- Click
 (Navigator), and under Application, click Settings.
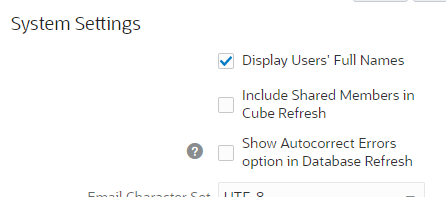
- In Application Settings, under Number Formatting, set the Thousands Separator to Comma.

- Under System Settings, select Display Users' Full Names.
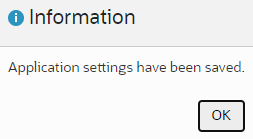
- Click Save.
- At the information message, click OK.
Setting User Preferences
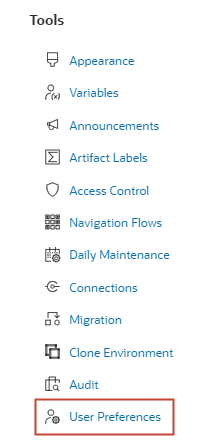
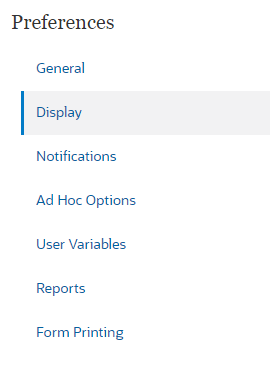
- Click (Navigator), and under Tools, click User Preferences.
- On the left, click Display.
- In Display, under Number Formatting, verify that the Thousands Separator is set to Comma.

- Under Other Options, for Date Format, select yyyy/MM/dd.
Note:
You must set the date format to yyyy/MM/dd.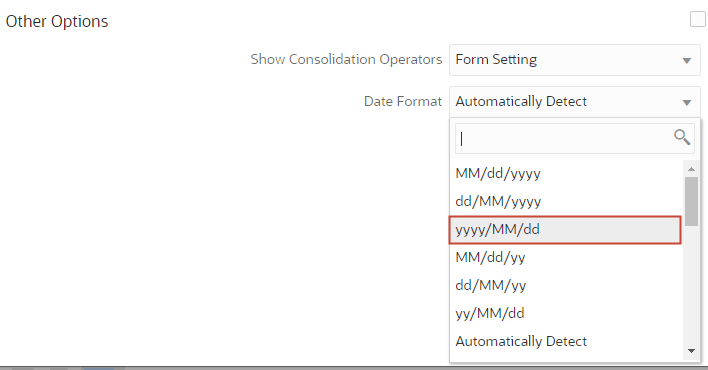
- Click Save.
- At the information message, click OK.
Renaming Dimensions (Optional)
Note:
This task may be optional in your production instance.To make sure that the dimensions map between Oracle ERP Cloud and Planning Financials, you can modify dimension names in EPM Planning Financials before enabling features. In this section, you rename Entity to Department.
Tip:
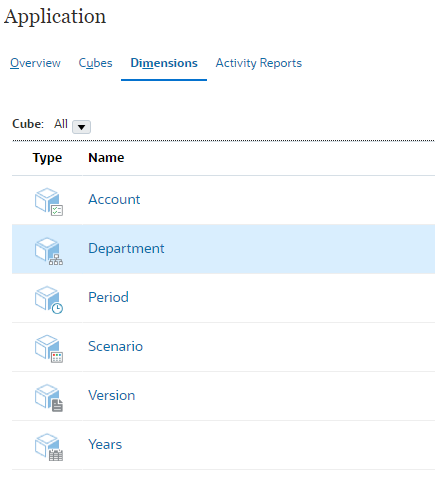
Alternatively, you can map dimensions in Data Integration.- Click (Navigator), and under Application, click Overview.
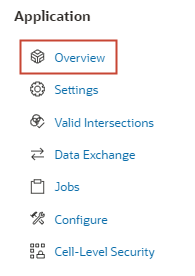
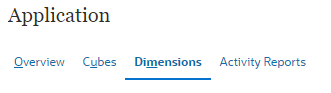
- In Application Overview, click Dimensions.
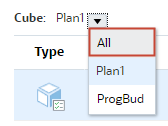
- From the Cube dropdown list, select All.
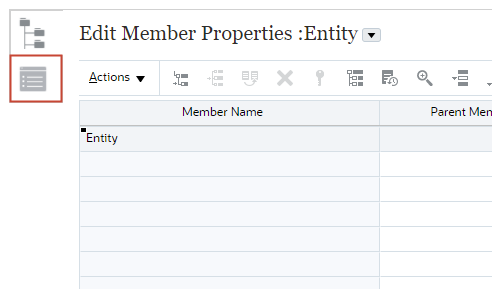
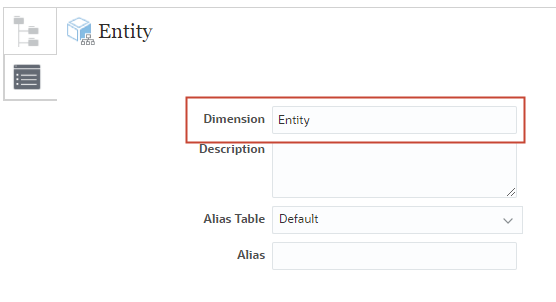
- From the list of dimensions, click Entity.

- Click the
 (Edit Dimension Properties) vertical tab.
- Rename Entity to Department.
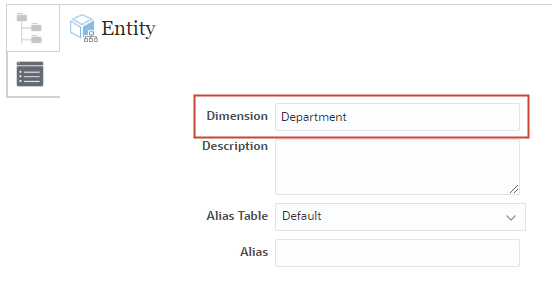
- Click Done.
- Verify that Department is now listed as a dimension.
Tip:
After making metadata changes, you must refresh the database to commit changes to the application. However, in this case, you will be enabling features in Financials which refreshes the database during the enablement process.
Enabling Financials with Budget Revisions
EPM Planning Financials provides components that you can enable incrementally to best meet your business needs. When you enable Budget Revisions:
- A new navigation flow is added in EPM Planning Financials to create budget revisions.
- New forms are added.
- New trends are added for trend-based planning to make adjustments to your current budget.
- Existing forms are updated to include the Budget Revision members and appropriate Approved Budget, Actual, and Encumbrance data.
- Valid intersections are added to limit the information shown on forms to be the appropriate combinations.
- Metadata is added to the application.
- A Smart List, Control Budget Name, is created.
- A new Connection type, Fusion Budgetary Control, is added in Connections.
- Rules are added.
In this section, you enable Expense Planning (Expenses) and Budget Revisions in Financials. You can, optionally, enable other Financial features as you go through the steps in this section or at a later time.
- From the cards on top, click Configure.

- On the Configure page, select Financials from the dropdown list.
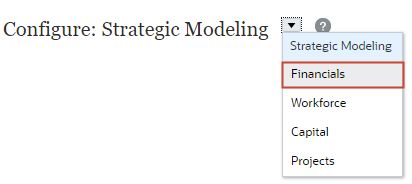
The Configure page for Financials is displayed.
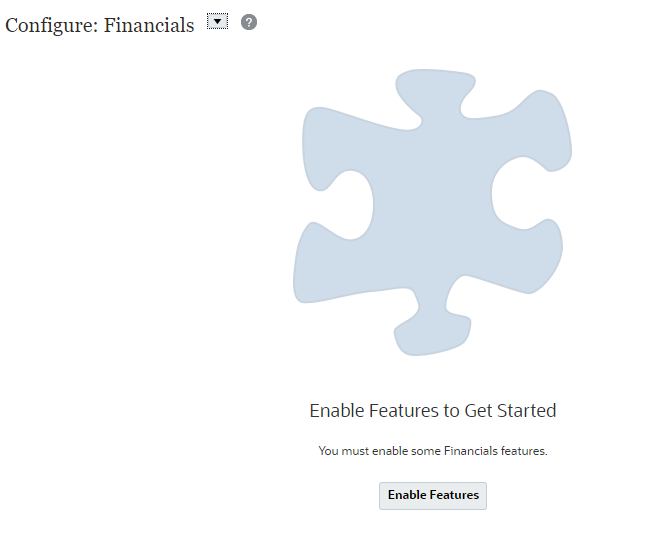
- On the Configure page for Financials, click Enable Features.
- In Enable Features, select Expense.
Caution:
You must use your own chart of accounts in EPM Planning Financials rather than using the provided chart of accounts.
Learn more from these tutorials: Configuring Financials to Bring In Your Own Chart of Accounts in Planning and Leveraging Best Practice Planning in Financials using your COA.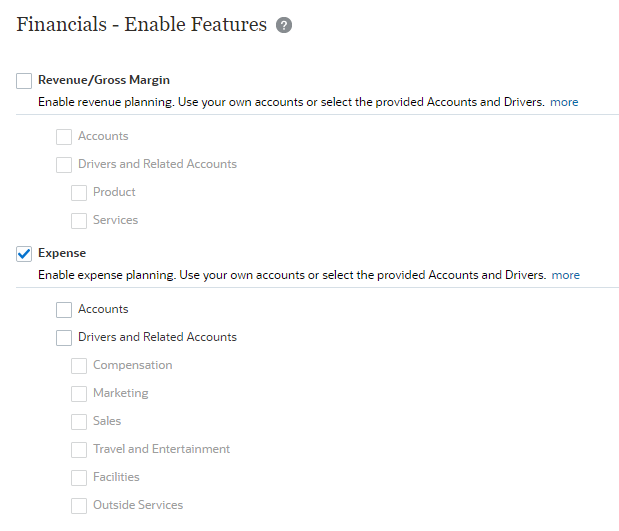
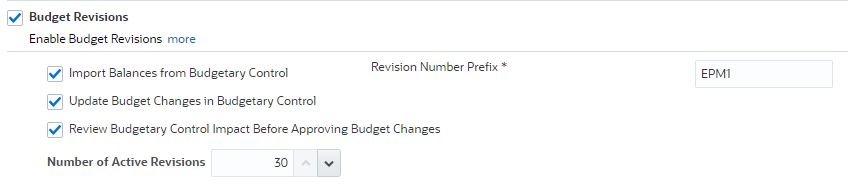
- Scroll down and select Budget Revisions. With Budgetary Control enabled, select the additional options you need.
- Import Balances from Budgetary Control—Enables integration of encumbrance accounting, allowing you to track encumbrance balance. Creates a Scenario dimension member called OEP_Consumed, as well as associated trends for revising budgets. You can use this option to import any encumbrance, obligation, or commitment balances from Budgetary Control into EPM Planning Financials.
- Update Budget Changes in Budgetary Control—Enables Funds Reserve to Budgetary Control to update budget balances and funds available in Budgetary Control from EPM Planning Financials.
- Review Budgetary Control Impact Before Approving Budget Changes—Enables Funds Check to Budgetary Control within EPM Planning Financials before a budget is approved.
- Number of active revisions—Specify the number of active budget revisions you can have, up to 30 active revisions. (This number is also limited by the total number of members in the Version dimension.) Note that when you reserve funds, the revision is cleared so EPM Planning Financials can reuse it. You can change this number later if you need to increase or decrease it.
- Revision number prefix—Specify a prefix to add to the system-generated revision numbers. This revision number is the unique identifier of the revision in Budgetary Control.
Note:
If you select only Budget Revisions, EPM Planning Financials provides metadata required to perform budget revisions. This option allows planners to create, populate, and share revisions. -
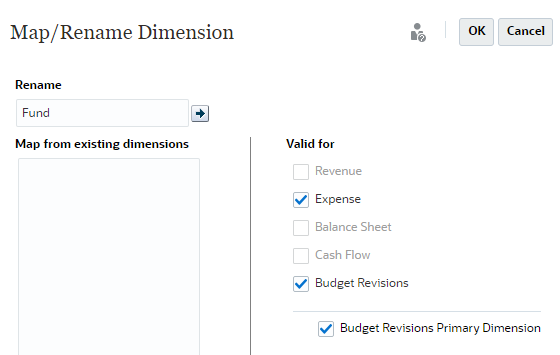
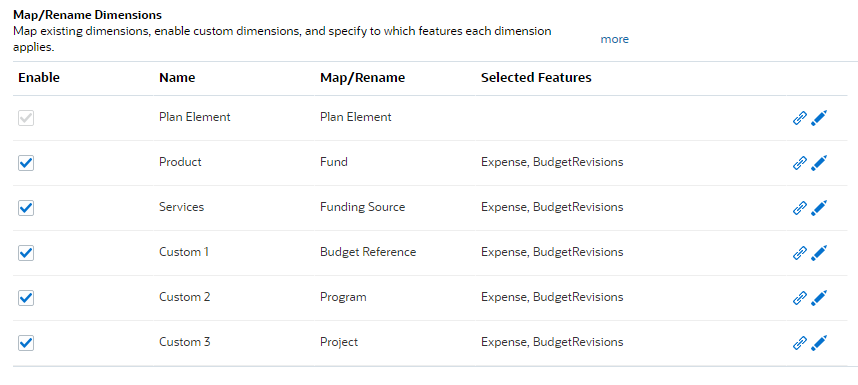
Scroll down to Map/Rename dimensions, enable custom dimensions, associate it with a feature, and set one of the dimensions as the primary dimension for display, along with the Entity dimension, on forms.
Here's an example:
Note:
When enabling Budget Revisions:- You must associate the custom dimensions with Financials features. Select the edit button next to the custom dimension and select Budget Revision.
- Select Budget Revisions Primary Dimension for one of the custom dimensions to make it the primary dimension for display, along with the Entity dimension, on forms.
- Only one dimension can be selected as the primary dimension.
- The selected dimension appears on the rows instead of on the page on forms.
- If you don’t select a primary dimension, then all of the dimensions show up on the page on forms.
- If you select a primary dimension, and then select a different primary dimension, the first selection is deselected.
- Do not rename the Plan Element dimension.
The enablement process takes a moment to complete.


Configuring Financials
In this section, you complete configuration tasks for Financials.
Note:
If you configured features other than those explicitly covered in the previous section, make sure to complete post configuration tasks required for those features. For more information, see the Administering Planning Modules documentation.Setting the Timeframe and Granularity for Plans
- From the home page, click Application, then Configure.
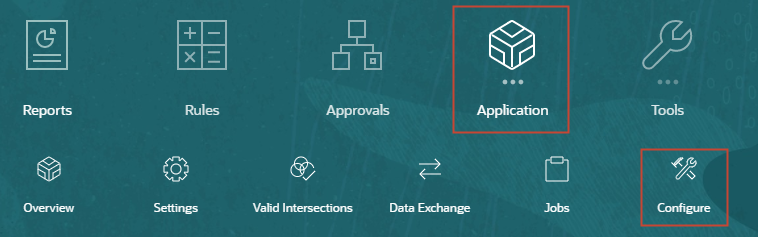
- On the Configure page, select Financials from the dropdown list.
The Configure page for Financials is displayed.
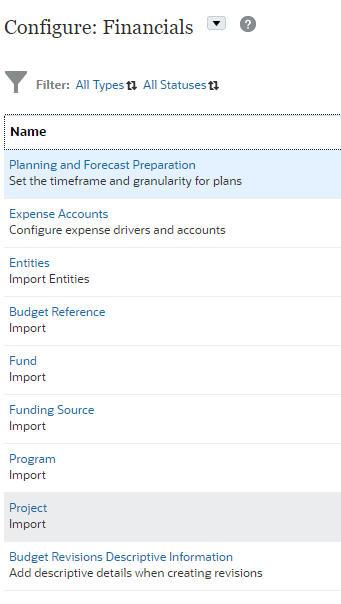
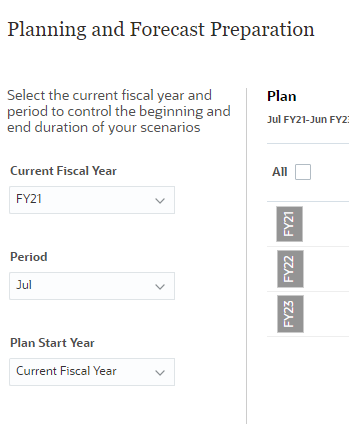
- Click Planning and Forecast Preparation.
- On the left, select the Current Fiscal Year, Period, and Plan Start Year of your plan.
Here's an example:
- On the right, select the planning frequency.
In this example, all four (4) years are set to Monthly.
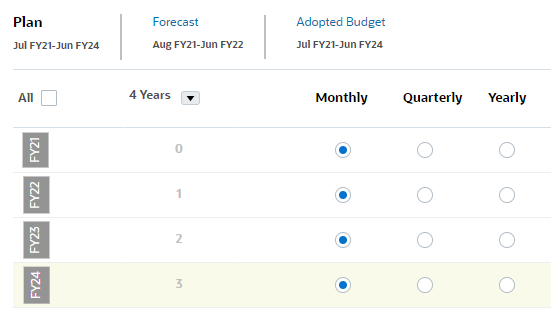
- Click Save.
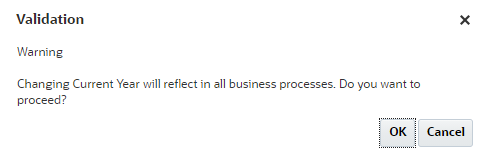
- At the validation message, click OK.
- Click Close.
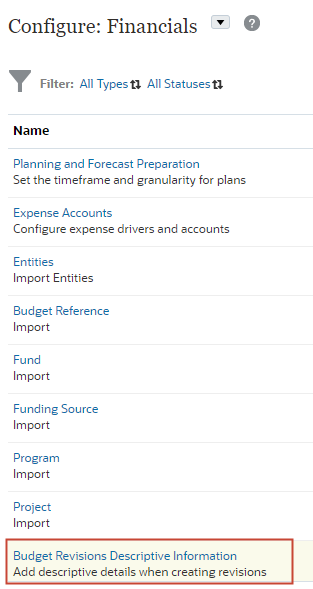
Configuring Budget Revisions Descriptive Information (Optional)
In EPM Planning Financials, you use Budget Revisions Descriptive Information to create custom fields for Budget Revisions. These fields are added to the Budget Revisions forms so users can add more details for revisions. Adding metadata using this configuration task ensures that members are added in the correct location in the Account dimension hierarchy.
In Oracle ERP Cloud, you add Budget Revision Attributes in the Manage Descriptive Flexfield task. See the Adding Budget Revision Attributes section in the Oracle Financials Cloud documentation.
In this section, you configure Budget Revisions Descriptive Information in EPM Planning Financials.
Note:
This task may be optional in your production instance.- On the Configure Page for Financials, click Budget Revisions Descriptive Information.
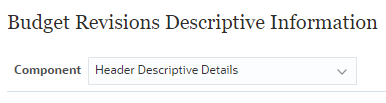
- In the Budget Revisions Descriptive Information dialog, verify that Component is set to Header Descriptive Details.
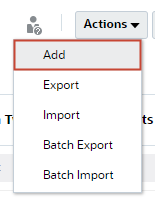
- Click Actions and select Add.
A new row is added to the dialog.
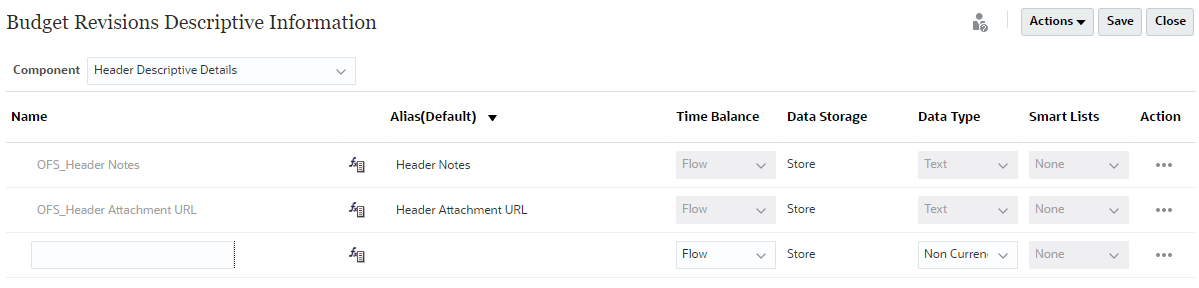
- Enter a member name and set member properties.
In this example, Reference is added. It will later be mapped as an attribute.
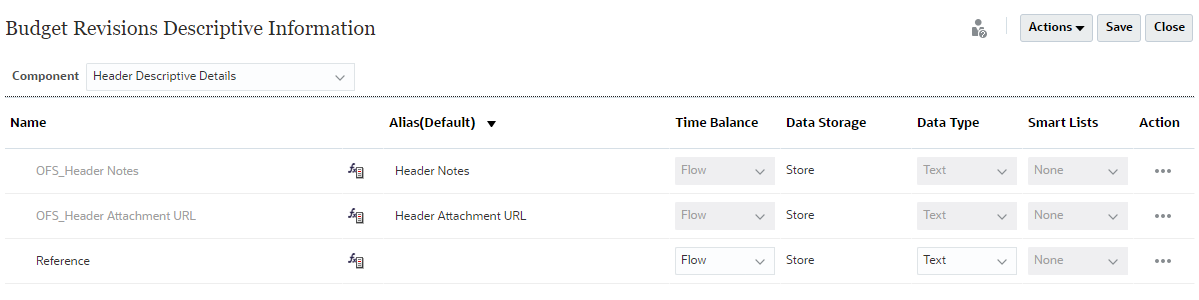
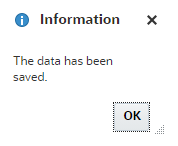
- Click Save.
- At the information message, click OK.
- From the Component dropdown list, select Line Descriptive Details.
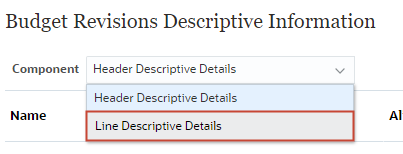
- Click Actions, and select Add.
- In the added row, enter a member name and set member properties.
In this example, Line Code is added.
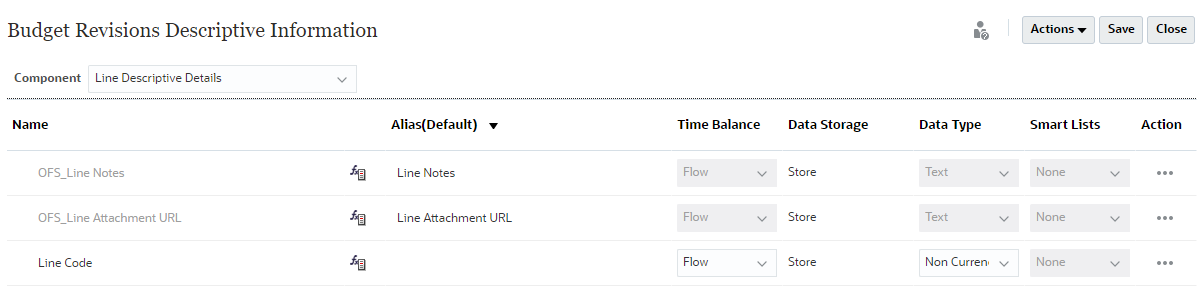
- Click Save.
- At the information message, click OK.
- Click Close.
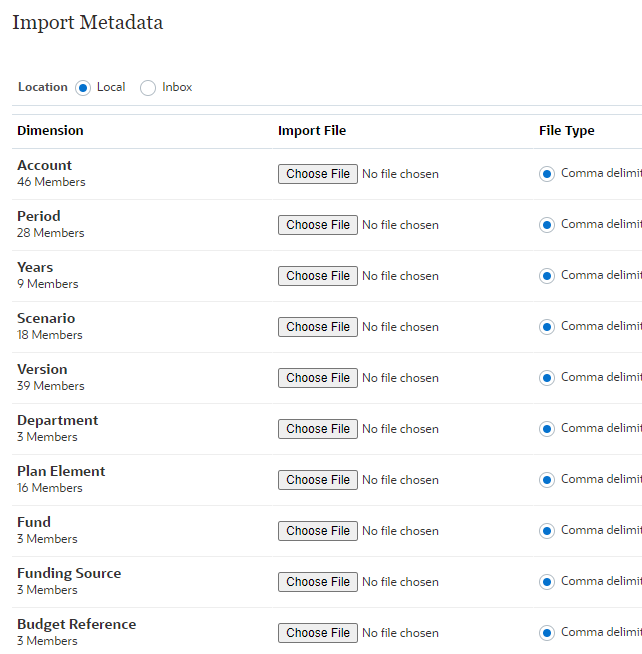
Importing Metadata
The dimension members must match between EPM Planning Financials and Oracle ERP Cloud Budgetary Control. You must use your own chart of accounts in EPM Planning Financials rather than using the provided chart of accounts.
Learn more from these tutorials: Configuring Financials to Bring In Your Own Chart of Accounts in Planning and Leveraging Best Practice Planning in Financials using your COA.
In this section, you import dimension members into EPM Planning Financials.
- Click (Navigator), and under Application, click Overview.
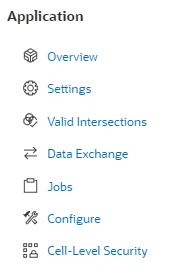
- Click Dimensions.
- On the right, click Import.
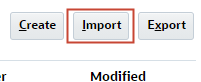
- Click Create.
- For each of your metadata files, click Choose File. Then, select and open the file.
Note:
Depending on your browser, the button label may display Choose File or Browse.
Here's an example:

- On the upper-right, click Import.

Caution:
Make sure that your metadata files are valid prior to importing.
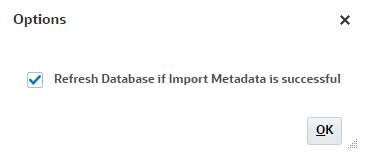
For more information, see the Importing Metadata section in the Administering Planning documentation. - In Options, select Refresh Database if Import Metadata is successful and click OK.
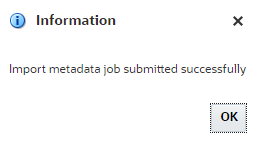
- In the information message, click OK.
- On the upper-right, click Refresh until the Last Validate/Import columns displays an updated status of the job.
Here's an example:
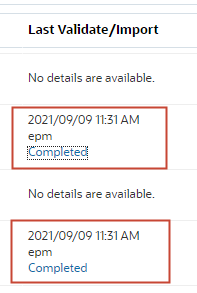
- Click Completed to view the Import and Export job status details.
- When finished reviewing, click Close.
- In Import Metadata, click Close.
- In the next Import Metadata page, click Close.
Adding Entries to the Control Budget Name Smart List
When you enable Budget Revisions, a Smart List, Control Budget Name, is created. In this section, you add Smart List entries to define each of the control budgets that you want to integrate. This provides options in the user interface that allow users to create budget revisions for a specific control budget.
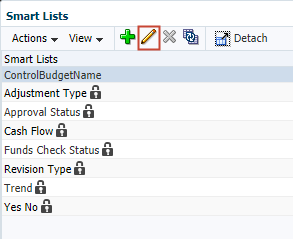
- Click (Navigator), and under Create and Manage, click Smart Lists.

- In Smart Lists, select ControlBudgetName and click
 (Edit).
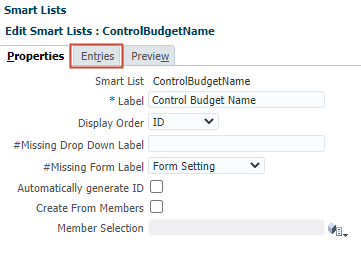
- In Edit Smart Lists, click the Entries tab.
- In Entries, click
 (Add).
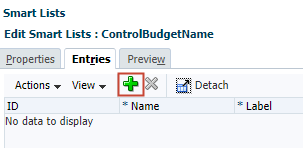
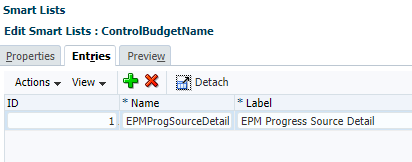
- In the new row, enter a name and label for a control budget that you want to integrate.
In this example, an entry for the EPM Progress Source Detail ERP control budget is added.
Tip:
The Smart List entries provide options in the user interface that allow users to create budget revisions for a specific control budget. - If you need to add more control budgets as entries, repeat steps 4 through 5.
- Click Save.
Assigning Values to User Variables
User variables act as filters in forms, enabling planners to focus only on certain members. In this section, you set values for user variables.
- Click (Navigator), and under Tools, click User Preferences.
- On the left click User Variables.
- For each variable, click its
 (Member Selector) to select a member as the variable's value.
Here's an example:
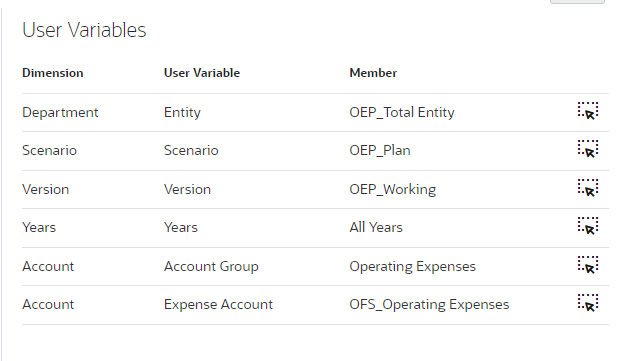
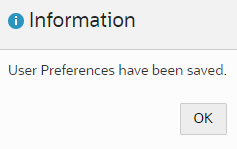
- Click Save.
- At the information message, click OK.
Assigning Access Permissions to Rules
EPM Planning Financials includes rules used to calculate and push data for budget revisions.
Aside from the standard Financials rules, the following rules are added when you enable budget revisions:
| Rule Name | Description |
|---|---|
| Prepare for Revisions | After planning and forecasting is complete and the budget is pushed to Budgetary Control, run this rule to copy data from the original budget to an adopted budget in EPM Planning Financials. Run this rule only once before beginning revisions for the current year. This rule copies data from the original budget using the scenario and version you select, for the periods and years you select. Running this rule also enables drill through from EPM Planning Financials to a control budget in Budgetary Control. |
| Create and Populate Revision | After running Prepare for Revisions, this rule creates a revision header and optionally populates it with a percentage of the current approved amount. |
| Share Revision | Shares the revision with other planners to contribute to the revision cycle. |
| Funds Check | Makes a call to Budgetary Control to check funds and validate that the budget revision meets the controls set in Budgetary Control. |
| Funds Reserve | Once the budget revision is ready, the funds check is successful, and optionally the budget revision is approved if you are using the approval process, reserve funds in the Budgetary Control control budget associated with the revision. The budget revision is pushed to Budgetary Control, invoking the funds reservation process in Budgetary Control, reserving funds for any updated cell values. Also clears the revision. |
| Clear Revision | Manually clears a revision if you decide not to proceed with funds reservation. |
| Get Funds Results | When you run the Funds Check rule, if there are a large number of cells being checked and you don't see results right away, run Get Funds Results to check when the batch job is complete and then review results. |
In this section, you set access permissions to Budget Revisions rules.
Assigning Permissions in the Rules Card
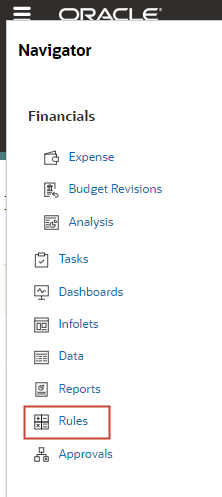
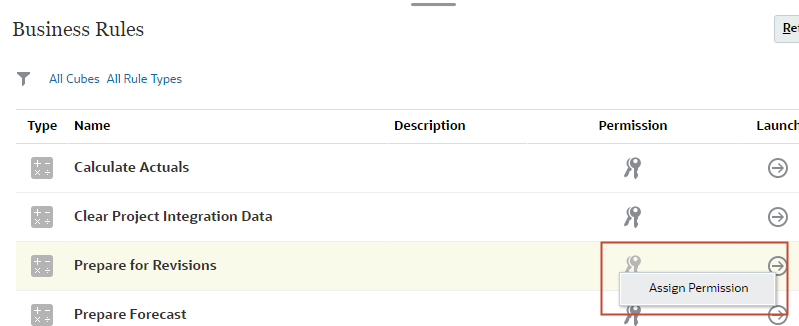
- Click (Navigator), and click Rules.
- For Prepare for Revisions, click
 (Actions) and select Assign Permission.
- Click + (Add User/Group).
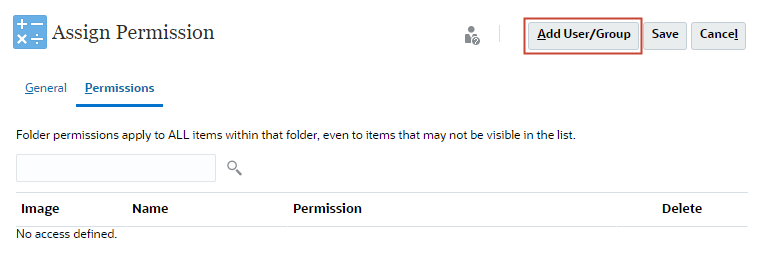
- Select a user you want to provision.
Tip:
You can assign permissions to a group in the Groups tab. - Click OK.
- Click Close.
- In Permissions, verify that the user you selected is assigned Launch permission.
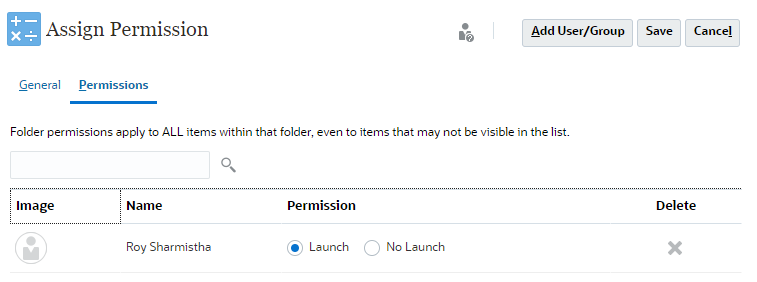
- Click Save.
- Click Cancel.
- Perform steps 2 through 10 to assign permissions to:
- Create and Populate Revision
- Share Revision
Assigning Permissions in Rules Security
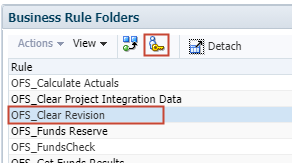
- Click (Navigator), and under Create and Manage, click Rules Security.
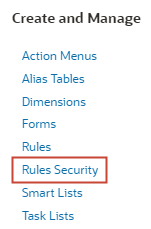
- In Business Rules Folders, select Clear Revision (OFS_Clear Revision) and click
 (Assign Access).
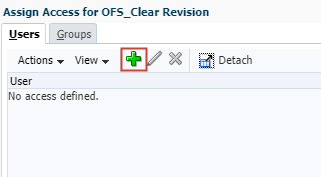
- In Users, click (Add Access).
- Select a user and, for Type of Access, select Launch.
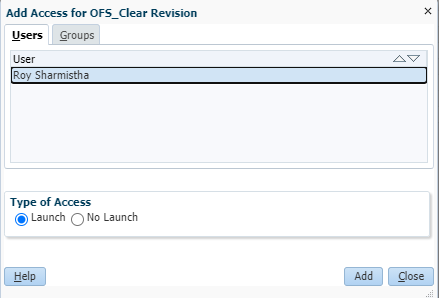
- Click Add.
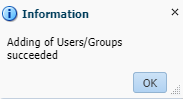
- At the information message, click OK.
- Click Close.
- In Assign Access for OFS_Clear Vision, verify that the user is listed with access rights assigned.
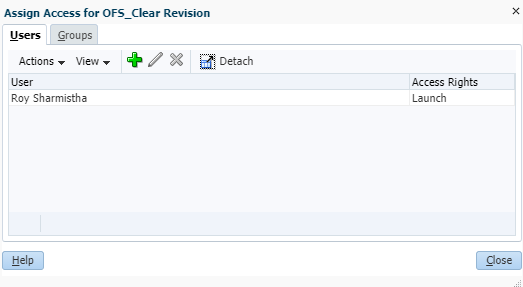
Tip:
You can assign rules Launch permissions to Groups. - Click Close.
- Perform steps 2 through 9 to assign access permissions to:
- Funds Reserve
- Funds Check
- Get Funds Results
Setting Up Data Integrations
About Integrations Between Budget Revisions and Oracle ERP Cloud Budgetary Control
You use Data Integration to drive the integration of budget revisions between EPM Planning Financials and Budgetary Control.
Data Integration provides out of box solutions that enable EPM Planning Financials customers to map EPM Planning Financials dimensions to the dimensions in the Budgetary Control data model. After the setup is done in both EPM Planning Financials and in Data Integration, planners push data to Budgetary Control from within EPM Planning Financials.
Here are the data integration tasks you complete in this section:
General tasks:
- Register Oracle ERP Cloud as a source system.
- Register your Planning Application with OEP_FS as an input cube.
- Register Budgetary Control as a data source, specify the connection to use, and then import into Budgetary Control balance Essbase cubes into Data Integration.
- Register the Planning Budget Revision Data Source, which stores the preparations or revisions made to the budget and then is loaded to Budgetary Control.
For each Budgetary Control Cube that you want to integrate, complete the following:
- Register a Budget Adjustment Request Application and associate it with a Budgetary Control Cube.
- Map Custom Budget Revision Attributes.
- Create the Integration between Planning Budget Revision and Budget Adjustment Request.
- Define dimension mappings with an import format. You also add Target Expressions to target dimensions.
- Define integration options.
Control Budgets can share Budgetary Control Cubes if they use the same chart of accounts and calendar.
Registering the Oracle ERP Cloud Source System
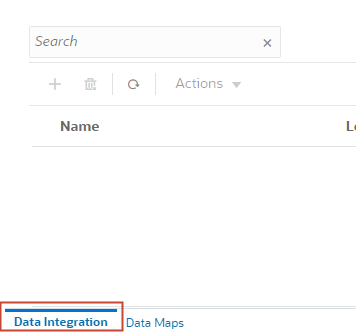
- Click (Navigator), and under Application, click Data Exchange.

- Verify that you are on Data Integration.
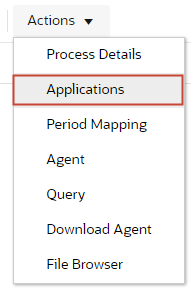
- Click Actions and select Applications.
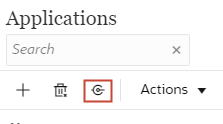
- Click
 (Configure Connections).
- In Connections, click the down-arrow next to
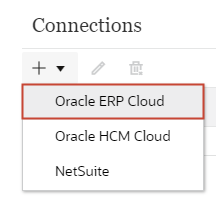
 (Add), and select Oracle ERP Cloud.
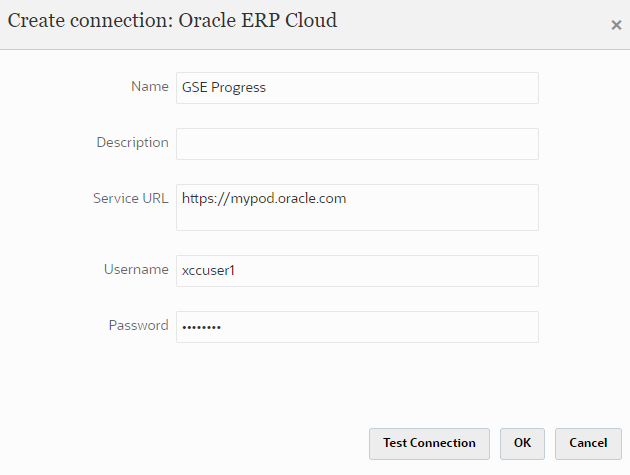
- In Create Connection, enter the source system connection details.
Here's an example:
- Click Test Connection.
Testing the connection takes a quick moment to complete.

When the connection is successful, a status message is displayed on the upper-right.
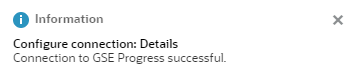
- Click OK.
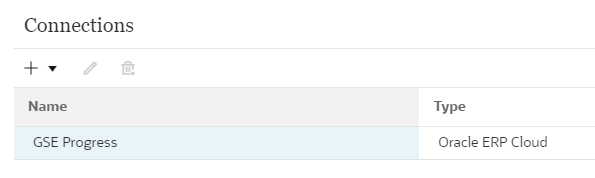
After saving the connection, it is listed on the Connections page.
- On the upper-right, click
 (Return).
Registering the OEP_FS Input Cube
- In Applications, click (Add).
- In Create Application, select:
- Category: EPM Local
- Application: <your EPM Planning application>
- Cubes: Input Cubes - OEP_FS
Here's an example:
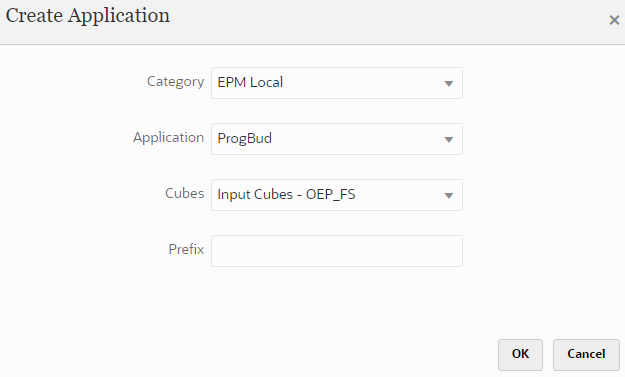
- Click OK.
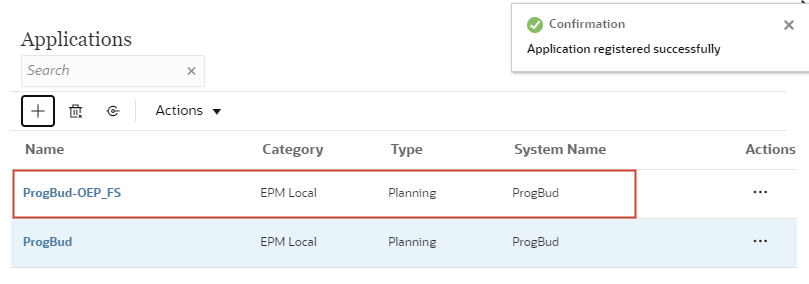
After saving, the application is listed on the page.
Registering Budgetary Control as a Data Source and Importing Applications
- In Applications, click (Add).
- In Create Application, select:
- Category: Data Source
- Type: Oracle ERP Cloud
- Connection: <Select the Oracle ERP Cloud Source System connection you registered>
- Budgetary Control: <Selected>
Here's an example:
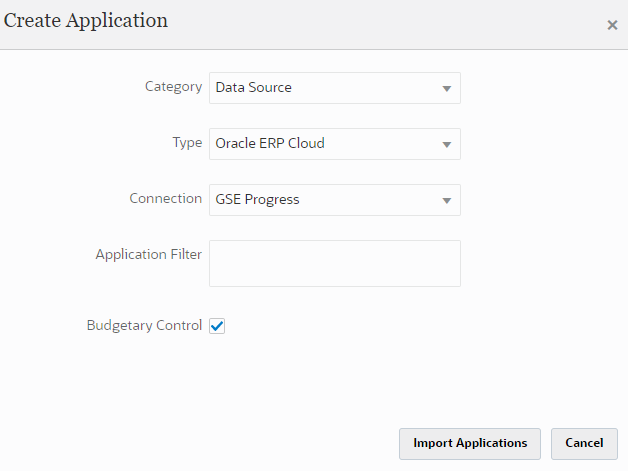
- Click Import Applications.

- On the upper-right, click
 (Close).
 - Click Actions and select Applications.
- In Applications, verify that additional applications were imported. Locate the Budgetary Control Cube name identified in step 22 of Managing Control Budgets for Integration.
Here's an example:
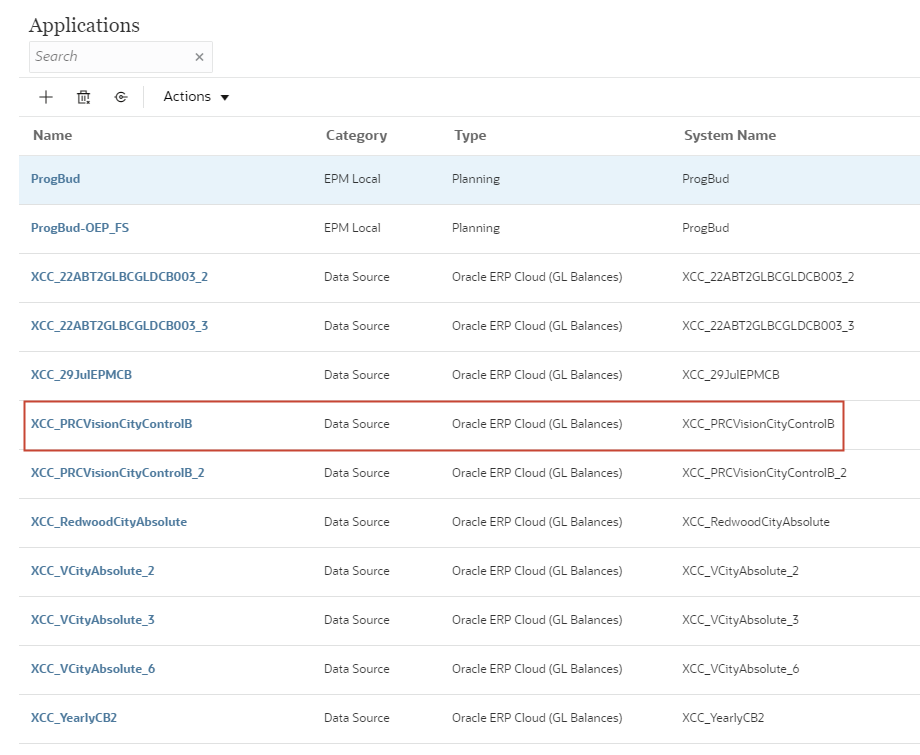
Clicking Import Applications brings over Budgetary Control balance Essbase dimensionality into Data Integration as Budgetary Control target applications. A control budget dimension member within each Budgetary Control target application represents a control budget in Budgetary Control used to load and write back data from and to the Oracle Enterprise Performance Management Cloud.
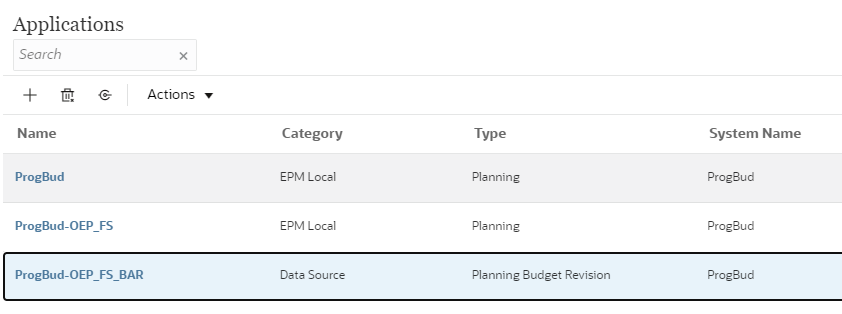
Registering the Planning Budget Revision Data Source
- In Applications, click (Add).
- In Create Application, select:
- Category: Data Source
- Type: Planning Budget Revision
- Application: <Select the OEP_FS Input Cube you registered>
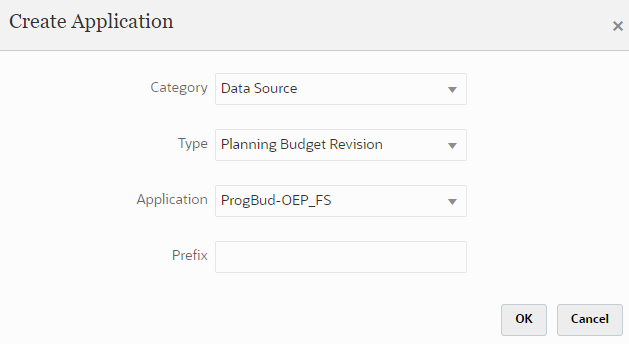
- Click OK.
When saved, this type of application is appended with a "BAR" in the application name. Here's an example:
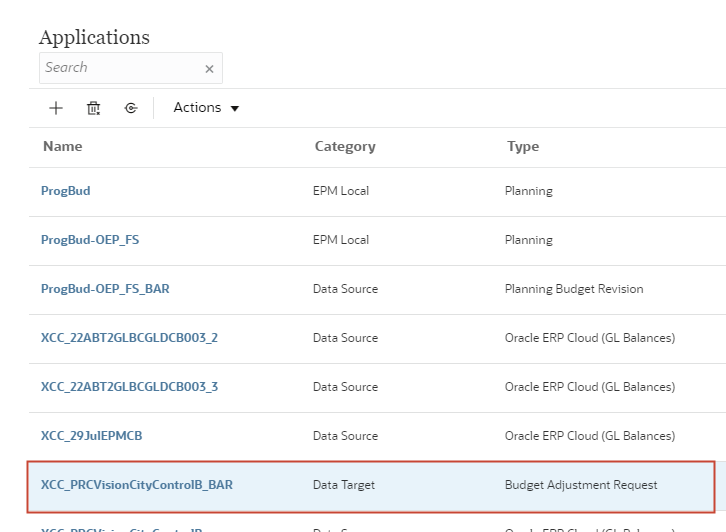
Registering a Budget Adjustment Request Application
- In Applications, click (Add).
- In Create Application, select:
- Category: Data Export
- Type: Budget Adjustment Request
- Application: <Select the Budgetary Control Cube name identified in step 22 of Managing Control Budgets for Integration>
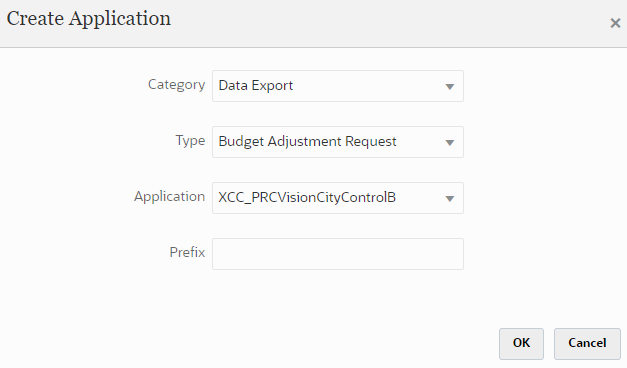
- Click OK.
When saved, this type of application is appended with a "BAR" in the application name. Here's an example:
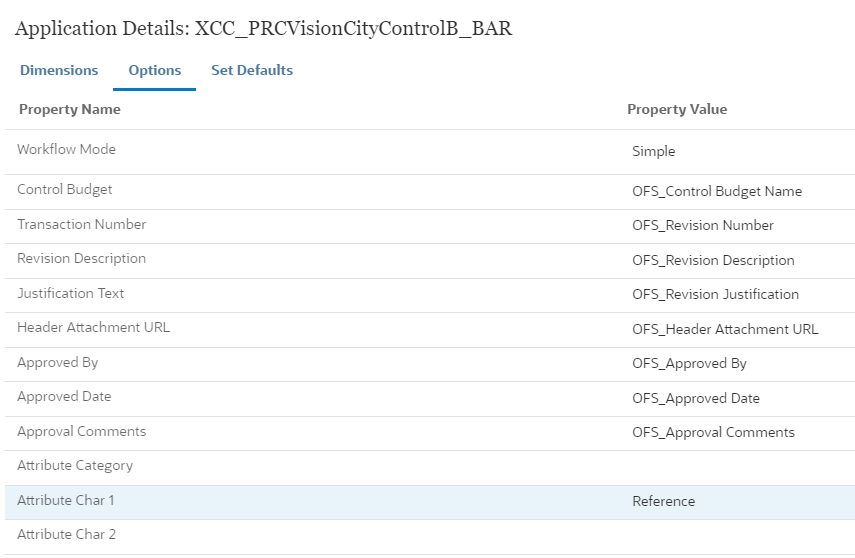
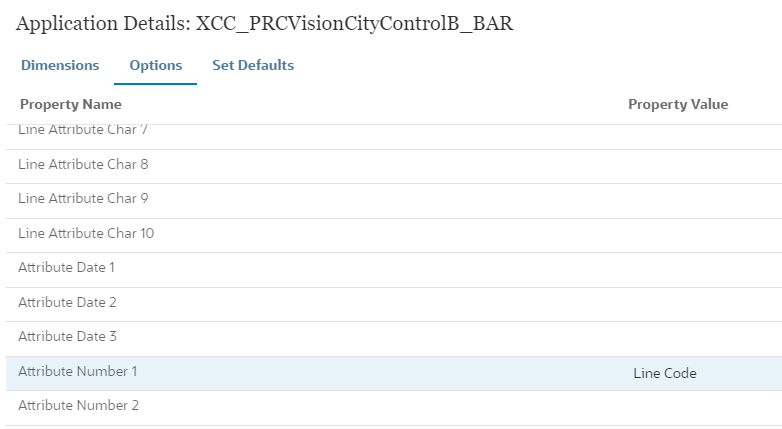
Mapping Custom Budget Revision Attributes
- In Applications, click the Budget Adjustment Request application you just created.
- Click Options.
- In fields that start with Attribute, map any additional attributes.
In this example, Reference is mapped to Attribute Char 1 and Line Code is mapped to Attribute Number 1. Both attributes were added in the Configuring Budget Revisions Descriptive Information section of this tutorial.
- Click Save.
- Click (Return).
- Click (Close).
Creating the Integration between Planning Budget Revision and Budget Adjustment Request
- In Data Integration, click (Create Integration).
- Enter a name and location.
Tip:
The integration and location name can be the same.Here's an example:
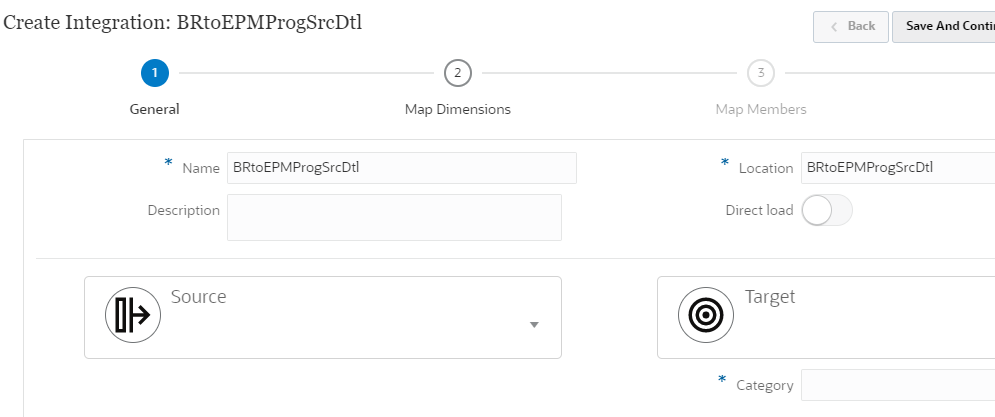
Note:
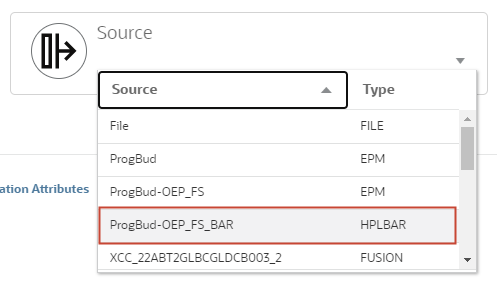
Note down all integration names. You will be adding them as parameters when defining connections later. - Click the down-arrow next to Source and select the data source you defined with the type Planning Budget Revision.
Here's an example:
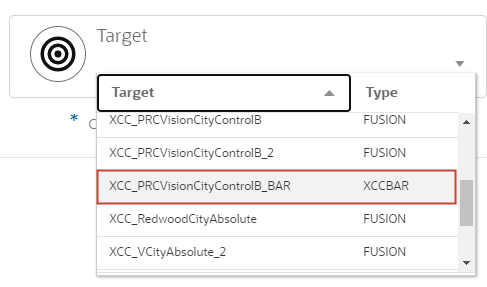
- Click the down-arrow next to Target and select the application you defined with type Budget Adjustment Request.
Here's an example:
- Verify or select a Category.
The Category refers to your budget scenario.
- Expand Location Attributes.
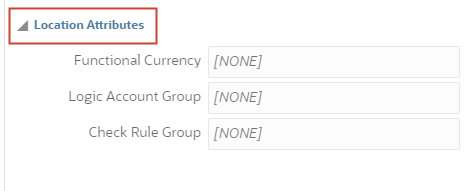
- For Functional Currency, enter your default currency.
In this example, USD is the default currency.

- Click Save and Continue.
Mapping Planning Budget Revision and Budget Adjustment Request Dimensions
- In Map Dimensions, verify that the Import Format name defaults to the integration name.
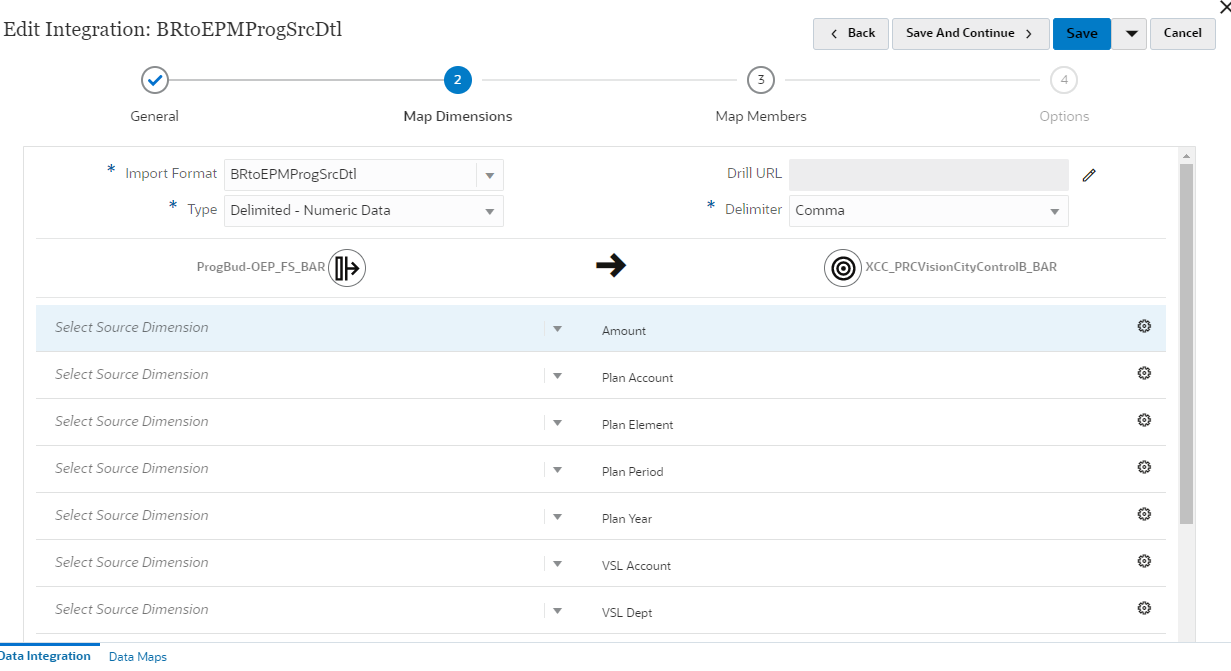
- For Type, select Delimited - All Data Type.
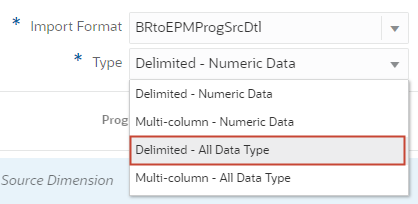
- Verify or select a delimiter.
- Click Save.
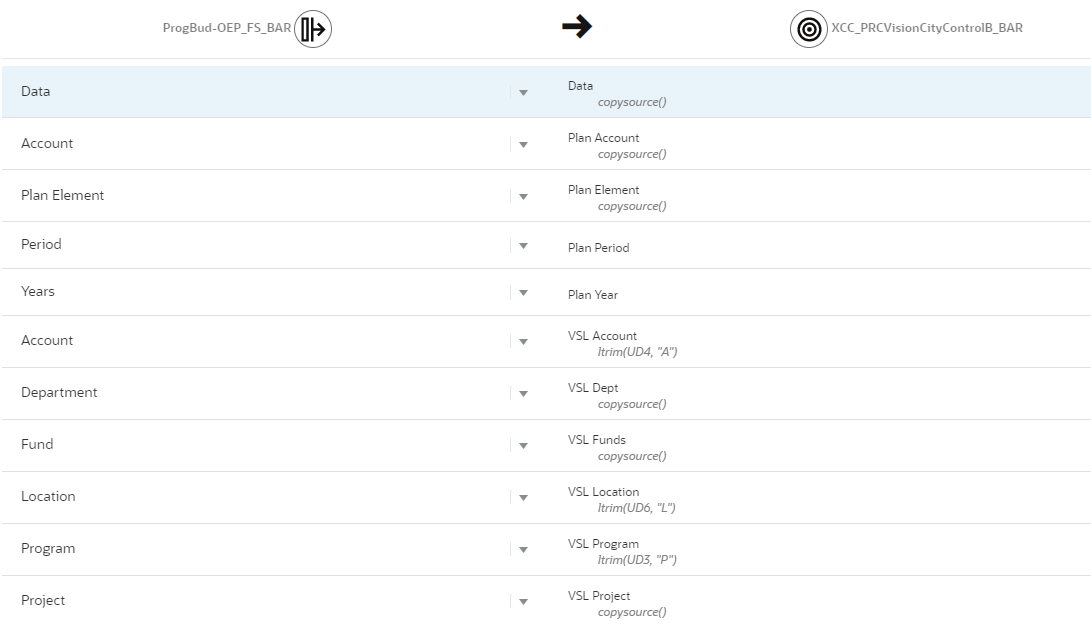
- Select dimension mappings between the source (EPM Planning Financials) and target (Oracle ERP Cloud Control Budget).
Tip:
Add Target Expressions to each of the Budgetary Control dimensions that do not directly map with EPM Planning Financial dimensions.
Target Expressions are used to transform the source value read from the source to the target dimension values to be loaded to target application.
Common expressions include:- Copysource - uses or copies the same member name from EPM Planning Financials in Budgetary Control
- LTrim- removes the prefix used in EPM Planning Financials.
- RTrim - removes the suffix used in EPM Planning Financials
- Constant - assigns a constant value for an extra dimension in Budgetary Control.
Here's an example:
- Click Save and Continue.
Defining Budget Adjustment Integration Options
- In Map Members, click Save and Continue.
You should be in Options.
- Next to Filters, click Options.
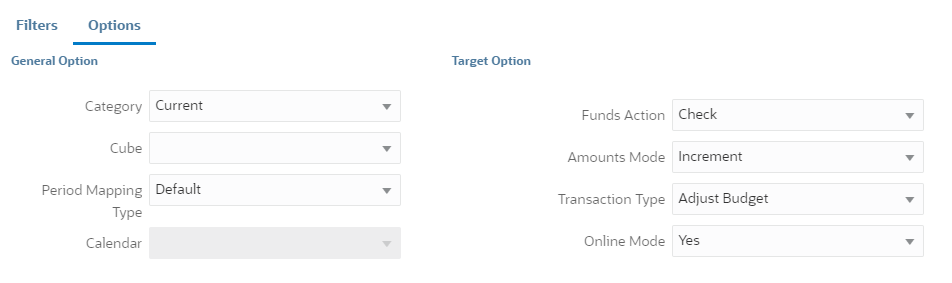
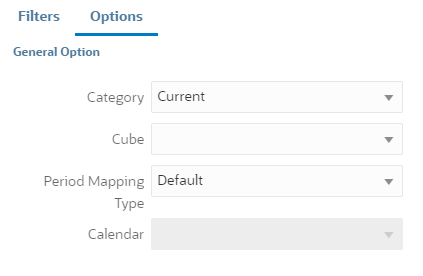
- Under General Options, accept defaults or select the following:
- Category (Budget Scenario).
- Period mapping type.
Here's an example:
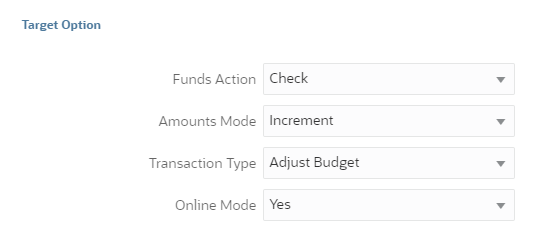
- Under Target Options, accept defaults or select the following:
- Funds Action
- Amounts Mode
- Transaction Type
- Online Mode
Here's an example:
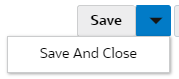
- Click the down-arrow next to Save and select Save and Close.
Tip:
Make sure that the default Period Mapping in Data Integration includes the period used in your budgets. See the Managing Period Mappings section of the Administering Data Integration documentation.Managing EPM Connections
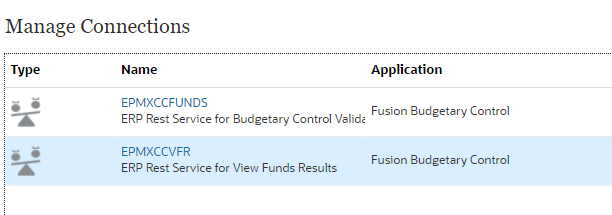
In this section, you create connections to facilitate user access and data movement between Planning Financials and Budgetary control.
- EPMXCCFUNDS
- EPMXCCVFR
- EPMXCCDMINTEGRATION
Setting Up a Connection for Funds Checking
In this section, you set up a connection to Budgetary Control for Funds Check to validate budget revisions and for Funds Reserve.
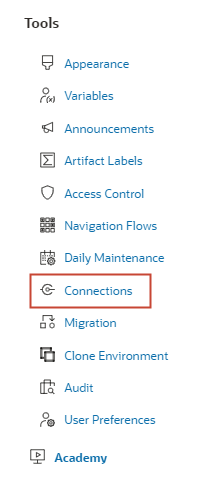
- Click (Navigator), and under Tools, click Connections.
- In Manage Connections, click Create.
- From the available providers, click Fusion Budgetary Control.
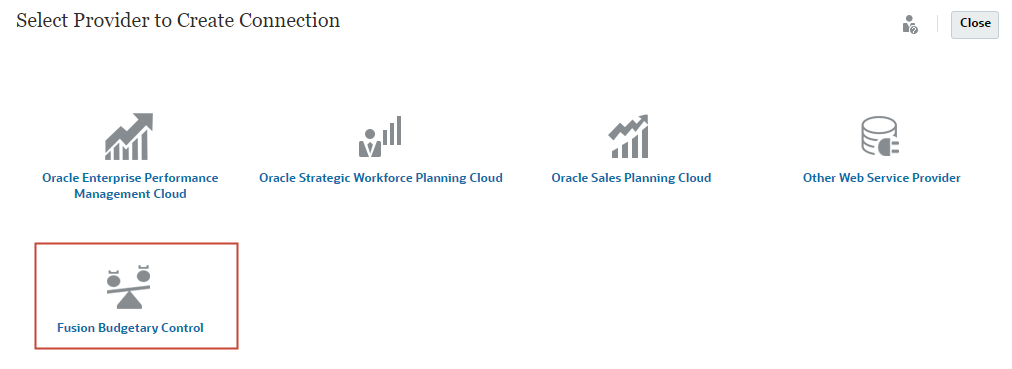
- Enter EPMXCCFUNDS as the name, and optionally add a description.
- Enter your Oracle ERP URL based on the following example:
https://<ERP Service Connection Name>/fscmRestApi/resources/11.13.18.05/budgetaryControlBudgetTransactions - Enter the name of the user who is assigned as a Budget Manager and has data access to the Budgetary Control budgets with which you want to integrate.
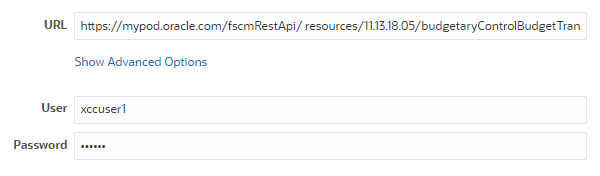
- Click Save and Close.
After saving, the connection is listed on the Manage Connections page.
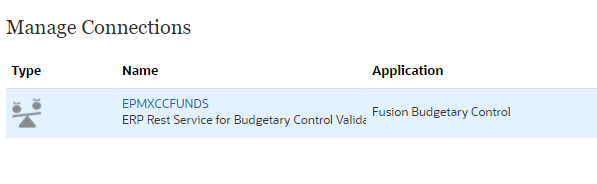
Setting Up a Connection to View Budgetary Control Result
In this section, you set up a connection to Budgetary Control to view Budgetary Control results.
- In Manage Connections, click Create.
- From the available providers, click Fusion Budgetary Control.
- Enter EPMXCCVFR as the name, and optionally add a description.

- Enter your Oracle ERP URL based on the following example:
https://<ERP Service Connection>/fscmRestApi/ resources/11.13.18.05/budgetaryControlResultsBudgetTransactions - Enter the name of the user who is assigned as a Budget Manager and has data access to the Budgetary Control budgets with which you want to integrate.
Tip:
The user must have Service Administrator access to Budgetary Control.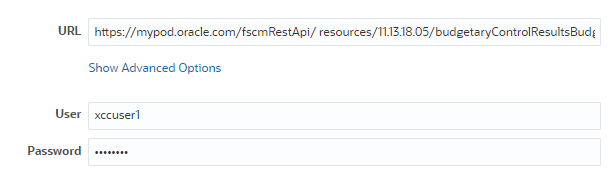
- Click Save and Close.
After saving, the connection is listed on the Manage Connections page.
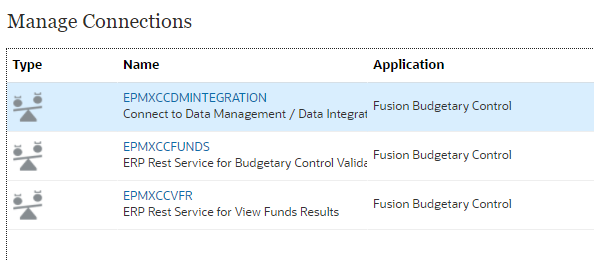
Setting Up a Connection for Data Integration
In this section, you create a connection to Data Management and Data Integration to invoke integration jobs.
- In Manage Connections, click Create.
- From the available providers, click Fusion Budgetary Control.
- Enter EPMXCCDMINTEGRATION as the name, and optionally add a description.

- Enter your Oracle EPM Planning URL based on the following example:
https://EPM Service connection Name/aif/rest.
- Enter user credentials.
Tip:
Enter the EPM Service Administrator user name, in the format domain.userName, and password. In Oracle Cloud Infrastructure environments, you can omit the domain.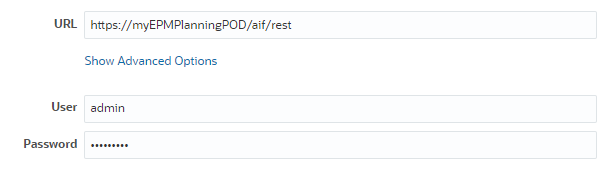
- Click Show Advanced Options.
- For each combination of the integration
name used in Data Integration and control budget, add a parameter to link.
- For Name, enter the Control Budget name.
- For Value, enter the integration name.
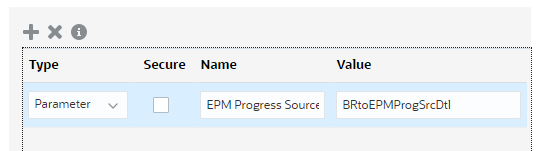
Tip:
For Control Budgets that share the same Budgetary Control Cube, you can enter the same Data Integration Name in the Value field. - Click Save and Close.
After saving, the connection is listed on the Manage Connections page.
Optional Tasks Before Starting the Planning Cycle
Here is a list of tasks that you may want to consider before starting the planning and forecast cycle:
- Add additional budget line attributes.
- Import actuals data to start your budgeting process in the EPM Planning Financials module.
- If you enabled Import Balances from Budgetary Control, load encumbrance data from Budgetary Control to OEP_Consumed in the Scenario dimension. You can use
this member to import any encumbrance, obligation, or commitment balances from Budgetary Control into EPM Planning Financials.
Use Data Management to total all these balances and bring them into this single member. See Loading Budgetary Control Budget Consumption Balances to the EPM Cloud Process Description in the Administering Data Management for Oracle Enterprise Performance Management Cloud documentation.
- Set Up the Approval Process. You can use your existing approval hierarchy if you have one. You can approve across two dimensions, for example
Entity and Product. For more information, see Managing Approvals in the Administering Planning documentation.
You set up the approval unit hierarchy scenario and version combination for each revision. For more information, see Assigning Approval Unit Hierarchy Scenario and Version Combinations in the Administering Planning documentation.
- Configure Single Sign-on between the Oracle EPM Cloud environment and the Oracle Fusion Cloud environment to allow planners to drill through from EPM Planning Financials to Budgetary Control.
After you complete the required and optional tasks, you can start the planning and forecasting cycle.
More Learning Resources
Explore other labs on docs.oracle.com/learn or access more free learning content on the Oracle Learning YouTube channel. Additionally, visit Oracle University to view training resources available.
For product documentation, visit Oracle Help Center.
Setting Up EPM Planning Financials Budget Revisions with Oracle ERP Cloud Budgetary Control
F47610-03
September 2025