Introduction
This 60-minute hands-on tutorial shows you how to register applications, define period mappings, define category mappings, and then create and run a file-based data integration in Oracle Sales Planning. The sections build on each other and should be completed sequentially.
Background
In Oracle Sales Planning, you can use Data Integration to copy or move data using an easy-to-navigate interface. You can define file-based and direct integration sources, create mapping rules to translate source data into the required target format, and execute and manage the periodic data loading process.
For Sales Planning, Data Integration is available for the following predefined roles:
- Service Administrator
- Power User
- User
Note:
In future releases, role definitions may change to provide additional levels of security for different roles.Data Management is still fully supported and remains available as a menu selection on the Navigator menu. Integration-related activities are bi-directional and synchronized between Data Integration and Data Management. For example, when you map dimensions in Data Integration, any saved mappings are populated automatically in Data Management.
In this tutorial, you complete the tasks needed to define and run file-based data integrations:
- Registering Applications
- Mapping Periods
- Mapping Categories (Scenarios)
- Defining Integrations
- Mapping Dimensions and Members
- Setting Integration Options
- Running Integrations
Prerequisites
Cloud EPM Hands-on Tutorials may require you to import a snapshot into your Cloud EPM Enterprise Service instance. Before you can import a tutorial snapshot, you must request another Cloud EPM Enterprise Service instance or remove your current application and business process. The tutorial snapshot will not import over your existing application or business process, nor will it automatically replace or restore the application or business process you are currently working with.
Before starting this tutorial, you must:
- Have Service Administrator access to a Cloud EPM Enterprise Service instance. The instance should not have a business process created.
- If you haven't already, register for a free Oracle Cloud Customer Connect account so you can
access the required files.
- Download the latest Sales Planning Sample Application snapshot from this idea page.
- Upload and import the latest Sales Planning Sample Application snapshot into your Planning instance.
- Save this data file and this data map locally.
- Download this snapshot to your local folder. This snapshot includes the Verify QTP Data Load form used in this tutorial.
Migrating Data Forms
In this section, you import a data form using Lifecycle Management.
Importing the Verify QTP Data Load Form
- On the home page, click Tools, and then Migration.
- In Migration, click Snapshots.
- Click Upload.
- In the Upload dialog box, click Choose File to select the file.
- Locate and select the Verify QTP Data Load Form.
- Click Open.
Note:
Depending on your browser, the button label may display Choose File or Browse. - Click Upload.
- When a message stating that the File uploaded and processed successfully is displayed, click OK.
- For Verify QTP Data Load Form, click
 (Actions), and then select Import.

- When prompted to proceed with the import, click OK.
- In Migration Status Report, click Refresh until the status displays Completed.
- Click Close.

Lifecycle Management is displayed.


The snapshot is now listed on the page.


Reviewing the Data Load Point of View of the Form
- Click
 (Navigator),
and under Create and Manage, click Forms.
(Navigator),
and under Create and Manage, click Forms.

- In the content area of Form and Ad Hoc Grid Management, select Verify QTP Data
Load and click
 (Edit) to
review the form.
(Edit) to
review the form.

The form is opened with Properties displayed.
- Click the Layout tab.
- In Point of View, review the member selections and confirm that the Year member selection is set
to
FY24.

- On the bottom right, click Finish to close the form.
- Return to the home page. Click
 (home).
- Click Data.

- Click Verify QTP Data Load.

You will be loading data to the members in the data point-of-view displayed on this form.


Registering Applications
Before defining integrations, you must register source and target applications. A file-based source system is readily available and can be used to load data into your application using a data load file.
Reviewing Source and Target Applications
- On the home page, click Application, then Data
Exchange.

- In Data Exchange, verify that you in Data Integration.

- Click Actions, and then select Applications.

A file-based data source and an EPM Local application are predefined when you first create your application. In this example, the EPM Local application for the current service, as well as a standard file-based source system, were created during the application creation process.

Registering EPM Local
- In Applications, click
 (Add).
- In Create Application, select the following:
- Category: EPM Local
- Application: SalesPln
- Cubes: Input Cubes - OEP_QTP
- Verify your selections and click OK.

The SalesPln-OEP_QTP (EPM Local) application is registered.

- Click SalesPln-OEP_QTP.
- In Application Details, review the Data Table Column Name mappings associated with each
dimension.
The Data Table Column Name shows the column name in the staging table, where the imported data is temporarily stored before proceeding with the export to the target.

- In Application Details: SalesPln-OEP_QTP, click
 (Return).
 - In Applications, click X (Close).

Reviewing Period Mappings
You can use various kinds of calendars with period granularity based on your business and application requirements. You can define period mappings in three ways:
- Global Mapping
- Application Mapping
- Source Mapping
- In Data Integration, click Actions, and select Period
Mapping.

- In Global Mapping, click
 (Filter).
 - In Target Year, enter FY24.
- Review the Global Mappings for FY24.
- On the top right, click X (Close).

You define a global mapping in cases where you do not have many target applications getting data from multiple source systems with different types of source calendars. Use a global mapping to ensure that various periods are accommodated in the individual mapping.
Defining Category Mappings
Depending on the Cloud EPM business process you are working with, you define category mappings for your source and target.
You can define these types of category mappings:
- Global mappings—lets you define mappings across multiple applications.
- Application mappings—can be defined for a target application.
- In Data Integration, click Actions and select Category
Mapping.

- In Global Mapping, click (Add).

A new row is added to the page.
- In the new row, click in the columns, then enter or select the following:
- Category: OEP_Actual
- Frequency: Monthly
- Target Category: OEP_Actual
- Verify your entries and click Save.

When saved, a category key is assigned to the entry.
- On the top right, click X (Close) to close the Category Mapping page.
Creating File-Based Data Integrations
Defining Integrations
- In Data Integration, click
(Create), then select Integration.

The integration workflow is opened with the General page displayed. Navigate between tasks by clicking a task on the workflow bar, or the buttons on the top right.

- For Name and Location, enter SPCOrders.
Tip:
Descriptions are optional.
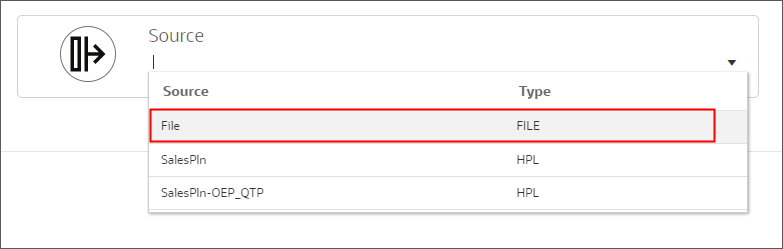
- For Source, click the down arrow and select File.
- In File Browser, click the inbox down arrow and select Create Folder.
- For folder name, enter SalesPln.
- Verify that you are in the SalesPln folder and click Upload.

- Locate and select ActualBookings2024.csv and click Open.
- Select the ActualBookings2024.csv row and click OK.
- Click File Options.
- In File Import - File Options, set or verify the following:
- Type: Delimited - All Data Type
- Delimiter: Comma
- Use Header for Column Names: 1
- Click Next.
- Verify the data to be imported and click Finish.

- For Target, click the down arrow and select SalesPln-OEP_QTP.

- For Category, select OEP_Actual.

- Expand Location Attributes.
- For Functional Currency, enter USD.
- Review your selections.

- On the top-right, click the arrow next to Save and select Save And Close.

Tip:
If you have locations previously defined for another integration, you can select them here. If you select an existing location for your integration, the target application is preselected for you. If you enter a new location, make sure to select a source and target application.


The ActualBookings2024.csv file is now associated with the Source.


Modifying Integrations
- In Data Integration, click SPCOrders.
- In Edit Integration: SPCOrders, review your previous integration selections on the
General page.


Mapping Dimensions and Members
Mapping Source and Target Dimensions
You map the source dimensions to the target dimensions in the application. In addition, you can define simple transformation rules using expressions.
When mapping dimensions in file-based integrations where the source file has a header record, select source columns for each dimension. Data Integration automatically determines the column number and populates the column number. You can also manually enter the column number.
- In Edit Integration: SPCOrders, click Map Dimensions.

- In Map Dimensions, set or verify the following:
- Import Format: SPCOrders
- Type: Delimited - All Data Type
- Delimiter: Comma

- On the top-right, click the arrow next to Save and select Save And Close.
- Re-open the Integration, click SPCOrders.
- In Edit Integration: SPCOrders, click Map Dimensions.

- For each source dimension, click the down arrow and select a dimension to map to the target
selection. Map:
- Data to Data
- Measures to Measures
- Product to Product
- Sales Channel to Sales Channel
- Territory to Territory
- Version to Version
- Verify your selections and Save your changes before proceeding to the next
step.
Account dimension mappings will be done in the next step.

Tip:
Multiple source columns of the same dimension can be mapped to target dimensions. You can also use source or target expressions to map dimensions. Aside from the standard expressions, you can use the SQL expression type to assign any SQL expression that can be used in a SQL INSERT statement for a value.Mapping Source and Target Members
Mapping members allows you to translate source values to valid members in each target dimension.
- If you did not define target expressions, you must add a mapping for each dimension.
- If you have defined target expressions to derive the target members for a given dimension, then you don't have to define member mappings.
- If you use conditional target expressions, then you can define member mappings for the remaining source values not covered by the conditions.
- If your data transformations can be achieved using target expression, Oracle recommends using target expressions instead of mapping members. Transformations using target expressions perform significantly better than member mapping for large data sets.
Mappings can be shared across multiple integrations using a parent location. Mappings are processed for each dimension in the default order of Account, Entity, ICP, UD1, UD2, and so on. You can override the mapping order by changing the calculation sequence in Application definition.
- In Edit Integration: SPCOrders, click Map Members.

- For Dimension, select Accounts.

Note:
For each dimension listed, you must define a member mapping. - Click (Add).
- In Add Member Mapping, click the == (Explicit) icon next to Source and
select Is
Like.

Tip:
In Source, you select a member mapping type before specifying a source value. For descriptions of supported member mapping types, see the Add Member Mappings section of the Administering Data Integration for Oracle Enterprise Performance Management Cloud documentation. - In the textbox next to the Source icon, enter *.
- In the Target textbox, enter All Channel Accounts.
- In the Processing Order textbox, enter Accounts.
- Verify your selections and click OK.

Mappings for Account are displayed.

- Import the rest of the mappings. Click Actions, and select
Import, and then All Dimensions.

- In Select a file to import, double-click inbox and select SalesPln folder.
- Verify that you are in the SalesPln folder and click Upload.

- Locate and select spcmaps2024.txt and click Open.
- Select the spcmaps2024.txt row and click OK.

- In Select import mode and validation, set the following:
- Import Mode: Replace
- Validation: No Validate
- Execution Mode: Online
- Verify your selections and click OK.

- For each dimension, click the down arrow next to Dimension, select a dimension, and verify
that mappings were added for each dimension.


- Click Save.
Setting Integration Options
Use Options to specify and verify file options, explicit period formats, category, cube, filters for importing data, and options on how to process the data when loading to the target application.
- In Edit Integration: SPCOrders, click Options.

- In General Options, review and verify selections.

- In Target Options, for Load Method, select All data types with security.
- Verify all other Target Options.

- Click the down arrow next to Save and select Save And Close.

Running Integrations
Running the File-Based Integration
- In Data Integration, for SPCOrders, click
 (Run).

- In Run Integration: SPCOrders, set or verify the following:
- Import Mode: Replace
Setting the import mode to Replace clears all the data for the data point-of-view in the Workbench.
- Export Mode: Merge
Setting the export mode to Merge overwrites existing data with the data in the load file. If data does not exist, it loads the new data.
- Start Period: Jan-24
- End Period: Jun-24
- File: ActualBookings2024.csv
- Import Mode: Replace
- Verify your selections and click Run.

The integration execution status message is displayed.
When completed, the Import, Validate, and Export icons change in color. The Status section states that the Integration process completed successfully.

Viewing Results in the Workbench
- In Executing Integration: SPCOrders, click Workbench.

- In the Workbench, review the imported data.

- On the top right, click X (Close).
In Data Integration, notice that the icon next to SPCOrders has changed to a green checkmark, indicating that the integration completed successfully.

Viewing Data Load Results in a Form
- Return to the home page. Click
(home).
- Click Data.
- Click Verify QTP Data Load.
The data you loaded using Data Integration is now displayed on the form.

Before you can start planning, make sure to run the required rules to process and aggregate the loaded historical data.
Related Links
Loading Data into Sales Planning using Data Integration
G11141-01
July 2024