Introduction
This tutorial shows you how to design forms for data entry and reporting. The sections build on each other and should be completed sequentially.
Background
Forms, when designed effectively, make planning easy.
This tutorial explores tasks and considerations for designing forms using Forms 2.0. Forms 2.0 uses the existing Forms 1.0 runtime functionality and enhances it using Slick Grid with Oracle JET components for faster rendering, sophistication, ease of use, and consistency.
Both Forms 1.0 and Forms 2.0 currently coexist in the same business process. Forms 1.0 is the default version for existing applications. Forms 1.0 behavior remains unchanged. You can still create and update these forms in your business process as you did before. All newly created and recreated applications will default to Forms 2.0.
Prerequisites
Cloud EPM Hands-on Tutorials may require you to import a snapshot into your Cloud EPM Enterprise Service instance. Before you can import a tutorial snapshot, you must request another Cloud EPM Enterprise Service instance or remove your current application and business process. The tutorial snapshot will not import over your existing application or business process, nor will it automatically replace or restore the application or business process you are currently working with.
Before starting this tutorial, you must:
- Have Service Administrator access to a Cloud EPM Enterprise Service instance.
- Have the Planning sample application (Vision) created in your instance.
Forms Overview
You use forms to support data entry and summary-level reports. You can transform forms into charts to help planners analyze results.
Form content is similar to the templates you use to collect and calculate data. While it looks similar to a spreadsheet, forms are directly connected to your data, minimizing manual processes.
Considerations for Forms 2.0
- Forms 2.0 is not available in Task Manager. Task Manager defaults to Forms 1.0, even when the Forms Version application setting is set to Forms 2.0.
- The Autosave option is not supported in Forms 2.0. Instead, perform Calc on the fly to see your changes without having to submit changes to the database and refresh.
- Forms 2.0 runtime filtering supports column filtering. Runtime filtering on rows will be supported in a future update of Forms 2.0.
- Service Administrators can define format rules for forms at design time, then users can apply the format rules to Forms 2.0 forms at runtime using styles.
- The Planning Modules Configuration Wizard is not supported in Forms 2.0.
- All future web form enhancements will be in Forms 2.0.
Form Components
You can create forms based on your company's planning requirements.
Forms and Cubes
When you create a form, you associate it with a cube, which determines the form's valid members. For example, if you assign a form to the Revenue cube, you can add only accounts that are valid for the Revenue cube. Entered data is saved to the selected cube's database.
A form's content is based on a single cube.
Form Layout
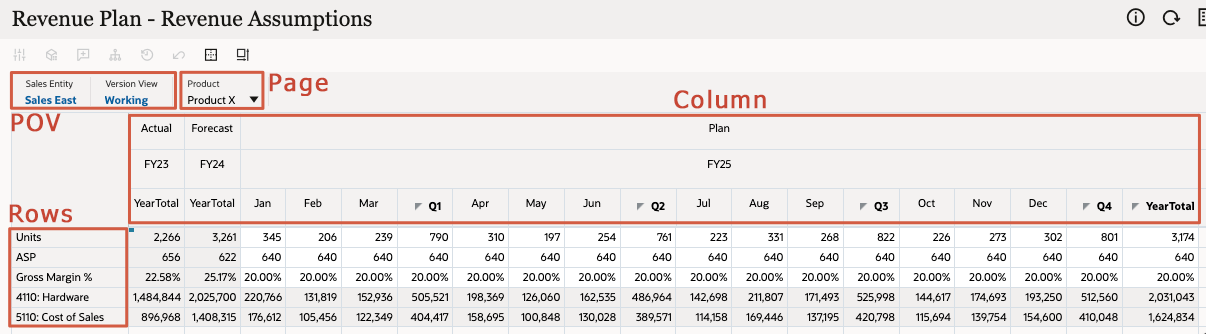
A form's layout includes:
- Point of View (POV) - Select point of view (POV) dimensions such as year, scenario, and version to define the context for pages, rows, and columns. For example, if Scenario is Budget, all data displayed and entered in pages, rows, and columns is written to the Budget scenario dimension member. Each POV dimension is set to one member, which planners can't change.
To simplify a form’s POV, or better tailor it to the needs and roles of planners, you specify only relevant members or define user variables.
- Page - Use the page axis to specify member combinations that may span dimensions so that users can work with data in smaller, logical views. Each page axis item can have members selected from different dimensions. Users see only members they can access.
- Rows and Columns - Rows and columns define the grid into which planners enter data. For example, you can assign Unit Sales to the row axis and January to the column axis. When planners access forms, they can enter data into the cell where the Unit Sales row intersects with the January column.
- Attribute Dimensions - In addition to using attribute dimensions as filters, you can define attributes as unique dimensions within Planning so that they can be placed on an axis other than their associated base dimension. This enables you to perform cross-dimensional rollups across attribute members.
You can specify multiple page drop-down lists, and select members using relationship functions or attributes. Switch between member sets by selecting them from the page axis.
You display member names or aliases on the page axis. You can specify the number of members in a page dimension that enables a search drop-down list on the data entry page, useful if dimensions contain many members.
By default, forms have one set of rows and columns. You can add rows and columns to create asymmetrical combinations of members.
Attribute dimensions are optional on form grids and are listed separately on the Layout tab of the Form Designer. To use an attribute dimension in a form, drag the attribute dimension to the point of view, page, row, or column.
Form Design
Design considerations for form organization and deployment:
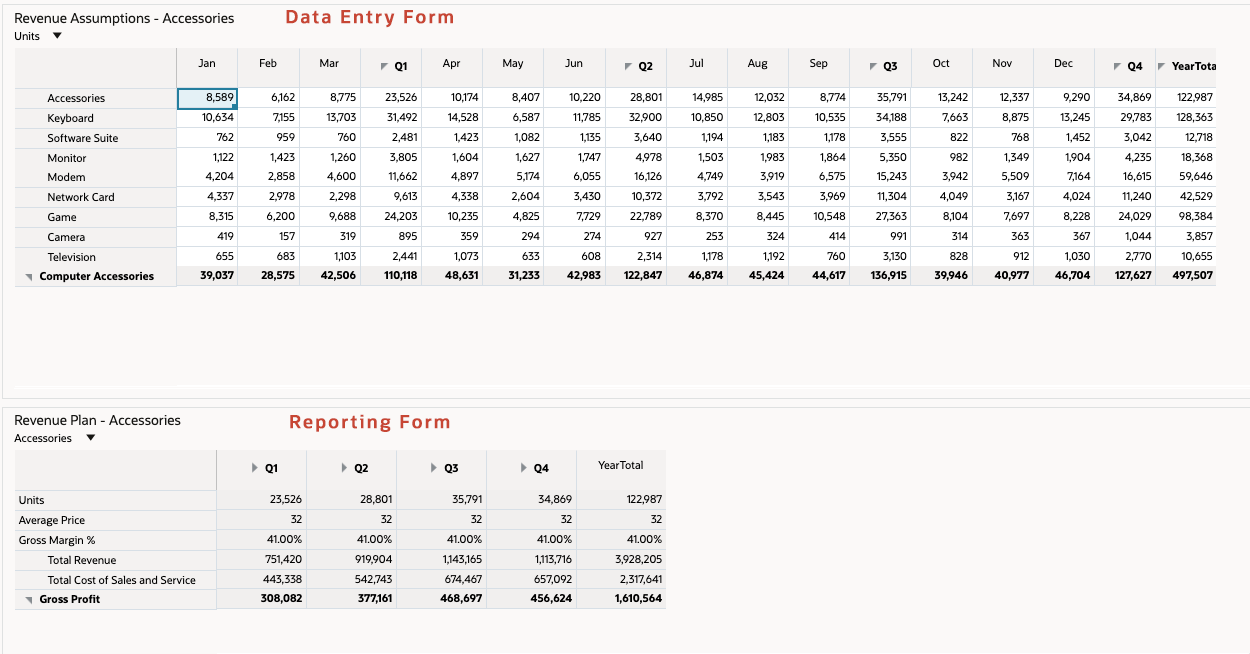
- Separate data entry forms from reporting forms.
- Limit the number of data entry forms to an amount comfortable for end users.
- Create detailed forms that enable users to enter all related information. For example, all accounts that require input should be found on a form. You can create forms specific to a logical group of accounts.
- Organize forms into folders.
- Use dashboards to combine data entry and reporting forms to enhance user experience.
- Set up navigation flows to help users navigate through their planning process.

- Assign permissions to a form to determine which users can modify its design (for example, layout and instructions) and input data. Users can input data on forms only if they have permission to one secured dimension’s member.
Design Considerations for the form layout and runtime efficiency:
- Optimize dimension layout:
- Put dense dimensions such as Account and Period on the row and column of a form. Put sparse dimensions such as Entity on the Page axis.
- Dimensions such as Scenario or Version and Year can reside on the POV, column, or row. It's important to properly gauge how columns or rows will be returned when a user opens the form.
- Group accounts logically, and don't include too many accounts on a single form.
- Use Substitution Variables to reference dimensions and reduce maintenance on forms.
- Consider using User Variables:
- Such as Entity and Scenario, to help reduce the dimension selection for end users
- To define the base currency, if your application supports multiple currencies
- Consider setting Valid and Invalid Intersections to set relationships between different dimensions. Suppressing invalid combinations can be set in row or column to make only valid intersections available to end users. By default, only valid intersections will be available to the end users when the dimensions are set in the Page selection.
- Use Settings to control precision, display, and menus, and to associate the proper rules with your form.
- Suppress invalid Scenario/Time Period options, set Periods in row or column on the form to the Start and End Period set for the Scenario. Leveraging this functionality can be used instead of substitution variables for Years.
- Suppress missing blocks to improve performance if sparse dimensions with functions are used in the rows.
Setting the Forms Version
Verify or set the application's form version to 2.0. By default, for new applications, Forms 2.0 is selected. This section shows you where you can change this setting for existing applications.
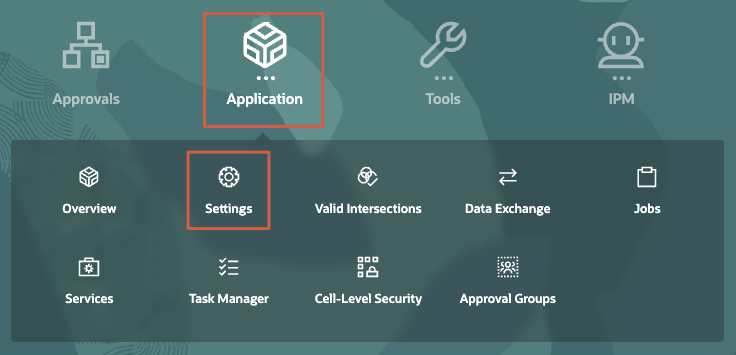
- On the home page, click Application, then Settings.
- Under Other Options, locate Forms Version, then set or verify that it is set to Forms 2.0.
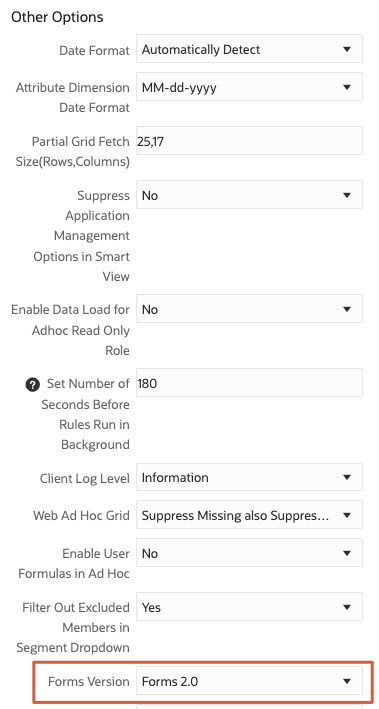
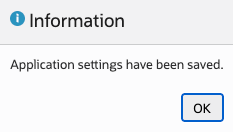
- Click Save.
- At the information message, click OK.
- Return to the home page. On the upper-right, click
 (Home).
Reviewing User Variables
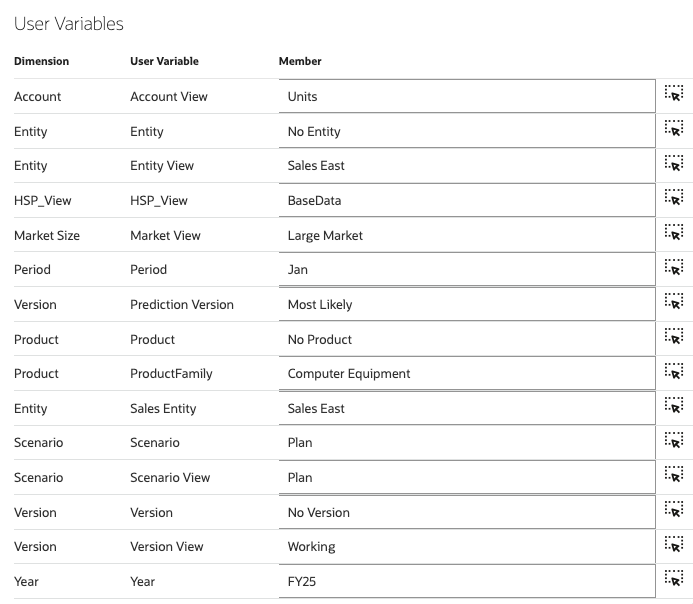
User variables act as filters in forms, enabling planners to focus only on certain members.
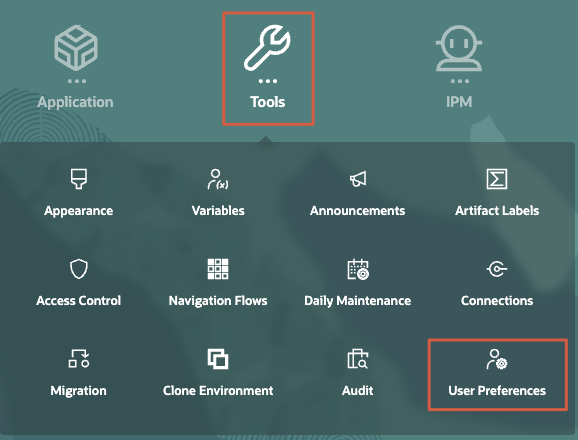
- On the home page, click Tools, then User Preferences.
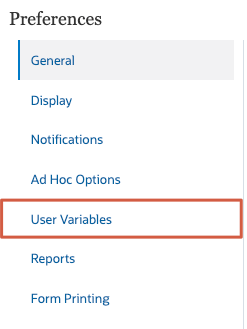
- On the left, click User Variables.
- Review the predefined user variables and their assigned values.
- Return to the home page. On the upper-right, click (Home).
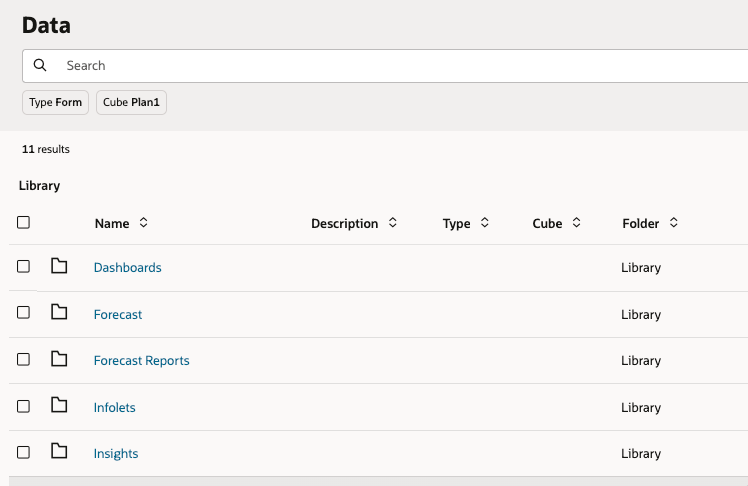
Creating Form Folders
Create a folder to organize forms.
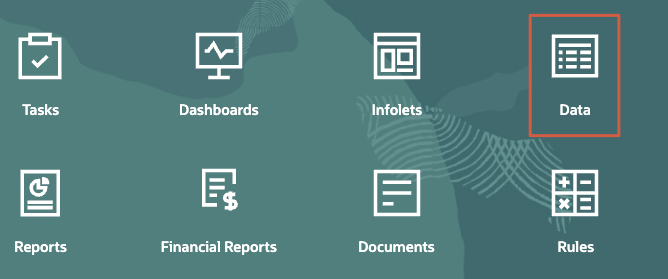
- On the home page, click Data.
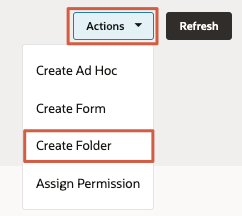
- Click Actions, then select Create Folder.
- In Create Folder, enter Custom as the Name.
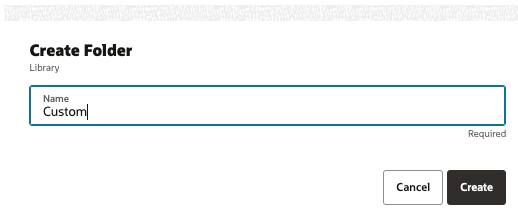
- Click Create.
The Custom folder is listed on the Data page.
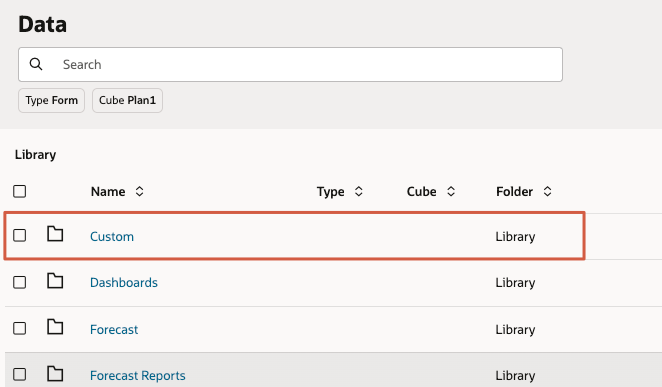
- Click Custom.
Designing Forms
This section includes tasks in creating forms.
Creating Forms
When you create a form, you first enter a name for it and select the cube you want to work with.
- In Custom, click Act
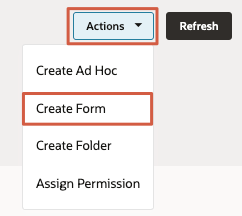
The Form Designer is opened in a new tab.
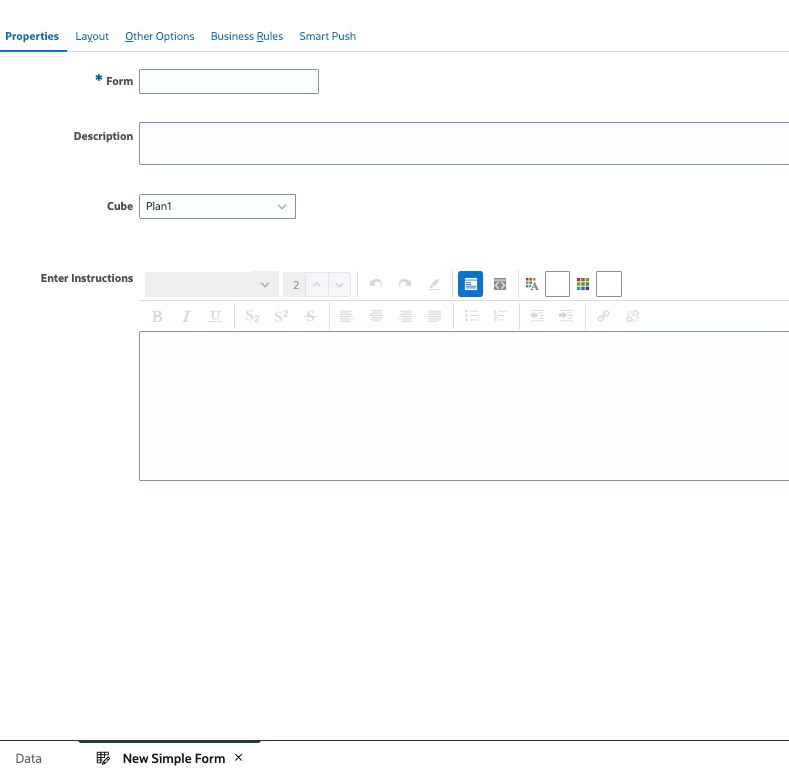
- For the Form name, type My Operating Expenses.
- For Cube, verify that Plan1 is selected.
- Click Next.
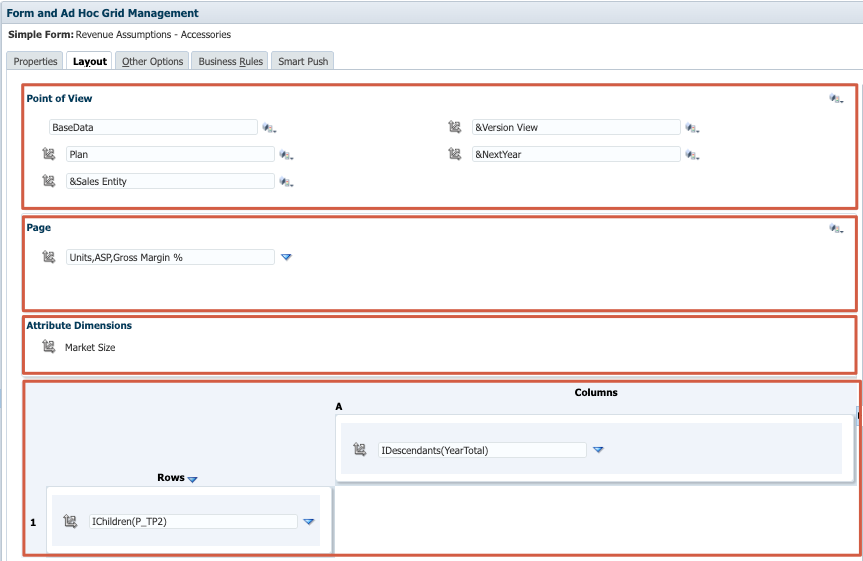
Defining the Form Layout
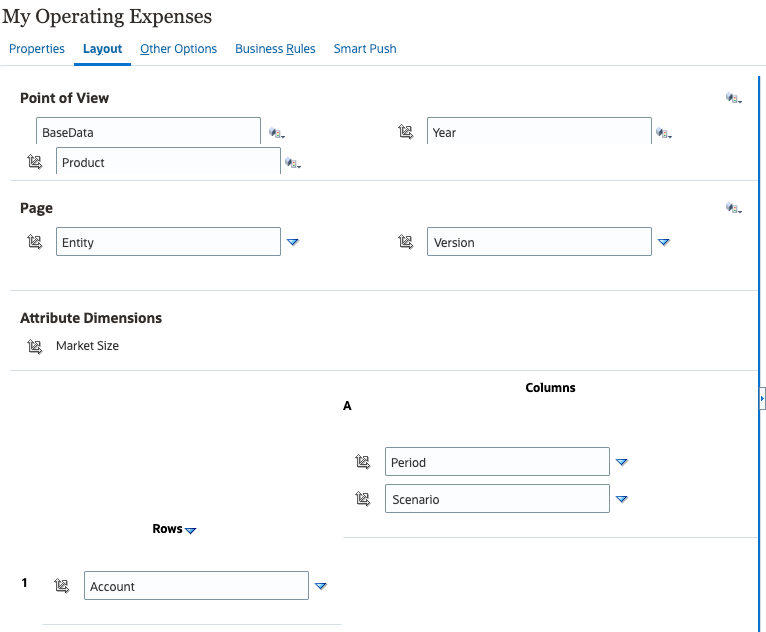
When you create forms, they initially contain only one row and column, and all dimensions, except for the optional attribute dimensions, are in Point of View.
- Drag and drop Entity and Version to the Page:
Tip:
To move dimensions, click its (Dimension) and drag it to the layout label or area (for example, Page, Columns, or Rows).
- Drag and drop Account to the Rows.
- Drag and Drop Period and Scenario to the Columns.
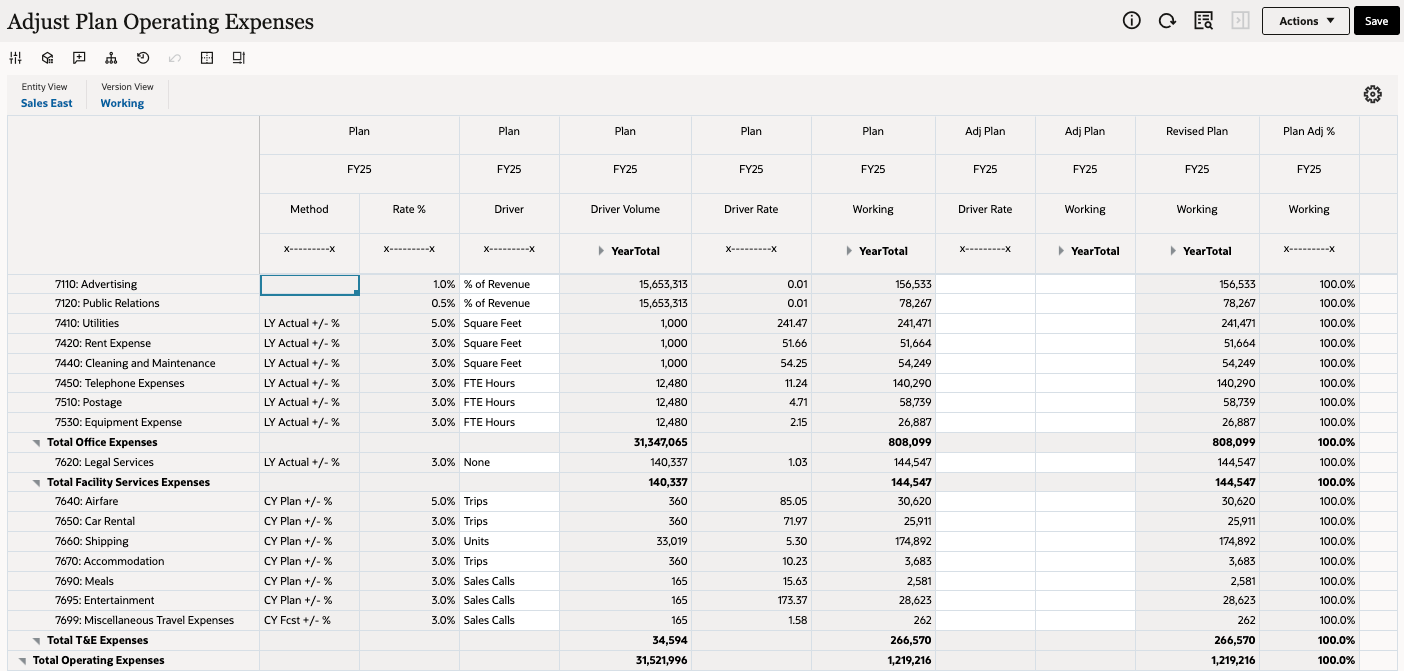
- Verify that your form displays the following layout:
- Click Save.
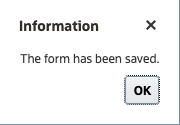
- At the information message, click OK.
Selecting Members
Next, select the form's data point of view.
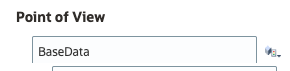
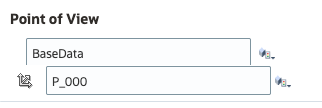
- In the Point of View section, verify that BaseData is already selected for HSP_View.
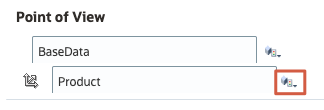
- For Product, click its
 (Member Selector) to open the Member Selection dialog.
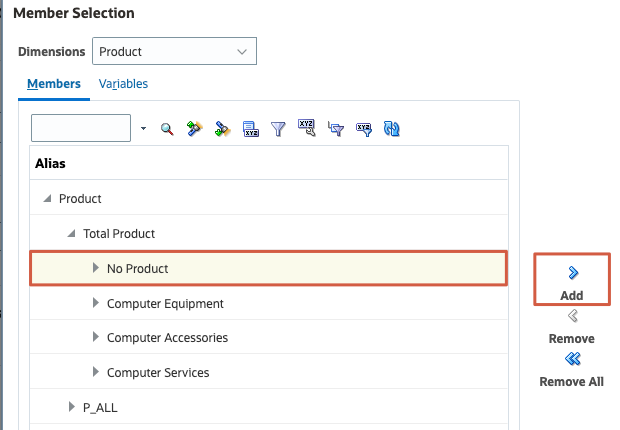
- In Member Selection for Product, expand Total Product.
- Under Total Product, select No Product and click Add.
"No Product" is added to the selection pane.
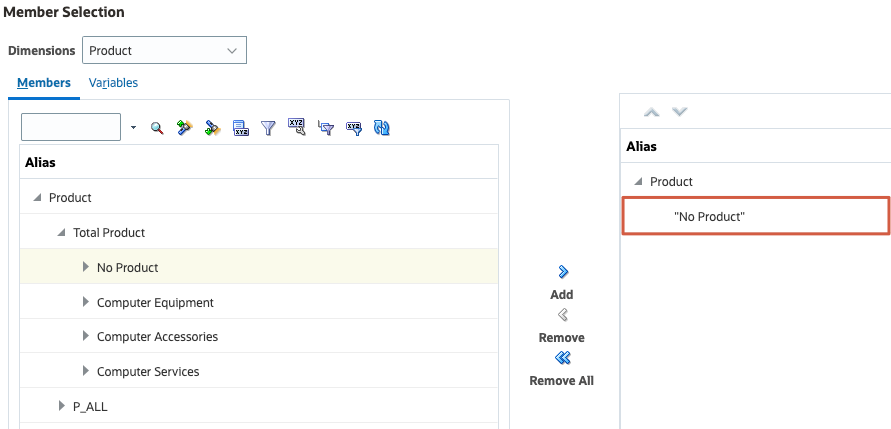
- Click OK.
P_000 ("No Product") displays as the selected Product dimension member.
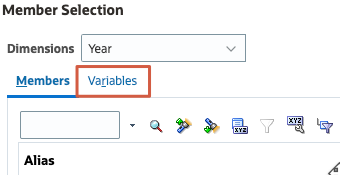
- For Year, click its (Member Selector).
- In Member Selection for Year, click Variables.
- In the User Variables list, click Year and click Add.
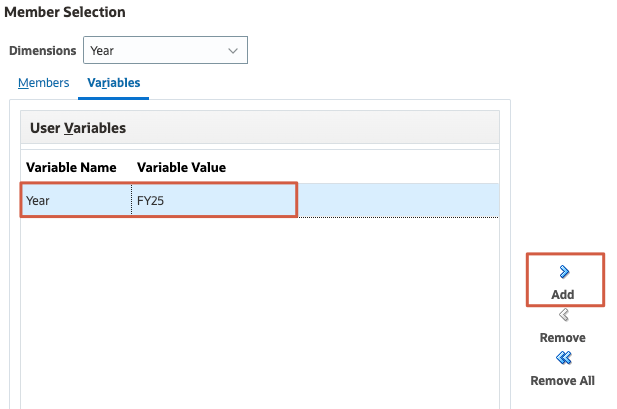
- Click OK.
- Verify your Point of View member selections.

Tip:
Click Save anytime while editing your form layout to avoid losing any of your changes. - In the Page section, for Entity, click
 and select Edit.
 - In Member Selection for Entity, type 710 in the search box and click
 (Search Down).
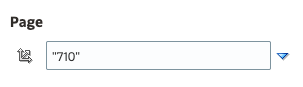
710 (CEO Office) is selected in the left pane. The member name for this entity is 710. The alias for 710 is set to CEO Office.
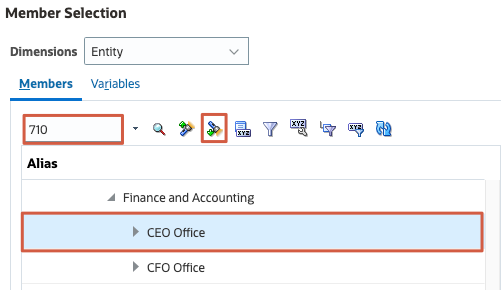
- Click Add.
- From the list of selected members on the right, click Entity and then Remove.
Your member selection for entity should only include "CEO Office."
Tip:
In the right pane, you may need to expand the dimension name to display selected members. - Click OK.
710 displays as the selected member for the Entity dimension.
- In the Page section, for Version, click and select Edit.
- In Member Selection for Version, click Remove All to clear all selections.
- From the list of available members, select Sandboxes, then click
 (Function Selector) and select Level 0 Descendants.
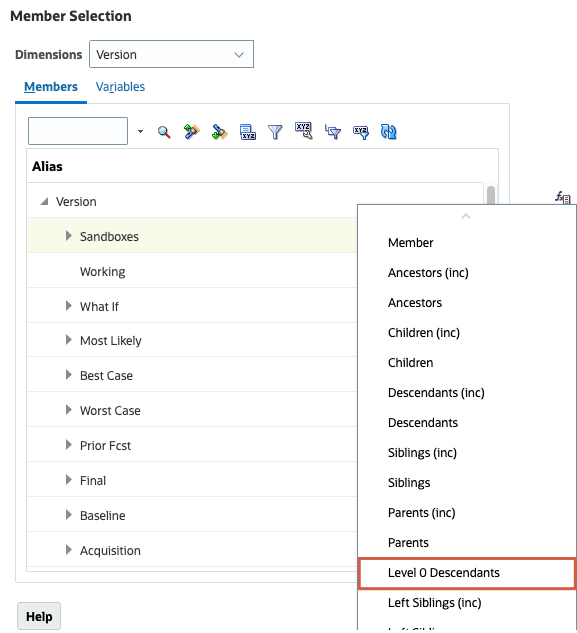
- Click Variables.
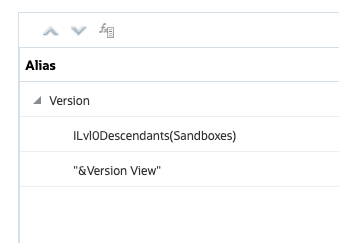
- From the list of user variables, select Version View and click Add.
Tip:
In the right pane, you may need to expand the dimension name to display selected members. - Verify your selections and click OK.
- In the Rows section, for Account, click and select Edit.
- In Member Selection for Account, click Remove All to clear all selections.
- In Member Selection for Account, type 7003 in the search box and click (Search Down).
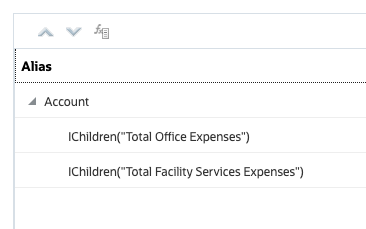
Search results will show Total Office Expenses. This is the alias for the 7003 Account member.
- Make sure that Total Office Expenses is selected, then click (Function Selector) and select Children (inc).
- In the search box, replace the member name with 7004 and click (Search Down).
Search results will show Total Facility Services Expenses. This is the alias for the 7004 Account member.
- Make sure that Total Facility Services Expenses is selected, then click (Function Selector) and select Children (inc).
- Verify your selections and click OK.
- In the Columns section, for Period, click and select Edit.
- In Member Selection for Period, click Remove All to clear all selections.
- From the list of available members, select YearTotal, then click (Function Selector) and select Descendants (inc).
- Verify your selections and click OK.
- In the Columns section, for Scenario, click and select Edit.
- In Member Selection for Scenario, click Remove All to clear all selections.
- From the list of available members, select Plan and then click Add.
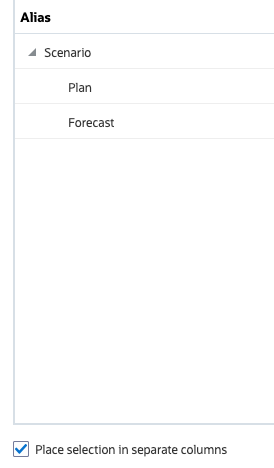
- From the list of available members, expand Revised Forecast, then select Forecast, and click Add.
- Select Place selection separate columns.
- Verify your selections and click OK.
- Review your selections and click Save.
- At the information message, click OK.
Setting Grid Properties
- In the properties pane, make sure Grid Properties is expanded.
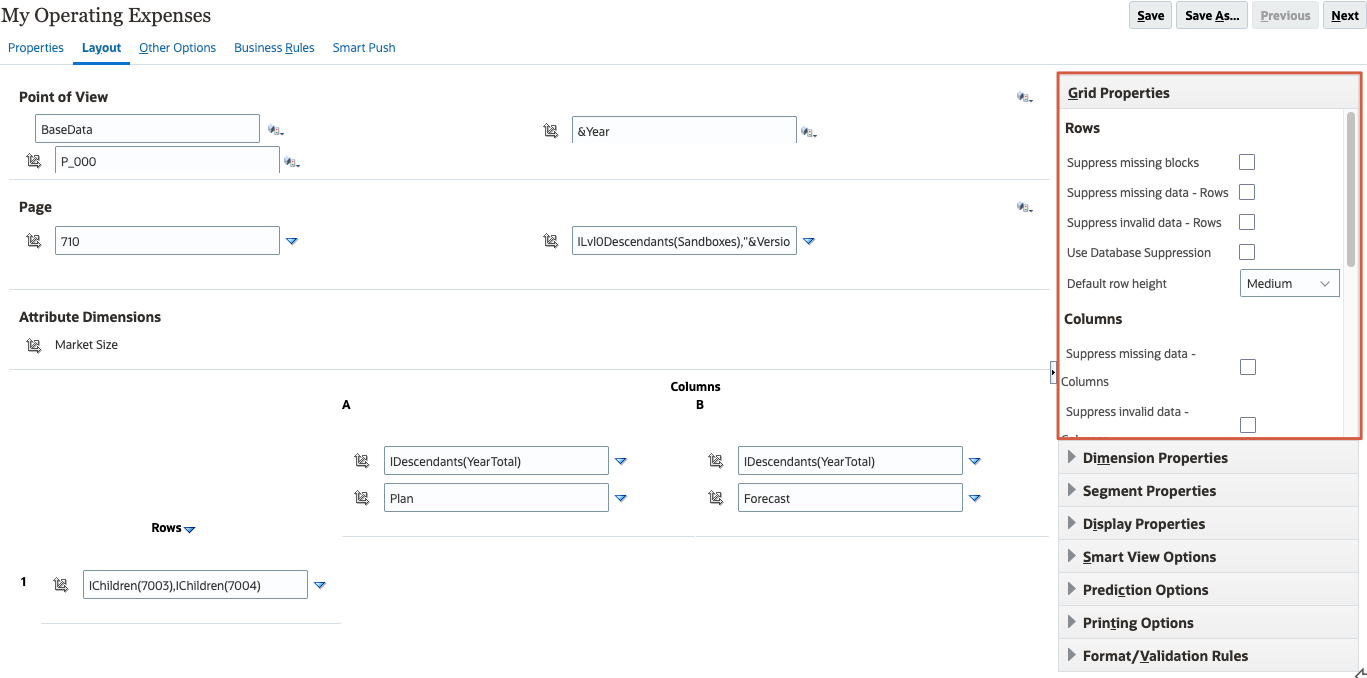
- Under Rows, make sure all options are cleared.
Since this is a data entry form, suppression must not be enabled.
- Scroll down and review the options under Columns. Make sure all options for suppression are not selected.
- For Default column width, change the selection to Custom. Then, in the textbox next to it, set the value to 60.
- Under Other, select Enable Autosave.
- Select Run Form Calc on Autosave.
- Click Save.
- At the information message, click OK.
Setting Dimension Properties
- In the properties pane, expand Dimension Properties.
- If not already selected, click the Account row to display its dimension properties.
- In Dimension Properties for Account, verify or select the following:
- Member name
- Alias
Selecting these options will display both the Account name and alias on the form.
- To display the accounts expanded when the form is opened, select Start expanded.
- Verify your selections and click Save.
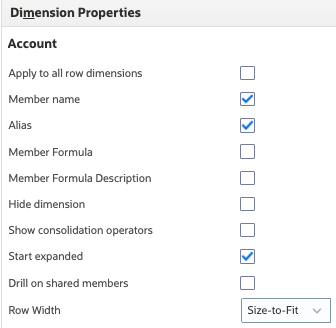
- At the information message, click OK.
Setting Segment Properties
- In the form layout, click the label for Column A to display its segment properties.
- In Segment Properties for Column A, change the Column width to Size-to-Fit.
- Select Apply to all columns.
Note:
Select this option after setting segment properties. - Verify your selections and Click Save.
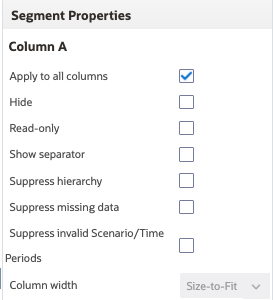
- At the information message, click OK.
Setting Display Properties
- Expand Display Properties.
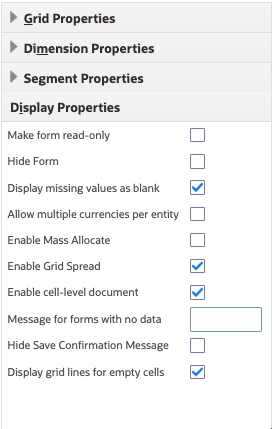
- Verify that the following options are selected:
- Display missing values as blank
- Enable Grid Spread
- Enable cell-level document
- Display grid lines for empty cells
About Smart View Options
You can specify Oracle Smart View for Office display options. In the properties pane, expand Smart View Options to view available options.
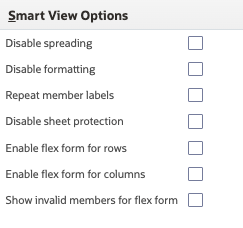
Note:
See the Setting Smart View Form Options section in the Oracle Fusion Cloud EPM Administering Planning Documentation.About Prediction Options
You can set prediction options when using Prediction Planning on a form. In the properties pane, expand Prediction Options to view the available options.
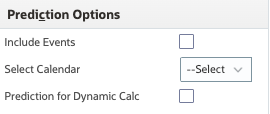
Note:
See the Setting Prediction Options section in the Oracle Fusion Cloud EPM Administering Planning documentation.Setting Printing Options
- In the properties pane, expand Printing Options.
- Select Include Supporting Detail and accept the default order selection, Normal.
- Review the selected options and click Save.

- At the information message, click OK.
- Click Next.
About Data Validation and Format Rules in Forms
You can add and update format and data validation rules for grids, columns, rows, or cells, on the Layout tab. When processed, rules may change the format of cells, change the promotional path for approval units, and, display validation messages to users during data entry. Areas on the Layout tab with a green background, indicate locations where format and data validation rules have been defined.
In the properties pane, expand Format/Validation Rules. In Format/Validation Rules, you can add or edit form validation rules.
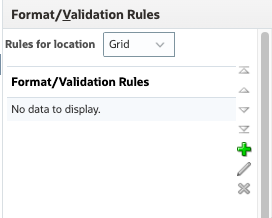
Validation is commonly used for approvals during the planning process. Learn more about form validation rules and approvals:
- Video: Overview: Threshold-Based Approvals in Cloud EPM Planning
- Hands-on Tutorial: Adding Data Validation Rules for Threshold-Based Approvals in Setting Up Approvals
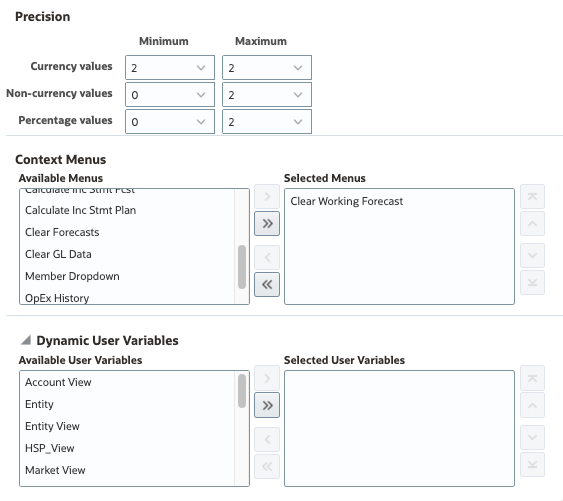
Setting Form Precision and Other Options
- In Other Options, under Precision, change the minimum and maximum decimal values to the following:
Minimum Maximum Currency values 2 2 Non-currency values 0 2 Percentage values 0 2 - Under Context Menus, in the Available Menus, scroll down and select Clear Working Forecast.
- Click
 (Move).
 - Expand Dynamic User Variables and review the available user variables.
You can set up a form with at least one user variable and enable dynamic user variables. Then, users with access to the form can select and change user variable values directly in the form.
- Click Save.
- At the information message, click OK.
- Click Next.
About Business Rules in Forms
You can associate one or more rules with a form, by cube. Users can launch associated rules from the form to calculate and allocate values. You can set whether each rule associated with a form automatically launches when the form is opened or saved. You can also change the order in which the rules are launched or remove rules from a form.

Learn more about associating rules with forms in the Adding and Removing Rules in Forms section in the Oracle Fusion Cloud EPM Administering Planning documentation.
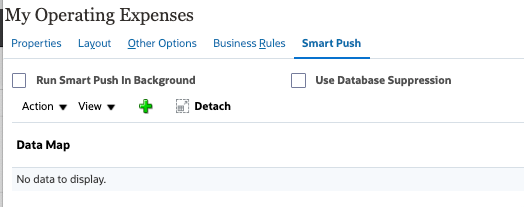
About Smart Push
You can move data, comments, attachments, and supporting detail between cubes while working in forms using Smart Push. Smart Push uses Data Maps, configured in Data Exchange to complete this process.
Learn more about Data Maps and Smart Push in the following videos:
- Instantly Push Data for Reporting in Planning
- Mapping Planning Data Across Applications - Part 1 & Part 2
- Mapping Data into Business Cases for Parent Models
Viewing Forms
To start viewing forms, you save the form and close the Form Designer tab. Then, open the form by clicking its name.
- Click Save.
- At the information message, click OK.
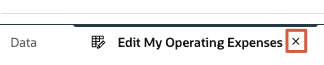
- Close the Edit My Operating Expenses tab. Click X (Close).
The My Operating Expenses form is listed in the Custom folder of the Data cluster.
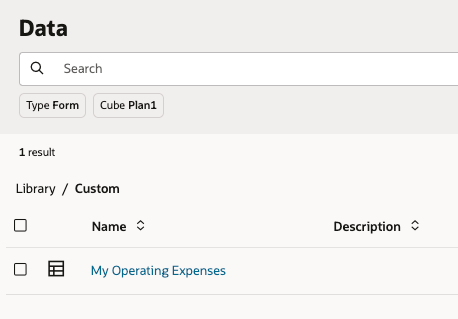
- Click My Operating Expenses to open the form.
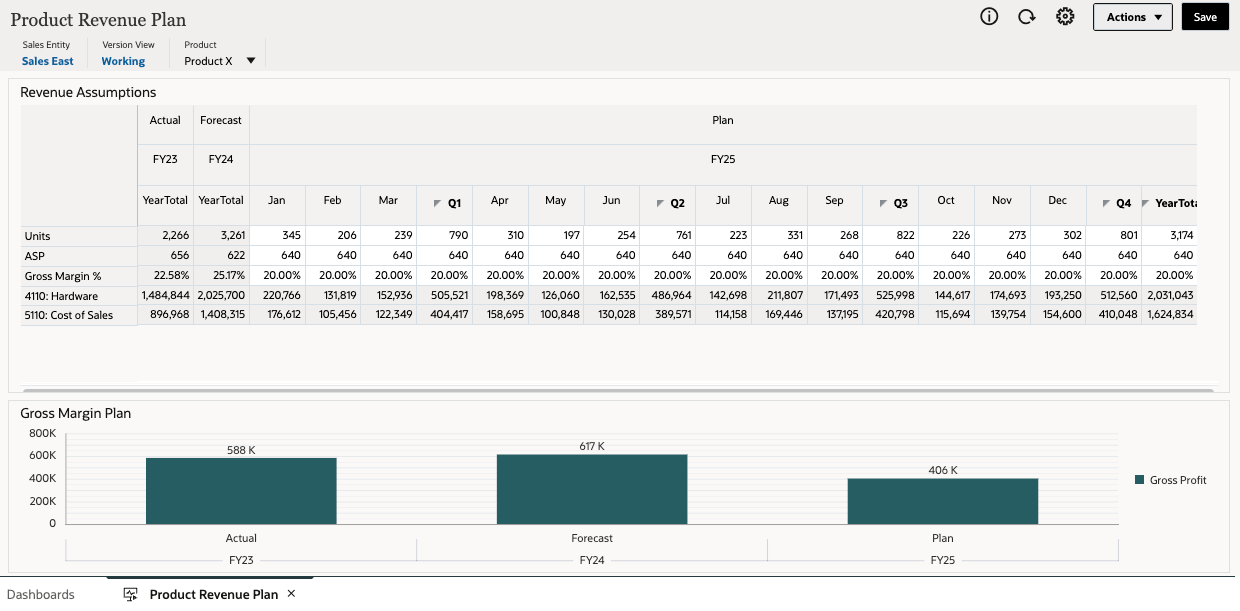
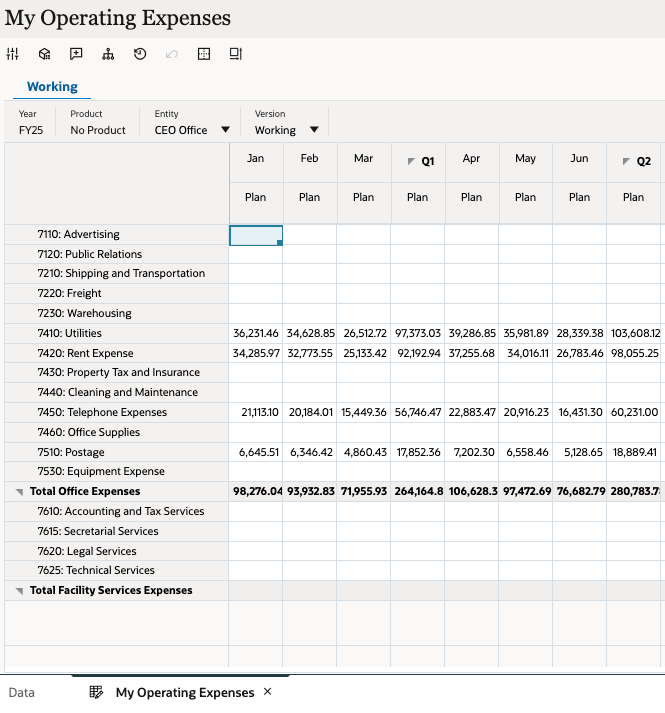
The form is displayed. You can now start planning using this form.
Related Links
More Learning Resources
Explore other labs on docs.oracle.com/learn or access more free learning content on the Oracle Learning YouTube channel. Additionally, visit education.oracle.com/learning-explorer to become an Oracle Learning Explorer.
For product documentation, visit Oracle Help Center.