Introduction
This tutorial shows you the approval process, how to set it up, and how to start the planning review cycle. Learn how to enable members for approvals, identify reviewers and owners, define approval groups, manage approval unit hierarchies, define the promotional path based on reviewers and validation rules with financial limits, start the review cycle and get your plan approved. The sections build on each other and should be completed sequentially.
Background
With approvals, you can manage your workflow within a defined process, and formalize authority levels as you prepare budget data. You can review and approve plans submitted by cost centers or departments as part of your overall budgeting process.
You manage the approvals process by:
- Creating approval units based on your organization, geographical regions or product lines
- Setting the promotional path by designating who reviews and approves plan data as it moves through the organization
- Starting the planning review cycle by selecting an approval unit hierarchy scenario and version
You can track budgets and review status, process issues, and approval unit ownership using approval units. Budget cycle time is reduced when:
- The approval path is independent of organizational structure
- Exceptions and problem areas are highlighted
- Audit information includes annotations and process status
- Reviews include annotations and comments
In this tutorial, you learn about the approval process, how to set it up, and start the planning review cycle.
Prerequisites
Cloud EPM Hands-on Tutorials may require you to import a snapshot into your Cloud EPM Enterprise Service instance. Before you can import a tutorial snapshot, you must request another Cloud EPM Enterprise Service instance or remove your current application and business process. The tutorial snapshot will not import over your existing application or business process, nor will it automatically replace or restore the application or business process you are currently working with.
Before starting this tutorial, you must:
- Have Service Administrator access to a Cloud EPM Enterprise Service instance. The instance should not have a business process created.
- If you haven't already, register for a free Oracle Cloud Customer Connect account so you can access the required files.
- Download the latest EPBCS Sample Application LCM snapshot from this idea page.
- Upload and import the latest EPBCS Sample Application LCM snapshot into your Planning instance.
- Upload and import ApprovalFlow snapshot over the EPBCS Sample Application in your instance.
- Then upload and import Security snapshot over the EPBCS Sample Application in your instance.
- Users and groups provisioned as noted in this section of this tutorial.
- Download the Approval Unit Hierarchy files - Projects_PUH.exp and FS_PUH.exp
Note:
If you run into migration errors importing the snapshot, re-run the migration excluding the HSS-Shared Services component, as well as the Security and User Preferences artifacts in the Core component. For more information on uploading and importing snapshots, refer to the Administering Migration for Oracle Enterprise Performance Management Cloud documentation.Setting up Access Control and Permissions
Assigning Security Roles to Users and Groups
To set up approvals with multiple reviewers or owners, you must create and provision users with the following application roles:
- One (1) User
- Five (5) Power Users
- One (1) Service Administrator
Tip:
If you have imported the security snapshot provided in the Prerequisites section of this tutorial, then this entire section of Access Control and Permissions should be already configured for you. Depending on how your environment is set up, the users may not be successfully imported. In that case, you will need to create and provision as noted above.In this tutorial, the users will be referred to as follows:
| Name used in tutorial | Application Role |
|---|---|
| Carol Judd | User |
| Kerry Lane | Power User |
| Betty Anderson | Power User |
| Alex Smith | Power User |
| Anita Kennedy | Power User |
| Casey Brown | Power User |
| George Foster | Service Administrator |
Note:
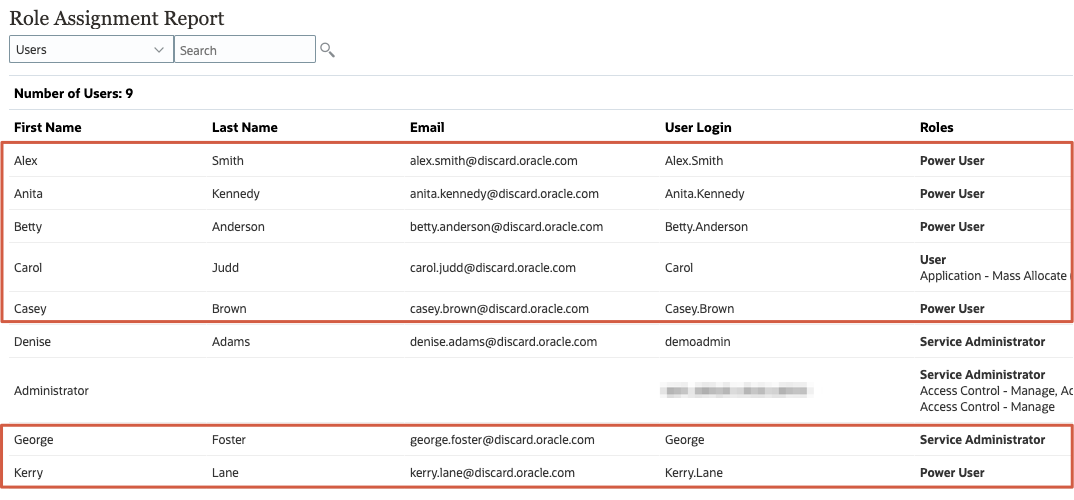
For more information on Planning security, refer to the Setting Up Security in Planning hands-on tutorial and Getting Started with Oracle Enterprise Performance Management Cloud for Administrators documentation.Here is an example of the Role Assignment Report for these users in Access Control:
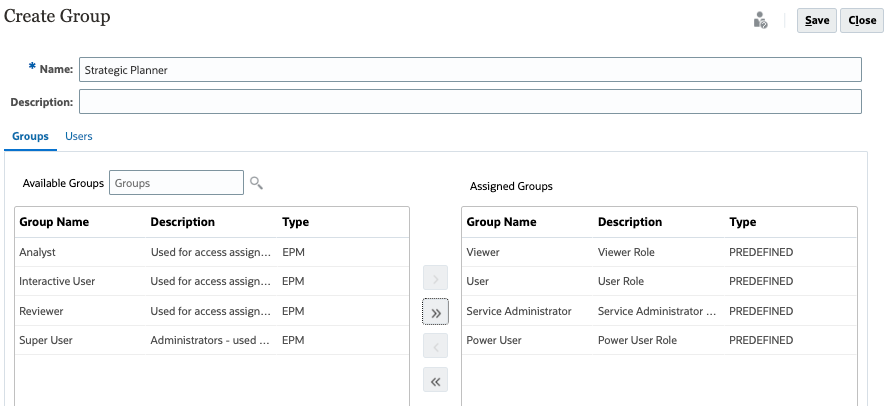
Creating the Strategic Planner Group
After creating users and assigning roles, create a group called Strategic Planner. The Strategic Planner group will be used for access permissions with forms and navigation flows.
Tip:
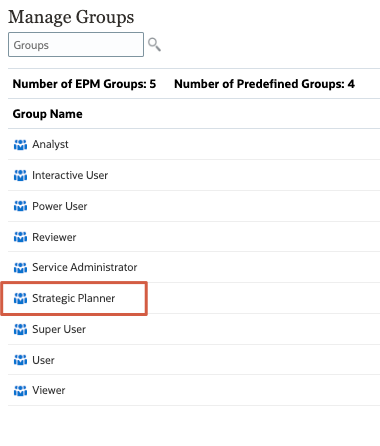
If you have imported the security snapshot provided in the Prerequisites section of this tutorial, then this entire section of Access Control and Permissions should be already configured for you. Depending on how your environment is set up, the Strategic Planner may not be successfully imported. In that case, you will need to create and provision as below.- In Access Control, go to Manage Groups.
- Verify that Strategic Planner is listed in Manage Groups.
Assigning Access Permissions to Forms
Tip:
If you have imported the security snapshot provided in the Prerequisites section of this tutorial, then this entire section of Access Control and Permissions should be already configured for you. Depending on how your environment is set up, the Access Permissions to Forms may not be successfully imported. In that case, you will need to create and provision as below.- Click
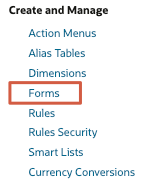
 (Navigator), then under Create and Manage, click Forms.
- In the left pane of Form and Ad Hoc Grid Management, under Folders, make sure that Library is selected and click
 (Assign Access).
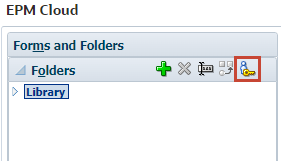
- In Assign Access for Library, click Groups.
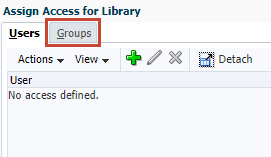
- From the list of groups, verify that Strategic Planner is listed with Write access rights.

- Click Close.
- Return to the home page. On the upper-right, click
 (Home).
Assigning Access to the Approvals Navigation Flow
Tip:
If you have imported the security snapshot provided in the Prerequisites section of this tutorial, then this entire section of Access Control and Permissions should be already configured for you. Depending on how your environment is set up, the Access to the Approvals Navigation Flow may not be successfully imported. In that case, you will need to create and provision as below.- On the home page, click Tools, and then click Navigation Flows.
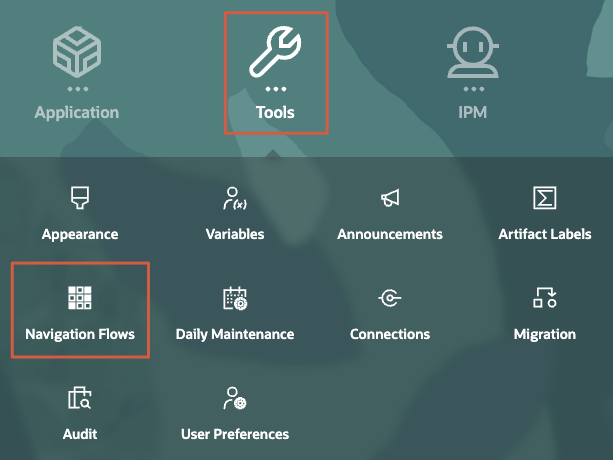
- In Navigation Flow, verify that Approvals is set to Active, lists Strategic Planner under Role/Group.

- Return to the home page. On the upper-right, click (Home).
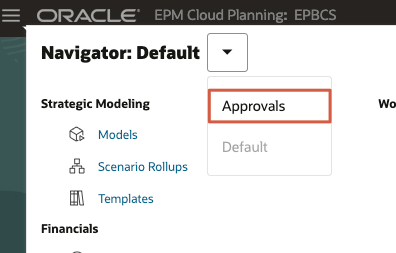
- On the upper-left, click (Navigator) and, from the dropdown, select the Approvals navigation flow.
Tip:
If the navigation flow is not available, click the down-arrow next to Administrator and click Reload Navigation Flow. - On the home page, verify the navigation flow displays as:

Tip:
If the navigation flow does not change, you can reload it from the Administrator's actions menu. On the upper-right, click the down-arrow next to Administrator and click Reload Navigation Flow.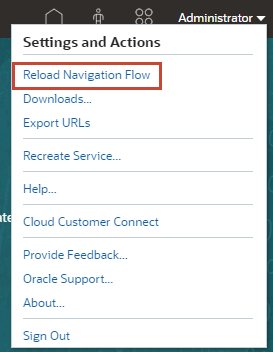
Approval Process Overview
In this section, you learn about the approval process.
You can perform the following planning tasks with approvals:
- Review and approve planning data
- Track the progress of the budget
- Identify issues in the review process
- View reviewers' remarks through annotations
- View the promotional path of planning data
- Ensure that the plan data meets data validation rules
Plans are tracked and managed through approval units. An approval unit is the basic unit for preparing, annotating, reviewing, and approving plan data.
Approval units are combinations of scenario, version, and entity or part of an entity.
Note:
You can have one scenario/version combination per approval unit.Scenarios and versions are the basis of the review cycle. Approval units submit planning data for a scenario and version. For example, an approval unit might consist of a version (Best Case), a scenario (Forecast), and an entity (New York).
Approval units can also include secondary dimensions within any entity, refining the granularity of an approval unit.
An administrator kicks off the annual or quarterly planning process by "starting" approval units. Before your approval unit is officially started, you can enter data into it, but the data isn't part of the official planning cycle.
After your administrator starts your approval units, you can enter data into the selected Scenario, Version, and Entity that comprise it. You can annotate, analyze, and revise an approval unit until you promote or submit it. After that, you can no longer change the data until you become the current owner again.
Process Flow for Sample Business Cases
With Planning, you can take advantage of these features when managing approvals:
- Dashboards and analysis for data reporting; including variance reporting between actual data and budget data.
- Ability to add justification and attach documents related to the plan.
- Threshold-based approvals based on your Level of Authority (LOA) matrix.
- Visibility and traceability that aids in decision-making, including a complete audit trail of all approvals.
- Online collaboration and notifications through email across your organization.
- Paperless approval workflow.
- Seamless integration with Oracle ERP Cloud.
- Phased submission using approval groups will enable you to submit a portion of the data for review first, while other data can be reviewed later.
Here are three (3) sample business cases:
Projects
Your organization plans for internal, capital, and/or contract projects that require different levels of approvals depending on the amount required for each project. You can create threshold-based validation rules that affect the promotional path of your approvals based on your organization's LOA matrix.
In Enterprise Planning, using Projects, you can include financial and non-financial benefits and justification when you add and plan for projects. Review project KPIs to help analyze and plan for future projects, as it goes through the approval process.
Capital Projects
Your organization plans to have large capital spends, including internal projects geared towards business expansion, organic growth, asset replacement, and so on.
When the annual budget for capital expenditure (capex) is approved, each department can initiate capex-related purchases by raising requests and obtaining management approval. In Enterprise Planning, the initiating department creates a Capital Expenditure Request (CER) against an approved budget. When submitting the request for approval, it would include all required justification and related attachments.
Depending on your organization's LOA matrix, the approval may have to go through different approvers based on the value requested. Your LOA can be included by creating validation rules that process based on threshold values.
Once the request is approved, they can start processing their purchase orders using their transactional ERP system.
Marketing Budgets
Your organization plans on preparing campaign and marketing ads to help with company and product advertising.
When the annual budget for marketing is approved, the appropriate department can initiate promotion, advertising, and media placement purchasing by raising requests and obtaining management approval. In Enterprise Planning, the initiating department creates a spend request against an approved budget. When submitting the request for approval, it would include all required justification and related attachments.
You can create threshold-based validation rules that affect the promotional path of your approvals based on your organization's Marketing LOA. This allows for a reduction in redundant manual reviews and processes.
Approval Setup Overview
In this section, you learn about the tasks you need to complete before starting the approval process.
Approval Setup Tasks:
- Enable Scenario, Version, and Entity members for approvals.
- Determine users and groups who will be assigned as reviewers and owners.
- Define Approval Groups.
Approval groups enable you to submit a portion of the data for review first, while other data can be reviewed later. During the review process, you can promote each phase of the approval unit rather than the entire approval unit.
- Create the Approval Unit Hierarchy.
- Set the approval hierarchy name, scope, and template.
- Select an Extended Approval Flow for your Approval Unit Hierarchy:
- None—The approval workflow will use the Entity dimension only workflow will use the Entity dimension only, and not use a secondary dimension or approval groups.
- Secondary—The approval workflow will use a secondary dimension.
- Approval Groups—Enables you to assign approval groups to the approvals workflow.
If you selected Secondary or Approval Groups, you can select whether to apply it to all entity levels and enable phased dependency.
The Approval Unit Hierarchy tabs change according to your selections.
- Select Approval Unit Hierarchy Members.
Display options by entities (all potential approval units) or by enabled approval units. If you chose Secondary for Extended Approval Flow, add a secondary dimension to the approval unit included in the approval process to provide finer granularity.
- Assign approval unit owners and reviewers. Add users for notifications.
- Manage the promotional path. You can modify the promotional path by:
- Assigning owners and reviewers directly in the approval unit hierarchy, or
- Creating data validation rules that determine whether a change in the approval unit promotional path is necessary. You can also specify threshold amounts that guide the approval unit promotional path.
- Set Value Definition Members to define data intersections.
By selecting members for the rest of the dimensions (non-approval unit dimensions), you specify the exact data slice or data intersection where the plan data will be picked up.
Note:
-
For non-approval unit dimensions: To view aggregated approval unit values, on Member Selection, you must select one member for each non-approval unit dimension in the cube selected on the Approvals Dimension tab. If you don't select members for the non-approval unit dimensions, the aggregated approval unit value is blank.
-
For approval unit dimensions: Value definition members specified for a parent member in the approval unit hierarchy are inherited by the descendants of that member. If value definition members are selected for both a parent and child member of an approval unit dimension, then the child's selection takes precedence. For example, you select a value definition member for both the parent US and its child, Western Region; the value definition member for Western Region takes precedence. At runtime, the Entity, Scenario, Version, and secondary dimension members specified in the approval unit hierarchy are selected.
-
Enabling Dimension Members for Approvals
You must enable approvals for scenarios and versions you want to use with your approval unit.
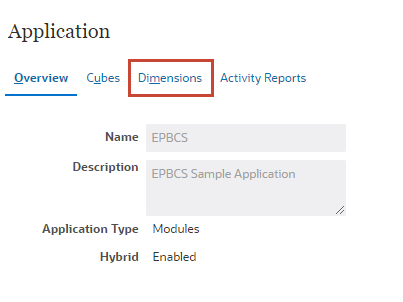
- On the home page, click Application, then Overview.

- In Application - Overview, click Dimensions.
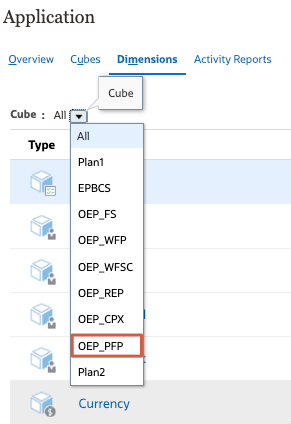
- From the Cube dropdown list, select OEP_PFP.
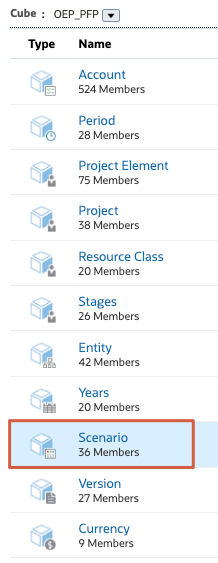
- From the list of dimensions, click Scenario.
Edit Member Properties: Scenario is displayed.
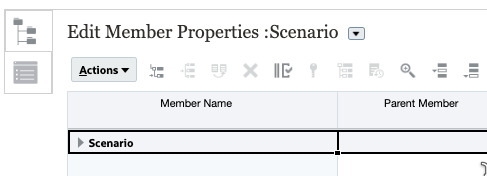
- In the grid, right-click the Member Name column header to open the Select Columns dialog.
- On the left, in Select Columns, expand Scenario, then select Enabled for Approvals.
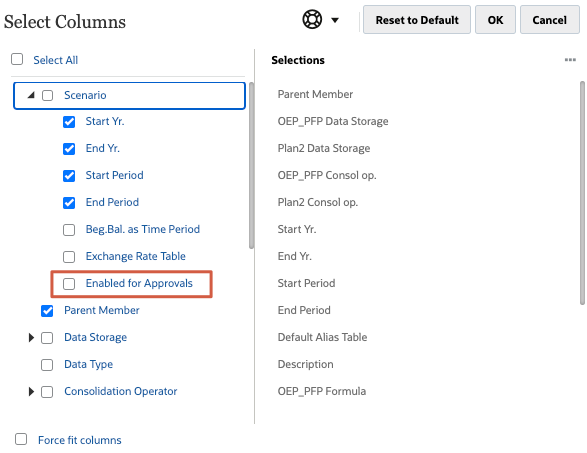
- Click OK.
- In the grid, expand Scenario, then OEP Scenarios, and then OEP_Planned Scenarios.
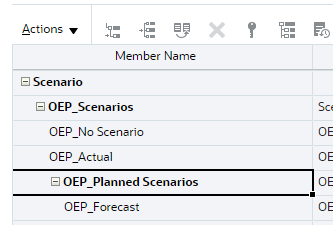
- For OEP_Plan, under OEP_Planned Scenarios, verify that Enabled for Approvals is set to Yes.
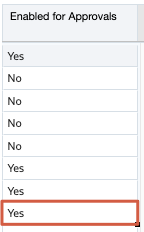
Tip:
You may need to scroll to the right to display Enabled for Approvals. - Switch dimension views. Click the dropdown arrow next to Edit Member Properties: Scenario, and select Version.
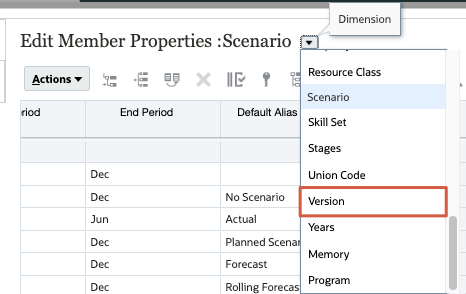
- In the grid, right-click the Member Name column header to open the Select Columns dialog.
- On the left, in Select Columns, expand Versions, then select Enabled for Approvals.
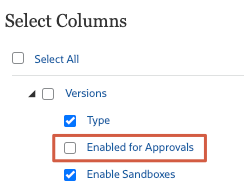
- Click OK.
- In the grid, expand Version, then OEP_Versions.
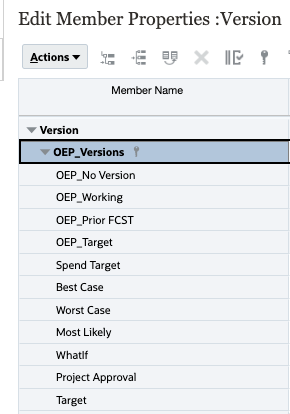
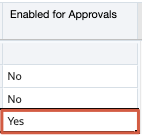
- For OEP_Working, under OEP_Versions, verify that Enabled for Approvals is set to Yes.
- In Edit Member Properties: Version, click Save.
- Click Cancel.
- Return to the home page. On the upper-right, click (Home).
Defining Approval Groups
You can create approval groups to divide approval units into more granular subsets of data which can then be submitted for approval in phases.
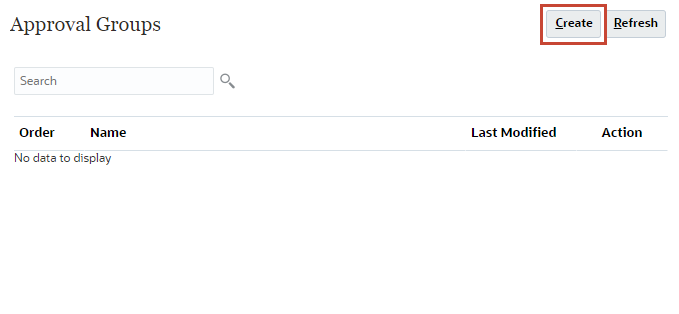
- On the home page, click Application, and then click Approval Groups.
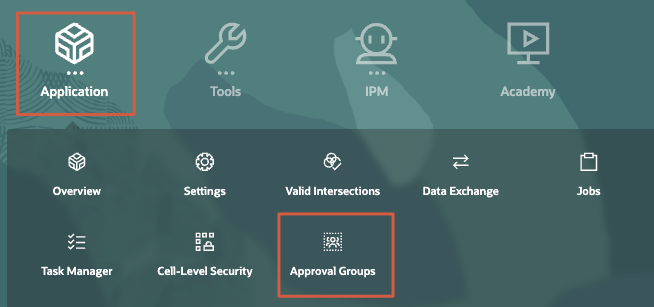
- In Approval Groups, click Create.
- Name the approval group Marketing Expenses.
- Select Account as the Anchor Dimension.
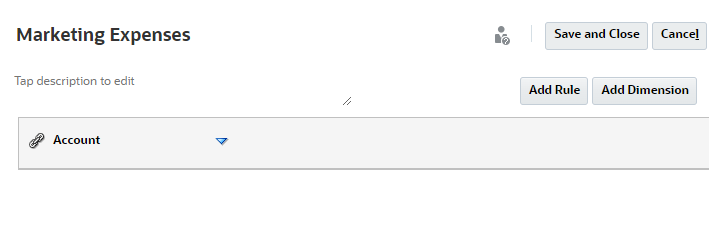
- Click Add Rule.
- Next to Account, click the dropdown and select Edit.
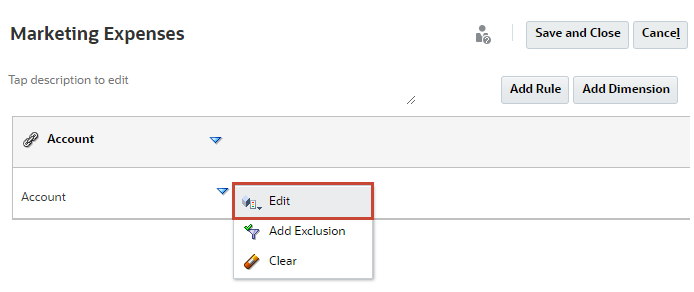
- In Select Members, next to Selections, click
 (Settings) and select Remove All.

- In the Search box, enter Marketing and press Enter.
- Hover over Total Marketing and click
 (Function Selector).
 - Select Descendants Inclusive.

Note:
Click on the I symbol next to Descendants. - Click OK.
- Verify your selections, and then click Save and Close.
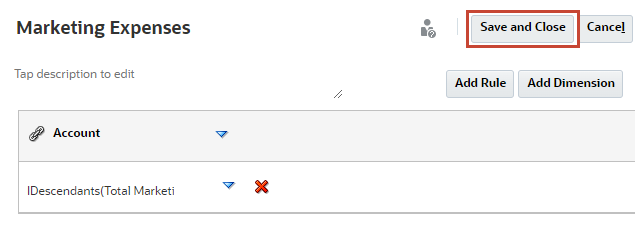
The Marketing Expenses approval group is created and listed on the page.
Managing Approval Unit Hierarchies
About Approval Unit Hierarchies
An approval unit hierarchy contains approval units and entities that are part of the review process.
Parent/child relationships between approval unit hierarchy members affect the review process:
-
When you promote or reject a parent, its children are promoted or rejected unless they are Approved. The owner for the parent becomes the owner of the children.
-
When you approve a parent, its children are approved.
-
After all children are promoted to the same owner, the parent is promoted to the owner.
-
When the status of all children changes to one status, for example Signed Off, parent status changes to the same status.
Note:
You can't change the status of a parent if its children have different owners. If the children are promoted to, submitted to, or signed off by different users, the parent has no owner and only a Service Administrators can change its status.You use approval unit hierarchies to adapt the budgeting process to all types of organizational requirements.
- Define approval units based on a combination of the entity and other dimensions. For example, if an application includes all of a company's products, the approval unit hierarchy for North America can include dimensions and members appropriate to products sold in North America. Similarly, the approval unit hierarchy for the European division can include dimensions and members for products sold in Europe. Within the same approval hierarchy, entities can be enhanced using the Account dimension, creating approval units such as Entities by HR, Entities by Capital Expenditures, and Entities by Revenue.
-
Select preset approval templates to create hierarchies that are bottom-up, distributed, or free form.
- Bottom-Up Budgeting—Data is input at the bottom member level and consolidated by rolling data up the organizational hierarchy. When the budget is started, data is populated for each scenario and user independently. The ownership follows the hierarchy of approval in bottom-up mode. Users can view or edit data based on access permissions defined for the approval unit. The topmost Budget Group owner consolidates individually approved budgets into a final consolidated budget.
- Distributed Budgeting—Data is entered at the leaf level of the organization, and ownership starts at the top level of the organization. Ownership is then distributed down the organization hierarchy. After ownership reaches the lower levels, budgets are submitted back to the top through the approval process. The top budget group owner reviews, approves, and loads the budgets for budgetary control, transaction control, and reporting.
- Free-Form Budgeting—With free-form budgeting, data is input at the selected member level, and then users select the next owner from a drop-down list.
-
Include dynamic links to dimensions based on generation numbers for the entity dimension and the secondary dimension that is used. For example, automatically add generations 0 to 3 in the entity or segment dimension to the approval unit hierarchy. If a change occurs in the dimension, the approval unit hierarchy can be easily updated.
-
Import and export approval unit hierarchies.
-
Create approval unit hierarchies that differ by scenario and version. For example, the Budget scenario can have a large approval unit hierarchy consisting of departments, accounts, and products, while the Forecast scenario has a simpler process organization with fewer levels of approval.
Creating Approval Unit Hierarchies
The EPBCS Sample application comes with two (2) Planning Unit Hierarchies. You will be modifying the Planning Unit Hierarchies as based on the sample business cases discussed in the beginning of this tutorial.
Financials Planning Unit Hierarchy
In this section, you create an approval unit hierarchy for the Financials cube that extends the approval flow using phased submission with approval groups. This approval unit is based on the Marketing Budgets sample business case.
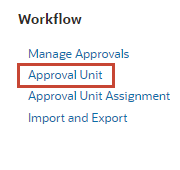
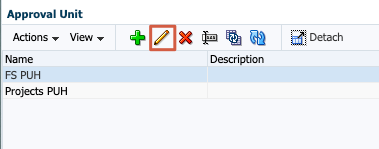
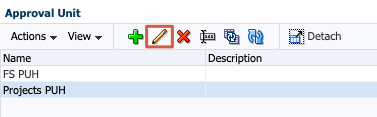
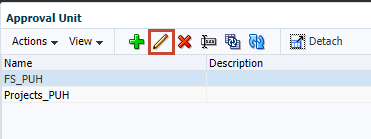
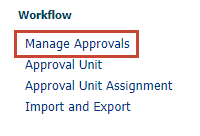
- Click (Navigator), then under Workflow, click Approval Unit.
- In Approval Unit, select FS PUH and click
 (Edit).
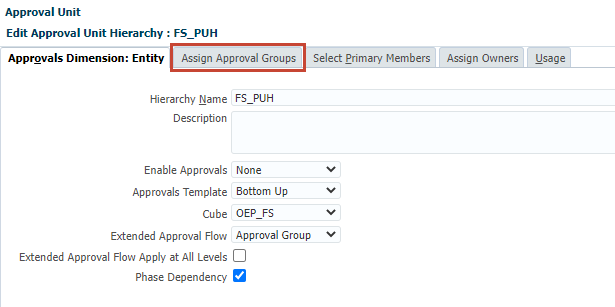
- In Edit Approval Unit Hierarchy, verify the Hierarchy Name: FS_PUH.
- For Enable Approvals, accept the default selection: None.
You'll be adding approval units when you select hierarchy members.
- For Approvals Template, verify that Bottom Up is selected.
- For Cube, verify that OEP_FS is selected.
- For Extended Approval Flow, select Approval Group.
- Select Phase Dependency.
- Verify your selections and click Save.
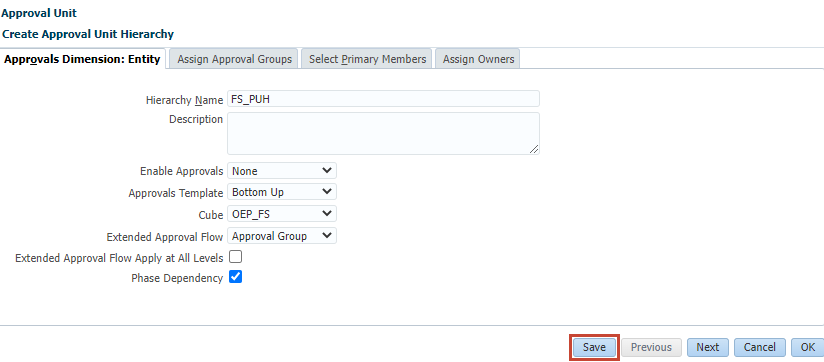
- At the information dialog, click OK.

- On the bottom-right of the page, click OK.
- At the information message, click OK.
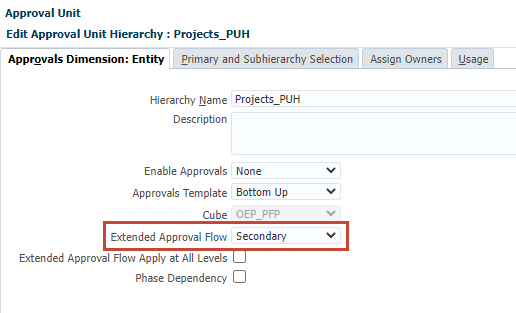
Projects Planning Unit Hierarchy
In this section, you create an approval unit hierarchy where you will assign approval unit owners and reviewers and later modify the promotional path using validation rules. This approval unit is based on the Projects sample business case.
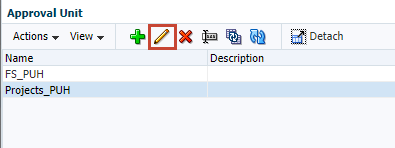
- In Approval Unit, select Projects PUH and then click (Edit).
- In Edit Approval Unit Hierarchy, verify the Hierarchy Name: Projects_PUH.
- For Enable Approvals, accept the default selection: None.
You'll be adding approval units when you select hierarchy members.
- For Approvals Template, verify that Bottom Up is selected.
- For Cube, verify that OEP_PFP is selected.
- For Extended Approval Flow, select Secondary.
- Verify your selections, and then click Save.
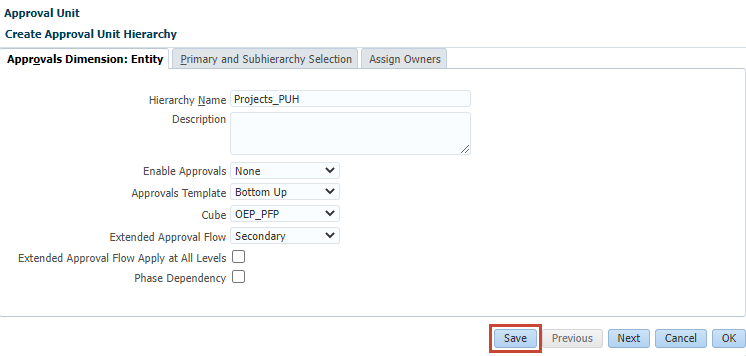
- At the information dialog, click OK.
- On the bottom-right of the page, click OK.
- At the information message, click OK.
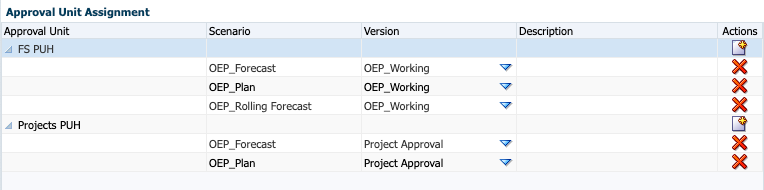
Assigning a Scenario and Version Combination to an Approval Unit Hierarchy
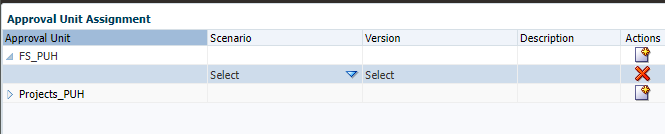
- Click (Navigator), then under Workflow, click Approval Unit Assignment.
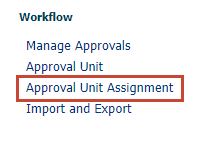
- In Approval Unit Assignment, expand FS_PUH.
- Review the Scenario and Version combinations for FS_PUH.

- Expand Projects_PUH and review the Scenario and Version combinations.
Note:
You will be making changes to the Projects PUH assignments later.
(Optional) Modifying Approval Unit Hierarchy Files
Tip:
See the Setting Up Access Control and Permissions section of this tutorial.- Using a text editor, such as Notepad++, edit the FS_PUH.exp file you downloaded from the Prerequisites section of this tutorial.

- Replace the users in the Planning Approval Unit Hierarchy with the users you defined in your system. You can optionally remove the names instead of replacing them. Do not remove the commas. You can add users when you assign owners in the approval unit hierarchy later. Make sure to save your changes.
- Using a text editor, such as Notepad++, edit the Projects_PUH.exp file you downloaded from the Prerequisites section of this tutorial.
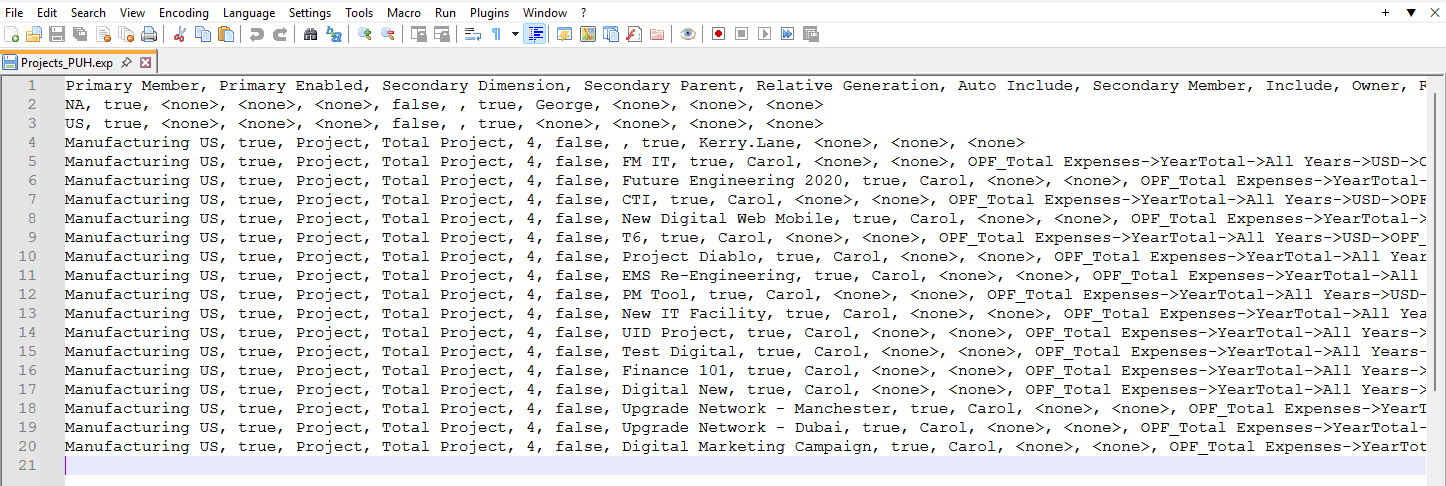
- Replace the users in the Planning Approval Unit Hierarchy with the users you defined in your system. You can optionally remove the names instead of replacing them. Do not remove the commas. You can add users when you assign owners in the approval unit hierarchy later. Make sure to save your changes.
Importing Approval Unit Hierarchies
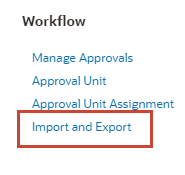
- Return to Planning. Click (Navigator), then under Workflow, click Import and Export.
- In File Based Import/Export, make sure that Import Approval Unit Hierarchy is selected.
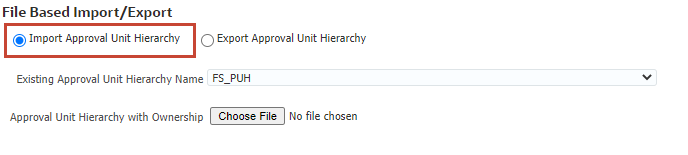
- From the Existing Approval Unit Hierarchy Name dropdown list, select FS_PUH.
- Next to Approval Unit Hierarchy with Ownership, click Choose File.
Note:
Depending on your browser, the button label may display Choose File or Browse. - Navigate to where you saved FS_PUH.exp, then select and open it.
- At the bottom right of the page, click Import.
- At the information message, click OK.

- From the Existing Approval Unit Hierarchy Name dropdown list, select Projects_PUH.

- Next to Approval Unit Hierarchy with Ownership, click Update.
- In Update File, click Choose File.
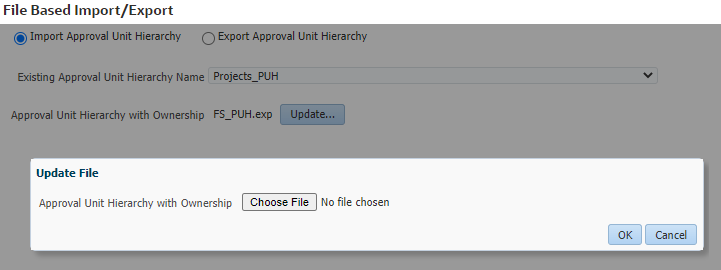
Note:
Depending on your browser, the button label may display Choose File or Browse. - Navigate to where you saved Projects_PUH.exp, then select and open it.
- In Update File, click OK.
- Verify your selections for the Projects_PUH. then click Import.
- At the information message, click OK.
- Click Done.
Assigning Approval Groups
- Click (Navigator), then under Workflow, click Approval Unit.
- In Approval Unit, select the FS_PUH row, and click (Edit).
- In Edit Approval Unit Hierarchy: FS_PUH, click Assign Approval Groups.
- In Assign Approval Groups, click
 (Add).
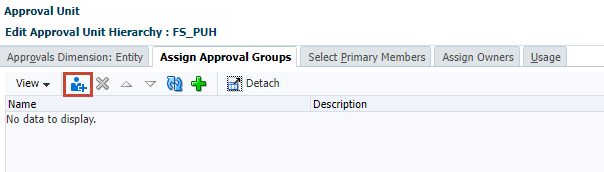
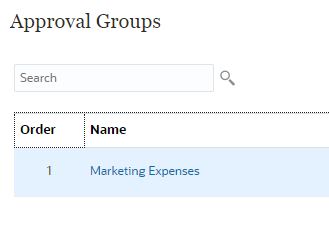
- In the dialog, select Marketing Expenses.

- Click outside the dialog to close it.
- Verify that Marketing Expenses is listed on the page, then at the bottom of the page, click Save.
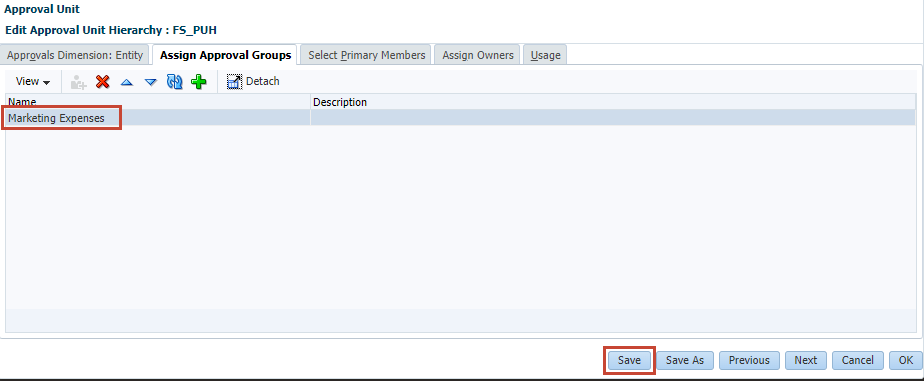
- At the information message, click OK.
- At the bottom of the page, click OK.
- At the information message, click OK.
Selecting Approval Unit Members and Value Definition
- In Approval Unit, select the Projects_PUH row, and click (Edit).
- In Edit Approval Unit Hierarchy: Projects_PUH, verify that the Extended Approval Flow is set to Secondary.
With Secondary selected for Extended Approval Flow, you can add a secondary dimension to the approval unit included in the approval process to provide finer granularity. This sets the value definition for members to define specific data intersections in your approval unit.
- Click the Primary and Subhierarchy Selection tab.
- In Primary and Subhierarchy Selection, for Display, select Approval Units.

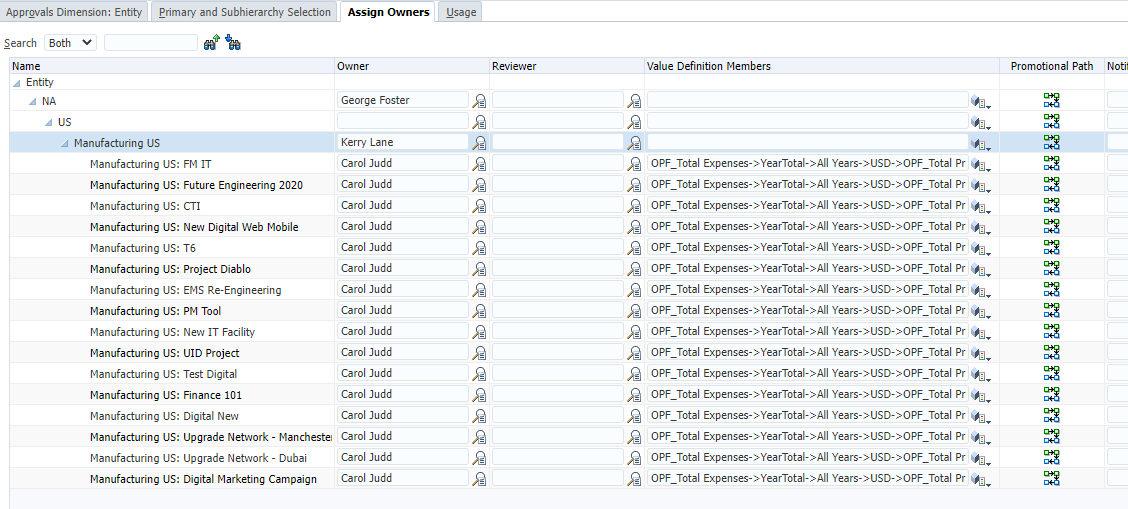
- In the grid, expand Entity, then NA, then US. Make sure Manufacturing US is displayed.
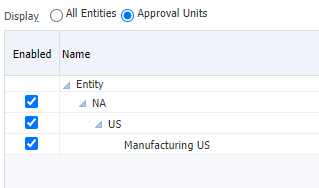
Tip:
Ignore if Data Center Operations is not available. - For Manufacturing US, verify the following selections:

- Dimension: Project
In this example, Project is selected as the Secondary dimension.
- Parent Member: Total Project
Total Project is the parent member selected.
- Relative Generation: 4
Relative generation specifies the parent-member generations to include. Adding a generation adds all members of that generation to the approval process. In this example, the relative generation to Total Project is 4. This points to four generations below Total Project, which are Level0 members. The member names are listed in Selected Members.
- Selected Members: FM IT,Project Diablo,Future Engineering 2020,EMS Re-Engineering,UID Project,Finance 101,CTI,New Digital Web Mobile,PM Tool,Test Digital,Digital New,Upgrade Network - Manchester,Upgrade Network - Dubai,Digital Marketing Campaign,T6,New IT Facility
You can further limit the subhierarchy by removing selected members.
Tip:
You can view the selected members in relation to the Project dimension hierarchy when you edit member properties in the Dimension Editor.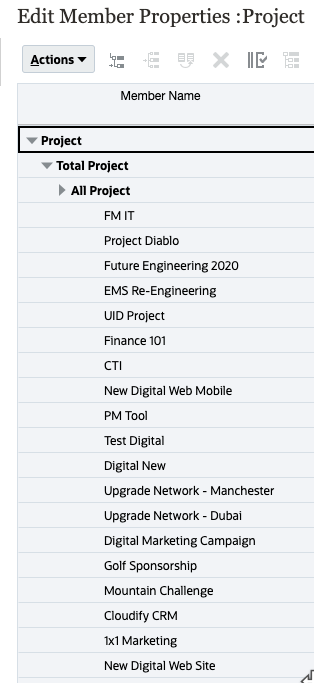
- Dimension: Project
Assigning Owners and Reviewers
See the Assigning Security Roles to Users and Groups section for a list of users referenced in this tutorial.
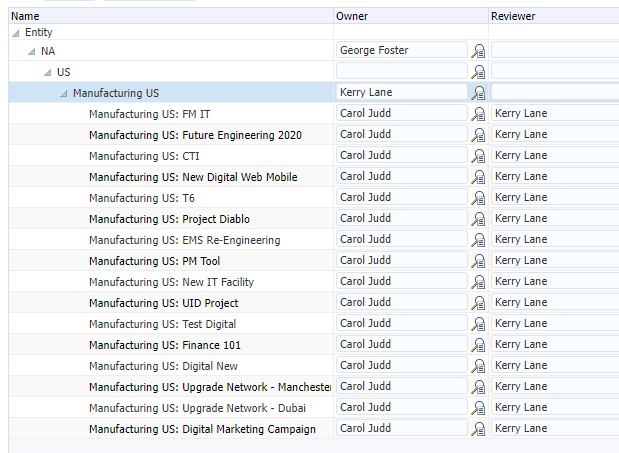
- Click the Assign Owners tab.
- In Assign Owners, in the grid, expand all levels.
Note:
If you replaced the users in the Planning approval unit files you imported, you should see those users under the Owner column. - If you removed the users in the Planning approval unit files you imported, add a user in the Owner column of NA and all Manufacturing US rows.
Tip:
See the Assigning Security Roles to Users and Groups section for a list of users referenced in this tutorial. - For all project rows under Manufacturing US, assign a reviewer. In this example, a first-level Power User is selected.
- Optional: For Manufacturing US: FM IT, add users to alert in the Notify These Users column.

You can add reviewers, owners, or any other additional users who may need to be informed when an approval unit is promoted. For example, add a team member who is in charge of payment processing or a team member from your treasury department. Make sure the users you add have notifications enabled. You can enable notifications for these users when you later complete tasks in this section: Setting Up Email for Approval Notifications.

- At the bottom, click Save.
- At the information message, click OK.
Managing the Promotional Path
Reviewing and Modifying the Promotional Path
- For Manufacturing US: FM IT, click
 (Promotional Path).

The promotional path for the selected approval unit is displayed.
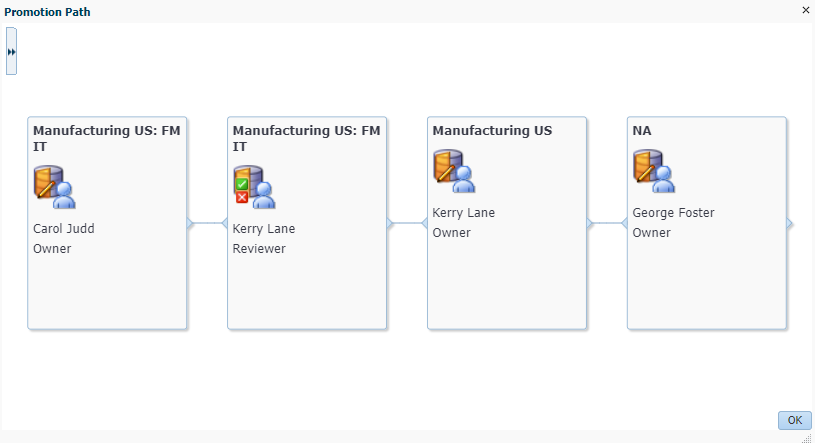
- Click OK to close the Promotional Path dialog.
- Remove the Owner assigned to Manufacturing US.
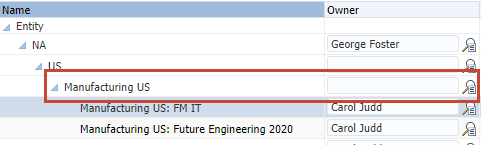
- For Manufacturing US: FM IT, click (Promotional Path).
Notice that the promotional path for the approval unit no longer displays an owner for Manufacturing US.
- Click OK to close the Promotional Path dialog.
- At the bottom, click Save.
- At the information message, click OK.
- At the bottom, click OK.
- At the information message, click OK.
Adding Data Validation Rules for Threshold-Based Approvals
When you select an owner and reviewers for an approval unit and its parents, you set the approval unit promotional path. However, when budget calculation results change, your organization requires additional reviewers and approvers depending on the calculated values. For example, if salaries for a sales group are more than 10% over the previous budget year, approval from someone other than the next reviewer may be required.
To automate redirecting the budget in these cases, you can add conditions and actions to data validation rules in forms that test for these exceptions, and then modify the promotional path when necessary. You can also use data validation rules to stop an approval unit from passing to the next reviewer when data errors exist in the approval unit.
When you design rules that affect the approval unit promotional path, you must consider the order in which these rules are evaluated and applied.
Here is the summary of promotional path for this section, including data validation rules:
| State/Rule | Process Cell Formatting | Reviewer |
|---|---|---|
| Owner | N/A | Carol Judd |
| First Reviewer | N/A | Kerry Lane |
| -> $500K
Total project expenses -> $500,000 |
Green: #3CB371 | Betty Anderson |
| ->$1 million
Total project expenses -> $1 million |
Blue: #0000FF | Alex Smith |
| ->$2 million
Total project expenses -> $2 million |
Magenta: #D02090 | Anita Kennedy |
| ->$10 million
Total project expenses -> $10 million |
Red: #FF0000 | Casey Brown |
| Final Reviewer/Owner | N/A | George Foster |
- Click (Navigator), then under Create and Manage, click Forms.
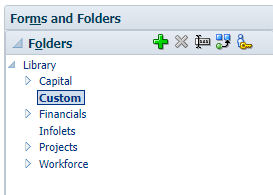
- In the left pane of Form and Ad Hoc Grid Management, under Folders, expand Library and click Custom.
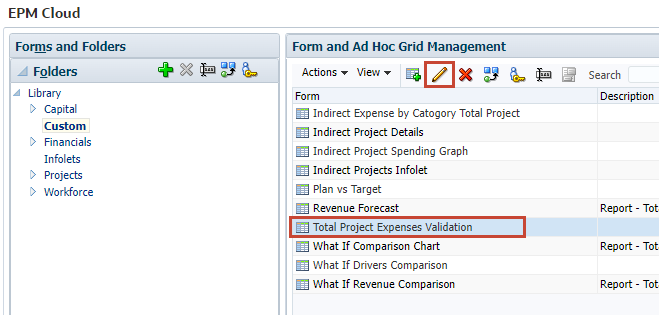
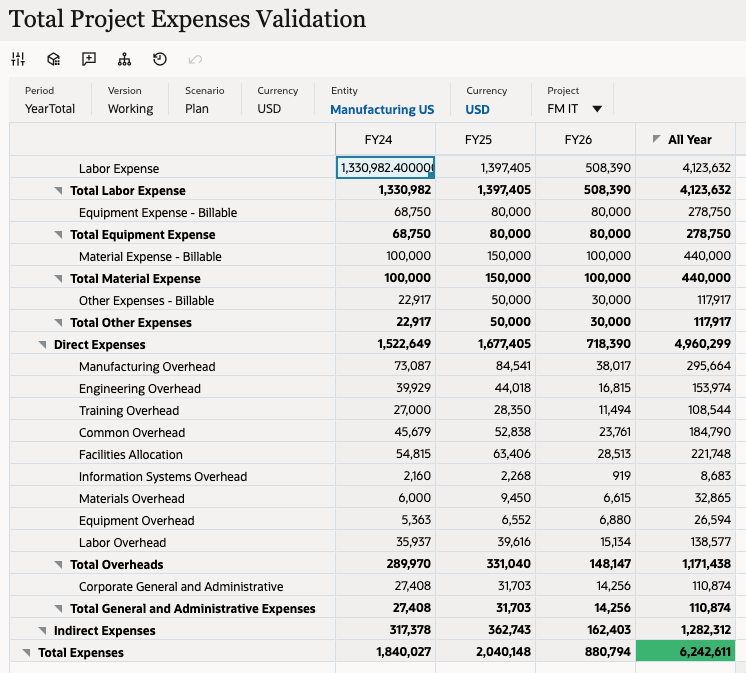
- In the content area, select Total Project Expenses Validation and click (Edit).
- Click the Layout tab.

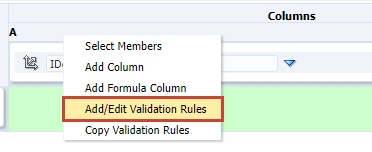
- In Layout, right-click the cell labeled A below Columns and select Add/Edit Format/Validation Rules.
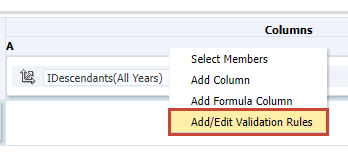
Format/Data Validation Rule Builder is displayed.
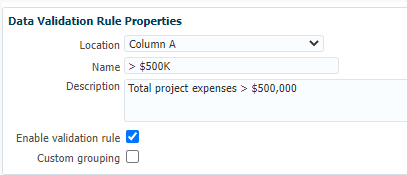
- Create a validation rule for project expenses amounting to more than $500,000. In Format/Data Validation Rule Properties, verify, enter, or select the following:
- Location: Column A
- Name: >$500K
- Description: Total project expenses > $500,000
- Enable format/validation rule: <Selected>
- Add conditions. In the first row, verify, enter, or select the following:
- Condition: IF
- Source Type: Current Cell Value
- Operator: >
- Target Type: Value
- Target Value: 500000
- Process: AND

- In the Actions column, click
 (Add Condition).
 - In the new condition row, verify, enter, or select the following:
- Condition: <Blank>
- Source Type: Member Name
- Source Value: Years
Note:
"All Year" is the member name. Its alias is set to "All Years". - Operator: Equals
- Target Type: Value
- Target Value: "All Years"
- Process: AND
- In the Actions column, click (Add Condition).
- In the new condition row, verify, enter, or select the following:
- Condition: <Blank>
- Source Type: Member Name
- Source Value: Account
- Operator: Equals
- Target Type: Value
- Target Value: "OPF_Total Expenses"
- Process: <Blank>
- In the Actions column, click (Add Condition).
- In the new condition row, verify, enter, or select the following:
- Condition: THEN
- Source Type: Process Cell
- In the Actions column, for the last row, click
 (Process Cell).

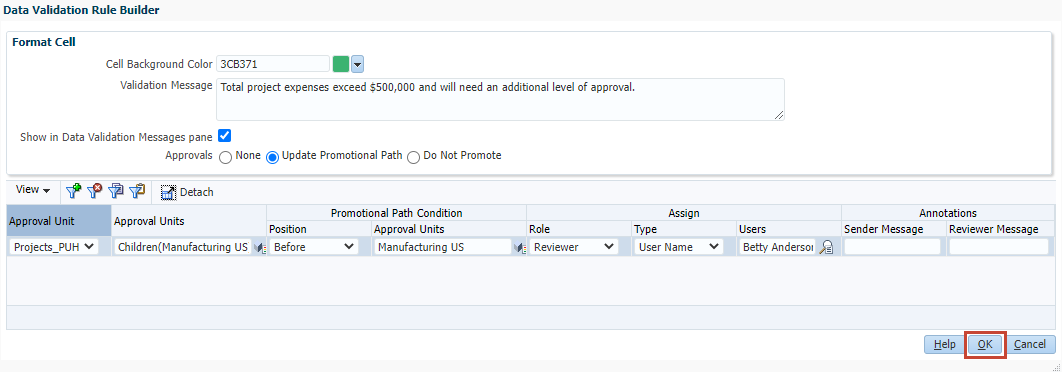
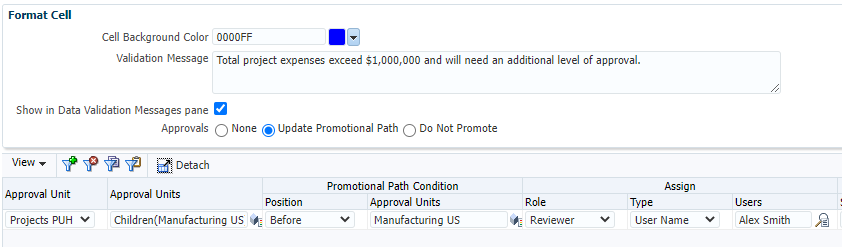
The Format Cell dialog for Format/Data Validation Rule Builder is displayed.
- In Format Cell, for Background Color, enter 3CB371.
Tip:
You can choose Other Color and then specify the Color code. - For Validation Message, enter Total project expenses exceed $500,000 and will need an additional level of approval.
- Make sure that Show in Format/Validation Messages pane is selected.
- For Approvals, select Update Promotional Path.
- Add promotional path conditions. Click (Add Rule).
- In the new row, verify, enter, or select the following:
- Approval Unit: Projects PUH
- Approval Units: Children("Manufacturing US")
- Position: Before
- Approval Units: Manufacturing US
- Role: Reviewer
- Type: User Name
- Users: Betty Anderson
Tip:
See the Assigning Security Roles to Users and Groups section of this tutorial.
- Verify your selections, then click OK.
- In Format/Data Validation Rule Builder, click Validate.
- At the information message, click OK.

- In Format/Data Validation Rule Builder, click OK.
In the grid section of Layout, the column and row cell intersection displays as green to indicate that the form contains data validation rules.

- Click Save.
- At the information message, click OK.
- In Layout, right-click the cell labeled A below Columns and select Add/Edit Format/Validation Rules.
- In Format/Data Validation Rule Builder, on the top right, click
 (Add Rule).
Tip:
Click (Duplicate) to create a rule similar to an existing rule, and then modify the duplicate rule to meet your requirements.
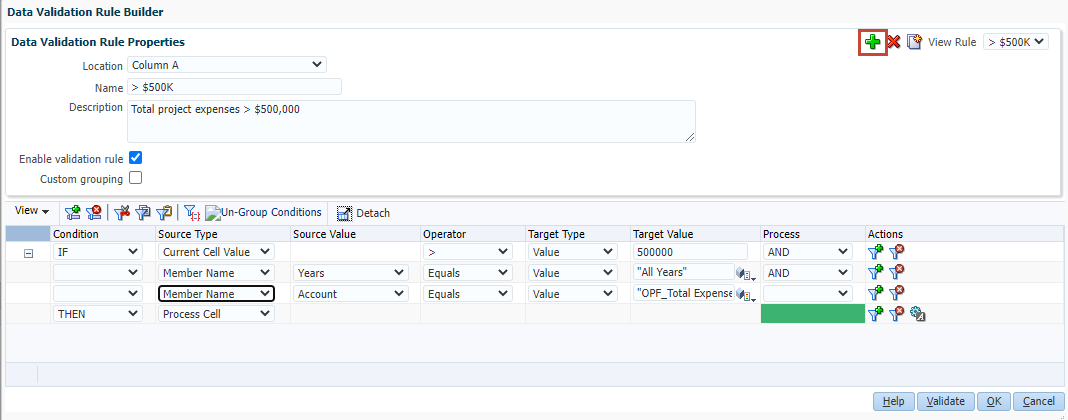
- Create the following rules, based on steps 6 through 23:
- Rule: >$1 million
Rule Properties
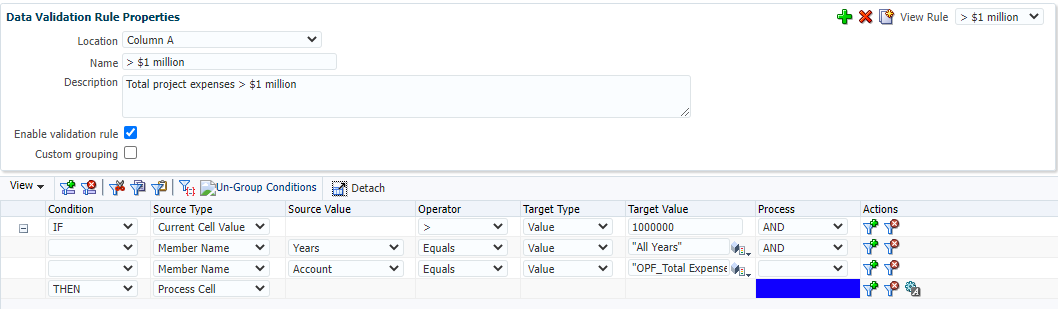
Format/Process Cell
Tip:
Cell Background Color used 0000FF.
- Rule: >$2 million
Rule Properties
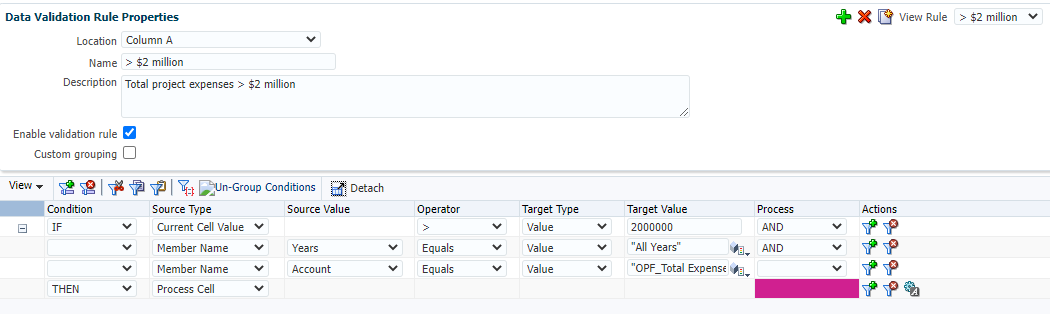
Format/Process Cell
Tip:
Cell Background Color used D02090.
- Rule: >$10 million
Rule Properties
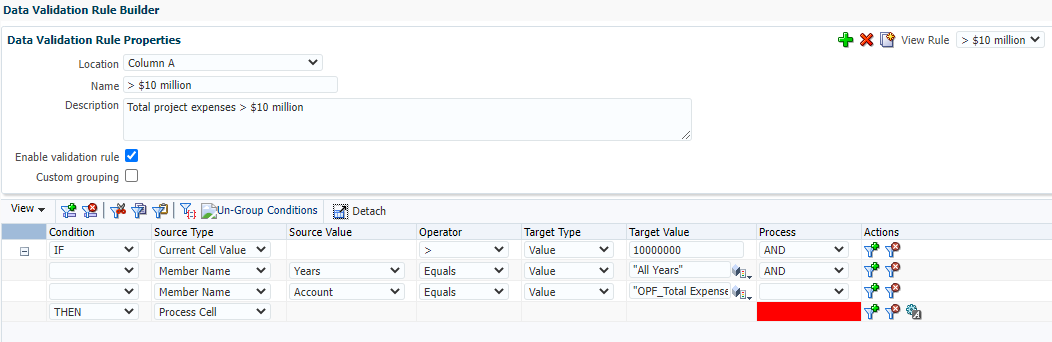
Format/Process Cell
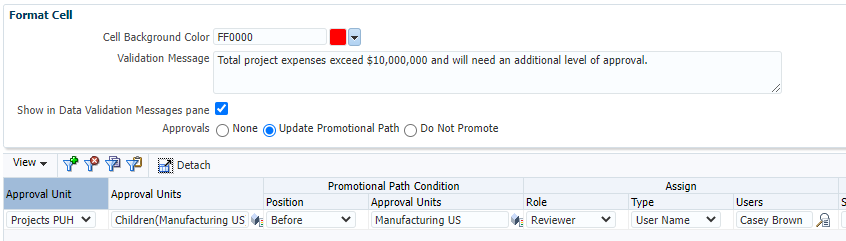
Tip:
Cell Background Color used FF0000.
Note:
Make sure that you validated all four rules. - Rule: >$1 million
- If Format/Data Validation Rule Builder is still open, click OK to close it.
- In Layout, click Finish.
Viewing Approval Unit Hierarchy Usage
Approval unit hierarchies might have dependencies such as approval unit assignments or data validation rules which are defined in forms. If dependencies exist for an approval unit hierarchy, the hierarchy can't be deleted until the dependencies are removed.
- Click (Navigator), then under Workflow, click Approval Unit.
- In Approval Unit, select the Projects_PUH row, and click (Edit).
- Click the Usage tab.

The Usage tab enables you to view approval unit hierarchy dependencies and links you to the forms or scenario and version combinations so you can remove the dependencies, if needed.
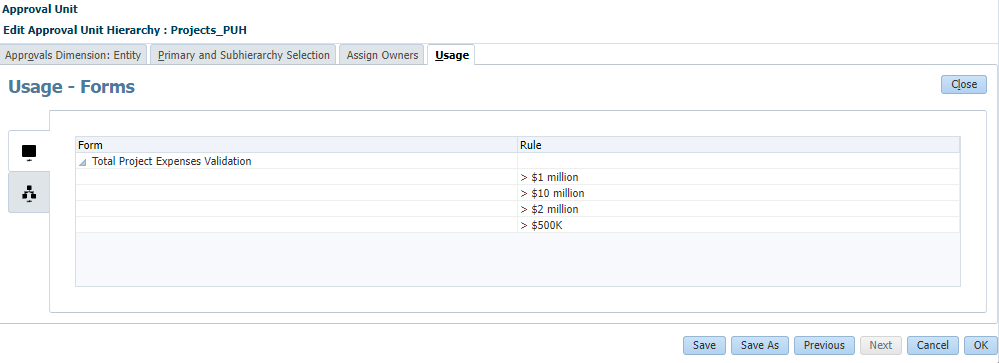
Data validation rules that update the promotional path defined on the Total Project Expenses Validation form are displayed.
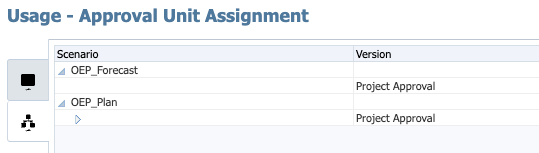
- From the vertical tabs on the left, click
 (Approval Unit Assignment).
 - In Approval Unit Assignment, review the scenario and version combinations assigned to the Projects_PUH approval unit.
Viewing the Updated Promotional Path
- Click the Assign Owners tab.
- In Assign Owners, in the grid, expand all levels.
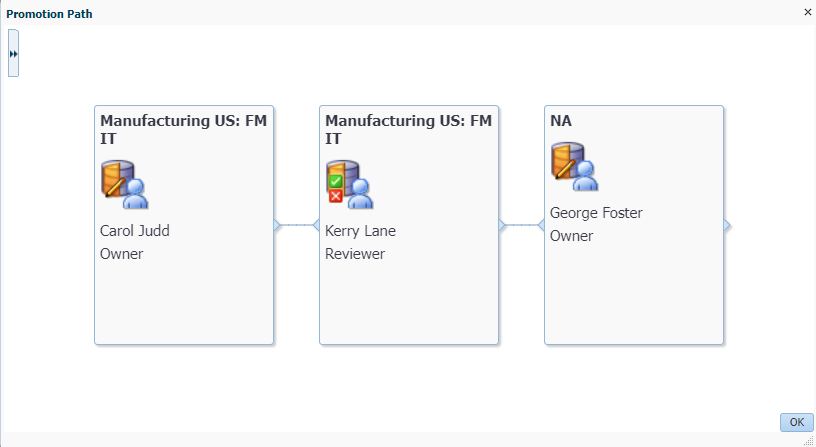
- For Manufacturing US: FM IT, click (Promotional Path).

The updated promotional path for the selected approval unit is displayed. Notice that the validation rules you previously defined are included in the updated promotional path.
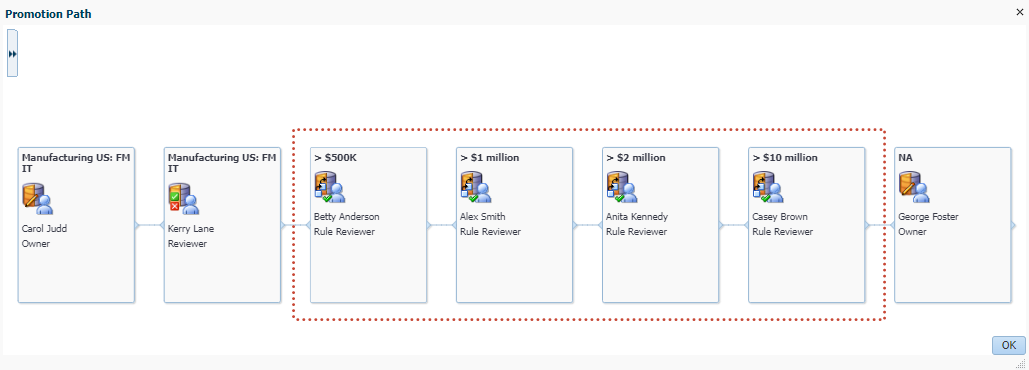
- Click OK to close the Promotion Path dialog.
- At the bottom right, click OK.
- At the information message, click OK.
Starting the Planning Review Cycle
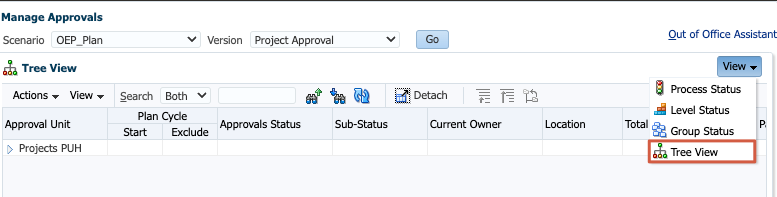
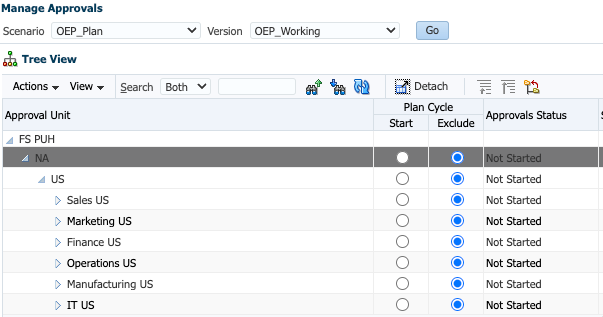
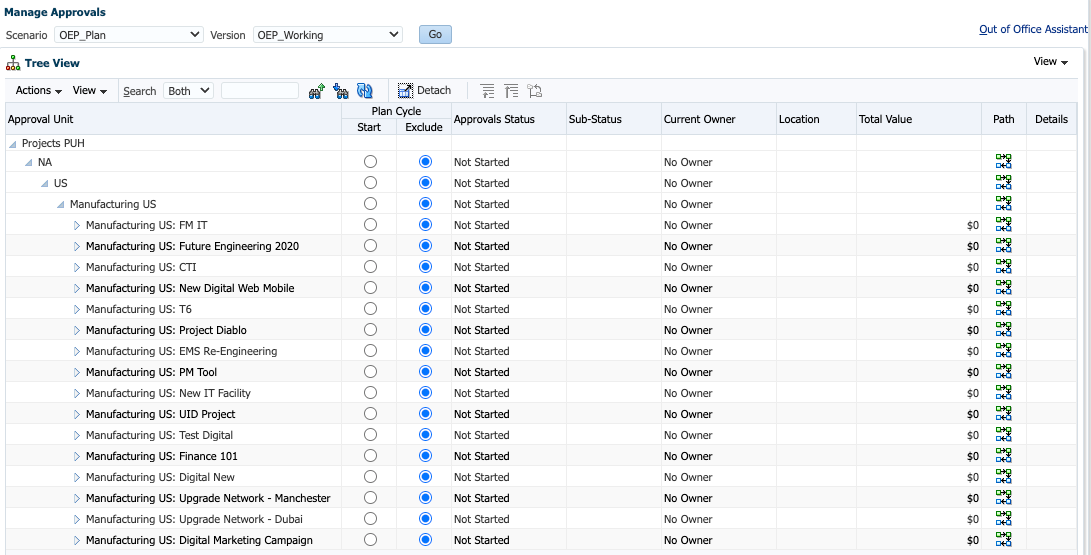
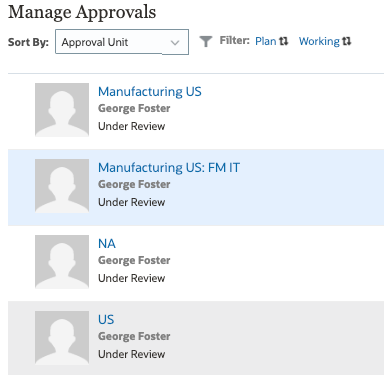
- Click (Navigator), then under Workflow, click Manage Approvals.
- In Manage Approvals, select the following and click Go:
- Scenario: OEP_Plan
- Version: Project Approval

- In Process Status, towards the right, click View and select Tree View.
- In Tree View, expand all approval units (both NA and Data Center Operations).
Tip:
Ignore if Data Center Operations is not available.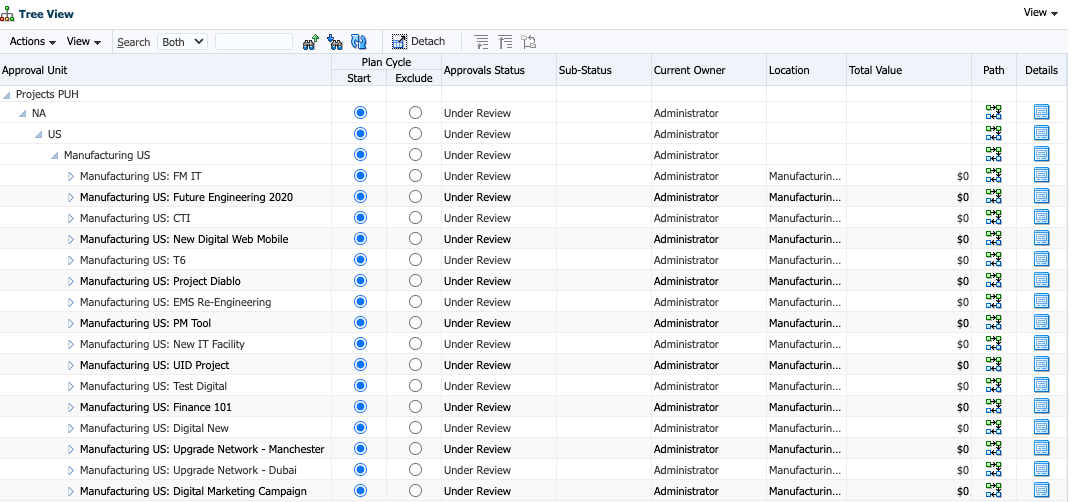
Notice that the Plan Cycle column allows for two options: Start and Exclude. In this example, the planning review cycle was started for all approval units in the Planning Unit Hierarchy. In the next steps, you will stop the planning cycle, revise the Scenario and Version assignments, and then start the appropriate approval units.
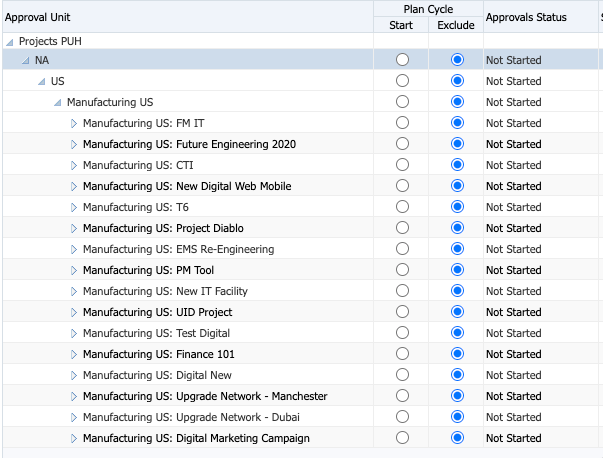
- Switch planning cycles for multiple units. For both NA and Data Center Operations, select Exclude.
- In the Exclude dialog, click Yes.
- At the information message, click OK.
- Verify that the planning review cycle has stopped for all approval units (both NA and Data Center Operations).
- Next, stop the planning review cycle for the FS PUH Planning Unit Hierarchy. In Manage Approvals, select the following and click Go:
- Scenario: OEP_Plan
- Version: OEP_Working

- In Tree View, expand FS PUH, then NA, then US.
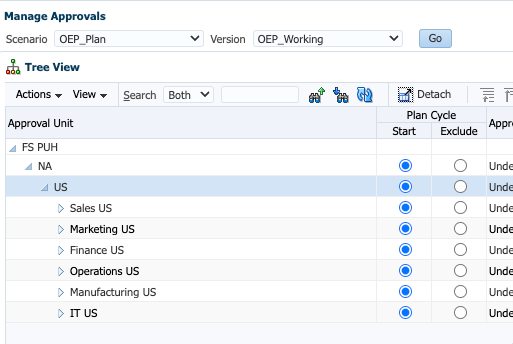
- For NA, select Exclude.
- In the Exclude dialog, click Yes.
- At the information message, click OK.
- Verify that the planning review cycle has stopped for all approval units (both NA and Data Center Operations).
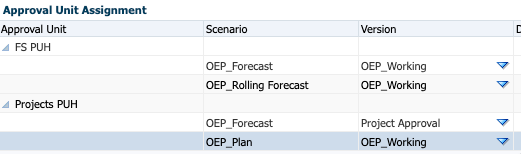
- Next, revise Scenario and Version assignments. Click (Navigator), then under Workflow, click Approval Unit Assignment.
- In Approval Unit Assignment, expand FS PUH and Projects_PUH.
- Under FS PUH, for OEP_Plan and OEP_Working, click
 (Delete).
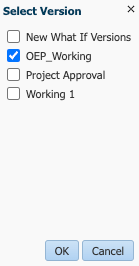
 - Under Projects PUH, for OEP_Plan, click the down arrow next to Project Approval.
- In Select Version, clear the selection for Project Approval, and then select OEP_Working.
- Verify your selections and click OK.
- Verify that your changes were applied to Projects PUH, then click Save.
- At the information message, click OK.
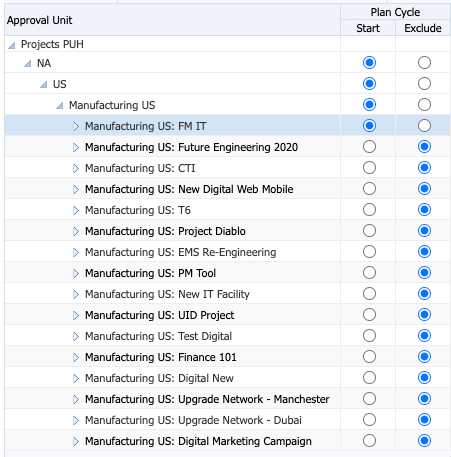
- Click (Navigator), then under Workflow, click Manage Approvals.
- In Manage Approvals, select the following and click Go:
- Scenario: OEP_Plan
- Version: OEP_Working

- In Process Status, towards the right, click View and select Tree View.
- In Tree View, expand all approval units.
- For Manufacturing US: FM IT, select Start.
- At the information message, click OK.
- Verify that the Approval Status now displays as Under Review and a Current Owner is assigned to approval units until Manufacturing US: FM IT.
Setting Application and User Preferences
Enabling Notifications and Setting an Application Owner
- Click (Navigator), then under Application, click Settings.
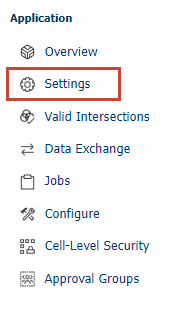
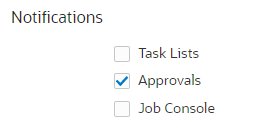
- In Application Settings, under Current Application Defaults, locate Notifications and select Approvals.
Tip:
You may need to scroll down to locate Notifications. - Under System Settings, locate Enable Use of the Application for and select All users.

- For Assign Application Owner, select a user assigned with the Service Administrator Application Role. in this example, George Foster is selected.

- Scroll up and click Save.
- At the information message, click OK.
Setting User Preferences
You must enable approval notifications for each user you want to get an email notice when there's a change in approval status or ownership.
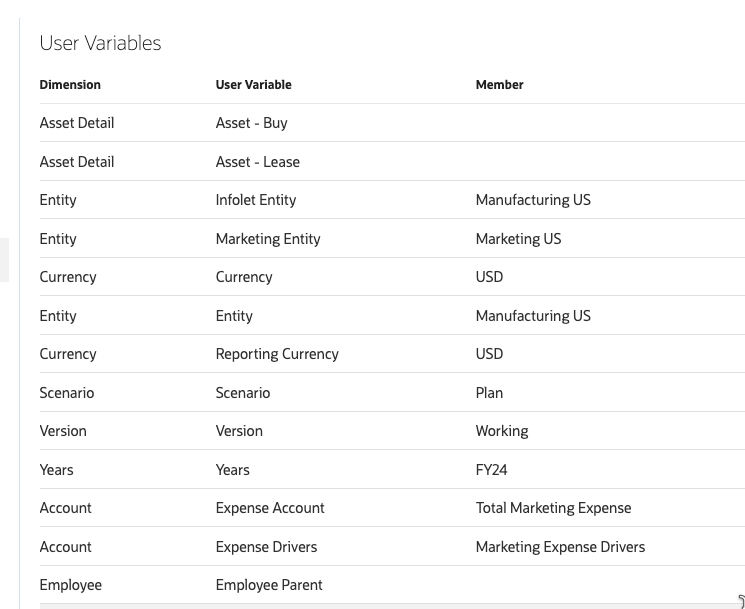
User variables act as filters in forms, enabling planners to focus only on certain members. Each user must set values for user variables.
Note:
Make sure you perform the tasks in this section for each user you created for this tutorial.Setting Up Email for Approval Notifications
- Log out of Planning and log in as the user you want to set up preferences.
- Click (Navigator), then under Tools, click User Preferences.
Note:
Menu options may differ depending on the application role assigned to the user.
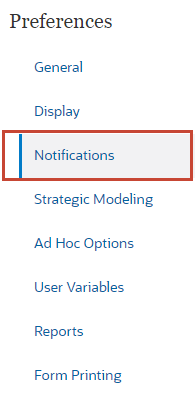
- On the left, click Notifications.
- Enter the email address of the user and make sure Approvals is selected.
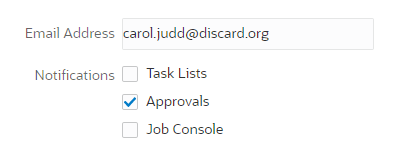
- Click Save.
- At the information message, click OK.
Assigning Values to User Variables
Note:
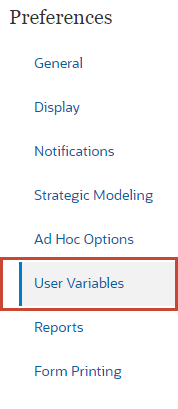
Menu options may differ depending on the application role assigned to the user.- On the left, under Preferences, click User Variables.
- For each variable, click its
 (Member Selector) to select a member as the variable's value.
Here's an example:
- Click Save.
- At the information message, click OK.
Adding Approvals Custom Menu to Forms
- Make sure you are logged on as a Service Administrator in Planning.
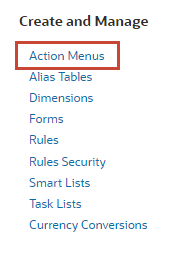
- Click (Navigator), then under Create and Manage, click Action Menus.
- Scroll down and select Submit for Approval, then click (Edit Menu).
Tip:
You can sort the list by Menu Name.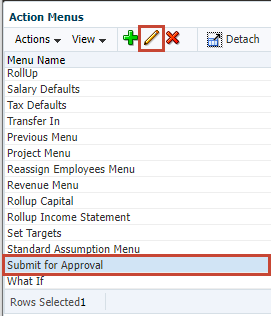
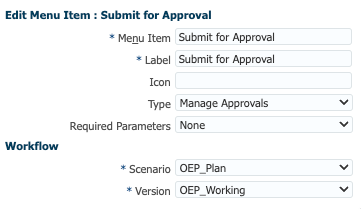
- In Edit Menu, with Submit for Approval selected, click Actions, then select Edit Menu Item.
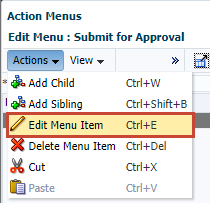
- Review the action set in this menu. In this example, the menu is set to move to Manage Approvals with a predefined scenario and version.
For Version, verify or set it to OEP_Working.
- Click Save.
- At the information message, click OK.
- Click Cancel.
- Click (Navigator), then under Create and Manage, click Forms.
- In the left pane of Form and Ad Hoc Grid Management, under Folders, expand Library and click Custom.
- In the content area, select Total Project Expenses Validation and click (Edit).
- Click the Other Options tab.
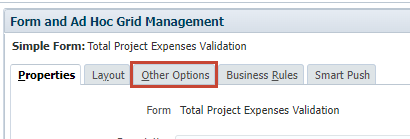
- From the list of Available Menus, select Submit for Approval and click
 (Move).
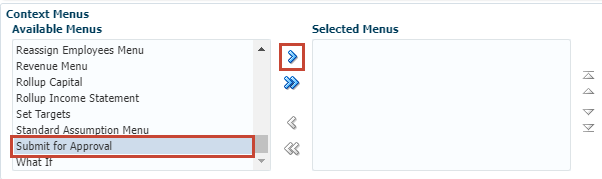
Submit for Approval is added to the Selected Menus list.
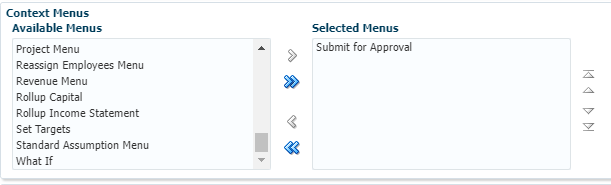
- Click Finish.
- Return to the home page. On the upper-right, click (Home).
Getting Plans Approved
About Approving Plans
Each approval unit has a status, depending on where it is in the review process.
- Not Started—Initial state of all approval units. An administrator begins the review process using the Start action, which changes an approval unit's state to either First Pass (in FreeForm); Under Review and first in the promotional path (in Bottom Up); or Under Review and last in the promotional path (in Distribute).
- 1st Pass—Beginning state of approval units selected for the budgeting process. Approval units have no owners during First Pass. People having write permission can enter data and promote approval units during the 1st Pass state. During this state, administrators may exclude members from approval units.
When an approval unit is ready for review, you select one of several actions, changing approval unit status and passing ownership. - Under Review—Occurs after a Promote or Submit action, and means that someone is reviewing the approval unit. Only the current owner or administrators can change data on approval units whose state is Under Review. While Under Review, approval units may undergo iterations of promotions, submissions, signoffs, and rejections until they are finally approved.
- Frozen—All related data in descendant approval units is locked (read only). The owner who froze the approval units, or an owner above that person, selects Unfreeze to reverse this action.
- Distributed—Multiple people are reviewing the budget. The reviewers are filtered by permissions and specified reviewers for the distribute action selected (Distribute, Distribute Children, or Distribute Owner).
- Not Signed Off—Occurs when the owner or administrator selects Reject. Only the current owner or administrator can change data or perform an action on an approval unit whose state is Not Signed Off.
- Approved—Occurs when Approve is selected. The last person in the promotional path (the owner of the approval unit) becomes the owner, regardless of whether they are an owner or a reviewer. Owners can edit the data if they have write permission to the member combination that defines the approval unit, and can perform the Approve action. Reviewers who are the last person in the promotional path can't edit the data in the approval unit, but can perform the Approve action. After all approval units are approved, the budgeting cycle is complete.
Actions available in an approval unit depend on what state the approval unit is in.
-
Start—Starts the approval unit.
New approval unit state: 1st Pass for Free Form, Under Review for Bottom Up and Distributed.
-
Exclude—Stops the approval unit and deletes all its history.
New approval unit state: Not Started.
-
Originate: Bottom Up—Moves the approval unit to first in the promotional path.
New approval unit state: Under Review.
-
Promote—Free Form moves the approval unit to anyone in the list. Bottom Up moves the approval unit to the next position in the promotional path.
New approval unit state: Under Review.
-
Reject—Free Form moves the approval unit to anyone in the list. Bottom Up and, Distributed move the approval unit to anyone previous in the promotional path.
New approval unit state: Not Signed Off.
-
Sign Off—Moves the approval unit to the Signed Off state.
-
Delegate—Delegates the approval unit to a newly selected owner.
New approval unit state: Under Review.
-
Take Ownership—Takes ownership away from the current owner. For Groups, claims ownership of the approval unit from the group.
New approval unit state: Under Review.
-
Return—Returns ownership to Group.
New approval unit state: Under Review.
-
Pass—When in a group, passes ownership to another person in the group.
New approval unit state: Under Review.
-
Freeze—Freezes the approval unit from data entry.
New approval unit state: Frozen.
-
Unfreeze—Unfreezes the approval unit and allows data entry again.
New approval unit state: Under Review.
-
Distribute—Moves the approval unit to previous in the promotional path.
New approval unit state: Distributed.
-
Distribute Children—Moves the approval unit to previous in the promotional path. Applied to children of the selected approval unit.
New approval unit state: Distributed.
-
Distribute Owner—Moves the approval unit to first in the promotional path.
New approval unit state: Distributed.
-
Submit—Moves the approval unit to next in the promotional path.
New approval unit state: Under Review.
-
Submit to Top—Moves the approval unit to last in the promotional path.
New approval unit state: Under Review.
-
Approve—Approves the approval unit. This completes the approval process, and users can't perform any additional actions.
New approval unit state: Approved.
-
Reopen—Reopens an approved approval unit. Reopen is available to users and Power Users who are last in the promotional path.
New approval unit state: Under Review.
Promoting and Approving Plans
In this section, you promote plans until it reaches the final approver.
Promoting Plans
Passes the approval unit to another person to review. This action assigns ownership of an approval unit the first time, and thereafter transfers ownership of an approval unit from one reviewer to another. Promote causes an implicit signoff by the current owner and changes the approval unit status to Under Review.
Approving Plans
Approves the approval unit and changes its status to Approved. With the Distribute or Bottom Up templates, only the last owner in the promotional path can approve the approval unit. With the Free Form template, a person can approve approval units from any status except Not Started. Only the last reviewer in the promotional path can approve from a Not Signed Off or First Pass status.Here is the promotional path, including data validation rules:
| State/Rule | Process Cell Formatting | Reviewer |
|---|---|---|
| Owner | N/A | Carol Judd |
| First Reviewer | N/A | Kerry Lane |
| > $500K
Total project expenses > $500,000 |
Green: #3CB371 | Betty Anderson |
| >$1 million
Total project expenses > $1 million |
Blue: #0000FF | Alex Smith |
| >$2 million
Total project expenses > $2 million |
Magenta: #D02090 | Anita Kennedy |
| ->$10 million
Total project expenses > $10 million |
Red: #FF0000 | Casey Brown |
| Final Reviewer/Owner | N/A | George Foster |
Once the review cycle begins, the budget will go through the applicable promotional path prior to getting its final approval. Based on the promotional path, the budget should pass through all reviewers until Anita Kennedy before it goes for a final approval with George Foster.
Tip:
If you receive an error opening dashboards and forms, make sure you have values assigned to user variables for each user you created.Carol Judd
- Log out of Planning and log in as owner of the Manufacturing US: FM IT approval unit. In this example, Carol Judd is logged in. Make sure you set values to User Variables for each user you use to log in.
Tip:
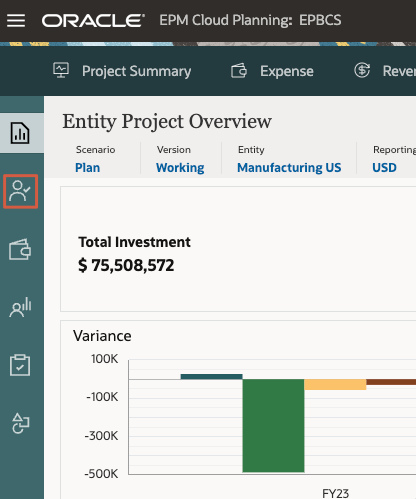
If you imported the security snapshot provided in the Prerequisites section of this tutorial, you can log in using the imported users. See Access Control for each user's login. All passwords are set to epmDem0s. - On the home page, click Projects, then Analysis.

- From the vertical tabs on the left, click
 (Project Analysis and Approval).
- In the data point of view (POV) of Total Project Expenses Validation, set or verify the following:
- Entity: Manufacturing US
- Project: FM IT

- In the data form grid, ensure the POV is as shown and locate Total Expenses for All Year (last row) and verify that the cell background displays green.
- Submit the budget for the FM IT Project. In the grid, right-click and select Submit for Approval.
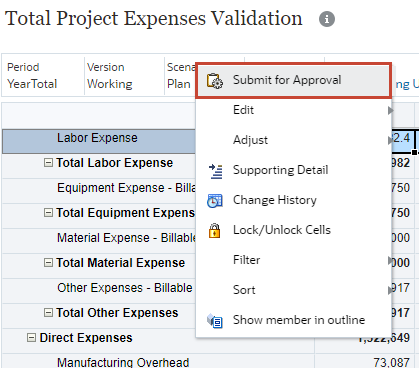
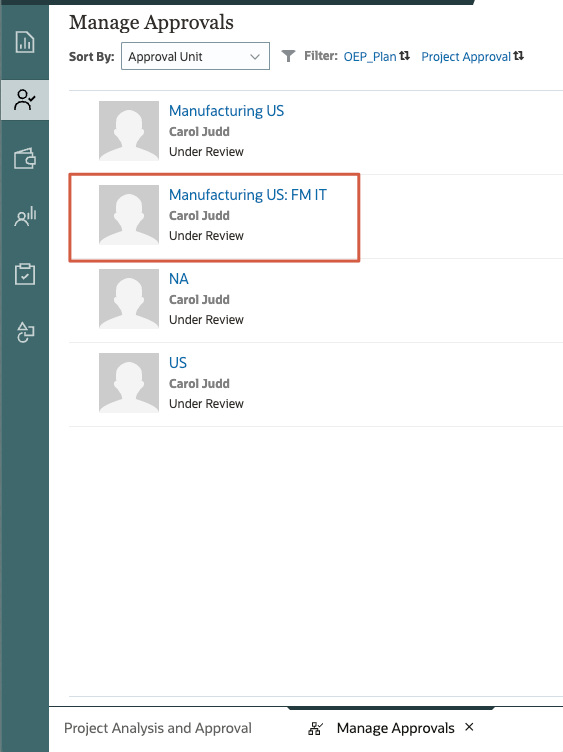
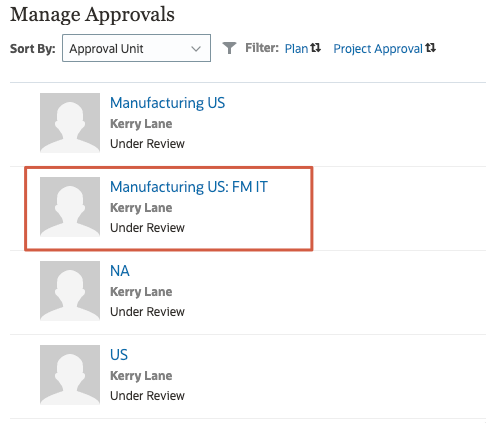
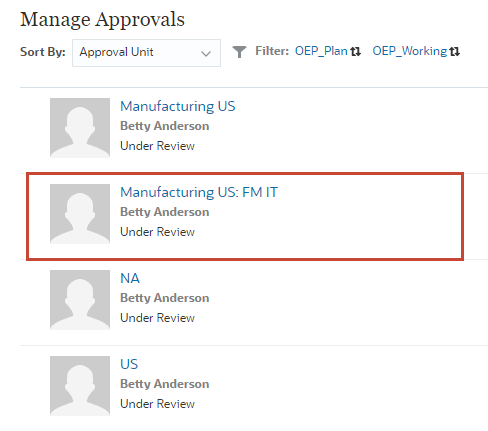
- In Manage Approvals, click Manufacturing US: FM IT.
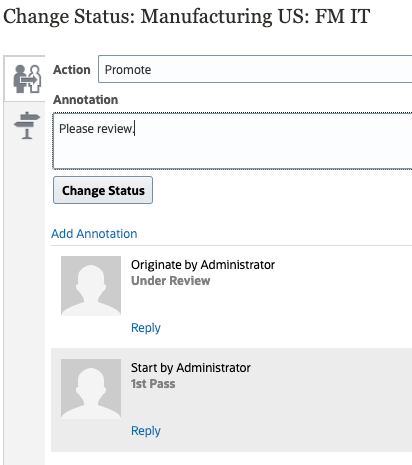
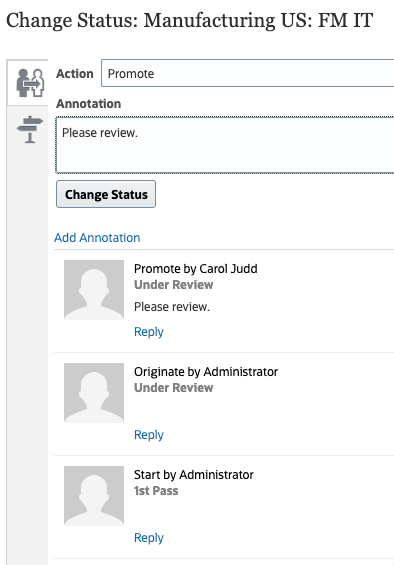
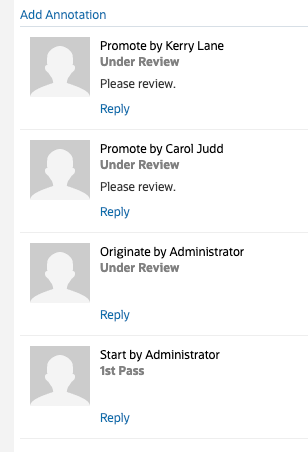
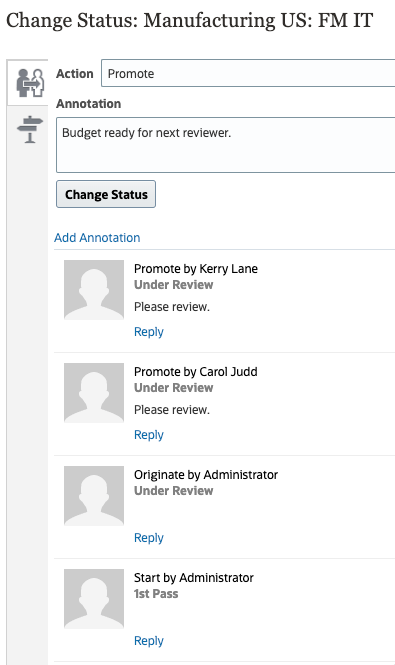
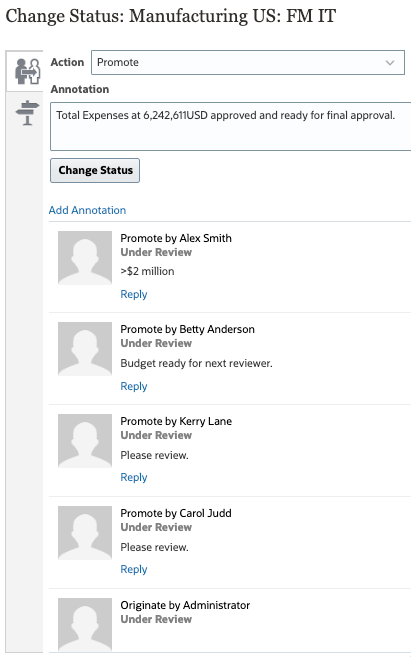
- In Change Status: Manufacturing US: FM IT, select or enter the following, and then click Change Status:
- Action: Promote
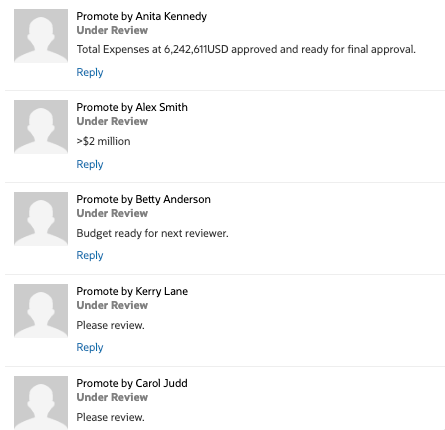
- Annotation: Please review.
- On the upper-right, click Refresh.
- Review the updated state of the approval unit, and then click Done.

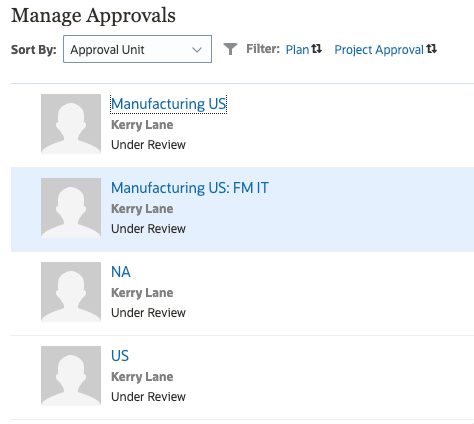
The approval unit is now assigned to Kerry Lane.
If you have email notifications enabled, check your email and review the notification message sent. Here's an example:
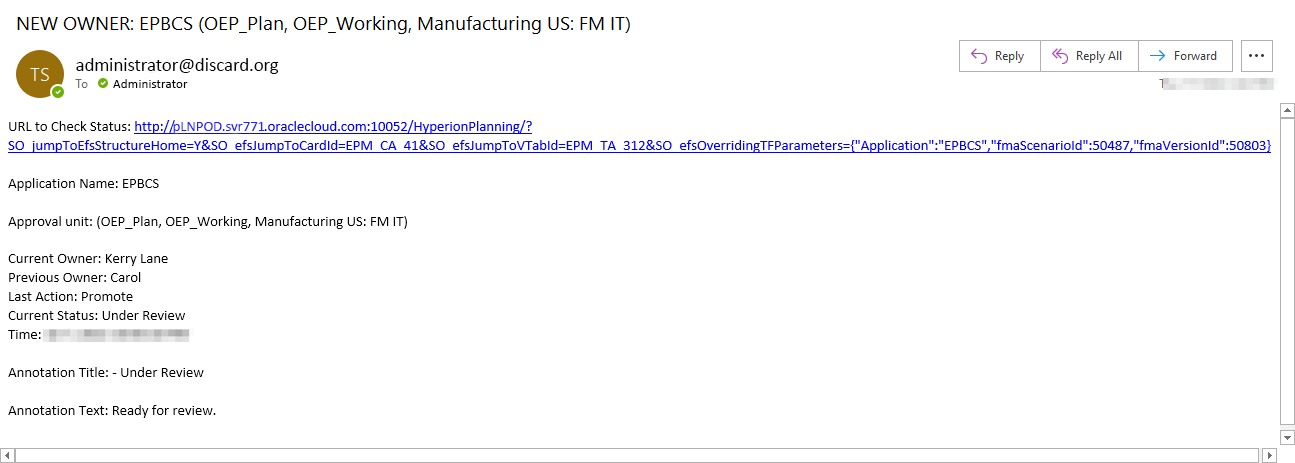
Approvals notification emails contain the following:
- URL to Check Status
- Application Name
- Approval unit
- Current Owner
- Previous Owner
- Last Action
- Current Status
- Time
- Annotation Title
- Annotation Text
Kerry Lane
- Log out of Planning and log in as owner of the Manufacturing US: FM IT approval unit. In this example, Kerry Lane is logged in.
- On the home page, click Projects, then Analysis.
- From the vertical tabs on the left, click (Project Analysis and Approval).
- In the data form grid, ensure the POV is as shown and locate Total Expenses for All Year (last row) and verify that the cell background displays green.
Note:
If you run into errors refer Assigning Values to User Variables section and update the User Variables. - Submit the budget for the FM IT Project. In the grid, right-click and select Submit for Approval.
- In Manage Approvals, click Manufacturing US: FM IT.
- In Change Status: Manufacturing US: FM IT, select or enter the following, and then click Change Status:
- Action: Promote
- Annotation: Please review.
- On the upper-right, click Refresh.
- Review the updated state of the approval unit, and then click Done.
The approval unit is now assigned to Betty Anderson.

Betty Anderson
- Log out of Planning and log in as owner of the Manufacturing US: FM IT approval unit. In this example, Betty Anderson is logged in.
- On the home page, click Projects, then Analysis.
- From the vertical tabs on the left, click (Project Analysis and Approval).
- In the data form grid, ensure the POV is as shown and locate Total Expenses for All Year (last row) and verify that the cell background displays green.
- Submit the budget for the FM IT Project. In the grid, right-click and select Submit for Approval.
- In Manage Approvals, click Manufacturing US: FM IT.
- In Change Status: Manufacturing US: FM IT, select or enter the following, and then click Change Status:
- Action: Promote
- Annotation: Budget ready for next reviewer.
- On the upper-right, click Refresh.
- Review the updated state of the approval unit, and then click Done.
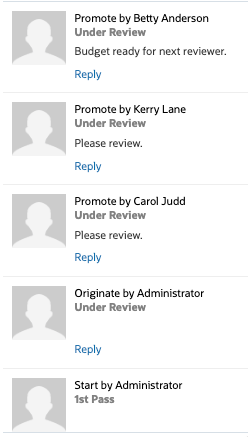
The approval unit is now assigned to Alex Smith.
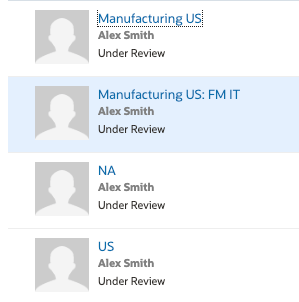
Alex Smith
- Log out of Planning and log in as owner of the Manufacturing US: FM IT approval unit. In this example, Alex Smith is logged in.
- On the home page, click Projects, then Analysis.
- From the vertical tabs on the left, click (Project Analysis and Approval).
- In the data form grid, ensure the POV is as shown and locate Total Expenses for All Year (last row) and verify that the cell background displays green.
- Submit the budget for the FM IT Project. In the grid, right-click and select Submit for Approval.
- In Manage Approvals, click Manufacturing US: FM IT.
- In Change Status: Manufacturing US: FM IT, select or enter the following, and then click Change Status:
- Action: Promote
- Annotation: >$2 million
- On the upper-right, click Refresh.
- Review the updated state of the approval unit, and then click Done.
The approval unit is now assigned to Anita Kennedy.
Anita Kennedy
- Log out of Planning and log in as owner of the Manufacturing US: FM IT approval unit. In this example, Anita Kennedy is logged in.
- On the home page, click Projects, then Analysis.
- From the vertical tabs on the left, click (Project Analysis and Approval).
- In the data form grid, ensure the POV is as shown and locate Total Expenses for All Year (last row) and verify that the cell background displays green.
- Submit the budget for the FM IT Project. In the grid, right-click and select Submit for Approval.
- In Manage Approvals, click Manufacturing US: FM IT.
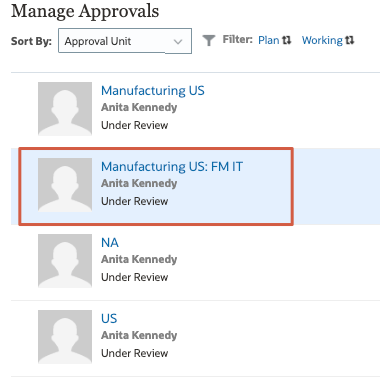
- In Change Status: Manufacturing US: FM IT, select or enter the following, and then click Change Status:
- Action: Promote
- Annotation: Total Expenses at 6,242,611USD approved and ready for final approval.
- On the upper-right, click Refresh.
- Review the updated state of the approval unit, and then click Done.
The approval unit is now assigned to George Foster.
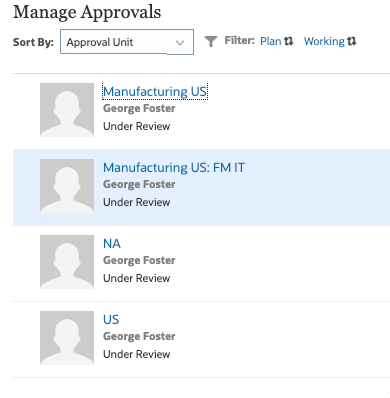
Since total project expenses is less than $10 million, the promotional path does not require the budget to be reviewed and approved by Casey Brown and is directly promoted to George Foster.
George Foster
- Log out of Planning and log in as owner of the Manufacturing US: FM IT approval unit. In this example, George Foster is logged in.
- On the home page, click Projects, then Analysis.
- From the vertical tabs on the left, click (Project Analysis and Approval).
- In the data form grid, ensure the POV is as shown and locate Total Expenses for All Year (last row) and verify that the cell background displays green.
- Submit the budget for the FM IT Project. In the grid, right-click and select Submit for Approval.
- In Manage Approvals, click Manufacturing US: FM IT.
- In Change Status: Manufacturing US: FM IT, select or enter the following, and then click Change Status:
- Action: Approve
- Annotation: Budget approved.
- On the upper-right, click Refresh.
- Review the updated state of the approval unit, and then click Done.
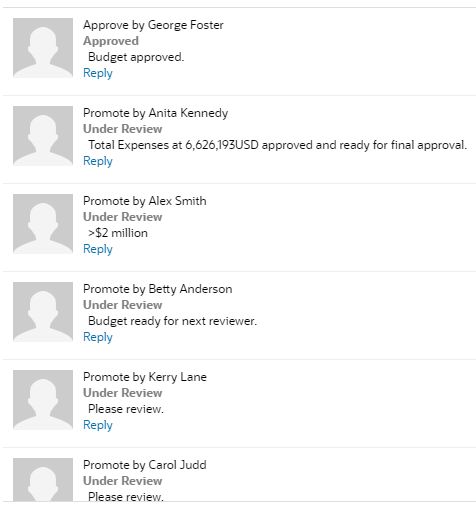
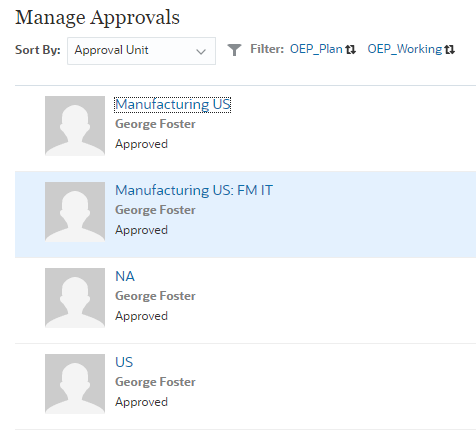
The review process for this approval unit is complete.
Related Links
More Learning Resources
Explore other labs on docs.oracle.com/learn or access more free learning content on the Oracle Learning YouTube channel. Additionally, visit Oracle University to view training resources available.
For product documentation, visit Oracle Help Center.
Setting Up Approvals in Planning
F57937-03
September 2025