Create Project Plan Types
Create project plan types to define default information used for creating a project plan and capturing progress.
While creating a project plan type, you can associate one or more sets, specify plan, task, currency, rate, and progress settings, and select budget generation options.
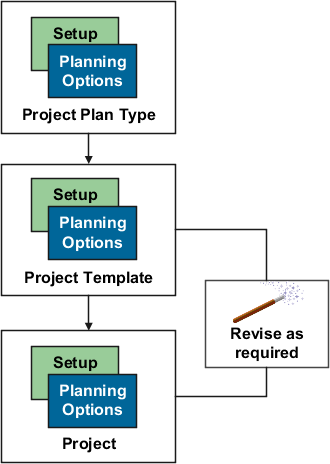
Associate one project plan type to a project template. Projects created using the template inherit setup and planning option values. You can revise setup or planning options at each level to match specific planning requirements. The following figure shows how you can edit the setup or planning options at the project template or project level.
The following sections describe how to create project plan types.
Enter Basic Information and Setup Options
To create a project plan type:
-
In the Setup and Maintenance work area, go to the Manage Project Plan Types task.
-
Use the Manage Project Plan Types page to create, review, edit, or delete existing project plan types.
-
Click the Create icon to open the Create Project Plan Type page.
Use the Create Project Plan Type page to provide basic project plan type information and specify setup and planning options that determine how associated project plans and progress are created.
-
Enter a unique project plan type name and select a date from which the project plan type is available for use.
-
Optionally, provide a description and a date to which the project plan type is available for use.
-
Use the options in the Setup Options section to indicate whether:
-
Project managers can use Microsoft Project for scheduling.
-
Project managers can enter amounts in currencies other than the project currency.
Note: When you select this option, you must provide currency conversion attributes in the Currency Settings tab. -
Assign Sets and Specify Plan Settings
To assign sets and specify plan settings:
-
Navigate to the Set Assignments tab.
Use the Set Assignments tab to associate sets with project plan types so that project managers can use them to create project plans for projects or project templates. For more information, see the Create Financial Plan Types section of this document.
-
Navigate to the Plan Settings tab.
Use the Plan Settings tab to indicate whether you will track costs in the project plan and whether you will plan for the project duration or by periods.
-
The following table lists the decisions you need to take when assigning sets to your project.
Option Name
Decision
Notes
Enable project plan costs
Will project managers plan for costs on the project?
Enable project plan costs if project managers must plan for costs on tasks and task assignments and monitor actual costs through the project lifecycle.
Note: If you don't enable planning for costs, then physical percent complete values are calculated based only on effort.Set unplanned assignments as planned assignments
Can a resource with actuals get added directly as a planned resource to the financial project plan?
When this option is selected, as project costs are incurred, the resource is added as a planned resource to the financial project plan instead of being marked as unplanned. When assigning a resource as a planned resource, the application:
-
Defaults the dates from the task dates. You can edit these dates unless the Use task planned dates as task assignment dates check box is selected at project plan type level.
-
Defaults the currency to the actual currency if the project plan type allows planning in multiple currencies, else it always assigns in the project currency.
-
Periodic spread for planned resource happens from the planned start date of the task or the actual period.
Associate project costs to summary task assignments
Do you want to associate cost to planned resource assignments in the task hierarchy?
Decide whether to associate the incurred costs for resources on the task hierarchy at the level planned.
Note: This check isn't available for selection if the Set unplanned assignments as planned assignments or Use third-party software for scheduling check box is selected.Calendar Type
Will project managers plan by period or for duration of plan lines?
Decide whether project managers will plan for the task assignment duration or if they can plan for specific periods in the accounting calendar or project accounting calendar.
Rate Derivation Date Type
How will cost rates be determined?
If project managers won't plan based on a calendar, then determine whether cost rates are derived based on the start or end date of plan lines, system date, a fixed date, or on effective resource rate dates.
If project managers plan based on the accounting calendar or project accounting calendar, then determine whether cost rates are derived based on the start date of plan lines or on effective resource rate dates.
Fixed Date
How will cost rates be determined?
If the rate derivation date type is Fixed Date, then select the date from which rates will be used for calculating costs.
Period Profile
How will period amounts be displayed?
If project managers will enter planning amounts by period, then select how periods will be grouped for display when project managers view amounts for task assignments.
Maintain manual spread on date changes Do you want to retain manual periodic spread on date changes?
Decide whether to retain manual periodic spread even if the duration changes due to a scope change.
The period-level adjustments previously made to the forecast or budget line aren't lost when you modify the line dates in the user interface.
Note: The Maintain manual spread on date changes option doesn't apply to non-periodic calendar versions. -
Specify Task Settings
Use the Task Settings tab to specify task and task assignment date settings.
-
Navigate to the Task Settings tab.
-
The following table lists the ways in which you can enter and calculate the planned dates for tasks and task assignments.
Option Name
Decision
Use task planned dates as task assignment dates
Must task assignment dates match corresponding task planned dates?
If yes, then project managers can't edit task assignment dates.
Automatically roll up task planned dates
Must planned dates for lowest-level tasks roll up to summary tasks?
If yes, then project managers can't edit summary task dates.
Caution: The Use task planned dates as task assignment dates check box and the Automatically roll up task planned dates check box are disabled if you enable use of Microsoft Project as the scheduling application. -
The following table lists the options that you can use to enter transaction dates.
Option Name
Decision
Synchronize task transaction dates with planned dates
Decide whether transaction dates must match the planned dates for tasks, plus or minus the date adjustment buffer.
If you don't select this check box, then transaction dates for summary tasks are blank by default. Transaction dates for subtasks are set to summary task transaction dates.
Date Adjustment Buffer in Days
Optionally, specify a date adjustment buffer to determine the maximum lag (positive) or lead (negative) time between task planned dates and task transaction dates.
-
Click Save.
Specify Currency Settings and Rate Settings
Use the Currency Settings tab to select transaction currencies in which to enter project plan amounts, and the rates for converting those amounts to project currency or project ledger currency.
Use the Rate Settings tab to specify the actual or planning rates used to calculate cost and revenue amounts on the project plan.
For more information on both tabs, see the Create Financial Plan Types section of this document.
Specify Progress Settings
Use the Progress Settings tab to define how progress values are calculated and roll up the task hierarchy. These options indicate default values that you can modify at the project level.
-
Navigate to the Progress Settings tab.
-
The following table lists the decisions you need to take on how the application should calculate physical percent complete values and rolls up task hierarchy.
Option Name
Decision
Notes
Physical Percent Complete Calculation Method
How is physical percent complete calculated for lowest-level tasks?
Decide whether project managers must enter physical percent complete or if the application calculates the value based on either cost or effort.
Calculation is based on the following formula, where amount can be cost or effort, as appropriate:
Actual Amount / Estimate at Completion (EAC) Amount * 100
Primary Physical Percent Complete Method
How does physical percent complete roll up the task hierarchy?
Decide whether the rolled-up physical percent complete for summary tasks is based on cost or effort.
Calculation is based on the following formula, where amount can be cost or effort, as appropriate:
Sum of Earned Value Amount from Subtasks / Sum of Baseline Project Plan Amount * 100
Note: The rolled up physical percent complete value is used in project forecasting, reporting, and revenue generation. -
Decide how ETC amounts are calculated as listed in the following table. The following table lists the ways in which you can calculate ETC amounts.
Option Name
Decision
Notes
ETC Method
How are ETC amounts calculated?
Use one of the following methods to calculation ETC values:
-
Remaining plan: For all progress calculations (initial and subsequent) ETC cost is calculated as:
Current Planned Cost - Actual Cost
-
Manual entry: For first progress as-of date, ETC cost is calculated as:
Current Planned Cost - Actual Cost
For all subsequent progress as-of dates, ETC cost equals ETC cost from the previous published progress.
Allow negative ETC calculation
Can ETC values be negative or should they be set to zero?
If you're using the Remaining plan ETC method and actual amounts are greater than the plan, then you can select to display negative ETC amounts that result.
-
-
The following table lists the ways in which you can update the project plan information and generate a forecast version when publishing progress.
Option Name
Decision
Update planned quantity with EAC quantity
Decide whether planned quantity in the project plan is updated with EAC quantity from progress.
Automatically generate forecast version
Decide whether a forecast version is created when the project manager publishes progress.
Financial Plan Type
Select the financial plan type for use in forecast creation.
-
Click Save.
Select Budget Generation Options
Use the Budget Generation Options tab to decide whether a budget version is generated when you set a baseline for your project plan and to specify how the budget version is generated. These options indicate default values that you can modify at the project level.
-
Navigate to the Budget Generation Options tab.
-
The following table lists the decisions you need to take when choosing to generate a budget version while setting a baseline for a project plan.
Option Name
Decision
Generate budget version
Decide whether a budget version is created when the project managers sets a baseline for the project plan.
Financial Plan Type
Select the financial plan type for use in budget creation.
Automatically designate budget version as baseline
Decide whether the budget version must be set as the current baseline version.
Note: If an existing current baseline budget version exists, then the existing version becomes a standard baseline version and the newly created baseline version becomes the current baseline version. -
Click Save.
Provide Additional Information
Capture information specific to your organization using the descriptive flexfield PJO_PLANNING_OPTIONS_DFF.