6Creating Intake Forms
Intake Form Designer Topics
The following topics apply to using the Intake Form Designer to create and publish intake forms, which registered users access online to initiate transactions, such submitting a permit application.
Using the Intake Form Designer
This topic describes the purpose of the Intake Form Designer, lists the prerequisites that must be completed prior to creating a form, and introduces you to the designer interface.
For any municipality that grants permits to citizens and handles planning and zoning applications, an intake form needs to be submitted by the citizen or registered user that captures the information required as prerequisites to initiating the process. The intake form can be a paper form or an online web page. With Oracle Public Sector Community Development, you use the Intake Form Designer to create application forms your citizens can access online and submit and monitor through the cloud.
Oracle does not deliver a predefined form for each type of transaction because for each form and for each municipality, the information required will be unique.
For example, for a fence permit, the City of San Diego may require only basic information about the material to be used and the measurements. On the other hand, the City of Sacramento may require the same information as San Diego, but also require the contact information of the contractor building the fence, the exact location of the fence, the area enclosed by the fence, and so on. Each municipality has its own set of requirements so you need to be able to tailor the forms to reflect your agency's requirements.
The Intake Form Designer enables you to create unique online application forms for each transaction your municipality offers. The Intake Form Designer provides modular sets of common fields, called predefined form elements, which you can use like building blocks to assemble the online application form. If a predefined form element does not contain fields you require, you can add user-defined form elements (custom fields) to meet your requirements.
Once you have created, configured, and tested your form, you can publish the form for end users to access, complete, and submit for review and approval.
Completing Prerequisites
Before creating an online form, you need to:
Create a transaction type.
For more information on creating a transaction type, see Setting Up Permit Types.
Set up any fees associated with the form.
For more information on fees, see Setting Up Fee Itemsand Setting Up Fee Schedules.
Accessing the Designer
Before you can create an application form, you must first create a transaction type on the Transaction Type page.
From the Transaction Type Definition page, select the Design Form button.
Working with the Designer Interface
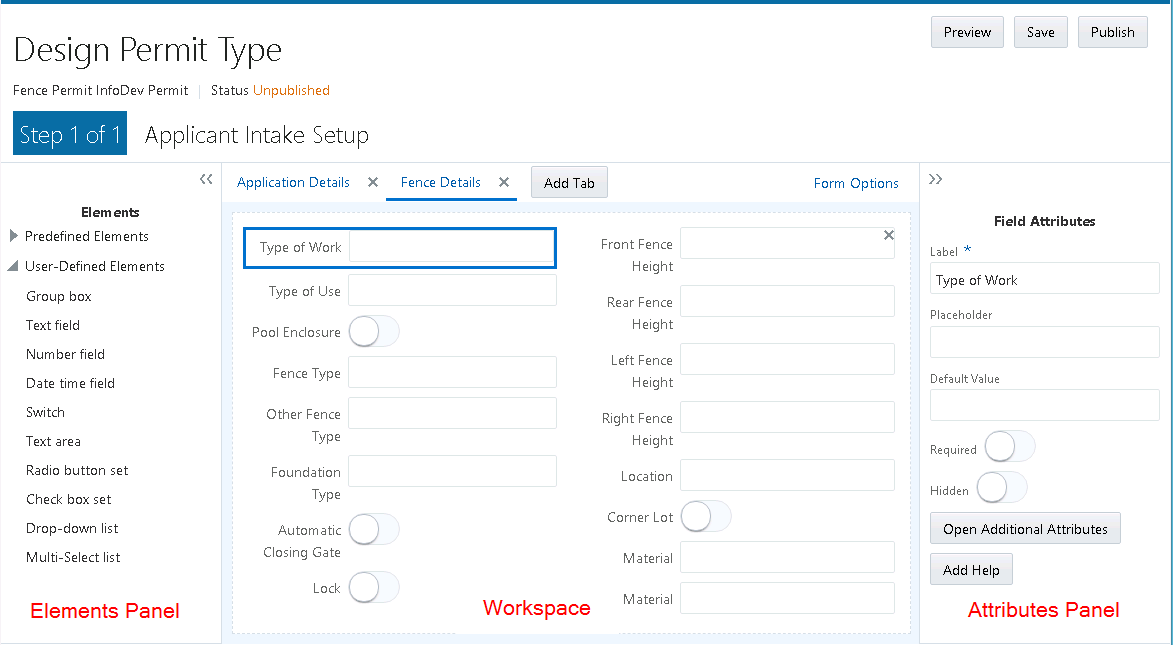
This example illustrates the interface of the designer when you begin creating an application form. The elements of the user interface are described below the image.
| Page Element |
Description |
|---|---|
| Status |
Indicates the status of the current design.
For more information on form status, see Working with Sandboxes. |
| Manage Sandbox |
Click to access the Oracle Fusion Applications Sandboxes page where you can view the status of your sandbox and refresh your sandbox if needed. For more information on sandboxes, see Working with Sandboxes. |
| Preview |
Enables you to preview your form to test layout, design, and data entry. |
| Save |
Saves changes made to the form design. |
| Publish |
Publishes the completed form design so that end users can access it from the landing page and submit applications. |
| Next |
Takes you to the Fee Mapping page. For more information on mapping fees, see Mapping Form Fields to Decision Model Attributes. |
| Form Options |
Click to display the Form Options dialog box where you can set options that apply to the entire form. For more information on form options, see Setting Form Options. |
| Elements panel |
Contains lists of all pre-defined and user-defined elements you can add to your form design. The Elements panel contains all of the items that you use to build an intake form. |
| Add Tab |
Adds additional pages to your form. You navigate between the pages by using the page tab for each page. |
| Workspace |
The area where you drag and drop form elements from the Elements panel and configure them. This is the main area used for creating and configuring your forms. |
| Attributes panel |
Displays the available attributes that you can configure for the currently selected form element. For example, if you have a field selected, the attributes panel reads "Field Attributes,” and it contains attributes specific to fields. If you have a group box selected, the attributes panel reads "Group Box Attributes,” and it contains attributes specific to group boxes. |
Viewing the Tasks for Creating Forms
This section provides the core set of tasks to complete when creating an intake form. The remaining topics in this chapter discuss the details of each task.
| Step |
Link |
|---|---|
| Add page tabs. |
|
| Add predefined form elements. |
|
| Modify field attributes. |
|
| Add group boxes. |
|
| Add user-defined form elements. |
Making Changes to Labels for Application Form Elements
When making changes to the labels for elements within your application form, you need to consider what type of element it is. Changing the label of some elements is a global change, while changing the label of other elements is a local change.
Global: A global label change means that a change to the label affects every intake form definition using that field or element.
Local: A local label change means that a change to the label affects only the current intake form definition where the field or element appears.
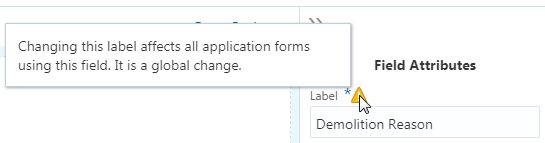
When you select a form element or field and a label change would have global effects, a warning icon appears above the Label field in the attributes panel.
When selecting an item in the workspace, if changing the label for that item has global effect on all application forms using the item, the system displays a warning icon.
| Form Element |
Scope of Label Change |
Label Change Considerations |
|---|---|---|
| Predefined Elements |
Global |
The label of a predefined element is the heading used to describe the grouping of the fields it contains. Changing the label of a predefined element is a global change. For example, if you change the label in the Applicant predefined element used in the fence permit intake form, that change will be reflected in the Applicant predefined element used in the electrical permit intake form (and any other application form using the Applicant predefined element). |
| Predefined Element: Parent Field |
Local |
Some fields appearing in predefined form elements are part of the parent record within the data structure storing the transaction data. You know a predefined element field is part of the parent record when the warning icon does not appear above the Label field in the elements panel. For example, the Description field in the Application predefined element does not display the warning icon. Changing this label affects only the current intake form definition. It is a local change. |
| Predefined Element: Child Field |
Global |
Some fields appearing in predefined form elements are part of a child record within the data structure storing the transaction data. You know a predefined element field is part of a child record when the warning icon appears next to the Label field in the elements panel. For example, the Demolition Reason field in the Demolition predefined element displays the warning icon. Changing this label affects all intake form definitions using the Demolition predefined element. It is a global change. |
| User-Defined Elements |
Local |
You can change the labels for the fields that you add to your application forms, such as text fields, number fields, drop-down lists, and so on. Because you add these fields manually to your application form, you can change the default labels as needed to suit your business requirements. The scope of any changes to the label for user-defined fields apply only to the current intake form. |
| HTML Constructs |
Local |
A general HTML construct refers to elements such as group boxes and page tabs. You can change the labels for general HTML constructs as needed to suit your business requirements. The scope of the construct and any changes to the label apply only to the current intake form definition. For example, changing the label of the default label for HTML constructs such as Group box or Field 0 to your desired label affects only the current intake form definition.
Note: If you change a label for a page tab or a group box used in an application form after the form has been published and used in the production system, make sure to update any instructions or documentation that may reference the previous label.
|
Working with Sandboxes
This topic provides an overview of the concept of sandboxes and how they are used within the Intake Form Designer, and it describes sandbox usage and behavior.
Most modern development environments typically require several different individuals to work simultaneously on application changes while sharing the same data model and configuration starting point. The Intake Form Designer utilizes the Oracle Fusion Applications technology referred to as sandboxes to enable form developers to work on projects simultaneously, and save and test their work without affecting other developers or the production environment..
The sandbox acts as the development and test mode of your application form. During sandbox mode, the form design can be viewed only internally by application developers or business analysts. In sandbox mode you can create your form, add required form elements, add UI elements, and test your changes. When you have completed all of your design, development, and test work, you can then publish the form so it can be accessed by end users.
Starting a Sandbox Instance for a New Application Form
Before you can create an application form in Intake Form Designer, you must first create the transaction type. For example, for the permit service, the transaction type is a permit. When you save a permit type, the application creates a sand box instance. From that point, the transaction type and the associated form design exist within the newly created sandbox instance.
Each form your implementation team is currently developing exists within its own, separate sandbox instance.
Until you publish the form, the transaction type and the form design remain in the sandbox instance. When you publish a transaction type, the system eliminates its sandbox instance, and the form is available to users outside the sandbox.
Starting a Sandbox Instance for a Published Intake Form
After an application form has been published, you can initiate sandbox instances to make any required changes discovered after the initial publication.
To initiate a sandbox for a published form:
Open the transaction type for the form.
Select Design Form.
Begin making the desired changes.
Click Save.
By clicking Save, the Intake Form Designer creates a new sandbox instance to store the current changes.
Viewing the Sandbox Status
You can determine if a form is in sandbox mode using the Status indicator located in the top left-hand corner of the Intake Form Designer. The Status indicator appears when you are creating the form or previewing the form. The sandbox status does not appear on the published version of the form.
| Status |
Description |
|---|---|
| draft |
The form is in sandbox mode. All changes exist in the sandbox instance only. |
| published |
The form is not in sandbox mode. The form is available to the runtime environment, where you can access the form from the landing page. |
Refreshing a Sandbox
Each application form is assigned to its own sandbox. Because transaction types share underlying metadata resources, if during the development of a transaction type or intake form some of the shared metadata resources get updated by another member of the implementation team, each transaction type also using the shared metadata resources needs to be synchronized with the most recent metadata updates.
To synchronize the metadata between permits, you need to refresh the sandbox for unpublished transaction types.
You will know that your sandbox is not synchronized with the current metadata resources when you see this message when you attempt to publish the transaction type:
The application was unable to publish the permit. Click the Manage Sandbox button to access the page where you can refresh the sandbox.
To refresh a sandbox:
In Intake Form Designer, click Manage Sandbox.
This takes you to the Sandboxes page in Oracle Fusion Applications.
On the Sandboxes page locate the sandbox for your transaction type.
The sandbox naming convention is: <Transaction Type Code>__sb_<number of publications>.
For example, if for a permit, the Type Code value is REMODEL, and the sandbox has been published once previously, the sandbox for that permit is named REMODEL__sb_1.
Click on the sandbox you need to refresh.
On the Sandbox Detail page review the messages related to the status of your sandbox.
You may notice the Current Status reads Refresh needed and the following note:
This sandbox is not synchronized with the mainline environment. You can refresh the sandbox before making any further changes.
On the Sandbox Detail page, click Refresh.
Click Yes on the prompt indicating you are about to refresh your sandbox and that you can’t make changes to the sandbox during the refresh.
This returns you to the Sandboxes page.
View the Status column on the Sandboxes page, which indicates your sandbox is refreshing.
Click on the sandbox again to access the Sandbox Detail page to confirm your sandbox Current Status is Up to date.
You may need to review the merge log and accept changes manually if needed.
Once your sandbox is refreshed, close the Sandboxes page, and return to the designer.
Working with Pages
This topic describes how to add pages to your application form and how to modify page attributes.
An application form can include one or more pages to contain the form elements and fields that you want to add to your form.
Adding Pages
When you create a form, by default, the application includes one page for your form. To add additional pages to your form, click the Add Tab button at the top of the workspace.
Setting Page Attributes
| Page Element |
Description |
|---|---|
| Label |
The name of the page that appears on the page tab. The default name is Page1, Page2, and so on. Change the name to your desired label, and tab out of the field.
|
| Hide From Public User |
Hides the page tab and all the elements on the page from the public user at runtime. Only agency staff can view and update information for a page with Hide From Public User turned on. In addition to hiding the UI element from the public user in the interface, the application also secures the back end for that specific UI element, such as preventing any unauthorized access to the fields within the UI element using a REST API, for example. |
| Help |
Click to launch the Contextual Help page, which you can use to add help information to aid end users in completing the application form. Page-level help should provide information pertaining to the overall page content. If the information applies to a specific UI element on the page, such as a component, group box, or field, consider adding help directly to that UI element. For more information on adding contextual help, see Adding Contextual Help to Forms. |
Deleting Pages
If you delete a page from your form, keep in mind that any UI elements you have added to the page, such as predefined form elements, group boxes, and fields will also be removed from your form.
To delete a page from your form:
Click the Remove button on the tab (the ‘x’ on the right side of the page tab.
On the Confirm dialog box, click OK.
Save your changes.
Working with Predefined Form Elements
This topic provides an overview of form elements and how you use them to build your application forms.
Oracle provides a set of predefined form elements to help you build application forms easily. Each predefined form element contains a collection of fields commonly used to describe a particular facet of the transaction type. Using predefined form elements, you can assemble simple online application forms in a matter of minutes.
Predefined form elements are:
Pre-mapped to attributes in the application view object (VO), which ultimately are mapped to fields in the SQL tables in the application database.
Grouped logically to provide descriptive metadata for a particular element of an intake form, such as Applicant, Electrical Equipment, Pool Information, and so on.
You drag the desired predefined element from the Elements panel onto the workspace. You use various combinations of predefined and user-defined form elements to assemble your application forms.
For example, assume that you need to create a form for citizens to apply for a roofing permit. In this case, you can drag the Applicant element and the Re-roof Information element onto the workspace to build your form.
| Page Section |
Example Page Section Fields |
|---|---|
| Applicant |
Name Address Phone |
| Re-roof Information |
Roof Size Roof Type Roof Material Pitch |
For more information on the delivered predefined elements, see Using Predefined Form Elements.
Adding Predefined Elements
To add a predefined form element to your form:
Make sure the page to which you want to add the predefined form element is the active page.
Expand the Predefined Elements list in the Form Elements panel to the left of the workspace.
Click on the desired element to activate.
Select the element to drag and drop the it in the workspace.
Deleting Predefined Elements
To delete a predefined element, click the Remove button (the ‘x’) in the upper, right-hand corner.
Setting Predefined Element Attributes
| Page Element |
Description |
|---|---|
| Label |
The name of the predefined form element. Initially displays an internal reference for the default label. When modified, the new label displays.
Note: Changing the label for predefined form elements can cause unexpected results if you don’t consider whether the change will be local to the transaction type or global, affecting all transaction types.
|
| Show Label |
Control whether to show the label. By default, the system shows labels for predefined form elements (Show Label is on). To hide the label, turn off Show Label. When turned off, the system hides the label at both design-time and runtime. Typically, you’d want the label to be visible to describe the logical grouping of the fields in the form element. In some cases, the page tab name and the predefined element label might be redundant, in which case you may opt to hide the label. You may also want to group multiple predefined form elements within a single group box. In this case, you can hide the individual predefined element labels within the group box container, using the group box label to represent the combined set of fields.
Note: When you turn off Show Label, the system disables the collapsible feature for a predefined form element.
Note: If the predefined element is delivered without a label, the Show Label attribute does not appear when you select that form element.
|
| Hide From Public User |
Hides the predefined form element and all the fields and controls it contains from the public user at runtime. Only agency staff can view and update information for a predefined form element with Hide From Public User turned on. In addition to hiding the UI element from the public user in the interface, the application also secures the back end for that specific UI element, such as preventing any unauthorized access to fields contained within the UI element using a REST API, for example. |
| Help |
Click to launch the Contextual Help dialog box, which you can use to add help text to a predefined form element for assisting users with interacting with your intake form. When adding help for a predefined form element, the help text should apply to the overall contents of the predefined form element. You can add help also at the page level and the field level, depending on the scope of the help text. For more information on adding contextual help to your intake form, see Adding Contextual Help to Forms. |
Adding a Predefined Form Element Multiple Times to the Same Form
The same predefined form element can be dragged into your form multiple times. This is referred to as a multiple-instance element. How you adjust the Multi-Instance Options attribute determines how the application stores the data for that predefined element.
If you make no changes to the Multi-Instance Options attribute, the data entered within that predefined element corresponds to one row of data only. In this case, the system duplicates the display of the data in each area of the form it is displayed. This option enables you to show the same data on a different tab within the form, if necessary. Updating the data in one instance of the predefined element updates the data displayed in the other instances as well.
For example, assume you want the same comment text to appear on multiple pages in your form. You can do this by adding the Comments element to the desired pages without making any updates to the Value field in the Multi-Instance Options attribute.
If you make changes to the Multi-Instance Options attribute, the application considers each instance of the predefined element unique, and then each individual occurrence of the predefined element is associated with its own row of data.
For example, assume you wanted to incorporate multiple comment sections in your form. In this case, you can add the Comments element to multiple locations of your form, and then you set the Multi-Instance Options attribute to different values. One might relate to fencing comments while another might relate to contractor comments. Another example would be to enable the end user to upload multiple attachments that apply to separate documents. One attachment might be photos of a property while another attachment might be blueprint or design documents.
Using the Keyboard to Drag and Drop Elements
You can use keyboard hot keys to drag and drop elements.
| Key |
Description |
|---|---|
| Enter |
Use to:
|
| Tab |
Use the tab key to select either the first element in the list or the last selected item in the list if a previous visit was made to the list. |
| Up and Down Arrows |
Use to:
|
| Space |
When an element is selected, the space key highlights the selected element and displays available drop zones for the current page on the Select a Drop Zone dialog box. The drop zones can be the page or group boxes contained by the page. For user-defined fields, the drop zones are group boxes. |
Using Predefined Form Elements
This topic lists and describes the set of predefined form elements delivered to help you build forms quickly and consistently.
Predefined form elements are prebuilt user interface modules that you can use as building blocks for assembling forms. Each element contains a set of fields and functionality specific to various sections of an application form.
Common Predefined Elements
| Form Element |
Description |
|---|---|
| Applicant |
Identification and contact information for the citizen filling out the form, including name, address, phone, and email. |
| Application |
Displays information about the form itself, such as status, relevant dates, and descriptions. |
| Attachments |
Enables you to attach and download files, such as documents or images. You determine document properties displayed in the list of attachments and during upload. Contains multiple instance options to create unique instances of the attachment element. |
| Comment |
Enables you to enter additional comments or descriptions pertaining to information on the form. Contains multiple instance options to create unique instances of the comments element. |
| Contact Details |
Enables you to add information for individuals or organizations that are contacts for an application.
|
| Fee Summary |
Lists the items selected, the cost for each item, and the total amount to be paid when submitting the form.
Note: This does not include additional inspection or other fees which may be assessed at a later time.
|
| Property |
Describes the parcel as it is registered with the municipality, such as the parcel ID, parcel type, and so on. |
| Site and Zoning |
Describes features of the property related to acreage, flood preparedness, as well as zoning and land usage information. |
| Terms of Use |
Provides access to the terms and conditions regulating the usage of the online form, and provides a way for the user to accept the terms. This element does not identify which Terms of Use definition to use, so if you add this element to an application intake form, you need to also add a Terms of Use definition on the Permit Type or Planning Application Type page. The Display Mode property has these options:
If the display mode is Link, these two additional properties are available:
Note: This element is not used to set up public user registration terms and conditions. The Public User Setup page includes all registration-related configuration.
|
Attachments Element
You can configure the attachments element and add it into your form multiple times. Attachments provide supporting documentation needed by agency staff to determine if a permit can be issued.
| Configurable Features |
Description |
|---|---|
| Component Attributes |
You can name the attachments component title in the Label field. |
| Component Multi-Instance Options |
Use these multiple instance options to create unique instances of the attachment element:
For more information about multiple instance options, see Working with Predefined Form Elements. |
| Attachment Columns: |
You can configure these attachment properties in the attachments list:
|
| Business Columns:
|
Agency-defined document categories and document subcategories enable you to organize the various types of attachments. You can configure these fields for document categories and document subcategories:
|
Predefined Permit Elements
| Form Element |
Description |
|---|---|
| Business Information |
Captures information to help describe the business, such as name, description, number of employees, industry, and so on. |
| Construction Information |
Captures information regarding the current construction site and the proposed construction project. |
| Demolition |
If demolition is required as part of the job, this element captures information related to the scope of the demolition and if hazardous materials or utilities need to be considered, such as electricity, gas, water, and so on.
|
| Electrical Equipment |
Describes a structures electrical features, such as outlet types, amps, voltage, and electric appliances. |
| Fence Information |
Describes the proposed fence attributes, such as type, material, dimensions, location, and so on. |
| Grading Information |
Describes the scope of grading work, such as the acreage affected, materials to be used and the amount of material. |
| Insurance |
Provides a contractor’s insurance type and policy information. |
| License Qualification |
Enables a contractor to add any state licences they have. |
| Mechanical Equipment |
Describes features of the job site related to ventilation, heating, cooling, fire safety, and so on. |
| Photovoltaic Information |
Describes attributes of a site’s solar energy configuration, such as roof area, coverage area, inverter information, and so on. |
| Plumbing Equipment |
Describes attributes of a site’s plumbing configuration. |
| Pool Information |
Describes attributes of a pool, such as type, depth, location, surrounding fencing, and so on. |
| Regulated Business Activity |
Enables you to specify any regulated activity or controlled substances allowed on the premises, such as alcohol, carnival rides, casino games, and so on. |
| Right of Way Use |
Enables you to provide any details related to the use of a right-of-way on the property or to gain access to the property, such as traffic, parking, or pedestrian impact. |
| Roof Information |
Describes features of a structure’s roof, such as existing roof type, proposed roof type, number of layers, and so on. |
| Special Event |
Enables you to specify information about an event, including the safety plan, concessions, facilities, potential impacts, and traffic plans. |
| Yard Sale |
Enables you to specify yard sale information, such as the start time, end time, and the number of days. |
Working with Group Boxes
This topic describes how to add group boxes to your form and discusses group box layout options and attributes.
Use group boxes as containers to indicate the items contained within a group box are grouped logically. Once you add a group box to a page, you can drag these items into the group box:
Predefined elements
User-Defined elements
Other group boxes (nested group boxes)
Adding Group Boxes
To add a group box:
Select the UI Elements tab in the Form Elements panel.
Click and hold on the Group Box option.
Drag and drop the group box into the workspace.
Deleting Group Boxes
Setting Group Box Attributes
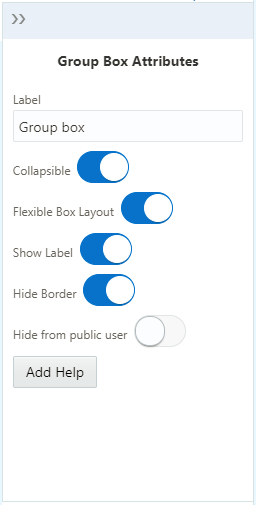
Select a group box to view the Group Box Attributes panel.
| Page Element |
Description |
|---|---|
| Label |
Add a name for the group box, describing the collection of items within it. |
| Collapsible |
Turn on to enable the group box to be collapsed when an end user clicks it, hiding items it contains. If not turned on, the group box is always expanded and its items are always visible. |
| Flexbox Layout |
With Flexbox Layout enabled, the system displays as many controls within the group box in one line until all of the space is utilized, then the system wraps the row, beginning a new line. With Flexbox Layout disabled, the controls within the group box display as stacked items, with each additional control displaying directly beneath the previous control. |
| Show Label |
Select to hide the group box label (specified in the Label field).
Note: You can add help only to group boxes with Show Label turned on. If Show Label is turned off, the Help button does not appear on the attributes panel and any help icons associated with any previously added help no longer appear.
|
| Hide Border |
Hides the group box border. When turned on, the border is not visible. |
| Hide From Public User |
Hides the group box and all the elements in the group box container from the public user at runtime. Only agency staff can view and update information within a group box with Hide From Public User turned on. In addition to hiding the UI element from the public user in the interface, the application also secures the back end for that specific UI element, such as preventing any unauthorized access to the fields contained within that UI element using a REST API, for example. |
| Help |
Click to launch the Contextual Help page, which you can use to add help information to aid citizens in completing the intake form. The Help button appears only if Show Label is turned on. Help text added for group boxes should apply to the overall group box content. Help can be added also at the page level, predefined element level, and user-defined element level depending on the scope of the help text. For more information on adding Contextual Help, see Adding Contextual Help to Forms. |
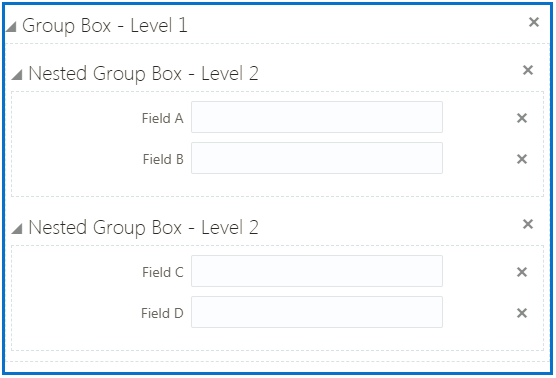
Nesting Group Boxes
The following example illustrates nested group boxes, which you achieve by dropping group boxes within group boxes. Nested group boxes can be used to represent subcategories of information and to enhance layout options, such as creating columns for form elements.
Using the Flexbox Layout Attribute
Use the Flexbox Layout attribute to establish a group box container based on the CSS flexible box layout model. In the flexible box layout model, the items contained within the parent container assume a layout position automatically, based on space in the container. As the available unused space grows or shrinks, the items in the container grow to fill the unused space or shrink to avoid overflowing the parent.
With Flexbox Layout on, the system displays as many controls within the group box in one line until all of the space is utilized, then the system wraps the row, beginning a new line.
With Flexbox Layout off, the controls within the group box display as stacked items, with each additional control displaying directly beneath the previous control.
Example: Using Group Boxes to Combine Predefined Elements
In some cases you may want to give the appearance of multiple predefined elements being combined. You can do this using a group box to act as the outer container for the set of predefined elements. When using a group box to contain predefined elements, consider the following items:
The collapsible attribute of the group box container controls the visibility of the contained predefined elements. If the group box container is set to be collapsible, when the user collapses that group box, all of the elements (predefined and user-defined) within that group box will be hidden.
If you want the predefined elements within the group box to be categorized under just the label of the group box, turn off the Show Label attribute of the contained predefined elements.
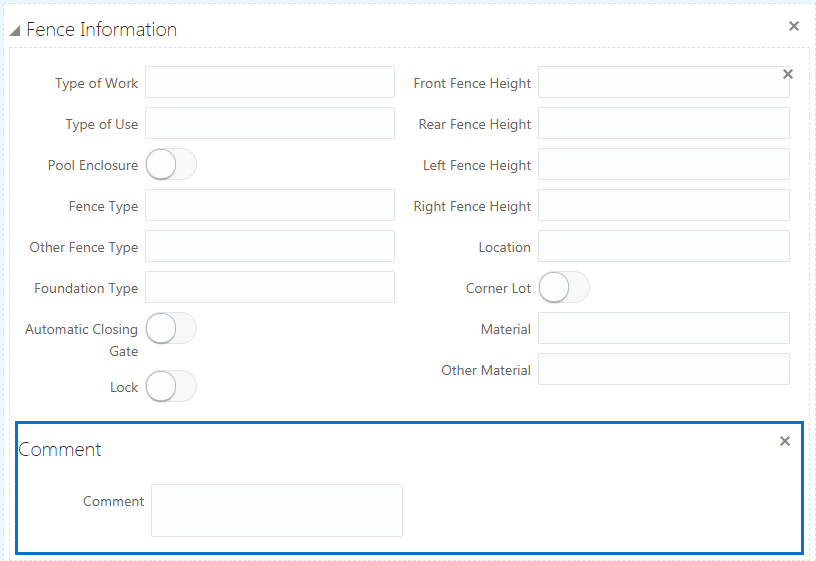
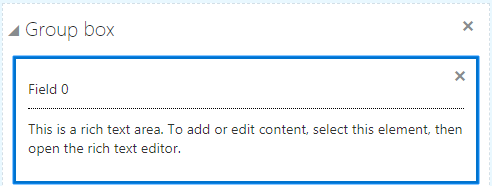
In the following example, assume you want to combine the Fence Information and Comment predefined elements, giving the appearance that Fence Information element contains a Comment field.
To combine predefined elements within a group box container:
From the user-defined elements list, drag and drop a group box into the workspace.
Select the group box and make these changes on the Group Box Attributes panel:
Group Box Attribute
Sample Value
Label
Fence Information
Flexible Box Layout
Off
From the predefined elements list, drag and drop the Fence Information element into the group box
Select the Fence Information element, and turn off Show Label on the Attributes panel.
From the predefined elements list, drag and drop the Comment element into the group box.
Select the Comment element, and turn off Show Label on the Attributes panel.
Save your changes.
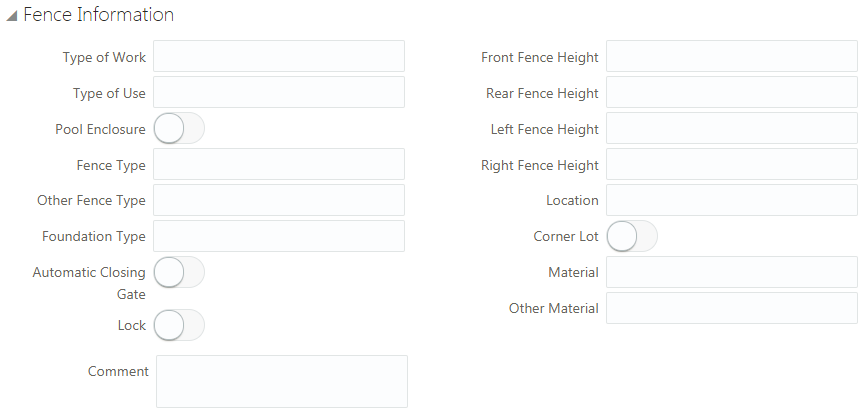
At runtime, the example steps above produce a single, collapsible section in the form that includes both the Fence Information and the Comment predefined elements.
This example illustrates the collapsed Fence Information group box.

This example illustrates the expanded Fence Information group box containing multiple predefined elements.
Example: Using Group Boxes to Combine a Predefined Elements and User Defined Elements
Similar to combining predefined elements within a single group box container, you can also combine predefined elements and user-defined elements within a single group box container creating the appearance of user-defined fields being part of a delivered predefined element.
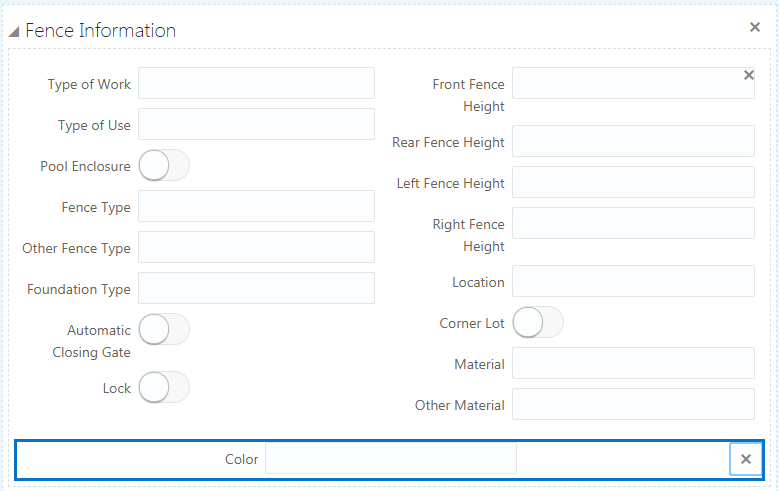
In the following example, assume you need to associate a field with the Fence Information element to capture the color of a proposed fence.
To combine predefined elements and user-defined elements with group boxes:
From the user-defined elements list, drag and drop a group box into the workspace.
Select the group box and make these changes on the Group Box Attributes panel:
Group Box Attribute
Sample Value
Label
Fence Information
Flexible Box Layout
Off
From the predefined elements list, drag and drop the Fence Information element into the group box
Select the Fence Information element, and turn off Show Label on the Attributes panel.
From the user-defined elements list, drag and drop a text field into the Fence Information group box.
Select the text field, and enter Color for the Label in the Field Attributes panel.
Save your changes.
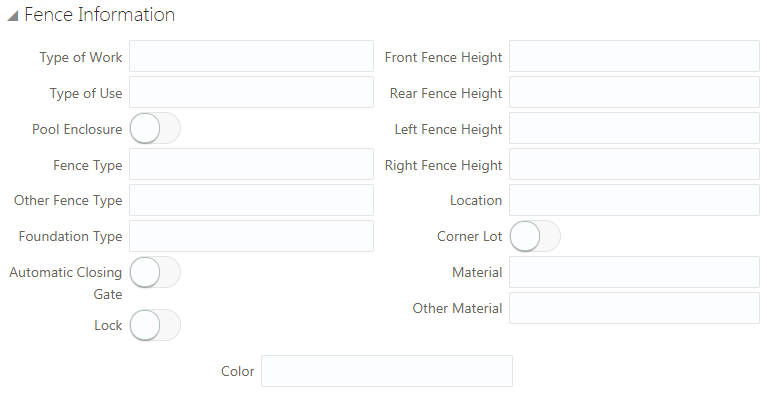
The following example illustrates how at runtime, the group box containing the predefined element and the user-defined element create the appearance of the manually created field being part of the delivered predefined element.
Working with Fields
This topic describes how add fields to your forms, modify field attributes, and hide fields.
When end users are completing an application for a permit, they enter the required information in fields. Fields can be added to forms by:
Adding predefined elements to your form. Each predefined element is delivered with a set of fields.
Adding user-defined elements (fields) to your form.
The fields that come with a delivered predefined elements are referred to as predefined element fields, while the individual fields you add manually to your form are referred to as user-defined element fields.
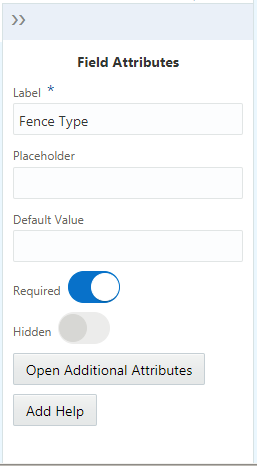
Setting Field Attributes
Predefined and user-defined element fields typically have the same set of attributes, however, in some cases the type of field you select determines the attributes appearing in the Field Attributes panel. Select a field to view the Field Attributes panel.
This example illustrates how the Field Attributes panel looks after selecting a field.
| Page Element |
Description |
|---|---|
| Label |
Add a custom label to the field.
Note: In the case of a custom field, the system forces the Map Field value to match the Label value, but removes any spaces. The map field represents how the field appears in the underlying data model. For example, a custom field with the label
Additional Requests, will have a Map Field value of
AdditionalRequests.
|
| Placeholder |
Add descriptive text to aid the user in entering data. For example, the placeholder text could read: Enter date in this format” MM/DD/YY. |
| Default Value |
Enter any default value required for the field. |
| Required |
Enable if this is a required field. |
| Hidden |
Hides the field from the user. If a predefined element contains fields that you do not need, select this option so the user does not have access to the field. |
| Open Additional Attributes |
Used to add values for fields containing a list of values. For more information, see Defining Fields Displaying a List of Values. |
| Add Help |
Click to launch the Contextual Help page, which you can use to add help information to aid citizens in completing the intake form. Help text added at the field level should apply specifically to that field. You can also add help to predefined elements, group boxes, and pages, depending on the scope of the help text. For more information on adding Contextual Help, see Adding Contextual Help to Forms. |
| Add Logic |
Click to add scripting logic using the Groovy programming language. For more information on adding logic to your forms, see Adding Logic. |
| Edit |
Click to display the Rich Text Editor dialog box for entering formatted text to the application form. Appears only for rich text areas. For more information on rich text areas, see Adding Rich Text Areas. |
Adding User-Defined Fields
To add a user-defined field:
Add a group box to the current page.
Click the UI Elements tab in the Form Elements panel to display the types of fields to add to your form.
Select the type of field you want to add to the page.
Once the field type is selected, drag it to the page and drop the field into the desired group box.
Note: User-defined fields must be contained by a group box.-
Select the user-defined field you added to the page, and use the Field Attributes panel to configure your field.Note: User-defined fields and component fields use the same set of attributes.
Save your changes.
Once saved, the system applies your user-defined field to the application data model so field data can be captured, stored, and retrieved.
Choosing User-Defined Field Types
Expand the User-Defined Elements list to view the user-defined elements you can add to your form.
| Field Type |
Description |
|---|---|
| Text field |
Adds a character field to hold text values. |
| Number field |
Number field used to contain integer values. |
| Date time field |
Stores date and time values, such as 09-26-2018 11:25 AM. |
| Switch |
On-off field, such as an “active” field indicating whether an item is active or not, which would be either on or off (yes or no). |
| Text area |
A long character field enabling the user to enter longer descriptions. |
| Rich text area |
A long character field enabling the user to enter longer descriptions or instructional information that can be formatted using a rich text editor. |
| Single-item check box |
Displays a single option for the end user to select, such as, "I have read the terms and conditions, and I agree to the terms and conditions." This is different from a check box set, which displays a list of multiple items for an end user to select. In the case of a single-item check box, the label of the field acts as the text the end user reads and responds to on the application form. |
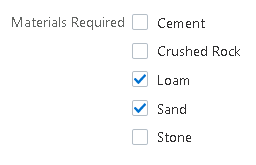
| Check box set |
A set of check boxes, from which the end user can make multiple selections. For example, the label for the check box set might be Heating Source(s), with values such as Oil, Gas, Wood, Solar, and so on. |
| Radio button set |
A set of radio buttons, from which the end user can make a single selection. For example, the label for the check box set might be Fence Type, with values such as Stone, Wood, Vinyl, and so on. |
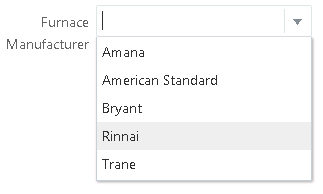
| Drop-down List |
A drop-down list allowing the user to select a single item. |
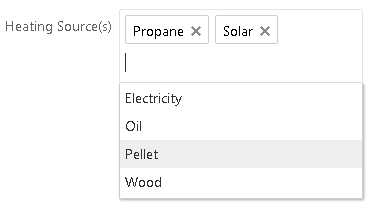
| Multi-select List |
A drop-down list allowing the user to select multiple items. |
Hiding Fields
In some cases, you may not want to display all of the fields associated with the predefined element you've added to a form. You can hide unneeded fields so they do not appear to the user at runtime.
To hide fields:
Place your cursor in the field to select it.
Turn on the Hidden switch on the Field Attributes panel.
Once you have hidden a field, the design-time interface continues to display the field, but places a darkened background around the field to indicate it is a hidden field. The application does not display the field at runtime.
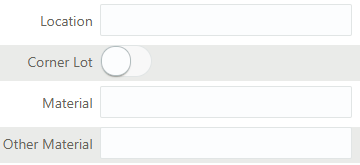
In this example of the design-time interface, Location and Material are not set to be hidden, but Corner Lot and Other Material are. Notice that the hidden fields display with the darkened background.
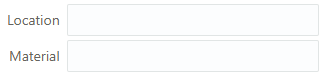
The following example of the runtime illustrates that the hidden fields do not display when an end user access the form. Only Location and Material render on the form at runtime, while Corner Lot and Other Material are not rendered.
style=”display: none;”. This style prevents the field from being visible on the page.
Adding Rich Text Areas
This topic describes how to add rich text areas to your intake forms so that you can display formatted text in application intake forms.
Rich Text Area Overview
In some cases, you may need to add rich text areas to your application forms so that you can display formatted text for users filling out the application. For example, if you needed to provide additional information, such as instructions or reference material, you can provide that within a rich text area.
When you add a rich text area element to your form, and Edit button appears in the Field Attributes panel when you select the rich text area element. The Edit button launches the Rich Text Editor dialog box.
The Rich Text Editor dialog box provides these formatting options:
Font size
Bold, italic, underline
Copy formatting
Text color
Text background color
Numbered and bulleted lists
Undo and redo
Increase and decrease indentation
Horizontal line
View and edit HTML source
Adding a Rich Text Area to a Form
To add a rich text area:
Insert a group box into your form where you want to place the rich text area.
From the list of user-defined elements, drag and drop a rich text element into the group box.
Select the rich text area element.
This example illustrates the rich text area element being selected prior to rich text being added.
In the Field Attributes panel, click Edit to open the Rich Text Editor dialog box.
Note: If needed, you can use the Description field to enter a description of the contents of the rich text area for other implementation team members. The description you enter only appears in the designer; it is not be displayed at run time.Add text and use the desired formatting options.
Click OK.
Save your form layout.
Defining Fields Displaying a List of Values
This topic describes how to add a list-of-values to user-defined fields you add to your application forms manually.
Some of the user–defined fields that you can add to your form are considered “list-of-value” fields. List-of-value fields enable end users to select field values from a predefined set of values (a list) to populate the field when entering data on the form. For example, radio sets and drop-down lists are list-of-value fields.
You can only add and modify the list of values associated with user-defined fields, which are the specific fields you have added to your application form manually. You can’t add or modify a list of values for a field contained within a predefined element, such as the Fence Information element.
A a list of values is a set of fixed field values defined within the field attributes.
Is not expected to change over time. Removing items from the list, for example, would make previously saved data invalid.
Should consist of reasonable number of items. Lists with larger numbers of items should be addressed with a dynamic list.
An example of a field with a list of values could be the Property Zone Type field, where the pre-defined values for a user to select are: Business, Residential, and Agricultural.
List of Value Type Fields
You associate a list of values with these field types:
Radio button set
Check box set
Drop-down list
Multi-select list
The following example illustrates a radio set, which is a set of radio buttons allowing a user to select a single value from the list of values.

The following example illustrates a check box set, which is a list of multiple items allowing a user to select multiple values from the list of values.
The following example illustrates a drop-down list, which is a list allowing a user to select a single value from the list of values.
The following example illustrates a multi-select list, which is a drop-down list allowing a user to select multiple values from the list of values.
Adding a List of Values
Select the user–defined field.
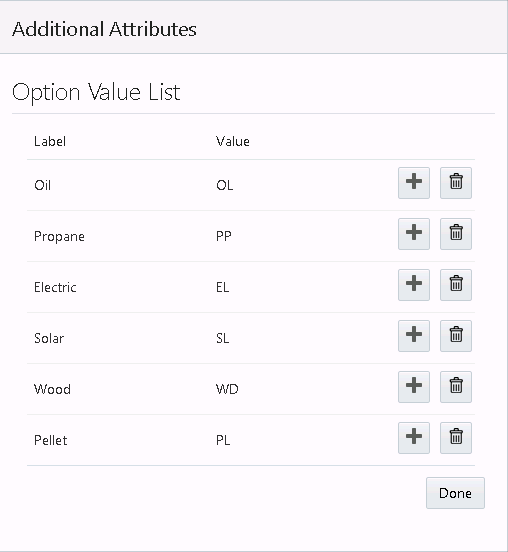
Click the Open Additional Attributes button in the Field Attributes panel.
In the Field Option Values grid, select the default row (the row with the Default Label and Default Value).
With the row selected, enable the row for editing by:
Double-clicking.
Pressing F2.
Pressing ENTER.
For Label, enter the value that the end user will see in the list of values in the user interface.
For example, if the field is Fence Materials the list of value labels could be: Wood, Stone, Metal, and so on.
Note: Each label must be unique and must not be Default Label.For Value, enter a numeric value or an abbreviated character value representing the label value.
The brevity of the value can make it easier when referring to a specific value when executing business logic or specifying the default value of the field. The end user will not see this value.
For example, if the field is Fence Materials, and the list of value labels are: Wood, Stone, and Metal, the abbreviated values could be WD, ST, and ML.
Note: Each value must be unique and must not be Default.Press TAB or click outside the current row to display the Add button and Delete button for that row.
Note: While editing the row, the Add and Delete buttons are hidden.Click the Add button in the current row to add a new row beneath it.
Repeat these steps until you’ve entered all the items in your list of values.
When you have added all of the items of the list of values, click Done.
Save your form design.
Updating a List of Values
Select the user–defined field.
Click the Open Additional Attributes button in the Field Attributes panel.
In the Option Value List grid, select the item in the list you want to update.
With the row selected, enable the row for editing by:
Double-clicking.
Pressing F2.
Pressing ENTER.
Enter the required changes in the Label or Value columns.
Click Done.
Save your form.
Deleting an Item from a List of Values
Select the user–defined field.
Click the Open Additional Attributes button in the Field Attributes panel.
In the Option Value List grid, locate the item in the list of values that you want to delete.
Click the Delete button in the row for that item.
Note: The Option Value List grid must contain at least one row. You can’t delete the last remaining item in the grid, leaving no rows.Click Done.
Save your form.
Displaying Form Elements Conditionally
This topic describes how you can show or hide elements on your forms depending on selections users make on other form elements.
You can configure some form elements to be either displayed or hidden, depending on the value of other fields in the form. Form elements that can control the display of other elements are controlling elements, and form elements that can be shown or hidden based on the value of controlling elements are controlled elements. The following table describes the elements involved in conditional display.
| Display Type |
Element Types |
Description |
|---|---|---|
| Controlling Element |
|
Form elements that determine whether another form element is displayed, depending on the value selected by the user. |
| Controlled Element |
|
Form elements that can be displayed conditionally, depending on the value of the associated controlling element. To control when these elements appear, click the Control Display button on the Element Attributes tab, which appears only for these element types. |
For example, assume you wanted to hide the Photovoltaic predefined form element only if the user has not selected the Solar single-item checkbox in a “Building Options” section of a permit application form. In this case, you can set the Solar single-item check box as the controlling element for the Photovoltaic predefined element, having the Photovoltaic element (the controlled element) display only when Solar is selected.
To configure conditional display for a form element:
Add the controlling element to a group box in your application form.
The controlling element can be a user-defined element of these types:
single-item check box
switch
Add the predefined form element or group box that you want to display or hide conditionally (the controlled element).
The controlled element can be:
predefined form element
group box
Select the predefined element you just added so that it is the active element in the layout.
In the Element Attributes panel, click Control Display.
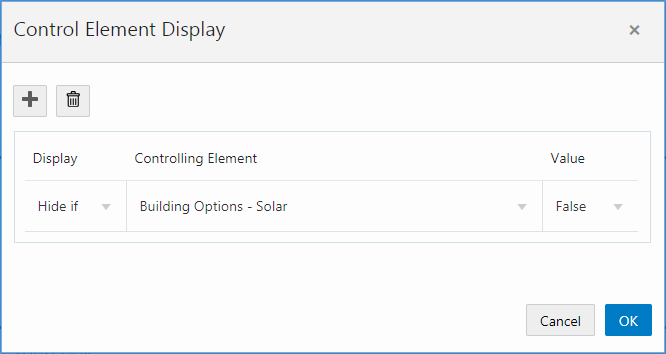
On the Control Element Display dialog box, click Add, then double-click in the newly added row in the grid, and make the appropriate selections.
This example illustrates the Control Element Display dialog box set to show a form element of the controlling element is set to true.
Element
Description
Add
Click to add a new row to the grid.
After adding a row, double-click the row to make it active.
Note: If you add multiple rows of conditions to the grid, the system assumes an “OR” operator exists between each row. If any of the conditions are confirmed, that display option will be enabled.Delete
Click to delete the selected row in the grid.
Display
Currently, Hide if is the only display option. You can hide an element based on the value of the controlling switch or single-item check box.
Controlling Element
Select the form element that will control the display of the selected predefined form element or group box.
The drop-down list displays all user-defined switches and single-item check boxes that exist on or before the current page in the form. If the selected element is a group box, the drop-down list does not display any switches or single-item check boxes within that group box.
Typically, you would select a controlling element appearing before the controlled element to follow the logical sequence a user would take when completing the application form.
Value
Select the value of the controlling element that determines when the display option will be rendered:
True: selected for a single-item check box or on for a switch.
False: deselected for single-item check box or off for a switch.
Click OK.
Save your form.
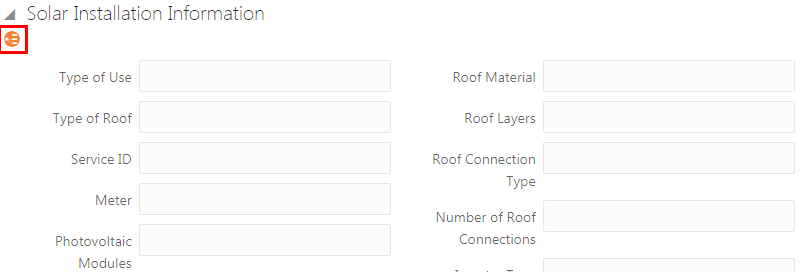
The controlled element appears with an icon below the element label to indicate it is an item whose display is controlled by another element in the intake form.
This example illustrates the icon displayed for a controlled element.
Adding Logic
This topic describes how to add validation logic to form elements to validate the values added by end users. The language used for this logic is Groovy.
Groovy Overview
You can add validation logic to fields in your application form using the Apache Groovy programming language. Apache Groovy is an object oriented language that can be used for scripting or programming. Groovy is often referred to as an extension of the Java programming language and uses similar constructs and syntax. For Java developers, Groovy can be compared to other programming languages, such as Python or Ruby, that don’t intend to replace Java, but act as a companion language, extending capabilities and providing additional flexibility.
In the context of designing application forms, in the current release you use Groovy as a scripting language to create validator scripts to provide data integrity for end user input. A validator script is a logical construct that returns either true or false.
Currently, only simple field validation scripts are supported for your application forms.
For example, assume you
/* Field value for "Number of Rooms"  must be greater than zero.*/

newValue > 0
The essential components of a validator script include:
Groovy logic
An error message
At runtime, if the field value entered does not meet your validation logic criteria during a save request, the system displays the error message to the user so they can resolve the issue.
Before adding Groovy validation, you will need to become familiar with the Groovy language and how it is intended to be used within Oracle applications.
For more information on Groovy usage within Oracle, refer to Oracle Applications Cloud: Groovy Scripting Reference.
For general information on the Groovy language, see Apache Groovy documentation.
Setting the Scope of a Groovy Script
The following table outlines the possible scope of a Groovy script.
| Scope |
Description |
Where Set |
|---|---|---|
| Field |
You can add Groovy logic to act on a single field. The code you add runs only against the selected field. You can add Groovy to fields in predefined elements or to user-defined fields you have added manually. |
Select the field to which you want to add validation logic, and click Add Logic in the Field Attributes panel for that field. |
| Object |
If your script involves more than one field, you need to add that code at the object level. The object refers to the current application you are creating. For example, if you are creating a fence permit, the logic you add for the current object applies to fields in that fence permit definition.
Note: To get the field names of each field you want to reference in your object-level script, you need to select that field, click
Add Logic, and copy the field name provided in the comments in the Groovy Script Editor.
|
When in the designer with the application form open, click the Add Logic button at the top of the form, next to the Preview button. |
Working with the Groovy Script Editor
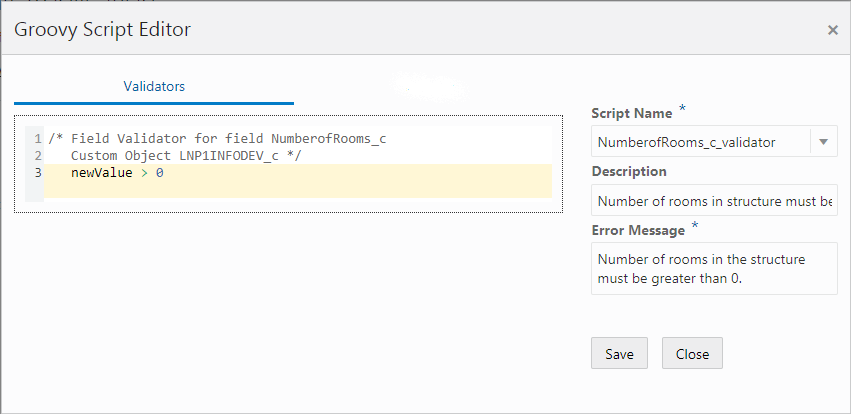
To access the Groovy Script Editor, click the Add Logic button at the field or object level.
The following example illustrates adding validation logic to a field using the Groovy Script Editor.
| Page Element |
Description |
|---|---|
| Work Area |
In the work area, add your validation logic. The first line in comments (/* <text> */) is automatically generated, and it provides you the field name and object name as they are referenced internally. For a field contained in a predefined form element, the field name will be similar to the field label, such as DemOverallHeight. In the case of a user-defined field, the field name will match the field label you have entered, with a “c” as a suffix to indicate it is a custom field. For example, if you have a user-defined field named Rooms, the field name appearing in the script will be Rooms_c. The custom object name is the type code as defined on the Transaction Type page, with either a “LNP1” or “PZ1” prefix and a “c” suffix. “LNP1” is the prefix for permits and “PZ1” is the prefix for planning and zoning applications. For example, if the Transaction Type Code is Fence, the custom object name in the script will be LNP1Fence_c.
Note: For validating at the field level use newValue and oldValue to reference the current field. At the object level, use the field name, such as Rooms_c.
|
| Script Name |
By default, the script name follows this structure: field_validator or object_validator You can change the script name if needed. |
| Description |
Add text to describe the purpose of the script. |
| Error Message |
Provide the message that the system displays the user if the data entered for the field does not pass the validation logic. The validator script returns either true or false. If the return is false, the system displays the error message. |
Adding Contextual Help to Forms
This topic describes how to add help text to various parts of your intake forms to aid citizens when they are filling out an application form.
Working with Contextual Help
If you determine that the end user needs additional information to understand a user-interface element (field, page control, or page) in your intake form, you can add contextual help text to that user-interface element. If you add contextual help to a user-interface element in your intake form design, the system displays a Help icon next to the label of that user-interface element.
You can see the Help icon in both the design and runtime mode. At runtime, end users click the Help icon to display your help text in a popup, without leaving the page.
You can add contextual help text to these intake form elements:
Page tabs
Components
Group boxes
Fields (component fields and custom fields)
You can’t add contextual help text to these intake form elements:
Radio sets
Check box sets
If you need to add help for radio sets or check box sets, use a group box to surround the radio items or check box items and add the help text to the group box.
Adding Contextual Help
To add contextual help:
Select the page element to which you want to add contextual help.
Note: You cannot add help text directly to radio sets and check box sets. Add help text to a group box surrounding the radio sets or check box sets.Click the Help button in the attributes panel.
On the Contextual Help Setup page, note the Type Code, Page Name, and Page Object values.
These values uniquely identify the page element to which you are associating the contextual help. You can’t change these values; they are read-only and maintained by the application.
Item
Value
Type Code
An automatically generated value consisting of the internal product code and the permit type code derived from the permit type definition.
Page Name
The name of the page tab on which you are adding help. Regardless of what the page label is on the tab, the application displays each tab using the default name in sequence, such as tabs1, tabs2, and so on.
For example, the second page tab in an intake form may have the name Fence Information, however in the Page Name field it will appear as tabs2.
Page Object
Identifies the page element for which you are adding help. Regardless of the page element’s label, the application displays the internal naming convention as the field value, which is the page element type code + sequence added.
For example, for the second field added to the form the field value is fields2, which indicates the element is a field and it is the second field added to the form.
The page element type codes are:
Components: ccas
Group Boxes: widgets
Component Fields: <component>_<internal field name> (such as ccas2_ReleaseDate)
Custom Fields: fields
In the Description field, add text to describe the purpose of the help text so other implementation team members can understand the content.
Click the Add New button in the Contextual Help Details grid to display the Add Context Help Details dialog box.
Select Agency Defined from the Type drop-down list.
Note: Help topics of type System Defined are provided by Oracle and should not be altered or removed. Customers should use the Agency Defined help topic type to add help topics specific to your implementation. If you want your custom help text to display instead of delivered help text, disable the System Defined help topic, create your custom topic, and enable it.Activate the Help Content edit box by clicking to the right of the Help Content field label.
In the Help Content edit box, enter your help text.
The system provides rich-text editing features, which enables you to implement limited formatting options, as needed.When you’ve added the content, and you are ready for it to be viewed by end users, turn on the Enabled switch.
Note: To prevent the help content from displaying at run time, turn off the Enabled switch.Click Save on the Contextual Help Details page.
Click Save on the Contextual Help page.
Confirm that the help icon appears on the page tab or next to the page control label in your intake form design.
For more information on contextual help, see Setting Up Contextual Help.
Setting Form Options
This topic describes the options you can set for the entire form to control the ways citizens interact with the form.
Enabling the Review Page
The review page presents all the fields of a multi-tab form on a single, scrollable page for efficient review of the entered data prior to submitting the form.
By default, the review page displays:
Form fields as read-only, but the end user can click the Edit button to modify the fields per predefined element as needed.
All predefined elements expanded.
For multi-page view or single-page view.
For all forms, unless disabled.
To disable the review page:
In the Intake Form Designer, click the Layout Settings link.
On the Layout Settings dialog box, turn off Show Review Page.
Click OK.
Setting a Confirmation Step
You can enable one of the pages in a form as a confirmation page to display after the end user has filled in the information and submitted the form. You create the confirmation step in the designer and then set it to be the confirmation step in the Layout Settings.
When set as the Confirmation Step, the page displays:
At design time with the page tab filled in grey to indicate it is the confirmation step.
At runtime as the last page in the train stop drop-down list.
To enable the review page:
In the designer, click the Form Options link.
On the Form Options dialog box, select the desired page from the Confirmation Step drop-down list.
Click OK.
Click Save.
Mapping Form Fields to Decision Model Attributes
This topic describes how the fields added to an intake form in the designer are mapped to the fee model defined for the transaction type.
The Fee Mapping page in the designer is used to map attributes in the decision model to the fields added to the intake form.
This image illustrates Step 2 of 2: Fee Mapping in the design of a permit application.
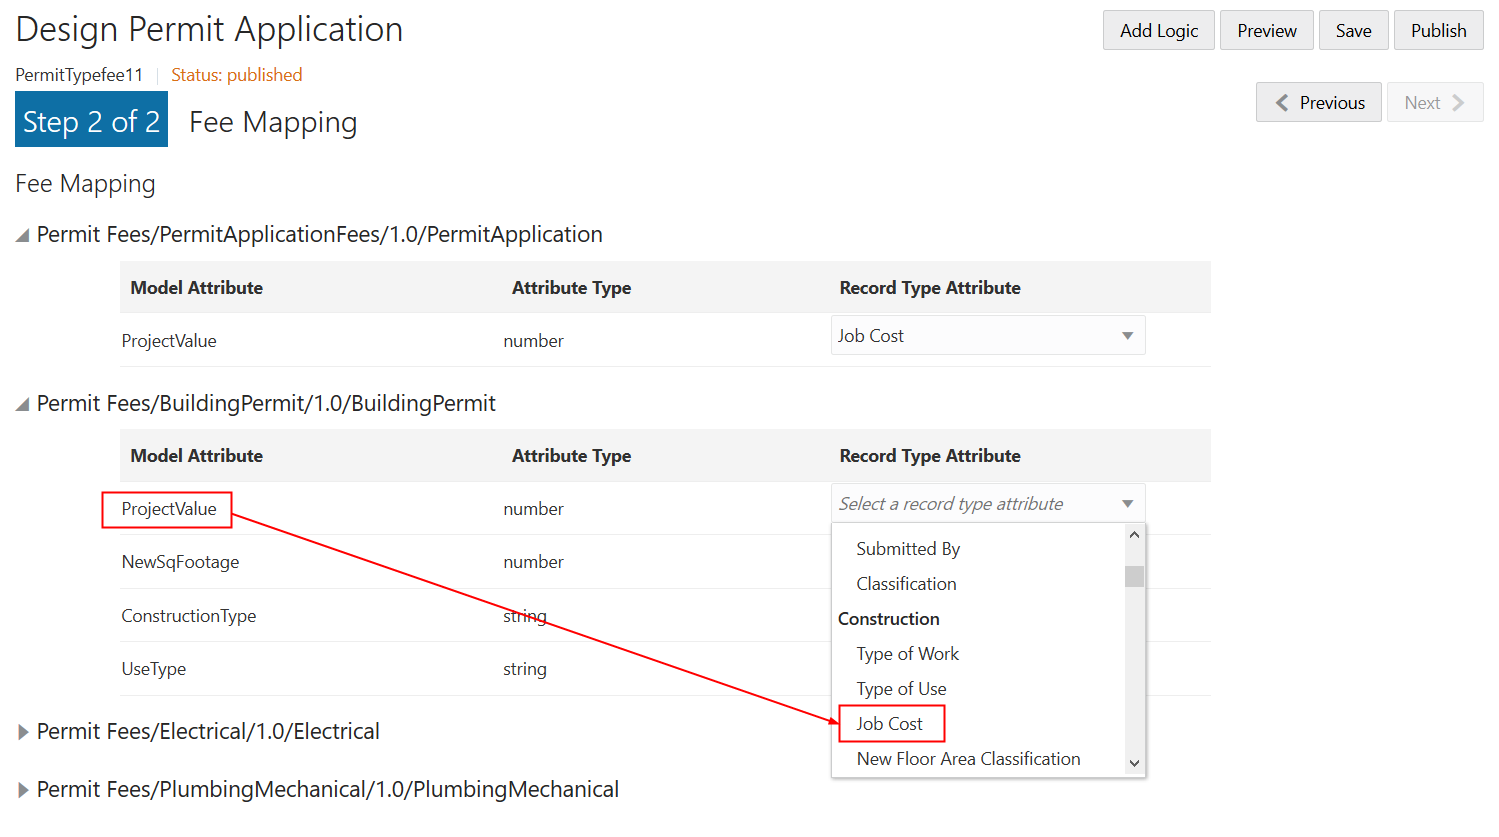
You assign a fee schedule to an application type on the Transaction Type page using the Fee Schedule field. You map attributes from the fee schedule’s underlying decision model created in Oracle Integration Cloud to the fields you have added to your intake form either through predefined elements or by adding fields manually.
For more information on setting up fee schedules, see Setting Up Fee Schedules.
For more information on decision models, see Creating Decision Models for Fees.
Mapping Application Fields to the Fee Item in the Decision Model
To access the Fee Mapping page in the form designer:
Navigate to the Transaction Type page:
Select the permit type or planning application type that you want to view in the designer.
Click the Design Form button.
Click the Next button while in the application form setup step.
The fields on the Fee Mapping page are as follows:
Page Elements
Description
Model Attribute
The name of the attribute as it appears in the decision model in Oracle Autonomous Integration Cloud.
Not all model attributes must be mapped. Because fee schedules can be reused by multiple transaction types, only the model attributes required for fee calculations for the current transaction type need to be mapped. All other model attributes can be left blank.
Attribute Type
The data type of the model attribute, such as string, number, boolean, and so on.
Record Type Attribute
The field added to the intake form layout either contained in a predefined form element or a user-defined element you have added manually.
Select the record type attribute from the drop-down list that you want to map to the decision model attribute.
Click Save.
Considering User Experience
This topic describes concepts related to using forms that implementation teams need to consider when designing forms.
Required Fields
The system validates that required fields contain values prior to a save request.
If a required field is empty the system displays the following error message on the page.
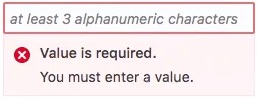
In addition to the message, the system disables the Save button until the required field values have been provided.
Runtime Application Form Save Behavior
When an end user navigates to another page in the application form using either the train stop drop-down list or the Next button, the system automatically:
Saves the currently entered data.
Performs data validation on the current page.
If the end user attempts to navigate away from the application form page using, for example, the back button, entering a different URL, or reloading the page, the system checks for any unsaved changes or new data. If the changes or new data have not been saved, the system displays a message to the user indicating that if they continue, unsaved changes and new data will be lost. The user can elect to leave the page or remain on the page to save.
Runtime Train Stop Drop-Down Behavior
The train stop drop-down list, appears in the center of the application form header to provide:
| Feature |
Description |
|---|---|
| Context |
The system automatically prepends the appropriate step number to the application form page name. The step numbers are assigned in the order the pages appear in the designer (from left-to-right). For example, assume you have three pages in your form: Application Details, Fence Details, Property Details. The train-stop drop-down list displays the pages as:
|
| Current Page |
To show the current page the user is viewing, the system displays a single, right-pointing, chevron character (>) to the left of page label in the drop-down list. |
| Navigation |
Select any page in the application form, including the review page, to access it immediately. |
| Switch to Single/Multi-page view |
Toggle between the multi-page view or the single-page view. |
Using the Single-Page View
When accessing the single-page view in review or advanced-edit mode, end users will notice these characteristics of the page elements.
| Page Element |
Behavior |
|---|---|
| Edit button |
Enables the end user to activate the form fields for editing. Initially, the system displays them in read-only mode. Once clicked, the system toggles the Edit button to the Done button. |
| Done button |
Once the end user completes any changes, clicking Done:
|
| Group Boxes |
If a group box contains multiple group boxes, only the outer (parent) group box displays an Edit/Done button. |
| Predefined elements |
If there are multiple predefined elements in a group box, they will appear to be a single page section, with one Edit/Done button controlling all the predefined elements within the parent group box. Otherwise, if the predefined elements are on the page tab separately (not within the same parent group box container), then the system displays an Edit/Done button for each predefined element. |
| Expand All/Collapse All |
Expands or collapses all the elements on the page, including group boxes and predefined elements within parent group boxes. |
Advanced-Edit Mode
If needed, agency staff members can update a form after a citizen has submitted the form. Agency staff members access the submitted form using the Permit Details page in the Permit List or by deep linking. Editing a form after a citizen has submitted it is referred to as advanced-edit mode.
When in advanced-edit mode, the system:
Displays only the predefined elements enabled for advanced-edit mode.
Presents the form in the single-page view.
Agency staff members click the Edit button to activate fields and update data, and they click Done to save changes.
Testing Intake Forms
This topic describes the methods and considerations involved with testing your application forms.
You design, create, and test application forms on your test database. You can test forms both inside and outside sandbox mode.
Once your forms have been created and thoroughly tested on your test database, you then migrate the newly created forms to your production system for public access.
Testing Forms Inside the Sandbox
You can test draft application forms in the sandbox using the application designer’s preview mode. To enter preview, click the Preview button.
In preview mode, you can test the layout of the user interface and the tab flow in a simulated runtime scenario, however, the preview mode does not enable you to enter data and save it. To test the full functionality and data validation of your permit or planning application, you must first publish the form in your test database, as described in the following section.
Testing Forms Outside the Sandbox
Once you are done testing the configuration of your form and the layout of the user interface using preview mode, you can begin testing your form in scenarios that end users will encounter when they apply for permits or create planning applications. To do this, you need to publish your form on the test database.
For more information on publishing forms, see Publishing Intake Forms.
Migrating Application Forms from the Test Database to the Production Database
After you have completed your testing of the application form on the test database, follow the procedure in Functional Setup Manager for migrating transaction type metadata and intake form layout metadata from the test database to the production database.
For more information on test-to-production data migration, see Managing Transaction Type Configurations.
Publishing Intake Forms
This topic describes the steps to complete to publish intake forms.
To make your application forms available on public landing pages, you need to publish your form.
To publish a form:
Confirm that you have saved and tested all changes made to your form.
In the Intake Form Designer, click Publish.
Navigate to the Transaction Type page:
To navigate to the Transaction Type page you can either click Back in the global header, or select
On the Transaction Type page, open the appropriate transaction type, and set these values:
Transaction Type Status: Ready
Public User Enabled: Enabled for all users or Enabled for registered users.
Click Save.
Cloning Transaction Type Definitions
This topic describes how to clone transaction type definitions and the associated form design. It also covers the attributes that will be shared between the source and clone definition and the attributes you will need to modify on the cloned definition.
You can clone a transaction type to:
Save time when creating a similar transaction type, rather than creating a new transaction type for each situation from scratch.
Create a new version of a currently published transaction type after making a significant correction or addition to the transaction definition.
In some cases, it may be more efficient to create a new transaction type and form, while in other cases, it may be more efficient to clone an existing transaction type and form.
When you clone a transaction type, you make a cloned copy of:
Most of the transaction type metadata, such as the specified Classification, Auto Number Rule, Department, Fee Schedule, and so on. Some of the metadata is not cloned, such as Transaction Type, Transaction Type Code, Transaction Type Status, Help Text and so on, as you’ll need to modify those values for the cloned copy.
All of the intake form layout in the Intake Form Designer, including pages, group boxes, predefined form elements, and user-defined fields you have added to your application form.
When deciding to clone a transaction type, you may consider:
The number of fields and pages within the existing application form layout that you’d need to change.
Similarity between the existing transaction type and new transaction type.
Number of shared attributes.
When cloning to make a new transaction type, you will want to make sure you are aware of:
The attributes that will be shared between the source definition and the clone.
The attributes you need to modify to create unique values between the source definition and the clone.
Transaction Type Metadata Considerations
All of the field values on the Transaction Type page will appear in the cloned transaction type, except for selected field values listed in the following table.
Make sure to update any of the copied information on the Transaction Type page to reflect the requirements of the new transaction type. For example, if the Department, Fee Schedule, or Workflow information, should be different, make sure to update it for the new transaction type definition so it is associated with the correct items.
| Page Element |
Description |
|---|---|
| Type |
The type name doesn’t have to be unique. You can create a new transaction type by using a unique value or enter the same value as the source transaction type, if you are creating a new transaction definition with the same transaction type. |
| Type Code |
The type code must be unique. Enter a transaction type code that identifies this version of the transaction type definition. |
| Status |
Initially, for a newly created transaction type the status on the Transaction Type page is always set to Preliminary. After you publish the form, change the status to Ready for Use. |
| Valid From Date |
The application inserts the current date for the cloned transaction type. |
| Valid To Date |
Update to reflect your business requirements. |
| Public User Enabled |
Initially, for a newly created transaction type this is always set to Not enabled for public users. When you are ready to publish the new transaction type, update this value. |
For more information on the fields on the Transaction Type page, see Setting Up Permit Types.
Intake Form Layout Attribute Considerations
The following table addresses specific considerations for UI elements in your form layout with respect to cloned transaction types and application forms and how any changes you make to the cloned definition may affect the source definition.
| Element |
Description |
|---|---|
| Predefined Elements |
The cloned copy of the transaction type contains the same layout as the source definition. If the intake form utilized any of the delivered, predefined elements, the application copies the predefined elements into the cloned copy of the definition, using the same layout as the source definition. For example, if you added the Fence Information predefined element to the source permit definition to the second page tab, the Fence Information element would appear in the cloned copy of the transaction type on the same page tab. |
| Labels |
The labels for fields and UI elements, such as pages, group boxes, predefined elements, and so on, are the same between the source and cloned definition. |
| User-defined fields |
Any fields you have added manually to the source will be copied, as is, to the cloned definition. For any fields that you have defined a list of values, make sure it applies to your new transaction type. |
| Security |
The cloned definition will have the same security configuration as the source definition for:
|
| Help |
If any help has been added to the form for a page, predefined element, group box, or field, for the source definition, the application does not copy help references into the cloned definition.
Note: You can remove the help references from the cloned form, but do not delete the help text from the Contextual Help page if other forms are still using that help text.
|
You are also cloning the fee mapping, which is defined in the second step of the Intake Form Designer.
Cloning a Transaction Type to Create a New Transaction Type
When you clone a transaction type, you also clone the associated form design. You can clone just the transaction type definition without cloning the application form design; however, you can’t clone just the form design by itself.
This example illustrates the Clone Permit Type page, which is described in the steps for cloning a permit type.
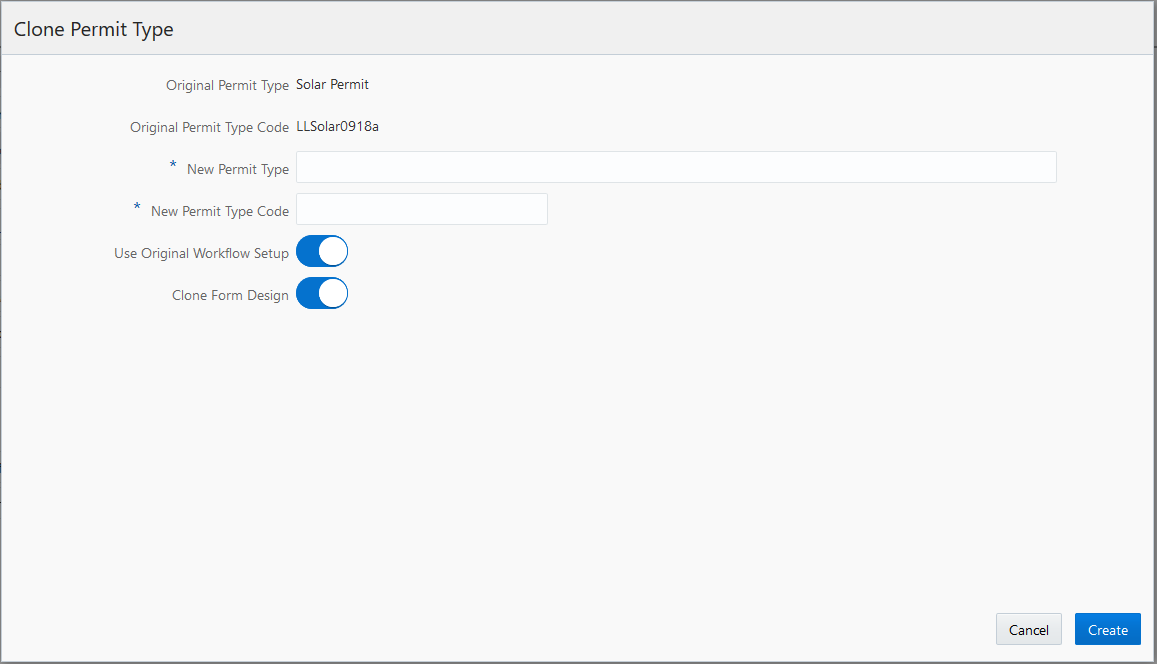
To clone a transaction type:
Select
Open the desired transaction type.
Click the Clone button.
On the Clone Type page, enter the following values:
Page Element
Description
New Transaction Type
Enter a transaction type name.
The transaction type name can be the same as an existing transaction type name so that you can have different versions of the same transaction type. For example, if the original transaction type name is Fences, you can reuse the name for the new transaction type definition, but you must enter a unique type code to distinguish the two.
New Transaction Type Code
Enter a unique transaction type code.
Oracle recommends manually adding a version number to the source transaction type code if you want different versions of the same transaction type definition. For example, if the original type code is Solar-001, you can enter a new code, Solar-001-v2
Use Original Workflow Setup
Turn on the switch to use the original workflow setup as defined in the original transaction type. Turn off the switch to leave the workflow setup fields blank on the new transaction type. You must enter a workflow setup values.
Clone Form Design
Turn on the switch on to clone the application form design associated with the original transaction type. Turn off the switch to create a completely new application form using the Intake Form Designer.
Note: Providing a unique type code is required to make the transaction type definition unique.Click the Create button.
The cloning process opens the cloned copy of the transaction type.
Note: When saving the cloned definition, the application places the cloned definition within a sandbox.Make any other required changes to the cloned transaction type definition and form design.
See the previous sections for more information regarding what items to check.
Note: If there are numerous custom fields in the application form, when you have the layout open in Intake Form Designer, it can take several minutes to perform the initial save. While saving, the application is creating all of the custom fields, creating the other elements, and running validation.Publish the application form in the Intake Form Designer.
For more information on publishing a transaction type, see Publishing Intake Forms.
Return to the Transaction Type page to change the status to Ready for Use.
Considerations for Creating a New Version of a Transaction Type Using Cloning
In some cases, you may want create a new version of an existing, published transaction type to correct an error or make a change.
If the change made is insignificant, as in it does not change the meaning of a field or page element, then in most cases cloning is not required, and you can simply make the change directly to the transaction type definition. For example, assume you have a field for an email address on your form, and it had been requested to change the label from E-mail to Email (removing the hyphen). In this case, the change can be made directly to the form and republishing it.
However, in other situations, the change may be significant, in that it affects reporting associated with transaction type, alters historical data, makes future data out of sync with historical data, and so on.
Significant changes where cloning a transaction type is recommended include:
| Transaction Type Element |
Examples of Significant Changes |
|---|---|
| Predefined form elements |
|
| User-defined form elements |
|
| HTML UI constructs |
|
Creating a New Version of a Transaction Type Using Cloning
Creating a new version of a transaction type using the cloning feature involves:
Deactivating the published version of the transaction type.
Cloning the published version of the transaction type.
Activating the cloned copy of the transaction type.
To deactivate a published transaction type:
Select
Open the definition for the published transaction type.
Set the Transaction Type Status field to Void.
Click Save.
To clone the published transaction type:
With the transaction still open from the previous steps, click Clone.
Enter the same Transaction Type value as used for the recently deactivated transaction type.
Enter a unique Transaction Type Code.
Note: Providing a unique transaction type code makes the transaction type definition unique. To keep track of versions, you can add v2, v3, v4 to the code, for example.Save the cloned definition.
Note: When saving the cloned definition, the application places the cloned definition within a sandbox.Make any other required changes to the cloned definition transaction type and form design.
See the previous sections for more information regarding what items to check.
Click Publish in the Intake Form Designer to publish the cloned definition.
For more information on publish a transaction type, see Publishing Intake Forms.
To activate the new transaction type:
Select or press Back from the Intake Form Designer interface.
Open the definition for the published transaction type.
On the Transaction Type page, set these values:
Transaction Type Status: Ready for Use.
Public User Enabled: Enabled for all users or Enabled for registered users.
Click Save.
Managing Transaction Type Configurations
This topic describes the considerations and steps related to migrating transaction type definitions, such as permits or planning and zoning applications, from your test environment to your production environment.
Transaction Type Lifecycle Overview
Any implementation of Oracle Applications Cloud usually requires migrating setup data from one environment to another at various points in the subscription lifecycle.
For example, you set up your initial configuration of the Public Sector Community Development services in the test environment, which is your source system. Then, after thorough testing and verification, you move the setup and configuration data from your test environment to the target environment, which is your production system.
You use the Fusion Applications Functional Setup Manager to perform these migration tasks.
This example illustrates that you use Functional Setup Manager to migrate data between your test and your production environment.
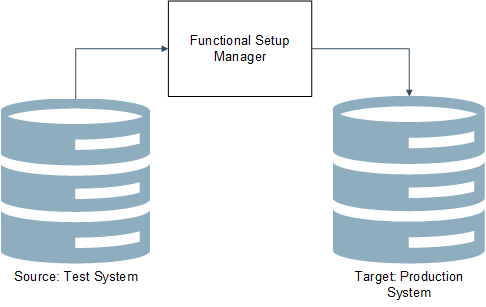
You access Functional Setup Manager from within Public Sector Community Development by selecting or by clicking the Setup and Maintenance tile on the springboard. To access Functional Setup Manager, you need to have the System Administrator role associated with your user account.
The functional areas in Functional Setup Manager that apply to your transaction type definitions and application form definitions are:
| Offering |
Functional Area |
|---|---|
| Public Sector Permits |
Permit Types |
| Public Sector Planning and Zoning |
Planning Application Types |
For more information on using Functional Setup Manager, see Using Functional Setup Manager.
Set the Target Instance URL
On the source system (your test environment), you need to define the URL target system (your production environment) so that setup data and configuration data can be sent to the target.
To set the target instance URL:
Sign on to the test environment.
Click the Setup and Maintenance tile on the springboard to access Functional Setup Manager.
On the right side of the Functional Manager Setup interface, click the Tasks tab to open the Tasks drawer.
Click Search, and search for Manage Configuration Set Migration Target Security Policy.
On the Manage Configuration Set Migration Target Security Policy page, enter the URL for your target environment, and the appropriate security credentials for the System Administrator role.
Note: It is recommended to include the port number when you specify the URL value. For example:https://server.example.com:443You can get the target port value by accessing the Manage Configuration Set Migration Target Security Policy page on your production system (your target).Save.
Disabling Unified Sandboxes on Target Production System
For migrating transaction types from your test system to your production system, make sure to disable the Unified Sandboxes feature on your target, production system. Because you should be completing all configuration tasks on your source test system, sandboxes shouldn’t be required on the production system. Having the Unified Sandboxes enabled on the production system can cause the Configuration Set Migration utility not to render or function properly.
To disable Unified Sandboxes:
Sign on to your target, production system.
Navigate to Functional Setup Manager.
Select your solution, such as Public Sector Permits or Public Sector Planning and Zoning.
Note: Disable Unified Sandboxes in all solutions you have licensed for Public Sector Compliance and Regulation.Click the Change Feature Opt In link.
Locate the Application Extensions feature, and click the pencil icon in the Features column.
Make sure the Unified Sandboxes feature is disabled.
Note: If there are any open sandboxes, they need to be deleted or published before you can disable this feature.Click Done.
Migrating Transaction Type Foundational Metadata
Before you use Functional Setup Manager to export transaction type configuration data, you need to create and migrate a configuration set, which includes the underlying metadata required to be in place as a prerequisite prior to migrating other transaction type setup data.
Because the Public Sector Compliance and Regulation solutions are metadata-driven, you need to migrate the metadata that is the foundation of the transaction definitions. This is the data stored in the Oracle Medata Services (MDS) layer. You do this by creating a configuration migration set. Once that is complete, you can then begin using Functional Setup Manager export and import features to transfer the rest of required definitions between test and production systems.
To migrate transaction type metadata:
Sign on to the test system, which is the source system.
Click the Setup and Maintenance tile on the springboard to access Functional Setup Manager.
Select the appropriate offering (Permits or Planning and Zoning).
Expand the Permit Types or the Planning Application Types functional area (depending on your offering).
Note: These steps for creating a migration set apply only to the Permit Types and the Planning Application Types functional areas.Click the Manage Permit Configuration task or the Manage Planning Application (depending on your offering).
This example illustrates selecting the option Manage Permit Configuration, which you select to set up and migrate a configuration set.
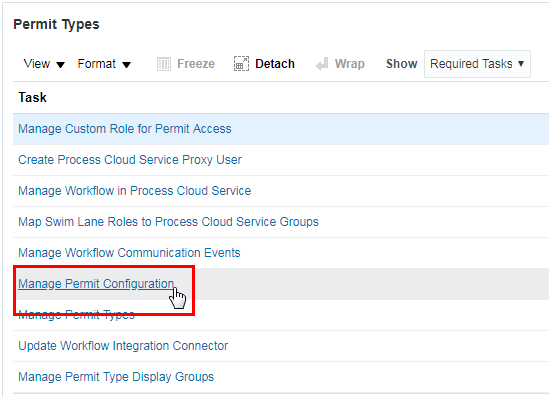 Note: This link takes you to the Manage Configuration Set Migration Target Security Policy. You can also access this page in Fusion Application by selecting .
If you have not already specified your target instance URL, you must do that prior to the next step.
See the previous section for more information.
Select the Outgoing tile and create an outgoing migration set to export to your production environment.
When creating a configuration set, the utility compares differences between source and target, and determines the metadata that needs to be exported to the target system. When the process is complete, the resulting migration set is downloaded in the form of a downloadable jar file.
After finishing the creation and migration of the outgoing migration set, sign on to the production system (the target system), and complete the steps for applying the incoming migration set.
Exporting and Importing Remaining Transaction Type Data
After you have completed migrating the configuration set on the source system, you then export the remaining transaction type data using the Functional Setup Manager options for the functional area or the entire offering.
This example illustrates using the functional area export options.
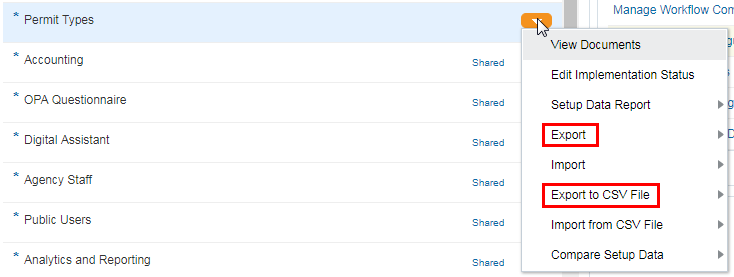
After exporting from the test system, you then sign on to the production system and import the corresponding business object data.
When you export business object data, you have the option to select only those business objects that you utilize. For example, if you are not using application groups, you could deselect Manage Application Groups from the Business Objects list.
The objects you export will be in the form of a downloadable jar file.
For more information on these Functional Setup Manager export and import features, see: