2Managing Permits
Using the Agency Springboard
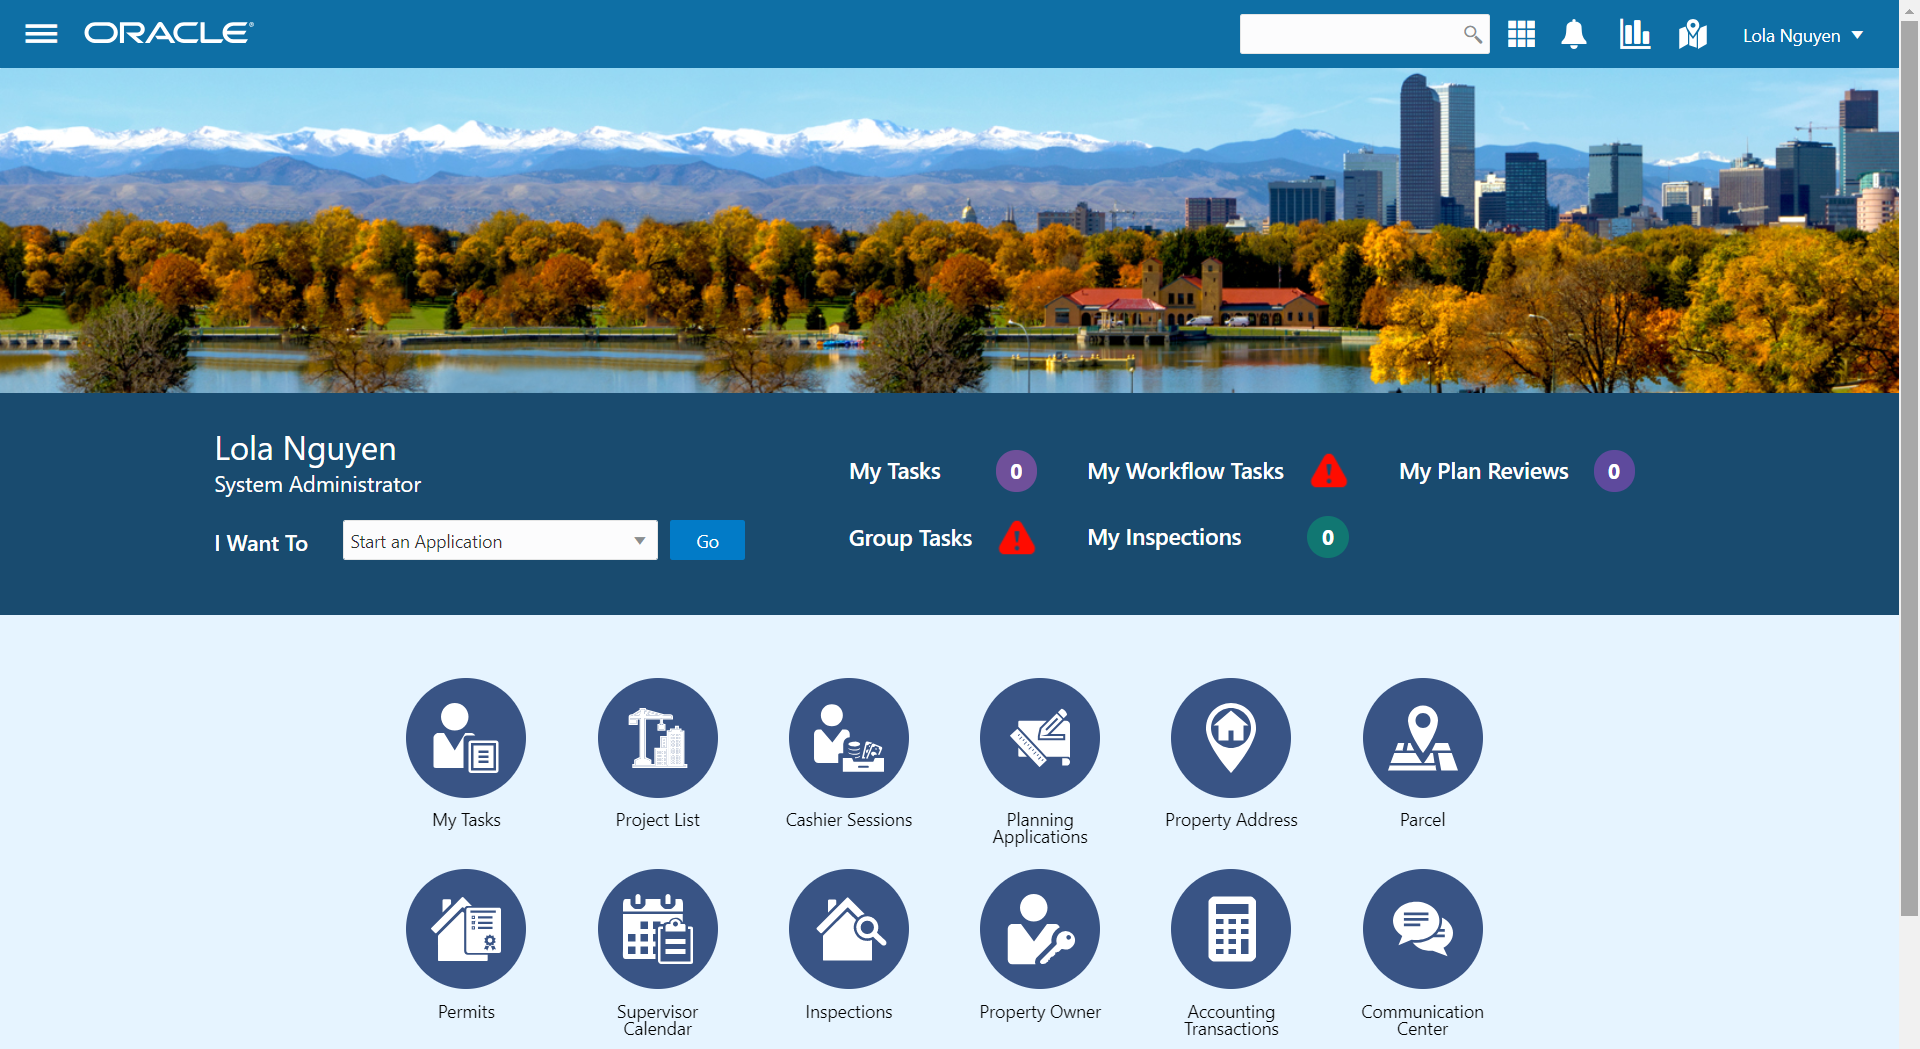
The Agency Springboard provides a landing page for agency staff to manage their work.
The Agency Springboard offers access to task lists and specific pages based on the staff role in the agency, from supervisors and accounting staff to permit technicians and inspectors.
You use these elements on the Agency Springboard to perform daily tasks:
Global Banner
Alerts
Quick Actions (I Want To)
Task Lists
Tiles
Depending on your setup, the Agency Springboard might looks like the following example. This example is configured to show the quick actions section, the task list element, and a selection of springboard tiles. Similar elements may appear on the landing pages for public users.
This example illustrates the Agency Springboard. The alerts banner is not shown in the example.
| Page Element |
Description |
|---|---|
| Global Banner |
The global banner appears as the page header with functionality that might include some or all of these elements:
|
| Alerts |
Alerts are displayed as a banner that broadcasts messages with important information. These alerts are configured by the agency administrators. |
| Quick Actions (I Want To) |
The quick actions section contains a drop-down list from which you choose an action, such as starting an application or scheduling an inspection. The actions in the list and on the tiles can provide access to the same pages. |
| Task Lists |
The task list section provides links to the Task Management page with predefined filters you access to manage tasks. The counts for each type of task help you monitor workload:
Note: The items that appear on the Agency Springboard are determined by the security roles assigned. For example, agency roles specific to the permits service display all of the items above, whereas, roles specific to the planning and zoning service display My Tasks, Group Tasks, and My Workflow Tasks, but do not display My Inspections or My Plan Reviews.
For more information about tasks, see Managing Tasks. |
| Tiles |
Tiles appear in the springboard section as icons with links to the pages you use to administer specific types of transactions. For example, you can access pages for accounting, customer payments, plan reviews, inspections, conditions, and so forth. For example, click the Permits tile to open a list of permit applications. For more information, see Overview of Public Landing Page Tiles. |
For information about setting up these elements on the Agency Springboard, see Setting Up the Agency Springboard.
Starting an Application
Before starting an application, users must determine the appropriate type of application. Application types, including types of permit applications and types of planning applications, are configured by the agency during implementation. The Apply page provides multiple tools to help users choose the appropriate application type.
Using the Apply Page for Anonymous Users
Anonymous public users, or guests, can make an informed decision about the type of application needed for their particular project without registering. They can save application types that are recommended by a questionnaire, but they must register before they can access the related intake form.
This example illustrates the Apply page for anonymous public users.
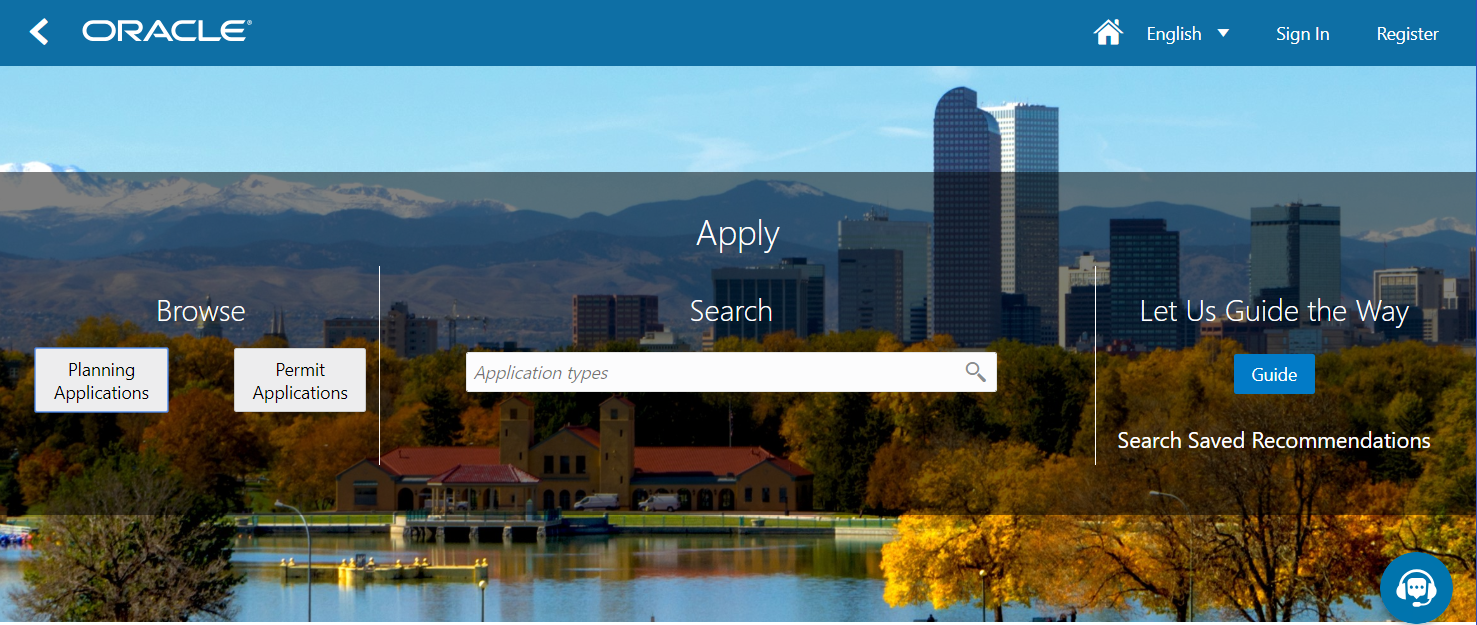
An anonymous users follows these steps to explore application types:
On the anonymous user landing page, the user clicks the Apply tile.
On the Apply page, anonymous users can explore and choose application types using these options:
Page Section
Description
Browse
Click either the Planning Applications or Permit Applications button to display a list of application types. The list appears at the bottom of the page. Initially, it lists groups of application types that your agency set up for either permits or planning. Expanding a group displays the specific application types.
Search
Search for an application type by entering its full or partial name in the Search field.
As the user types, a drop-down list shows any matches.
Let Us Guide the Way
Click the Guide button to start a questionnaire that can help identify the recommended applications for a project.
The Guide is available only if set up by the agency using Oracle Policy Automation (OPA) or a custom implementation.
An anonymous public user can save the Guide’s recommendations. When saving, the user is prompted to supply an email address. The system sends the user an acknowledgement number that can be used to access the saved recommendations later.
Search Saved Recommendations
Click the Search Saved Recommendations link to review previously saved questionnaire results. The guest is prompted to enter the email address and acknowledgement number that are associated with the saved recommendations.
To open an application, the user clicks the application type. Only registered users can start applications, so guests are prompted to log in or register when they click an application type.
Guests can also register by clicking the Register link in the global header to create an account.
For more information about registering, see The Public User Registration Process.
If a guest saves questionnaire results and then registers, the recommended application types are transferred to their registered user account as saved recommendations.
Using the Apply Page for Registered Users
Registered public users can view application type recommendations saved when they were a guest user, fill out the questionnaire to find more recommendations, and start applications.
This example illustrates the Apply page for registered public users.
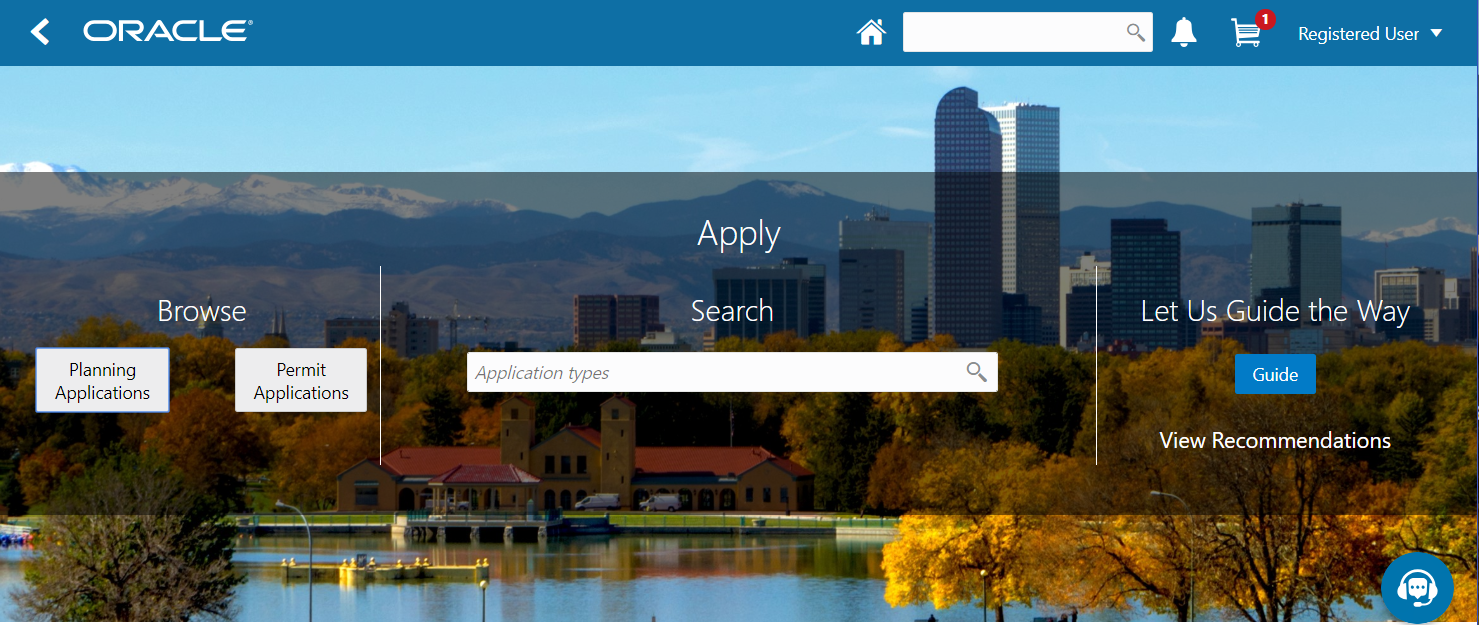
A registered users follows these steps to explore application types and start an application:
To open the Apply page from the registered user landing page, the user can:
Click the Apply tile.
Select the option to start an application in the I Want To bar.
On the Apply page, registered users can explore and choose application types using these options:
Page Section
Description
Browse
Click either the Planning Applications or Permit Applications button to display a list of application types. The list appears at the bottom of the page. Initially, it lists groups of application types that your agency set up for either permits or planning. Expanding a group displays the specific application types.
Search
Search for an application type by entering its full or partial name in the Search field.
As the user types, a drop-down list shows any matches.
Let Us Guide the Way
Click the Guide button to start a questionnaire that can help identify the recommended applications for a project.
The Guide is available only if set up by the agency using Oracle Policy Automation (OPA) or a custom implementation.
An registered public user can save the Guide’s recommendations.
View Recommendations
Click the View Recommendations link to review previously saved questionnaire results.
To start an application, the registered user clicks the application type.
In the newly started application, the applicant information is automatically filled in.
The registered user proceeds step by step through the application form.
The user submits the completed application.
Using the Apply Page for Agency Staff
Agency staff can assist registered users with applications. When an agency staff member submits an application on behalf of a registered user, the application does not appear in the payment cart. The registered user can see the application on their Applications page and add the application fees to their payment cart when they choose. Agency staff can also assist with fee payment.
To start an application:
Open the Apply page.
To access the Apply page:
On the Agency Springboard, select the option to start an application in the I Want To quick actions bar.
On the Transactions page, which lists existing applications, click the Apply button.
On the Apply page, use these options to select an application type:
Action
Description
Browse
Click either the Planning Applications or Permit Applications button to display a list of application types. The list appears at the bottom of the page. Initially, it lists groups of application types that the agency set up for either permits or planning. Expanding a group displays the specific application types.
Search
Search for an application type by entering its full or partial name in the Search field.
As the user types, a drop-down list shows any matches.
Select an application type to initiate a the application.
In the first step of the application, select the applicant from a searchable list. The search list includes the applicant name, business name, address, email, and phone.
Continue step by step through the application form, entering all necessary information.
Click the Submit button to submit the application.
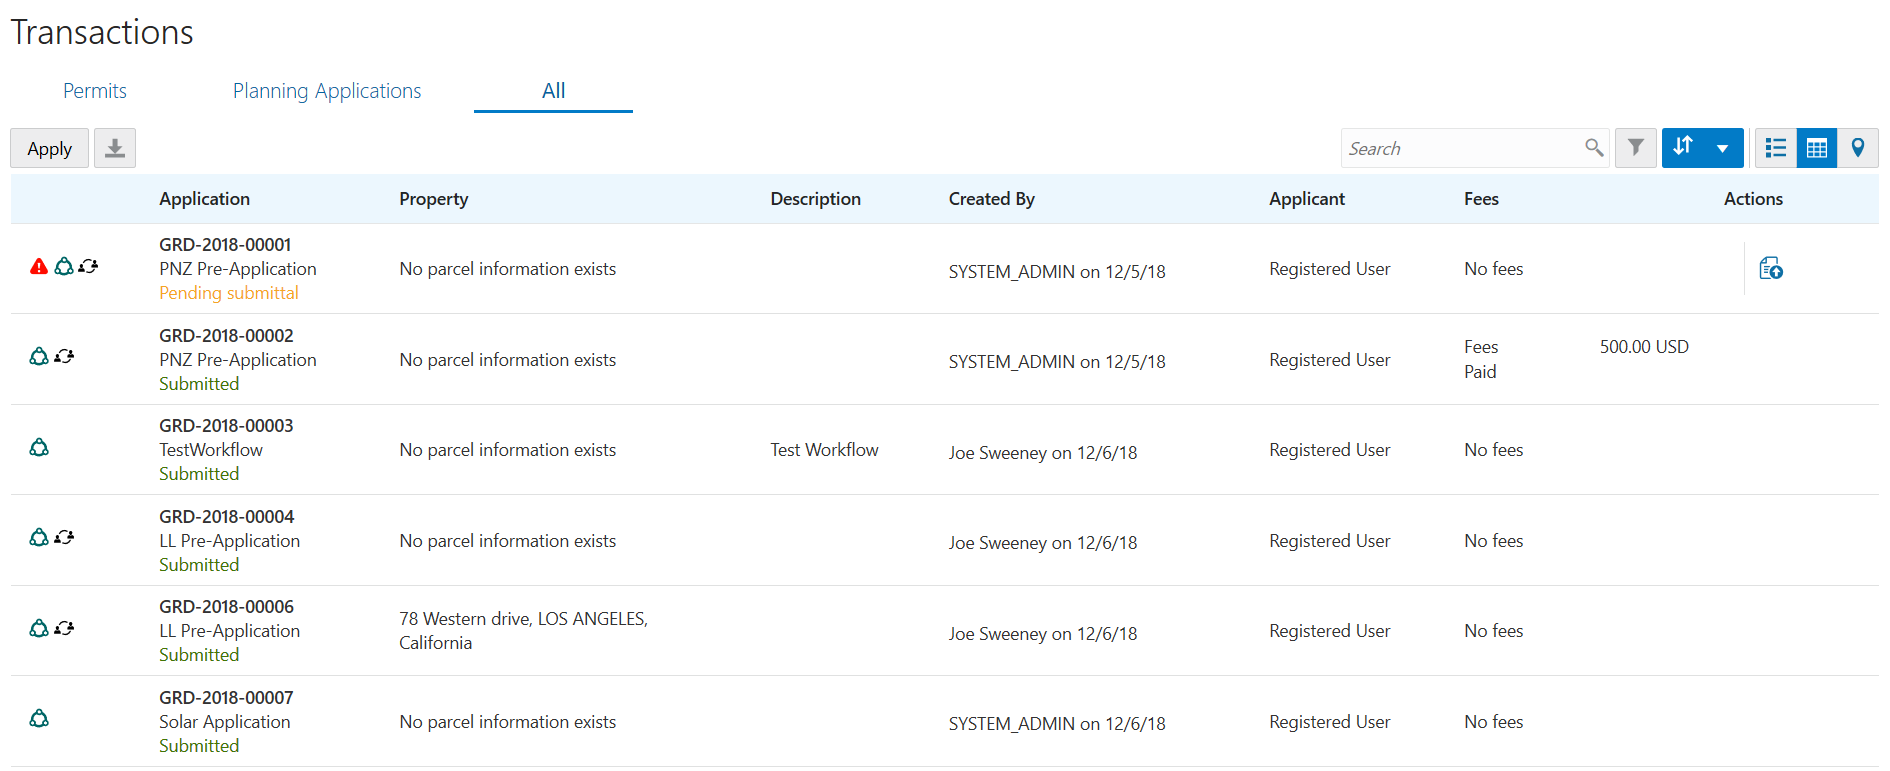
Managing Transactions
View application data and statuses for permits and planning applications using the Transactions page. You can also perform actions, such as paying fees and accessing detailed application information from this page.
Manage application activity.
Create or resubmit permit and planning applications on behalf of applicants.
Manually enter fee payments on behalf of applicants.
Access details about permit and planning application activity.
Registered users can access the list by selecting Go to Applications from the quick actions drop-down list or by clicking the Applications tile on the landing page for registered users.
Agency staff can access the Transactions page by clicking the Permits or Planning Applications tile on the Agency Springboard.
This example illustrates the Transactions page as viewed by agency staff and containing the page elements described in the following tables.
Using the Transactions Page
Select the Permits or Planning Applications tile on the Agency Springboard.
On the Transactions page, select one of the following tabs:
Permits: View a list showing active permit applications only.
Planning Applications: View a list showing active planning applications only.
-
All: View a list showing all permits and planning applications, including inactive applications.
You can perform these actions to display permits or planning applications that meet specific criteria:
Page Element
Description
Download
Click the download button to export the list to a .csv file.
Search
Search by alphanumeric characters on the fields for permits or planning applications in the list. The permits or planning applications that meet the search criteria are displayed on the page.
When you search on dates, use this format: MM/DD/YYYY.
Search results display only the primary address for the permit or planning application. You can confirm the correct transaction by clicking the row for the permit or planning application and reviewing all of the associated addresses in the application details.
Filter By
Apply filters to display permits or planning applications that contain the selected parameter values in the list. Click the filter button to open the filter options, where you can define, modify, and save your own filters.
Sort By
Select an option to sort the applications in the list by these fields:
Application
Type
Status
Creation Date
Created By
Applicant
Total Fees
Total Due
List View
Grid View
Map View
View the inventory of permits or planning applications in a list, on a grid, or on an interactive map. See Using Maps
Managing Application Activity
Select the Permits or Planning Applications tile on the Agency Springboard.
On the Transactions page, select one of the following tabs:
Permits: View a list showing active permit applications only.
Planning Applications: View a list showing active planning applications only.
-
All: View a list showing all permits and planning applications, including inactive applications that are completed or voided.
Use the information on the Transactions page to manage applications created by public users.
The icons help you identify application activity as described in the following table:
Icon
Description

Indicates that there was an error during the submittal process and the application status is pending submittal. There may be a problem initiating workflow. Click the Resubmit button to retry initiating workflow.

Indicates that the permit or planning application is part of one or more projects. For more information, see Viewing Project Summaries.

Indicates the planning application is classified as a pre-application.
 (Hold)
 (Lock)
 (Notice)
Indicates that a condition has been placed on the application. Conditions are set up by the agency and include these:
Hold
Lock
Notice
For more information about conditions, see Applying Conditions to Applications.
You can also identify the application and basic information about the application using the following information:
Page Element
Description
Application
View the application ID, application type, and status.
Review the application status, for example, Payment Pending, Submitted, Pending, Permit Issued, and so on.
Property
View parcel information.
Review the parcel information, including the street address, if available.
The transaction list displays only the primary address. You can review all of the addresses associated with the application in the details, which you access by clicking the application row.
Description
View the description of the application entered on the application form or on the Overview page in the permit or planning application details.
Created By
Review the user name of the person who filled out the application and the date the application was created. For example, the application was created by John Doe on 12/20/2018.
Applicant
Review the permit or planning applicant’s name. This may not be the same as the person who created the request.
Fees
Review the total fees that may be applicable to the permit or planning application and a fee balance if the total has not been paid.

Select the Pay button to submit a payment on behalf of the applicant.

Select the Resubmit button to resubmit an application.
The application status is Pending Submit because there may be a problem initiating workflow. Click the Resubmit button to retry initiating workflow.
Resubmitting the application does not affect the fee calculations.
Creating or Updating an Application
As agency staff, you can create new applications or update existing applications. Only agency staff can update applications that have already been submitted.
Select the Permits or Planning Applications tile on the Agency Springboard.
To create a new application, click the Apply button to access the questionnaire and submit the application.
To update an existing application, click the row for the selected application to open the pages comprising the details.
Go to the page for the information of the existing application that you would like to update, using the links in the left navigation panel. The actions vary by your role and the specific page.
Entering Application Fee Payments
Applicants typically pay their fees online using the payment cart, but if needed, you can initiate a payment on behalf of the applicant using the Pay button on the Transactions page.
Select the Permits or Planning Applications tile on the Agency Springboard.
Click the Pay button for the selected application with an outstanding fee balance.
When using the Pay button, you bypass the payment cart and go directly to the Checkout page in payment services.
Accessing Application Details
You can access application details from the Transactions page.
Select the Permits or Planning Applications tile on the Agency Springboard.
Click the row for the selected application on the Transactions page.
The Overview page for the application appears in the content pane of the details page.
For more information about the overview of permit details, see Viewing the Permit Summary.
For more information about the overview of planning application details, see Viewing the Planning Application Detail Overview.
Working with Permit Details
You find permit detail pages in a collection that consolidates all aspects of a permit application, including contacts, communication, parcel information, fees and payments, plan reviews, inspections, and workflow.
The permit detail pages include the functionality you need to manage a permit throughout its lifecycle.
To access the permit detail pages:
Select the Permits tile on the Agency Springboard.
On the Transactions page, click the row for a permit.
Navigate to permit information using the links in the left panel.
The information for a permit comprises these pages:
| Page Name |
Description |
|---|---|
| Overview |
View the core information regarding the selected permit with links to more detail. |
| Property Information |
View parcel data from the permit application and a map of the parcel location. |
| Workflow |
View the workflow status of each task as defined by the agency using Oracle Autonomous Integration Cloud (OIC). See Using Workflow. |
| Permit Details |
Review information captured during the application intake that is specific to the permit type. For example, for a solar permit, the applicant enters the number of solar panels to be installed. |
| Plan Reviews |
Perform administrative tasks for review cycles as a plan coordinator and perform reviews of building plan documents prior to permit issuance as a plan reviewer on the Plan Review page. See Managing Plan Review Cycles and Performing Plan Reviews. |
| Contacts |
Review and add contacts for the permit. |
| Conditions |
Review conditions placed on the permit or person that must be resolved to complete the permit process. |
| Attachments |
View a list of files and upload or download documents on this page. |
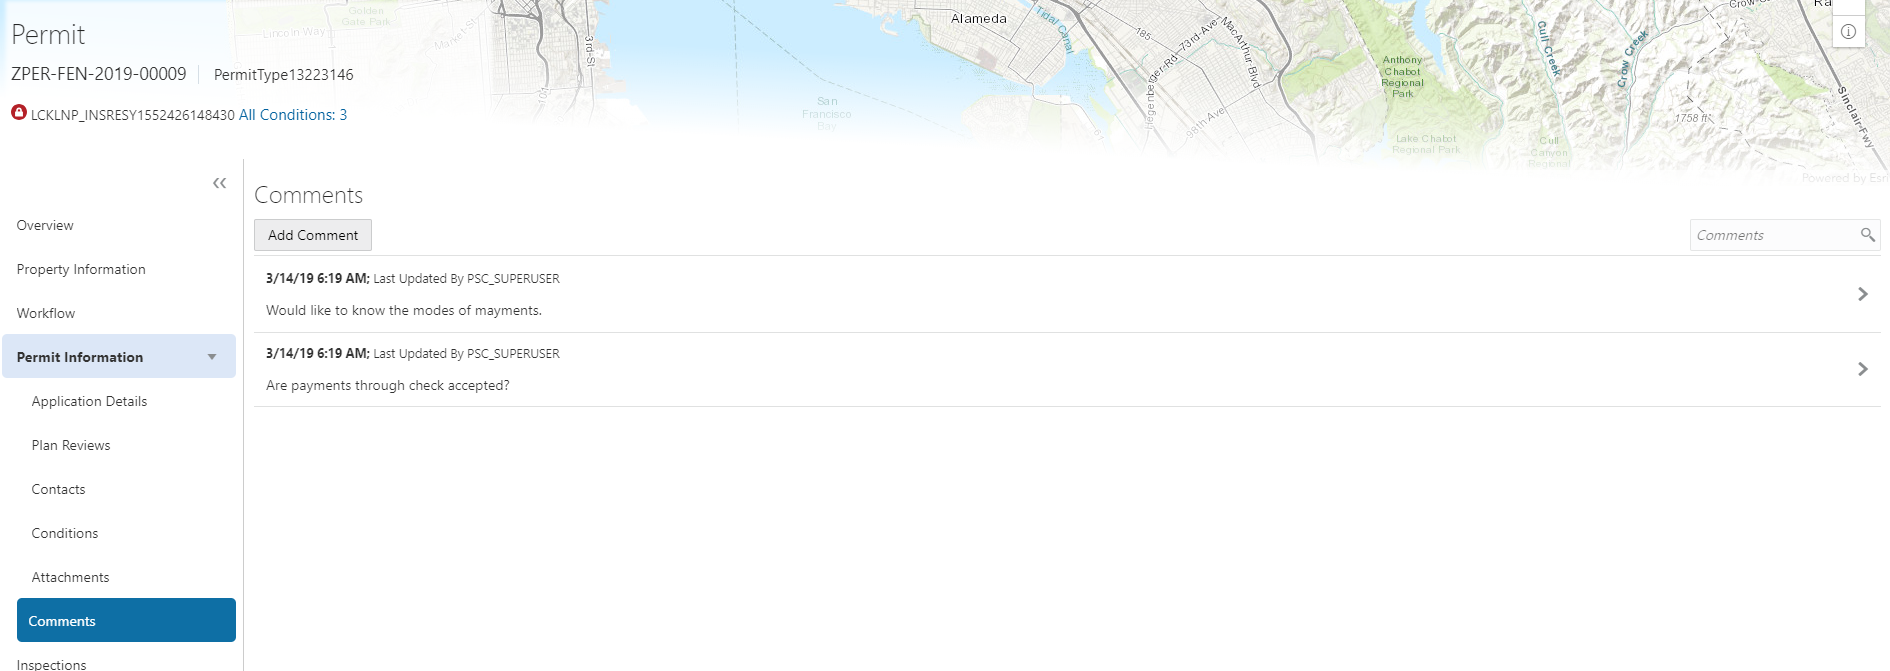
| Comments |
Review or add comments pertaining to this permit. |
| Inspections |
Review a consolidated list of inspections related to a permit. As a permit coordinator, you manage inspection activity for the permit on this page. |
| Fees and Payments |
Review fees assessed and payments due. You can also add additional fee items and pay fee items from this page. |
| Projects |
View the summary of projects associated with a permit in the permit details. The permit can be assigned to multiple projects. |
| Communications |
Send ad hoc email messages and notifications associated with this permit. |
Viewing the Permit Summary
You view a permit summary on the Overview page, where you get a snapshot of the core information regarding a permit with links to more detail.
When you access the details for a permit, you see a summary of the permit activity. This information is updated to show the latest activity.
This example illustrates the Permit Detail Overview page, which is described in the following text.
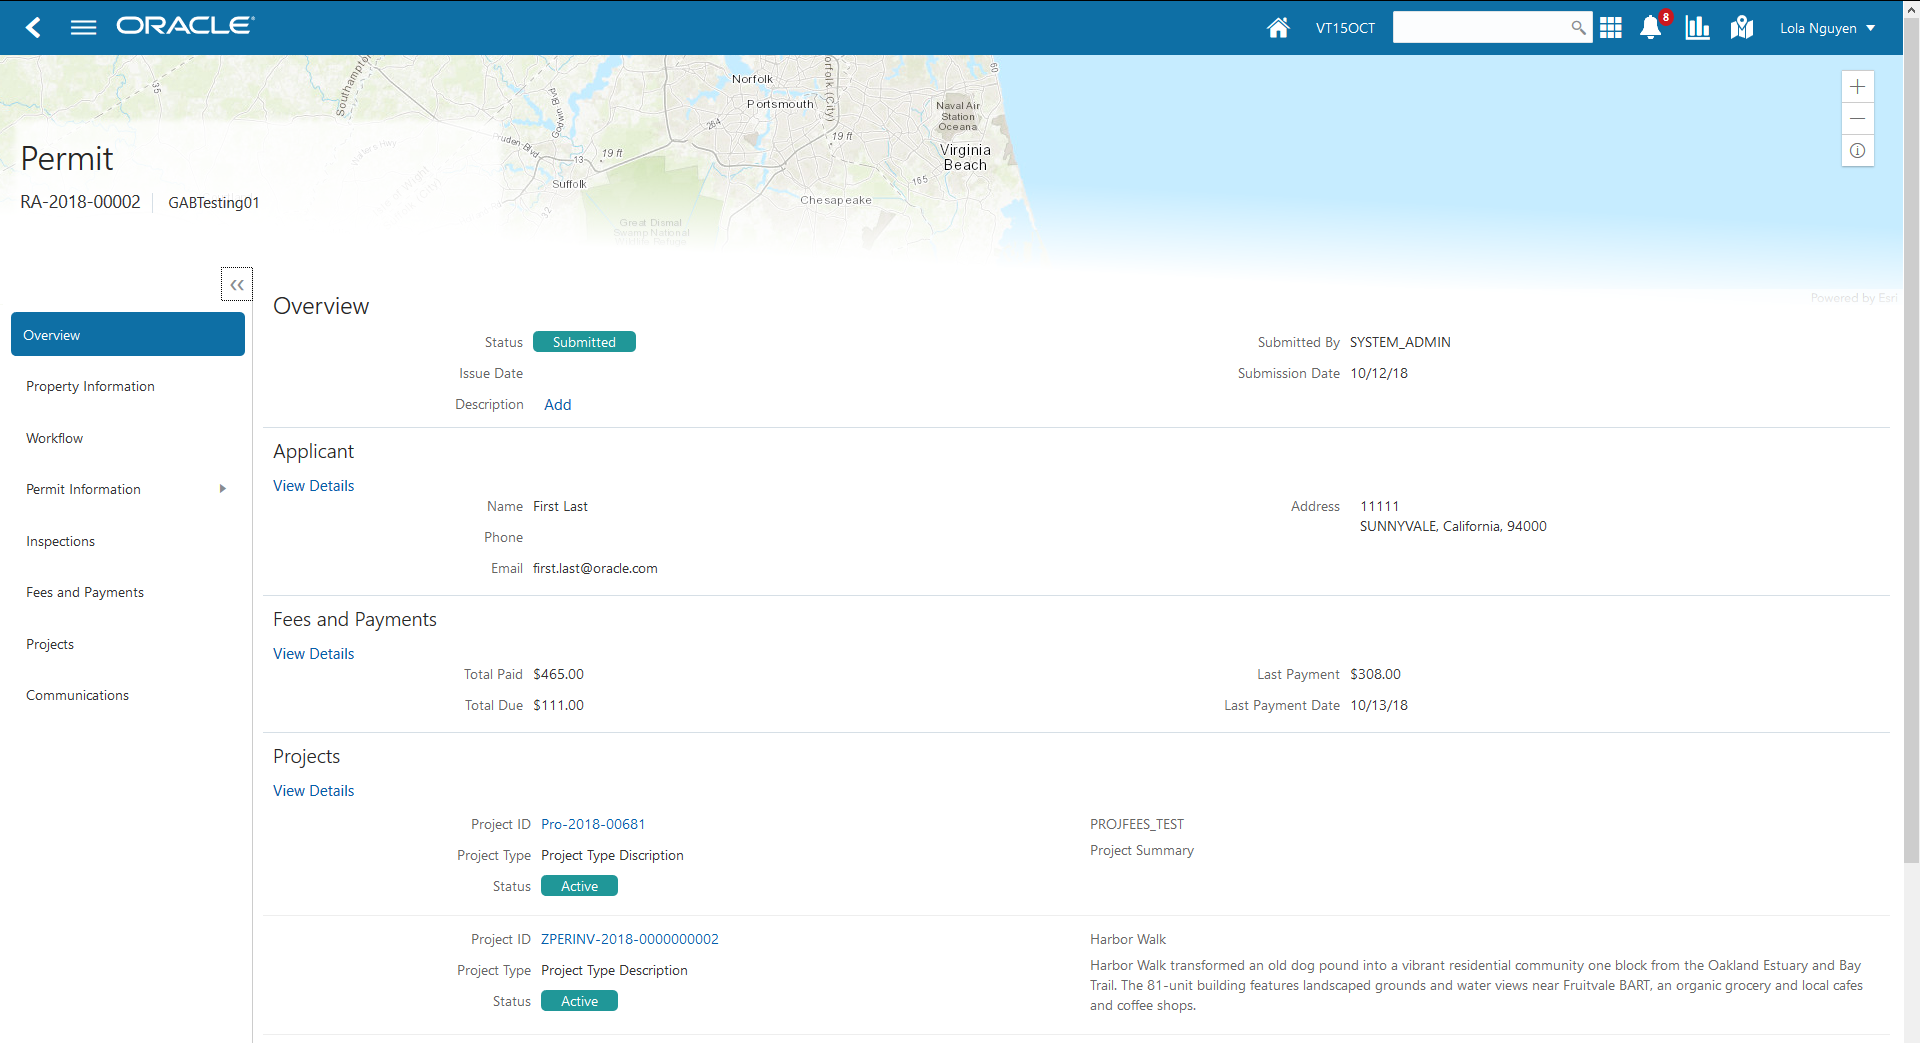
Using the Overview Page
Select or click the Permit List tile on the Agency Springboard.
On the Permits page, select the View More Details button for a permit in the grid.
Review information about the selected permit in the sections and navigate to more details on the Overview page:
Note: If you’re using a phone, you can review a summary and access details for fees and payments, and projects, from the Overview page. For complete details, access permit applications using a laptop or desktop computer.Page Element
Description
Overview
Review the permit status, who submitted the application, the day the application was submitted, and the permit issue date.
The applicant can enter a description of the permit record by clicking the Add link.
Applicant
View the applicant’s name and contact information.
Click the View Details link to open the Contacts page, where you can add additional contacts.
Projects
View the projects to which this permit belongs.
Click the View Details link to open the Projects page, where you can see the list of projects in more detail. Click the Project ID link to find out more about the project, which may contain other permits.
Workflow
View a list of active and recently completed tasks, including the task status, assignment, last updated date, and number of days in the current status.
Click the View Details link to open the Workflow page.
Fees and Payments
View the total fees paid, amount due, and the date and amount of the last payment.
Click the View Details link to open the Fees and Payments page.
Inspections
View the number of scheduled, upcoming, and completed inspections, as well as the number of inspections that have passed and failed.
Click the View Details link to open the Inspection List page.
Working with Property Information
Property information shows parcel data from the permit or planning application and a map of the parcel location. You can add parcels, and modify or delete the parcel, owner, and address information.
Property information is configured on the application forms by the agency during the design process. When filling out an application, the public user enters information, which is then displayed in the detail pages of the permit or planning application. Only agency staff can update information on the Property Information page after an application has been submitted.
Viewing Parcel Information
You view a list of parcels associated with this permit or planning application in the Parcel List section. The list view displays parcel details. You can also view the location of the parcels on a map.
Select the Permits or Planning Applications tile on the Agency Springboard.
On the Transactions page, click the row for the permit or planning application you are working with.
On the Property Information page, view the list of parcels in the Parcel List section.
Click the parcel number button in the list to view the parcel details, owner, and address in the right pane.
Click the map icon to find the parcels in the list on a map.
Adding Parcels
The system automatically makes the first parcel added to the permit the primary parcel.
Select the Permits or Planning Applications tile on the Agency Springboard.
On the Transactions page, click the row for the permit or planning application you are working with.
On the Property Information page, click the Search icon in the Parcel List section.
Use the search field on the Search Property page to find parcels by parcel number, address, or owner. Only parcels enabled by the agency are available as lookup values.
Click the check boxes for one or more parcels.
Click the Add Selected button.
Updating Parcel Details
Select the Permits or Planning Applications tile on the Agency Springboard.
On the Transactions page, click the row for the permit or planning application you are working with.
On the Property Information page, click the Edit button in the Parcel Number section.
On the Parcel Detail page, you can turn on the Primary switch to make this the primary parcel for the permit.
Update parcel data such as the property description, jurisdiction, subdivision, primary zone, zone description, land use, parent parcel, parcel type, book, section, page, map book page, map name, boundary description, and so on.
Click Save.
Updating Parcel Owner Details
Select the Permits or Planning Applications tile on the Agency Springboard.
On the Transactions page, click the row for the permit or planning application you are working with.
On the Property Information page, click the owner row in the Owner section.
On the Parcel Owner Detail page, you can turn on the Primary switch to make this the primary parcel owner.
Enter a value in the Zip Code field to add address information.
You can also update the owner name, secondary owner name, ownership type, home phone, and email address.
Adding Parcel Addresses
Select the Permits or Planning Applications tile on the Agency Springboard.
On the Transactions page, click the row for the permit or planning application you are working with.
On the Property Information page, click the Search icon in the Address section.
Use the search field on the Search Property page to find parcels by parcel number, address, or owner.
Only parcels associated with this permit are available as lookup values.
Click the check boxes for one or more parcels.
Click the Add Selected button.
Updating Parcel Addresses
Select the Permits or Planning Applications tile on the Agency Springboard.
On the Transactions page, click the row for the permit or planning application you are working with.
On the Property Information page, click the address row in the Address section.
On the Parcel Address Detail page, you can turn on the Primary switch to make this the primary parcel address.
Update parcel address data such as address type, address line 1, address line 2, street number, street, street type, unit, floor, direction, building, municipality, and longitude and latitude.
Click Save.
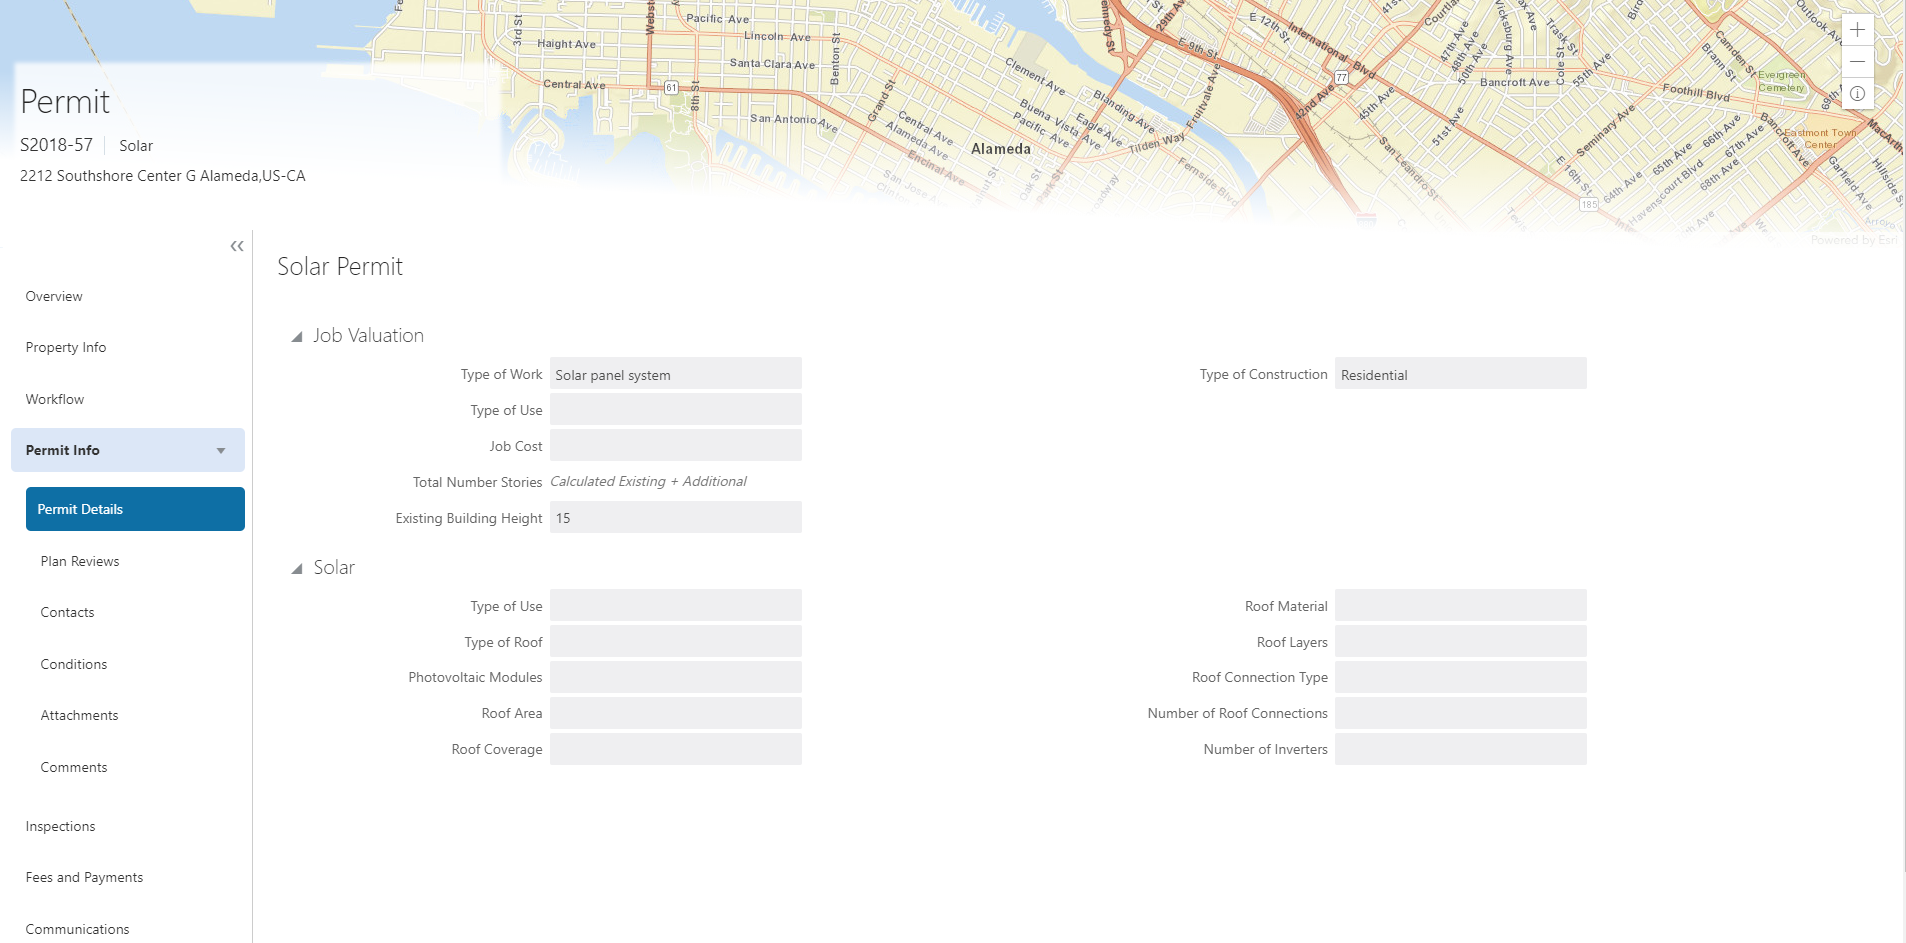
Viewing Permit Application Details
You review information captured during the application intake that is specific to the permit type in the application details. Some agency staff can update the permit details captured from the application.
When an agency designs the application form for a specific type of permit, they use elements that capture the information necessary for evaluating adherence to permit requirements. For example, for a solar permit, an applicant would enter data about the job (type of work, job cost, and so on) and solar details (type of roof, roof area, number of solar panels, and so on). These application details are reflected on the Permit Details page for the permit.
This example illustrates the Permit Details page containing the information described in the surrounding text.
| Permit Application Details |
Description |
|---|---|
| Construction Information |
Captures Information regarding the current construction site and the proposed construction project. |
| Demolition |
Captures information related to the scope of the demolition and if hazardous materials or utilities need to be considered—such as electricity, gas, water, and so on—when demolition is required as part of the job. |
| Electrical Equipment |
Describes electrical features, such as outlet types, amps, voltage, and electric appliances. |
| Fence Information |
Describes the proposed fence attributes, such as type, material, dimensions, location, and so on. |
| Grading Information |
Describes the scope of grading work, such as the acreage affected, materials to be used and the amount of material. |
| Insurance |
Provides a contractor’s insurance type and policy information. |
| License Qualification |
Enables a contractor to add any state licences they have. |
| Mechanical Equipment |
Describes features of the job site related to ventilation, heating, cooling, fire safety, and so on. |
| Photovoltaic Information |
Describes attributes of a site’s solar energy configuration, such as roof area, coverage area, inverter information, and so on. |
| Plumbing Equipment |
Describes attributes of a site’s plumbing configuration. |
| Pool Information |
Describes attributes of a pool, such as type, depth, location, surrounding fencing, and so on. |
| Property Information |
Describes the parcel as it is registered with the municipality, such as the parcel ID, parcel type, and so on. |
| Regulated Business Activity |
Enables you to specify any regulated activity or controlled substances allowed on the premises, such as alcohol, carnival rides, casino games, and so on. |
| Right of Way Use |
Enables you to provide any details related to the use of a right-of-way on the property or to gain access to the property, such as traffic, parking, or pedestrian impact. |
| Roof Information |
Describes features of a structure’s roof, such as existing roof type, proposed roof type, number of layers, and so on. |
| Site and Zoning |
Describes features of the property related to acreage, flood preparedness, as well as zoning and land usage information. |
| Special Event |
Enables applicants to specify information about an event, including the safety plan, concessions, facilities, potential impacts, and traffic plans. |
| Yard Sale |
Enables applicants to specify yard sale information, such as the start time, end time, and the number of days. |
Updating Permit Application Details
The fields available to update depend on the permit details on the application form.
Select .
On the Permits page, select the Details button for a permit in the grid.
Click Permit Info to expand the section in the left navigation panel.
Click Permit Details.
On the Permit Details page, click the Edit button.
Update available fields on the page.
Click the Done button to save.
Using Workflow
Workflow provides a defined structure for the permit and planning application lifecycles. For example, humans perform manual steps such as approving a permit application and indicating when a plan review is complete, while the workflow engine performs automated steps such as updating permit and inspection statuses.
Managing workflow tasks consists of updating the assignment, status, and priority for a task that a human performs. You can also add comments to a task and edit workflow comments.
You do not, however, use workflow functionality to perform the actual task. If workflow includes a task to review plans, you need to review the plans manually, record your plan review decision in the plan review pages, and mark the workflow task complete. However, as an inspector, when you approve the final inspection, the workflow engine automatically changes the inspection task in the workflow to complete.
Workflow and Non-Workflow Tasks
This topic discusses workflow tasks. These are tasks that are defined in workflow process definitions within Oracle Autonomous Integration Cloud (OIC). Agency staff manages these tasks using the Workflow page in the details of a permit or planning application.
Oracle provides an additional page that agency staff can use to review both workflow and non-workflow tasks. For information about this functionality, see Managing Tasks.
Managing Workflow Tasks
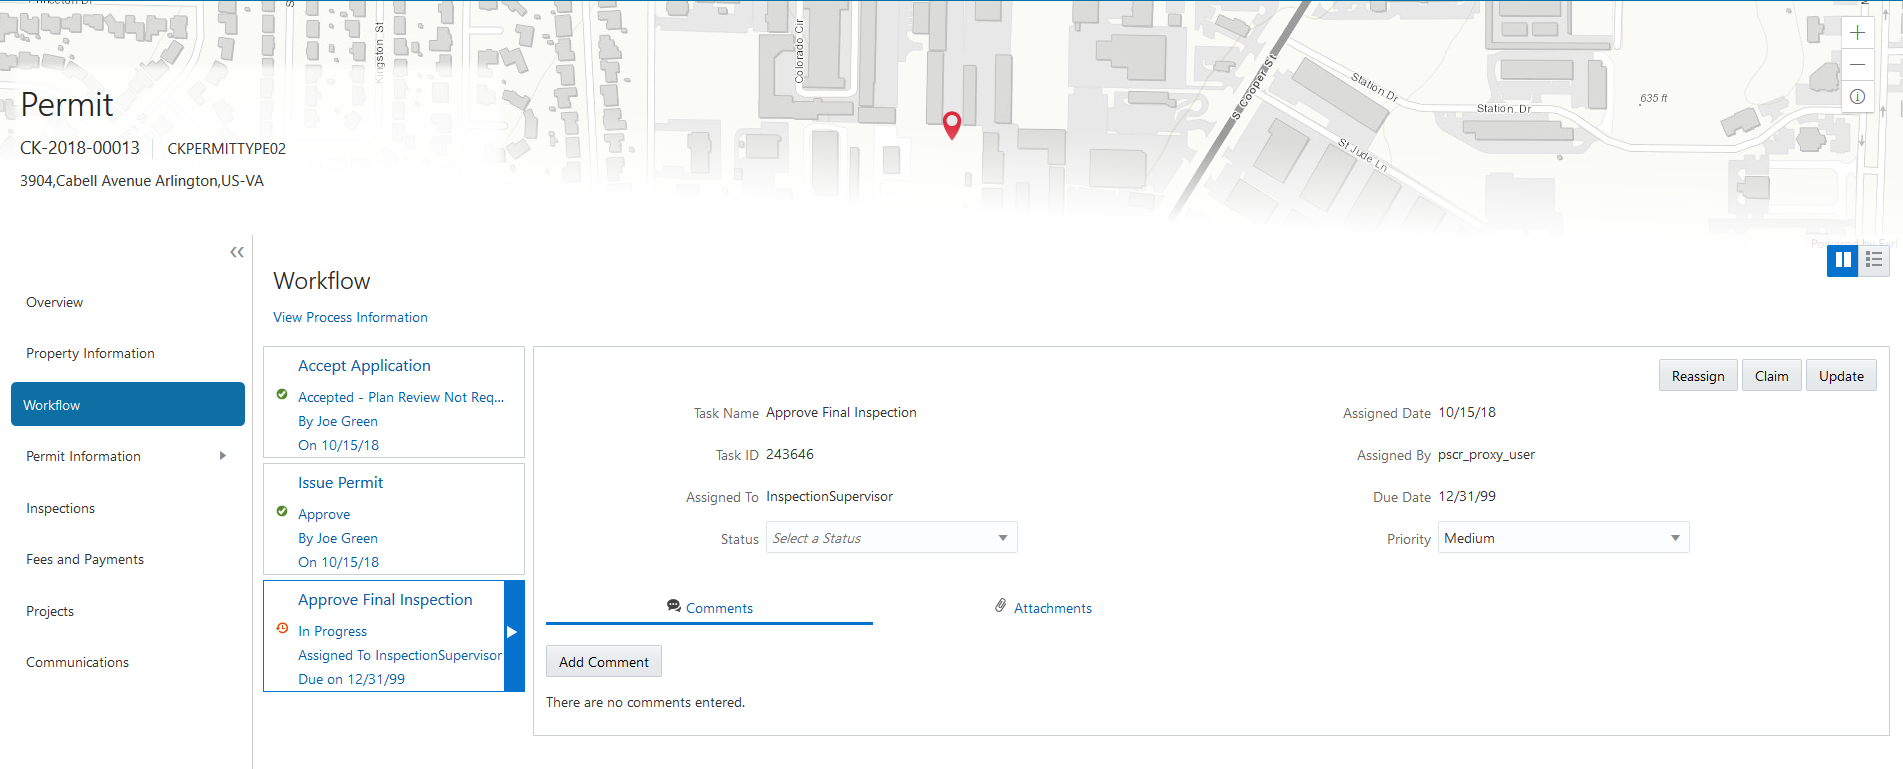
This example illustrates the two-panel view of the Workflow page, which is described in the following text.
To manage a workflow task:
Select the Permits or Planning Applications tile on the Agency Springboard.
Click the row for the permit or planning application you want to view.
Use the navigation links on the left side of the screen to select Workflow.
The Workflow page appears on the right side of the page. This page can be toggled between a two–panel view and a list view. The list view is display-only and visible to both agency staff and registered public users; the two–panel view is for agency staff only. The default two-panel view includes the following:
Panel
Description
Task summary cards on the left.
The left panel lists completed and in progress tasks. Each task appears on a card that lists the following information:
Task name
Task status
Although completed tasks can have a variety of statuses based on the outcome of the task, the status of an in progress task is always In Progress. If the workflow process definition uses parallel gateways, you might see multiple in-progress tasks.
Assignee
Tasks can be assigned to an individual, or they can be assigned to a group whose members can claim the task.
Either the due date (for in progress tasks), or the last-updated date, which is the completion date for past tasks.
Task details on the right.
The right panel displays more details for the task that is selected in the left panel.
If the task is in progress, use the right panel to change the task assignment, update the status and priority, or add task comments.
Completed tasks are not updatable, but you can add comments to them.
Select a workflow task from the left frame to see details in the right frame.
Review read-only task information.
These fields are not updatable regardless of the task status:
Page Element
Description
Task Name
The task name as defined in the OIC workflow engine. For example, the Application Acceptance task is for reviewing and accepting a permit or planning application that has been submitted.
Task ID
The identifier for this specific instance of a task. For example, multiple permits or planning applications have an Application Acceptance task, but the Task ID for accepting the application is unique for each permit or planning application.
Assigned To
The name of the individual who is assigned to the task, or, if the task isn’t assigned to an individual, displays the name of the group or role that is responsible for the task.
Assigned Date
The date that the task assignment was last updated.
Assigned By
The name of the person who last updated the task assignment. When an assignee claims a task, the Assigned To and Assigned By names are the same.
Due Date
The date by which the task must be completed. The workflow process definition in OIC sets the due date. Generally the due date is defined as a specific amount of time after the task is started.
If the task is in progress, you can reassign it using these buttons:
Page Element
Description
Reassign
Click to choose an assignee for the task.
See Managing Tasks.
Claim
Click to assign the task to yourself.
This button is visible only for tasks that are assigned to a group rather than to an individual.
Release
Click to remove yourself as the task assignee. The task is reassigned to its default group so that group members can see and claim the task.
This button is visible only for tasks that are assigned to you.
To update the status or priority of an in progress task, use these fields:
Page Element
Description
Status
Select a status that represents the final outcome of the task.
The task statuses depend on the workflow setup. For example, the available statuses for a task that requires a simple approval might be Approve and Reject. The workflow status of each task is defined by the agency using OIC.
Other tasks might require different statuses. The sample workflow that Oracle provides includes these statuses for the task where you review an application: Accepted - Plan Review Not Required, Accepted - Plan Review Required, More Info Needed, and Reject.
Note: Task statuses are not the same as application status. However, the workflow engine can update the application status based on the outcome of a task.Priority
Set the priority to High, Medium, or Low. The priority is informational only.
Click Update to save your changes.
When you save your changes, the system does the following:
Sends an update to the workflow engine in OIC, triggering any subsequent tasks in the workflow.
For example, in a delivered sample workflow, approving a permit application triggers an update to the permit status, which triggers an email to the applicant. The workflow then reaches a decision point that checks whether a plan review is required. The next human step in the process is either completing a plan review or, if no review is required, issuing the permit.
Refreshes the Workflow page, which becomes read-only if the task is complete.
Displays a Refresh icon on the read-only page so that you can check if any new human workflow tasks get triggered.
Click Refresh to update the page and see if the completion of the task has triggered another workflow task for the application.
Processing time can vary, so you might need to wait before refreshing the page.
Adding Comments to a Workflow Task
Comments are a useful mechanism for adding information to a workflow task. You can control whether the comment is visible to public users who view their application workflow. The default setting is for comments to be visible, so you must manually hide comments that you do not want the public user to see.
For more information about comments, see Working with Application Comments.
To add a comment to a task:
Access the workflow task.
Click Add Comment.
To write a new comment from scratch, enter and format your comment in the rich text field on the page.
To create a new comment based on one or more existing comments:
Click Select Comments.
On the Select Comments page, click Favorite, Standard, or Recent to see the corresponding list of comments.
Favorite, standard, and recent comments are described in the topic Working with Application Comments.
Locate and select the comments you want to copy, using the search and filter options as needed.
Click Insert to copy the text of the selected comments into the field for the new comment.
If necessary, modify the copied text.
If you want to hide the comment from public users, click the Hide from Public icon to toggle the visibility setting.
When the icon displays an open lock, the comment is visible to the public. This is the default setting for new comments.
When the icon displays a closed padlock, the comment is hidden from the public.Click Save to save the comment and return to the Workflow page.
Modifying a Comment in a Workflow Task
To modify a comment:
Access the workflow task.
Click an existing comment to view it on the Comment page.
Modify the text of the comment as needed.
if you use the Select Comment option to add text from an exiting comment, the new text is added after any existing text.
To modify the comment visibility, click the Hide From Public icon.
Clicking the icon toggles the setting. When the icon displays an open lock, the comment is visible to the public. When the icon displays a closed padlock, the comment is hidden from the public.
Click Save to save changes and return to the Workflow page.
Deleting a Comment from a Workflow Task
To delete a comment:
Access the workflow task.
Click an existing comment to view it on the Comment page.
Click the Delete icon.
The comment is deleted, the window closes, and you return to the Workflow page.
Managing Attachments for a Workflow Task
You can upload files to attach them to specific workflow tasks. File that you associate with a workflow task are visible only on the detail page for that task. That is, workflow attachments are not visible on the general Attachments page for an application.
To manage attachments for a workflow task:
Access the workflow task.
Click the Attachments link to display attachments information.
The Attachments link and Comments link toggle the display between task comments and task attachments. In Attachments view, a grid displays the File Name, a Description, and the File Size for each attachments.
To add a new attachment:
Click Add.
Select a file using your browser’s file selection window.
On the Add Attachments page, verify the File Name and optionally enter a Description.
Click Upload.
When the upload is complete, the new attachment appears in the workflow task details.
To view or modify attachment information:
Click the Actions icon for the existing attachment.
Select View Details.
On the Attachment page, review the File Name, File Size, and the Last Updated By and Uploaded By user names.
Optionally update the Description.
Click Save or Cancel to return to the Attachments page.
To download a file, click the Actions icon and select Download.
To delete a file, click the Actions icon and select Delete.
You are prompted to confirm the deletion.
To close the Attachments window, click Cancel.
Viewing the Overall Workflow for an Application
Use the list view on the Workflow page to view all of the workflow tasks that a human must perform for a specific permit or planning application. This list does not include system tasks such as updating the application status and sending automated notifications.
The list includes completed, in progress, and not started steps. Showing all of these steps together provides a big-picture view of the process. However, some steps that are not yet started might not be applicable depending on the workflow path.
To use the list view:
Select the Permits or Planning Applications tile on the Agency Springboard.
Click the row for the permit or planning application you want to view.
Use the navigation links in the left frame to select Workflow.
Click the Show List View icon.
Review the task list.
The task list displays:
The Task Name and Status.
The Last Updated Date.
The Days Taken, which represents the number of days elapsed while the task is in progress.
The value is the number of days so far for an in progress task, or the total days from start to finish for a completed task. This field is blank for tasks that have not started.
Comments, which displays the two most recent comments.
For each comment, this column displays the creation date and time, the creator, and the comment text. Lengthy comment text is truncated.
To review task history, click a specific task to open the Task Details page.
This page lists the dates that the task was updated along with the task status on that date, the number of days taken as of that date, and all comments that were added on that date.
-
Close the Task Details page to return to the workflow list view.
Managing Tasks
The Task Management page enables you to review both workflow and non-workflow tasks and to reassign tasks (including claiming a task for yourself).
Reviewing and Managing Tasks
On the agency springboard, select the My Tasks tile.
On the Task Management page, select the tab that lists the tasks that you want to review:
Task Tab
Description
Available Actions
My Tasks
Lists tasks that are assigned to you.
Release
Reassign
Group Tasks
Lists workflow tasks that are assigned to a group to which you belong. Non-workflow tasks (plan review tasks and inspection tasks) do not appear here.
Tasks on the Group Tasks tab are not assigned to individual group members. So this list functions as a group work queue from which individuals can claim specific workflow tasks. When a task is claimed, it is assigned to the individual and no longer appear in the list of group tasks.
Claim
Reassign
All Tasks
Lists all tasks assigned to groups to which you belong, including tasks that are assigned to you and to other group members.
Reassign
Use the search, filter, and sort options to refine the list of tasks as needed.
Use these fields to review task information:
Page Element
Description
Task Type
Identifies the nature of the task to be performed. Values include:
Inspection
Plan Review
Workflow
The Workflow task type represents overall permit workflow.
Transaction
Displays the transaction type number. For example, in the case of a permit, it displays the permit number and permit type for the associated permit.
Tasks
Displays a task name and identifier that depend on the task type:
For workflow tasks, the workflow process name and task ID appear. The task ID is for the specific instance of the task.
For inspection tasks, the inspection name and ID appear.
For plan review tasks, the plan review name and cycle count appear.
Status
Displays the task status. Different types of tasks can have different statuses. For example, inspection tasks can have the status Scheduled, which is not applicable to permit workflow tasks.
Assignment
Displays the date that the task assignment was last updated and to whom the task is assigned.
>
Click to access details for the permit to which the task is related. The page that appears depends on the type of task. For example, clicking the button for a permit workflow takes you to the Workflow page in the permit details.
To update the task assignment, select one of these options from the task’s Actions menu:
Claim assigns the task to yourself. This action is available only for tasks that are currently assigned to a group. It is not relevant on the
Release removes the assignment without assigning a new owner. The task will now appear on the Group Task list until it is claimed or reassigned.
Reassign opens the Reassign Task page, where supervisors can select a new assignee.
Reassigning a Workflow Task
Claiming a workflow task is a quick shortcut for assigning a task to yourself. To assign a task to someone else, though, you must use the Reassign action.
To reassign a workflow task:
On the agency springboard, click the My Tasks tile.
Locate the workflow task on either the My Tasks list, the Group Tasks list, or the All Tasks list.
Use the search, filter, and sort options to help you refine the task list.
Click the Actions icon, and then select Reassign.
The Reassign Task page appears.
-
Confirm that the Search By value is User.
Enter your search criteria, then click Search.
You can search by Keyword, First Name, Last Name, and Email.
Locate the desired assignee in your search results, then click the Select button for that assignee.
The system prompts you to confirm the assignment, then reassigns the workflow task and returns you to the task list.
Adding Contacts to Applications
This topic discusses how to add contacts to an application. Users can add contacts to a permit or planning application after submittal.
Adding Contacts to an Application
The Contacts page displays the applicant details entered at the time of creating the transaction and allows you to add additional contacts to be associated with the transaction. Additional Contacts can be:
Add from Registered Contacts: You just select a contact already registered in the system and include in the transaction .
Add Brand New Contact Manually: You create a new contact by entering all the contact details and then include in the transaction .
Select Permits or Planning Applications. Select Transactions and then select a Submitted transaction row.
Select Permit Information or Planning Application Information and select Contacts. The Contacts page displays the applicant information in the top section and Additional Contacts option in the bottom section.
You can make changes to the following fields for the applicant information and save the record:
Salutation, Suffix, Country, Address fields, State, County, City, Zip Code, Phone, and Email.
Note: The address fields are unavailable for entry by default. To enable these fields for entry, click the Don’t know link or enter a zip code.Click Add New Contact to open the Contact Details page and include a new contact. The Contact Details page lists all the registered contacts. The Create New Contact button below the Contacts grid allows you to create a new contact and include it in the transaction.
To add a registered contact, select a contact from the Registered Contact list. A modal window opens, allowing to select the Contact Type and the Primary flag.
Page Element
Description
Select Contact Type
Use the look up to view all the contact types and their description and then select the contact type for the transaction.
Is This Primary Contact
Turn on the switch if you want to make the selected contact person as the primary contact. If you make this contact person as the primary contact, then if there is any earlier contact assigned as Primary, it will automatically change to non primary contact.
Click OK to save the record and return to the Contacts page, which lists your newly added registered contact.
To create a brand new contact, click Create New Contact and manually enter all contact details.
Update the additional contacts by clicking the Details button on a contact from the Additional Contacts list.
For registered contacts, the following fields are not available for edit: First Name, Middle Name, Last Name, and Business.
For newly created contacts, all the fields are available for edit.
Click Save to save the contact and return to the Contacts page, which lists your contacts.
Applying Conditions to Applications
This topic describes how your Public Sector Community Development service allows you to view, update, apply, and resolve conditions on an application such as a permit or a planning application.
Viewing and Updating Conditions
The Conditions page lists all the conditions applied to the selected transaction (such as a permit or a planning application), sorted by the applied ones at the top followed by the resolved ones. The Condition Indicator at the top displays the most severe condition having a high priority. A link – All Conditions allows you to view all the active conditions applied, their severity, applied date, and the display message.
Select Permits or Planning Applications and select a transaction row. On the Permit or Planning Application .page, select Conditions under Permit or Planning Application Information.
The Conditions page lists all the conditions applied to the transaction .
This example illustrates the Conditions page.
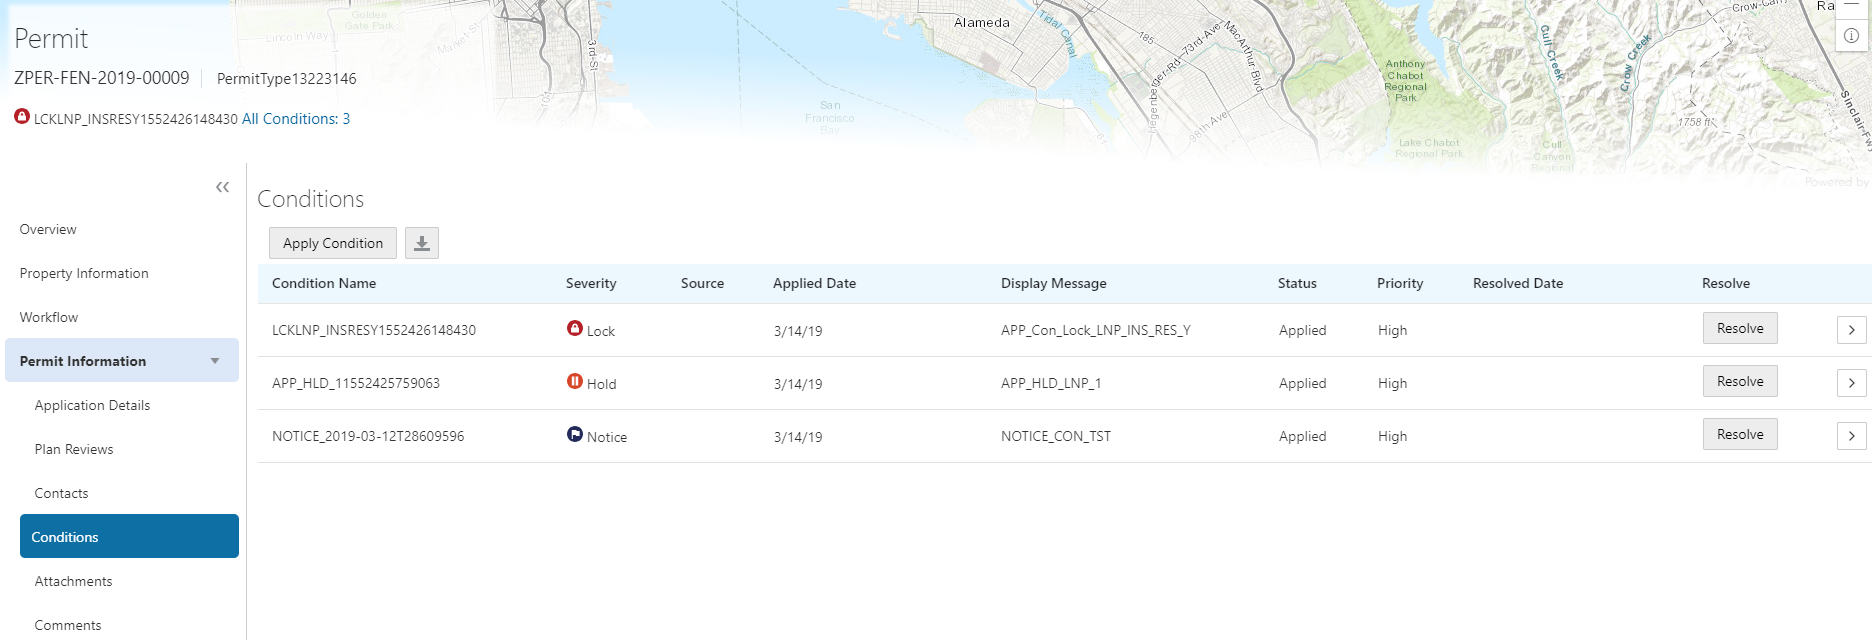
Select a condition and click the View More Detail button to open the Condition Details page and view the details of the condition. For a detailed description of all the fields, see the next section..
You can also edit the values and click Save to update the condition.
Applying a Condition to a Transaction
You apply conditions to transactions on the Apply Condition page.
Select Permits or Planning Applications and select a transaction row. On the Permit or Planning Application .page, select Conditions under Permit or Planning Application Information. Select Apply Condition.
On the Condition Details page, enter values for the following fields:
Page Element
Description
Condition Name
Select a condition from a list of conditions that are enabled in setup.
Severity

Displays the level of severity as defined while setting up the condition:
At the most severe level, the Lock condition suspends all operations, including workflow advancing, payment processing, inspection scheduling, and inspection results.
Severity

Agency staff can select which rules to apply to conditions with this level of severity.
Severity

This level functions as an alert and has no effect on operations.
Business Rules
Select one or more business rules. Options are:
Prevent New (applicable to a parcel)
Prevent Workflow Advancing
Prevent Issue or Final
Restrict Payment
Prevent Inspection Schedule
Prevent Inspection Result
Note: The business rules available for selection are based on the severity of the condition you have selected. For example, for a condition whose severity is Hold you must select at least one business rule, and for a condition with Lock severity, all the business rules are automatically applied.For more details on the business rules, see Setting Up Conditions.
Additional Information
Enter additional information regarding the condition applied to the transaction.
Display Message
Displays the message on the Conditions list page as well as on the condition indicator at the top of the page, when you click the All Conditions link.
Priority
Select a priority from options High, Medium, and Low.
Description
Displays the description as entered while setting up the condition. You can change the text here and the condition description is updated when you save the condition.
Click Save to save the condition and return to the Conditions page.
Resolving a Condition
You can resolve a condition that you applied to a permit.
Select Permits or Planning Applications and select a transaction row. On the Permit or Planning Application .page, select Conditions under Permit or Planning Application Information.
Select the condition that you want to resolve and click the Resolve button to open the Resolve Condition page.
Enter a resolution text in the Resolution Action field and click Save. The resolution is applied and the resolved condition is listed at the bottom of the condition list.
Viewing a Resolved Condition
You can view the details of a resolved condition on the Condition Details page.
Select Permits or Planning Applications and select a transaction row. On the Permit or Planning Application .page, select Conditions under Permit or Planning Application Information.
Select a row with a status of Resolved and click View Details.
The Conditions Details page opens to display the details of the condition at the top, followed by an additional information about its resolution:
Applied By
Resolution Action
Resolved By
Resolved Date
Click Cancel to return to the Conditions page.
Working with Application Attachments
You view a list of files and upload or download documents associated with an application on the Attachments page.
Attachments provide supporting documentation needed by agency staff during the permit or planning application process.
Viewing Application Documents
You view a list of application documents on the Attachments page.
Select Permits or Planning Applications on the Agency Springboard.
Click the row for a permit or planning application to access the detail.
Click the Permit Information or Planning Application Information menu item in the left panel.
Click the Attachments link to view the Attachments page for the permit or planning application.
On the Attachment page, view the list of documents, including this information:
Page Element
Description
File Name
View the following information in the Filename field:
Filename with file type extension
File Size
Uploaded By user name
Uploaded On date
Description
View the description of the attachment as entered by the person who added the attachment.
Category / Subcategory
View the document category and subcategory for the attachment.
Actions
Click the actions icon to select and perform an action:
View Details
Download
Delete
Click the Sort By to view attachments grouped by these fields: file name, file size, uploaded by, uploaded on, description, category, and subcategory.
To find a specific attachment, you can enter values in the search field.
Adding Application Documents
You upload files to the Attachments page using the Add Attachments page. Inspectors can also add documents in Oracle Inspector.
Select Permits or Planning Applications on the Agency Springboard.
Click the row for a permit or planning application to access the detail.
Click the Permit Information or Planning Application Information menu item in the left panel.
Click the Attachments link to view the Attachments page for the permit or planning application.
Click the Add icon.
Select the file to upload in the browser dialog box and click Open.
The filename appears on the Add Attachments page.
On the Add Attachments page, you can enter a description of the file, a document category, and a document subcategory, if desired.
Use the look-up prompt to select a document category and subcategory that have been defined by the agency. For more information, see the implementation documentation for Setting Up Document Categories and Subcategories.
Click the Upload button.
Viewing Application Document Details
You view document details on the Attachments details page.
Select Permits or Planning Applications on the Agency Springboard.
Click the row for a permit or planning application to access the detail.
Click the Permit Information or Planning Application Information menu item in the left panel.
Click the Attachments link to view the Attachments page for the permit or planning application.
In the attachments grid, click the Action icon for the document you want to download.
Select View Details to open the document details page. In addition to the information on the Attachments page, you can see who last updated the document and when.
Downloading Documents
You download a document on the Attachments page.
Select Permits or Planning Applications on the Agency Springboard.
Click the row for a permit or planning application to access the detail.
Click the Permit Information or Planning Application Information menu item in the left panel.
Click the Attachments link to view the Attachments page for the permit or planning application.
In the attachments grid, click the Action icon for the document you want to download.
Select Download and save to the location of your choice.
Deleting Documents
You can use this method for deleting one or more documents.
Select Permits or Planning Applications on the Agency Springboard.
Click the row for a permit or planning application to access the detail.
Click the Permit Information or Planning Application Information menu item in the left panel.
Click the Attachments link to view the Attachments page for the permit or planning application.
Click the Edit icon above the grid.
Select one or more documents to delete.
Click the Delete icon.
To delete a single document, go to the Attachments page, and select Delete in the Action menu for the document you want to delete.
Working with Application Comments
This topic discusses how to use comments. You can view, edit, and add comments on the Comments detail page for an application.
Adding Comments for an Application
You view, edit, and add new comments on the Comments page. You can mark comments you use regularly as your favorite and access them easily from the Favorite comments tab. You can also select and post a comment from the Standard comments tab, which lists all the pre-defined comments. In addition, Recent comments tab allows you to select and post comments from a list of recently posted comments.
This example illustrates the Comments page, which is described in the following text.
Viewing and Editing Comments
Select Permits or Planning Applications on the Agency Springboard.
Click the row for a permit or planning application to access the detail.
Click the Comments link in the navigation panel on the left.
You can view the list of comments and select the comment row to view the comment details. The Comment page opens to show the details of the comment.
To view the details of a comment entered earlier click the comment row.
You can edit, delete, or hide the comment from public only if it was entered by you.
Click Save after making changes to the comment.
Adding a New Comment
Select Permits or Planning Applications on the Agency Springboard.
Click the row for a permit or planning application to access the detail.
Click the Comments link in the navigation panel on the left.
Click the Add Comment button to open the Add Comment page and enter a new comment. You can choose to use the Rich Text Editor option for formatting your comment. See Managing Comments documentation to enable the option of Rich Text Editor formatting.
Click Post to post the comment and return to the Comments page.
Adding Favorite, Standard, and Recent Comments
You can also post a comment that is already available in the Community Development service. Click the Select Comments button to open the Select Comments page and select a comment from one of the three tabs of comments – Favorite, Standard, and Recent.
The Favorite tab lists all the comments you have marked as favorite. The Standard tab lists all the predefined comments available in the Community Development service. The Recent tab lists all the comments that were recently posted.
Select a comment from any of these three categories and click the Insert button to post the comment.
See Managing Comments.
Working with Fees and Payments
You view and manage fees and payments associated with a submitted permit or planning application on the Fees and Payments page in the application details.
Fees are calculated based on agency fee setup.
For more information about setting up automatic fee calculations based on permit or planning application type, see Creating Decision Models for Fees.
This example illustrates the Fees and Payments page containing the field values described in the following table.

Viewing Fees and Payments for an Application
Select the Permits or Planning Applications tile on the Agency Springboard.
Click the row for the selected application on the Transactions page.
Click Fees and Payments in the left panel or click the View Details link in the Fees and Payments section on the Overview page for the application.
On the Fees and Payments page, view a list of fees, including this information:
Page Element
Description
Fee Description
The description of the fee item as defined when creating a fee item.
Amount
The amount due for each fee item.
Currency
The currency in which the transaction will be paid.
Status
Canceled: Indicates the fee payment is no longer required.
Pending: Indicates the payment transaction is currently in process.
Hold: Indicates the fee requirement has been put on hold until an issue or condition associated with the application or a permit inspection has been resolved.
Due: Indicates the current fee request is due and needs to be paid.
Department
The department within the agency requiring the payment.
Assessed Date
The date the request for payment was issued.
Payment Date
The date payment was received.
Payment Reference
The payment reference issued for the transaction.
Invoice
The invoice number of the agency associated with the application.
Total Fees
The total amount of fees that may be applicable to the application.
Total Payable
The amount of fees that are designated as payable.
The agency may generate fees that are not due upon application submission and are therefore not payable. For example, plan review or inspection fees may be applied based on whether a plan review or inspection is required or not. Or the agency may place a due fee on hold.
Total Paid
The amount of the total fees already collected.
Balance Due
The remaining portion of the fees yet to be collected.
Adding a Fee Item
Using the Fees and Payments page, you can add additional fees to an application if the situation arises, such as a late fee, an unforeseen processing fee, an addition to the project request, and so on. These fees are assessed outside of the automatic fees process. The Add Fees button is not available when the application status is Pending Payment or Pending Submittal. When the fee status changes to Due, the system sends a notification to the applicant that new fees have been assessed and are due.
To add a fee item:
Click Add Fees in the Fees and Payments grid to display the Add Fee Item page.
Select the appropriate fee from the Fee Item lookup list.
-
Enter the fee required for the item in the Amount field.
Set the status of the fee item using the Status drop-down list, such as Due.
Use the Department lookup list to select the department to collect the fee.
The department defaults from the fee item, if specified. Otherwise, the system uses the department from the Permit Type or Planning Application Type setup.
Set the appropriate date for the fee item using the Assessed Date field.
Use the Memo field to add any additional description to help identify the nature of the newly added fee, which can help answer questions regarding why a fee was added during the application process.
Click Save.
Paying Fees
To add a payment for all fees that are due, click the Pay button. Doing so takes you to the Checkout page, where you can select the payment method.
For more information about paying fees, see the Payment Flow Overview.
Viewing Project Summaries
If a permit or planning application is assigned to a project, agency staff and public users can view a summary of the project in the application details. The permit or planning application can be assigned to multiple projects.
Agencies create projects to group various applications. A project provides a summarized, consolidated view across project-related records, for example, a construction project for a residential building or commercial development. Projects can be simple or more complex, including permits and various compliance requirements through to completion.
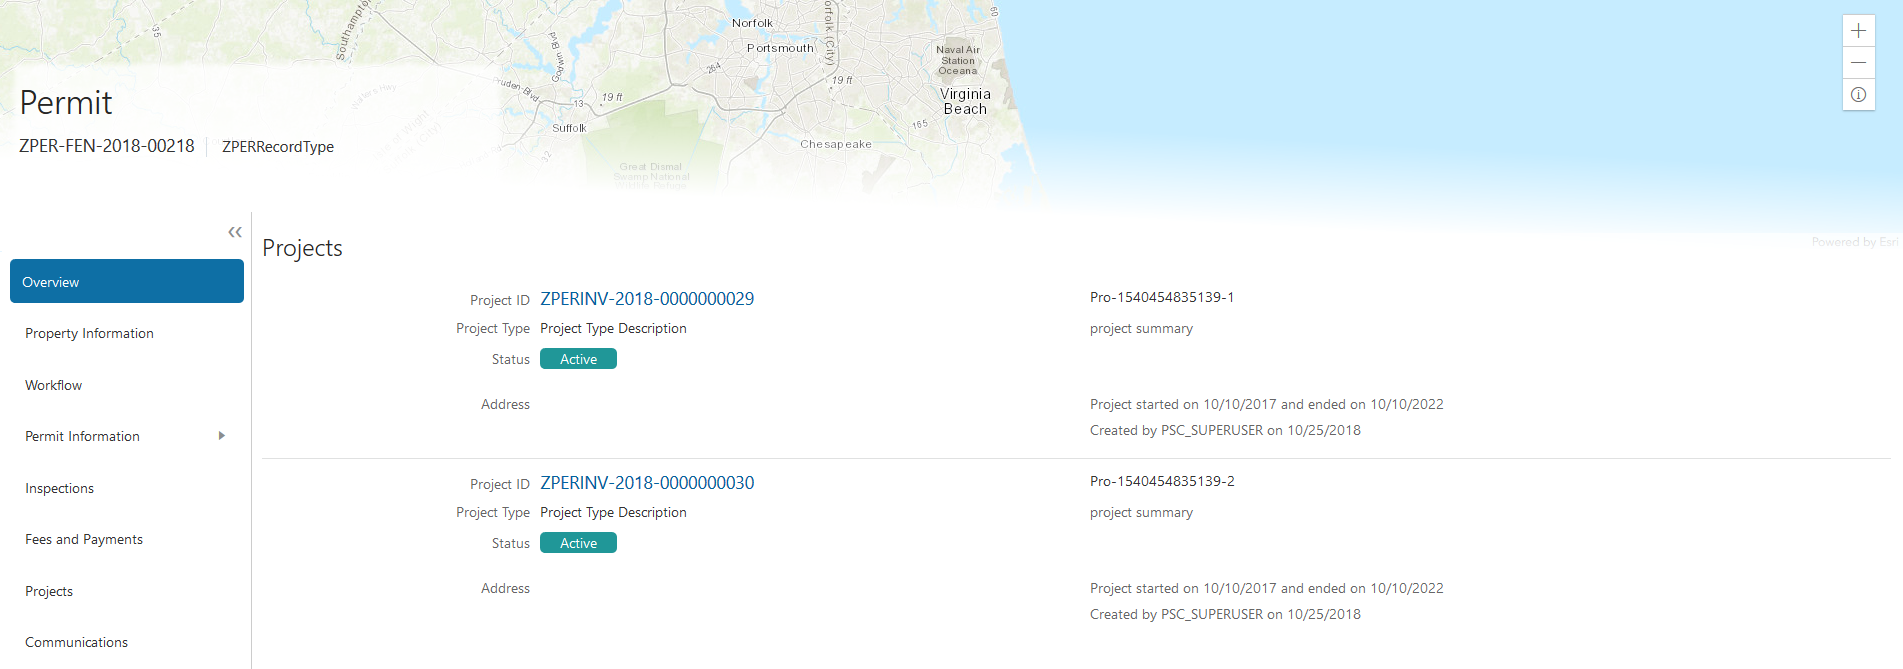
This example illustrates the Projects summary page in the permit details, which is described in the surrounding text.
Viewing the Project Summary
As an agency employee, you can navigate to the project summary in the application details through the Agency Springboard:
Select Permits or Planning Applications on the Agency Springboard.
Click the row for a permit or planning application to access the detail.
Click Projects in the left navigation panel.
On the Projects page, you see a summary of the project that was created by the agency staff on a master projects page.
Page Elements
Description
Project ID
Click the project ID link to access the projects page that was created by agency staff. The project ID is automatically generated after saving the project.
Project Type
Review the project type. A project type is based on the nature of the project and is set up during implementation, for example, Commercial Project or Residential Project.
Status
Review the status of the project. For example, Active, Canceled, On Hold, Inactive, or Completed.
Address
Review the address of the project.
Project Name
Review the name of the project.
Project Summary
Review a summary of the project. The summary can be a long description of the project, as entered by the agency staff.
Project Start Date and Project End Date
Review the start and end dates.
Project Created By
Review the name of the person who created the project.
Working with Application Communications
Application-specific ad hoc messages enable agency staff and applicants maintain correspondence regarding the progress of applications.
Agency users can send ad hoc emails and notifications associated with a specific application on the Communication Details page. Agency staff and applicants can also use the Communication Details page to view a record of the messages associated with a application.
Sending Application Communications
Click Permitsor Planning Applicationson the Agency Springboard.
Select an application on the Transactions page.
Click Communications in the navigation bar.
On the Communication Details page, click Add.
On the Ad Hoc Message page, enter values for the following fields:
Page Elements
Definition
Channel Type
Specify what type of ad hoc message you want to send. Values are:
Email: Generates an email that is sent to users.
Notification: Generates a notification that appears when users click the notification icon in the application.
Note: The fields that are available to define on this page vary depending on the channel type that you select.Visibility
Select which type of user can see this message. Values are:
Account owner
Public user
Agency staff only
MIME Type (Multipurpose Internet Mail Extensions type)
Select the format of the message. Values are:
HTML
Text
Priority
Turn this switch on to display the notification at the top of the notification list.
Note: This field appears only for the Notification channel type.User Can Delete
Turn this switch on to enable users to delete this notification from their notification lists.
Note: This field appears only for the Notification channel type.Select and Insert
These fields enable you to insert variable attributes into your message. You select the field and the attribute that you want to insert in that field, and click Insert to enter a variable for that attribute.
For example, if you select the Body field and the Status attribute, and click Insert, the
${Status}variable is inserted into the Message Body field of the message. When you send this message, the status of the application associated with the message is included in the body text.Create Web Form
Click to access the Web Form modal page where you create a questionnaire that you can insert into your message. For each row of the web form, enter the Question text along with the Answer Type that you expect from the recipient for that question. Possible answer types are:
Date
Text
Number
Click OK to save your web form questionnaire and return to the Ad Hoc Message page. The Create Web Form button displays the number of questions included on the web form in parentheses.
Insert Web Form
Click to insert the web form questions into the body of your message along with a link that the recipient can use to access and respond to the questionnaire.
From
Enter the email address or user ID of the person or organization who is sending the generated email.
Note: Enter email addresses for the Email channel type, and user IDs for the Notification channel type.To
Enter the email addresses or user IDs of the people or organizations that you want to receive the message.
Note: Enter email addresses for the Email channel type, and user IDs for the Notification channel type.Cc
Enter the email addresses of the people or organizations that you want to receive a copy of the message.
Note: This field appears only for the Email channel type.Subject
Enter a brief description of the purpose and content of the message.
Message Body
Enter the main body text of the message.
For the Text MIME type, you can enter only plain, unformatted text.
For the HTML MIME type, you can enter rich text, links, and images.
Click Send.
Viewing Application Communications
Click Permitsor Planning Applicationson the Agency Springboard.
Select an application on the Transactions page.
Click Communications in the navigation bar. The Communication Details displays all of the messages that are associated with the application.
For each row on the Communication Details page you can:
Click the Actions icon to resend or forward the message.
Select the Resend action to access the message in the Message Details modal page in display-only mode. Click Resend to send the message another time to the same list of recipients.
Select the Forwardaction to access the message in the Message Details modal page. Enter new recipient email addresses, update the message if necessary, and click Forward to send the updated message to the new recipients.
Click the View More Details button to view detailed information about the message.
Working with Ad Hoc Communications
Ad hoc communications enable agency staff to create and distribute alerts, emails, and notifications.
Agency staff can create and update ad hoc communications on the Communication Center page.
Alerts appear as text in the banner of the Agency Springboard or the landing pages for anonymous or registered users. Emails are messages sent to anonymous or registered users, and accessed through an email client. Notifications appear when registered and signed-in users click the notification icon at the top of the page in Oracle Public Sector Community Development.
Adding Ad Hoc Alerts
Select in the Navigator, or click Communication Center on the Agency Springboard.
On the Alerts tab of the Communication Center page, click Add.
On the Alert Details page, enter values for the following fields:
Page Element
Description
Reference Name
Enter a unique name for the alert.
Start Date Time and End Date Time
Enter the date and time when the alert starts and stops displaying.
Enabled
Turn on the switch to activate the alert.
To
Enter a value for the target recipients of the alert:
Individual Registered Users
Enter comma-separated user IDs for the registered users, for example,
SYSTEM_ADMIN,BUSINESS_ANALYST.All Registered Users
Enter this attribute:
${User}. The application displays the alert when the registered user logs in.All Anonymous Users
Enter this attribute:
${Anonymous}.A Combination of Users
Enter a string including comma-separated user IDs for the registered users,
${User}for all registered users, and${Anonymous}for all anonymous users.
Message Body
Enter the main body of the alert using plain, unformatted text.
Select and Insert
These fields enable you to insert variable attributes into your message. You select the field and the attribute that you want to insert in that field, and click Insert to enter a variable for that attribute.
For example, if you select the Body field and the Current Date attribute, and click Insert, the
${Current Date}variable is inserted into the Message Body field of the alert. When the application displays this alert, the current date is included in the body text.Remarks
Enter any reference information for agency use. These remarks are not included in the displayed alert.
Click Save.
Modifying Ad Hoc Alerts
Select in the Navigator, or click Communication Center on the Agency Springboard.
Select an alert on the Alerts tab of the Communication Center page.
On the Alert Details page you can:
Update the alert field values.
Delete the alert. You will be prompted to confirm the permanent deletion.
Click Save.
Deleting Ad Hoc Alerts
Select in the Navigator, or click Communication Center on the Agency Springboard.
On the Alerts tab of the Communication Center page click Edit.
Select the check boxes next to the alerts that you want to delete.
Click Delete. You will be prompted to confirm the permanent deletion.
Sending Ad Hoc Notifications and Emails
Select in the Navigator, or click Communication Center on the Agency Springboard.
On the Emails and Notifications tab of the Communication Center page, click Add.
On the Message Details page, enter values for the following fields:
Page Elements
Definition
Channel Type
Specify what type of ad hoc message you want to send. Values are:
Email: Generates an email that is sent to users.
Notification: Generates a notification that appears when users click the notification icon at the top of the page in the application.
Note: The fields that are available to define on this page vary depending on the channel type that you select.Visibility
Select which type of user can see this message. Values are:
Account owner
Public user
Agency staff only
MIME Type (Multipurpose Internet Mail Extensions type)
Select the format of the message. Values are:
HTML
Text
Priority
Turn this switch on to display the notification at the top of the notification list.
Note: This field appears only for the Notification channel type.User Can Delete
Turn this switch on to enable users to delete this notification from their notification lists.
Note: This field appears only for the Notification channel type.Reference
Enter a unique alphanumeric reference for the communication.
Select and Insert
These fields enable you to insert variable attributes into your message. You select the field and the attribute that you want to insert in that field, and click Insert to enter a variable for that attribute.
For example, if you select the Body field and the Current Date attribute, and click Insert, the
${Current Date}variable is inserted into the Message Body field of the alert. When the application displays this alert, the current date is included in the body text.Create Web Form
Click to access the Web Form modal page where you create a questionnaire that you can insert into your message. For each row of the web form, enter the Question Text along with the Answer Type that you expect from the recipient for that question. Possible answer types are:
Date
Text
Number
Click OK to save your web form questionnaire and return to the Message Details page. The Create Web Form button displays the number of questions included on the web form in parentheses.
Insert Web Form
Click to insert the web form questions into the body of your message along with a link that the recipient can use to access and respond to the questionnaire.
From
Enter the email address or user ID of the person or organization who is sending the generated email.
To
Enter a value for the target recipients of the message.
For notifications, enter comma-separated user IDs for the registered users, for example,
SYSTEM_ADMIN,BUSINESS_ANALYST.For emails, enter comma-separated email addresses for the recipients, for example,
john.doe@example.comCc
Enter the email addresses of the people or organizations that you want to receive a copy of the message.
Note: This field appears only for the Email channel type.Subject
Enter a brief description of the purpose and content of the message.
Message Body
Enter the main body text of the message.
For the Text MIME type, you can enter only plain, unformatted text.
For the HTML MIME type, you can enter rich text, links, and images.
Click Send.
Viewing Ad Hoc Emails and Notifications
Select in the Navigator, or click Communication Center on the Agency Springboard.
For each row on the Emails and Notifications tab of the Communication Center page you can:
Click the Actions icon to resend or forward the message.
Select the Resend action to access the message in the Message Details modal page in display-only mode. Click Resend to send the message another time to the same list of recipients.
Select the Forwardaction to access the message in the Message Details modal page. Enter new recipient email addresses, update the message if necessary, and click Forward to send the updated message to the new recipients.
Click the View More Details button to view detailed information about the message.
Using Maps
Maps provide a convenient way for both agency staff and public users to see application locations and to select parcels when starting an application.
Map functionality relies on integration with a third-party map service such as Esri Global Information Systems (GIS).
This example shows some of the options on the Explore Your City map for registered public users.
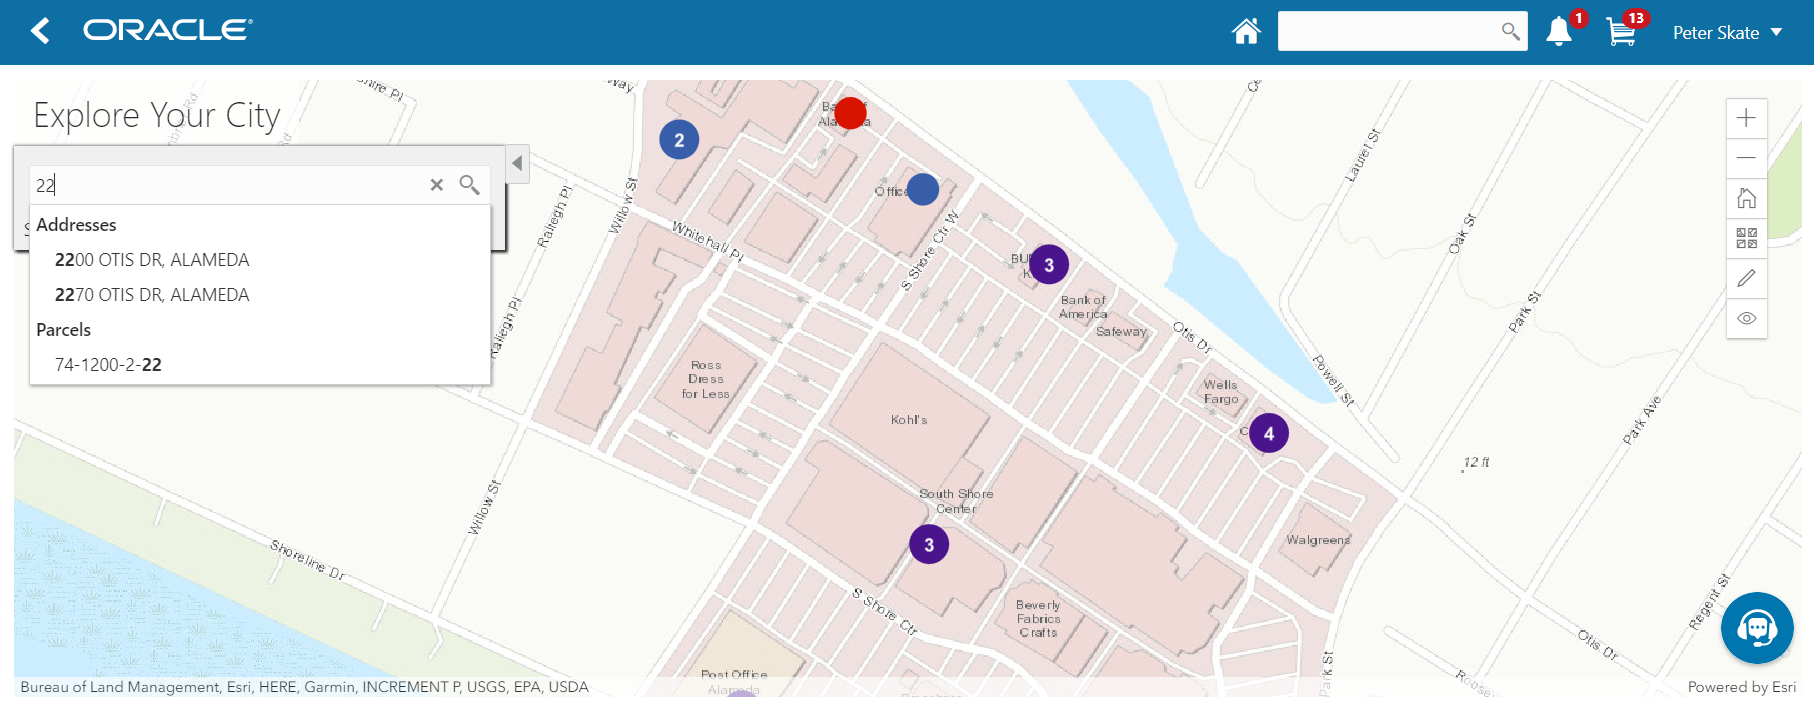
Pages With Maps
The following table describes how you access and use maps throughout the system:
| Page and Users |
Navigation |
Usage |
|---|---|---|
| Main Map page (agency staff) |
Click the Main Menu icon in the page header. |
View application locations on a map. Select parcels by searching or by drawing on the map, and start applications for selected parcels. Search applications by address or parcel number, and filter applications by start date, end date, and application type. |
| Explore Your City page (anonymous and registered public users) |
Click the Explore Your City tile on the landing page. |
All public users can view and search applications and select parcels. Registered users can additionally filter applications so that only the user’s own applications appear on the map. Also, registered users can start new applications for parcels that they select. |
| Application list pages:
|
|
View map markers for listed applications. The map view of these pages has a left frame that lists the applications. Clicking a specific application zooms the map to the application location. |
| Detail pages for an individual application (agency staff and registered public users):
|
From the Applications page or the Transactions page, access an individual application in the list. |
If the application is associated with a parcel address, the map at the top of the page includes a map marker to indicate the primary address for the application. If the application is not associated with a location, the map displays a default area that your agency configures. |
| Property Picker map (agency staff and registered public users) |
|
Choose a parcel on the map, then add it to the current application. |
| Generate Notifications List page (agency staff) |
From the Planning Application detail page, click Planning Application Information in the left panel, then click the Hearing link. Locate the hearing, then select the Actions button and choose Generate Notifications from the menu that appears. |
Create a notification zone by specifying a distance from selected parcels. This page is accessed from a hearing for an application, and the parcels from the application are automatically selected. You can change the selection if necessary. After creating a notification zone, download .csv files with parcel, address, and owner information for all parcels that are at least partially within the zone. |
| Parcel detail pages (agency staff) |
Click the Parcel tile on the agency springboard to access the parcel list, then drill into an individual parcel |
The map above the parcel detail pages displays a marker at the parcel address. |
| Address detail pages (agency staff) |
Click the Property Address tile on the agency springboard to access the address list, then drill into an individual address. |
The map above the address detail pages displays a marker at the specified address. |
Generic Map Tools
The main toolbar on any map has tools that relate to the map itself, without regard to applications.
Use map profiles to configure which tools are available on the main toolbar. Different maps support different tools. For information on configuring which tools appear in the main map toolbar, see Setting Up Map Profiles
These are the generic map tools that can appear on the main map toolbar:
| Image |
Name |
Description |
|---|---|---|
 |
Zoom In and Zoom Out |
These standard zoom controls are available for all maps. You can also double-click a map location to zoom in. |
 |
Show Default Map View |
Click to restore the map to its default display area. Use map profiles to configure whether this button appears on the toolbar. |
 |
Select Base Map |
Click to display a pop-up window with a gallery of map options such as Streets or Topographic. Use map profiles to configure whether this button appears on the toolbar. |
 |
Select Layers |
Click to display a pop-up menu for changing the visibility of various map layers. Examples of layers include the parcel layer and address layer provided by the map service. To hide the pop-up menu, click the button again. Use map profiles to configure whether this button appears on the toolbar. |
 |
Show Attribution (for maps in page headers) |
Click to display a pop-up window that identifies the third-party map sources. This toolbar button is not configurable. Some maps have this button, while other maps, such as Explore Your City, display attribution information across the bottom of the map page. |
|
Identify GIS Information (for maps that are not in page headers)
|
Click to enable the display of object details for map objects (such as parcels) that you click. Details appear in a pop-up window. To stop displaying object details, click the button again to turn off the option to identify GIS information. The location of the pop-up window depends on the docking settings in the map profile. Use map profiles to configure whether this button appears on the toolbar. |
 |
Show Selection Tools or Hide Selection Tools |
Click to show or hide a toolbar with drawing tools. Use the drawing tools to select parcels on the map. This button is not configurable. It appears on the Main Map and Explore Your City map. |
 |
Show Transactions |
Click to display the Show Transactions pop-up window. This window has controls for showing or hiding transactions on the map and for filtering those transactions by date or by the kind of application (permit application or planning application) |
Map Markers
Map markers identify the location of an object such as an application, a parcel, or an address.
This example illustrates the Parcel page, where the map marker shows the parcel’s location. Similar markers appear on the detail pages for applications, addresses, and property owners.
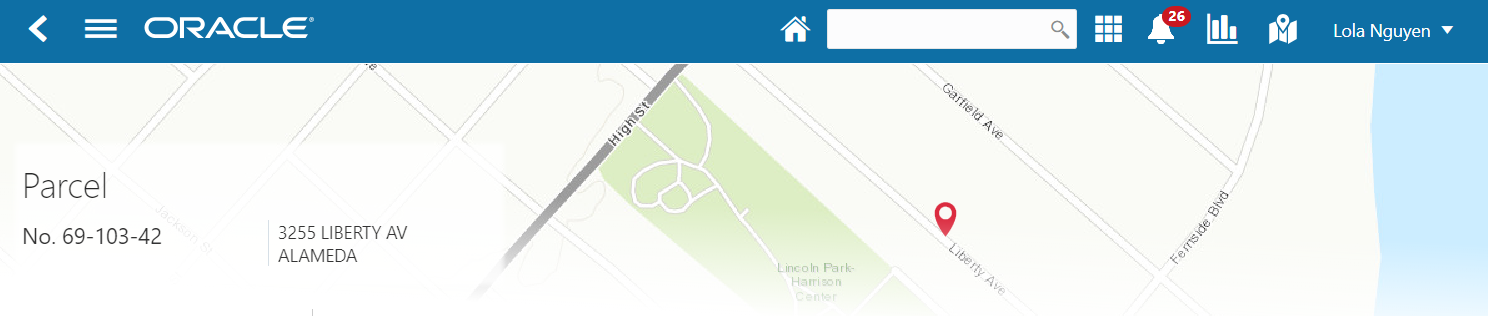
This example illustrates the Explore My City page, where map markers show application locations. Numbers on markers indicate the number of applications associated with the location. When there is just one application, the marker does not have a number.
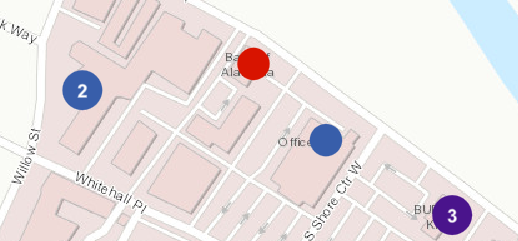
Each color represents different types of transactions:
| Application Map Marker |
Description |
|---|---|
| Red |
One or more permit applications for the same location. |
| Blue |
One or more planning applications for the same location. |
| Purple |
A mix of permit applications and planning applications for the same location. |
Viewing Application Details
Clicking an application marker displays a pop-up window with additional details. (However, if the selection toolbar is visible and there is an active selection tool, clicking performs the selection action rather than opening the details pop-up.)
This example illustrates the detailed information for a map marker. The location of the pop-up window depends on the docking settings in the map profile
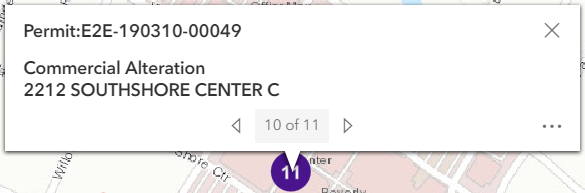
The detail window includes this information:
| Map Marker Detail |
Description |
|---|---|
| Permit or Planning Application followed by the application number |
Identifies whether this is a permit application or a planning application, and identifies the individual application. |
| <Application Type> |
Identifies the specific permit application type or planning application type. |
| <Address> |
Identifies the location for the application. |
| <sequence number> of <total number of applications> and controls for paging through multiple applications. |
Indicates that there are multiple applications associated with the marker, and enables you to page through the applications. |
 Button to display an action menu. |
Click to open a menu with these actions:
|
Searching for Applications and Parcels On Maps
This table describes search, filter, and selection functions on various maps.
| Map |
Description |
|---|---|
| Main Map (agency staff) Explore My City (public users) |
These maps have robust options for working with parcels and applications, including:
For more detailed information about working with the Main Map and the Explore My City map, see Using the Main Map and Explore Your City Map. |
| Transactions (agency staff) Applications (registered public user) |
On these list pages, the map view shows the location of the listed applications. The search and filter options in the map view are the same options that you have in the list view. The map view includes a left frame with a list of permits, and you can click a permit to zoom to its marker on the map. |
| Generate Notifications List (agency staff) |
This maps has the same parcel selection options as the Main Map, including:
|
| Property picker map within an application (all users) |
The property picker map has a single search field where users can enter an address. If a match is found, the map zooms to the to the desired location and displays a pop-up box that points to the location so the user can click it to select the parcel. Clicking a parcel on the map retrieves the parcel identifier from the map service. This value is used as criteria for searching the Parcel table, and the search results appear in a modal window. As long as the parcel number has a unique match in the Parcel table, the search results include just one value, representing the selected parcel. From the search results window, you can select the parcel and add it to the application. |
Using the Property Picker to Select a Parcel for an Application
The property picker is a map-based tool for choosing the parcel to association with an application.
To select a parcel using a map:
Access the page where you select a parcel to associate with the application:.
-
In an unsubmitted application, find the Property section and click the Select button.
In a submitted application, access the application detail page, click the Property Information link, and find the Parcel List section.
-
Click the Find Parcel on Map icon to open the map-based property picker.
Use map tools such as searching or zooming to locate the parcel on the map.
Click the parcel.
The map closes, and the Search Property window opens. The system searches properties using the parcel ID provided by the map service, so the list of search results shows the parcel that you selected.
Select the check box for the parcel.
Click the Add Selected button.
The selected parcel is now added to the application.
Using the Main Map and Explore Your City Map
The agency-facing Main Map and the public-facing Explore Your City map provide a variety of options for viewing existing applications on the map and for selecting parcels so that you can start new applications.
To provide different types of users with the most appropriate interface, there are separate main maps for agency users, registered public users, and anonymous public users. These maps have different map profiles, giving you control over whether various map options are available to each audience. However, these maps provide the same functionality, enabling users to:
Search for and select parcels, and then start an application for the selected parcels.
View transaction locations on the map.
There are some differences depending on whether the user is a registered public user, an anonymous user, or agency staff. These differences are noted in the documentation.
This example shows the Explore Your City map for registered public users.
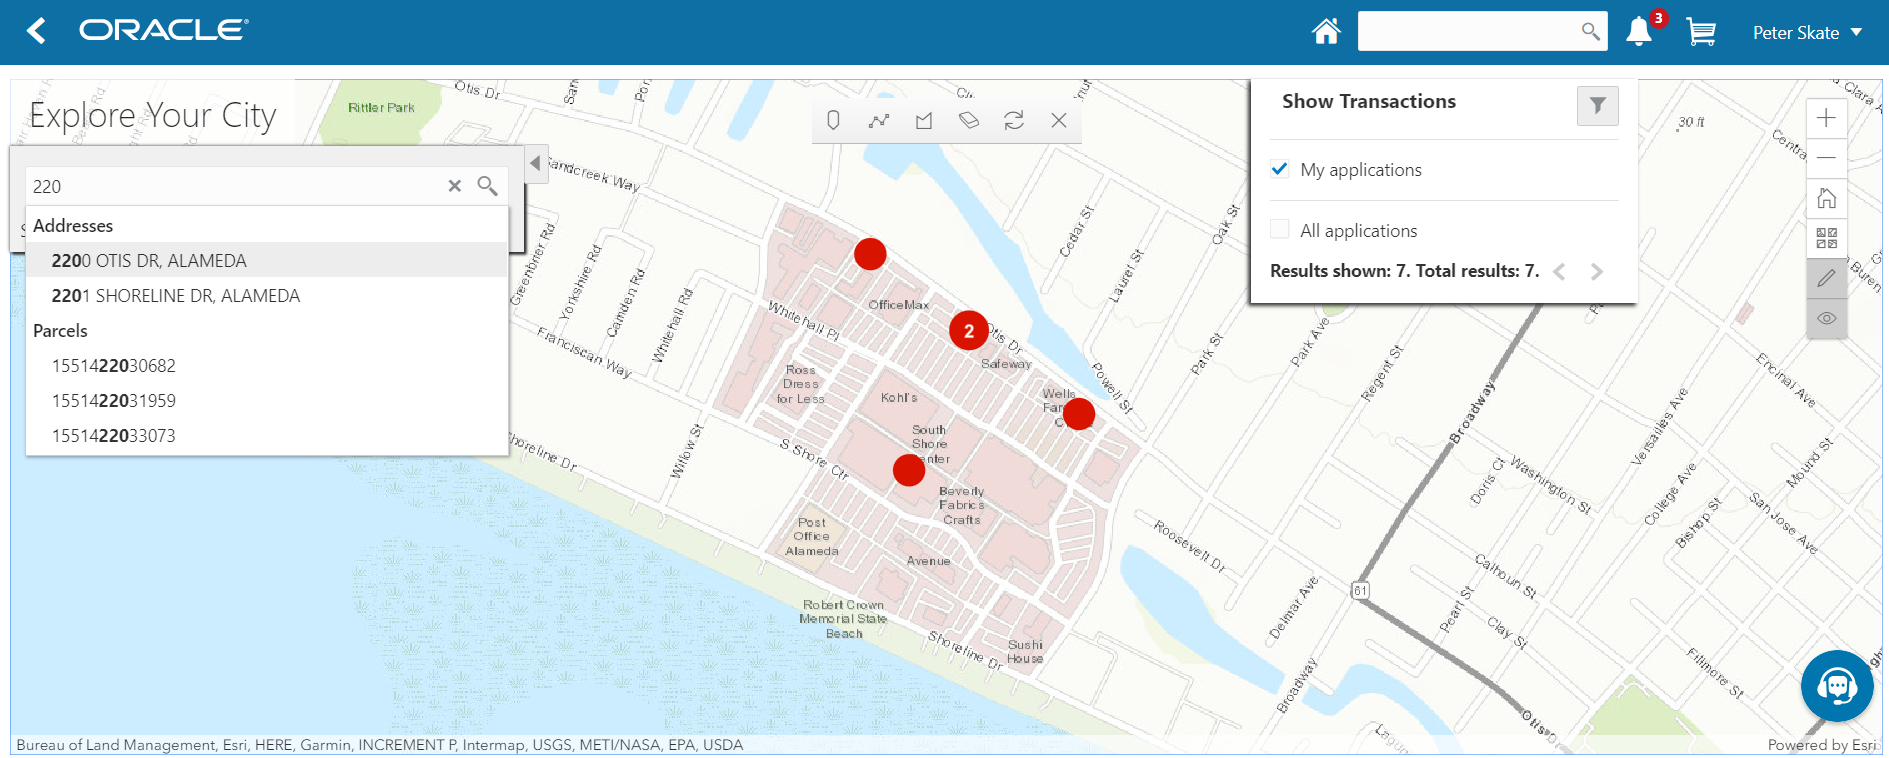
Selecting Parcels
Selecting parcels on the map enables you to start applications for those parcels. The system brings the parcel information into the application intake form.
To select parcels, use the search feature, or the drawing tools on the selection toolbar, or a combination of both. When parcels are selected:
-
The parcel polygons on the map are solid blue, and parcels with existing applications have an application marker (a circle).
If a parcel has multiple applications, the circle displays the number of applications.
The Selected Locations overlay replaces the Search overlay and provides additional information about the selected locations.
Apply and Guide buttons appear so that you can start an application for the selected parcels.
The Guide button tile links to a questionnaire set up with Oracle Policy Automation (OPA). It appears only if your agency has implemented this functionality.
Anonymous public users cannot start applications, so they don’t see the Apply button. They still see the guide button.
This example shows a map with selected parcels.
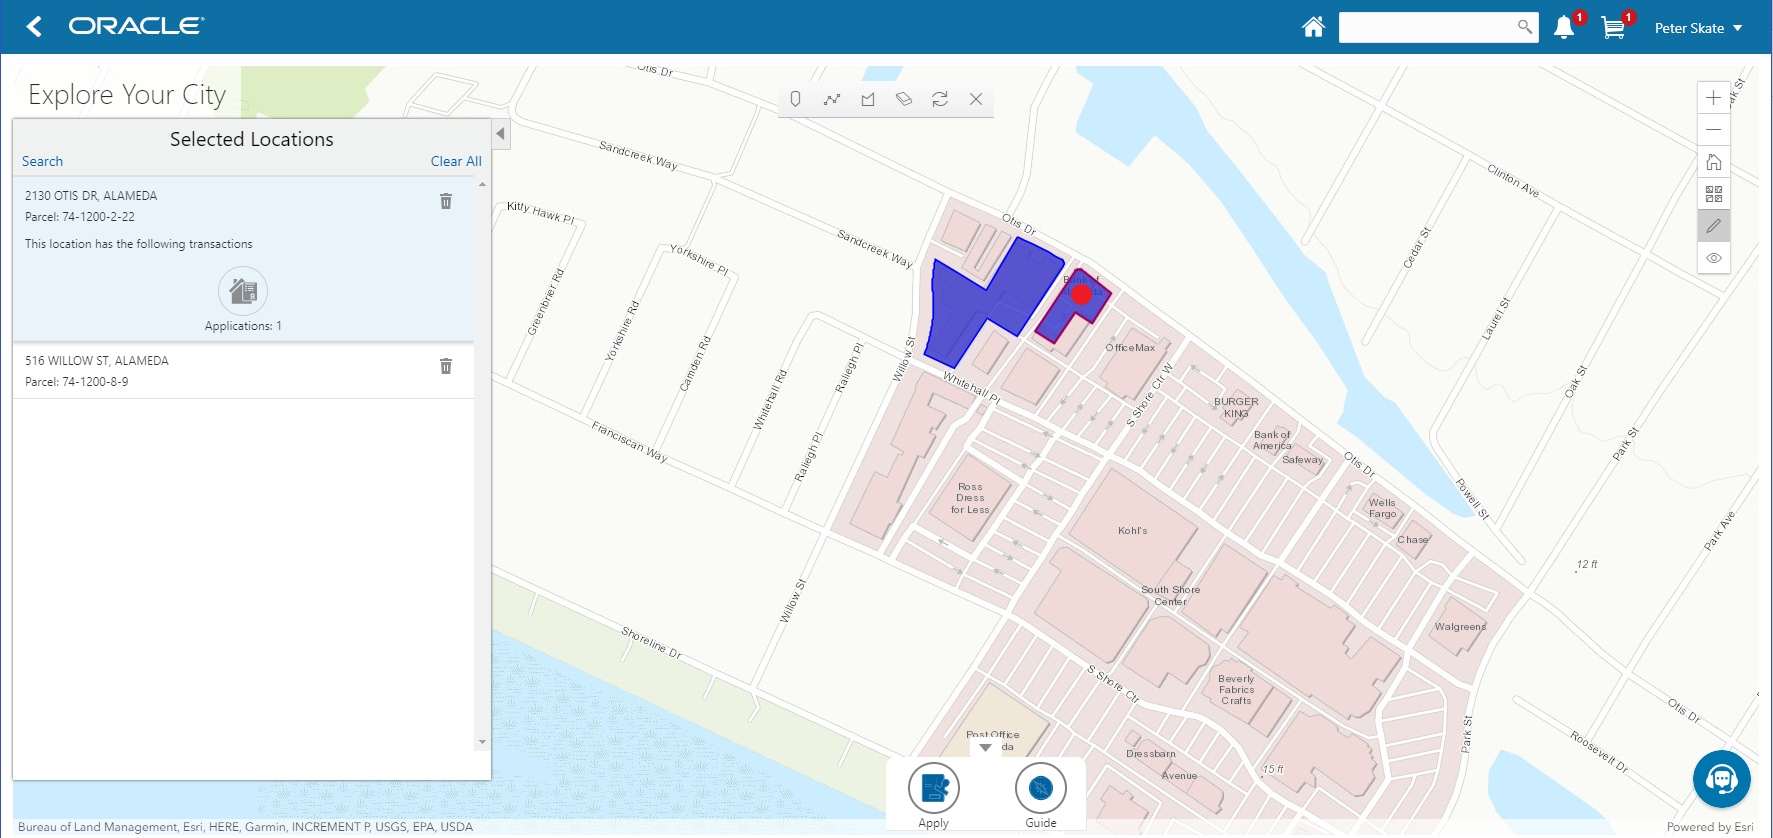
To select and deselect parcels using the Search overlay:
Enter a full or partial address or parcel number in the search field.
As you type in the search field, up to five matching addresses parcels appear in a type-ahead drop-down list. The type-ahead list includes headings to indicate which items are Addresses and which are Parcels.
Press the Return key or click the magnifying glass icon to perform a full search.
The Search window expands to show lists for Addresses and Parcels with a count for each type of result. Initially a maximum of five items appears in each list.
If more results exist, click the More link to show all results in a scrolling list. When the list is expanded, click the Less link to shrink the list back down to five locations.
To select a parcel, click a single address or parcel number from either the type-ahead list or the full results list.
The corresponding parcel on the map is selected, and the search field is replaced by the Selected Locations list.
To deselect a single parcel from the Selected Locations list, click the Delete icon for that parcel.
To deselect all parcels from the Selected Locations list, click the Clear All link at the top of the list.
To re-display the search field without losing your selection, click the Search link.
Perform as many searches as needed to select the desired parcels. Each time you select a parcel, it is added to the Selected Locations list.
To return to the Selected Locations overlay from the Search overlay without performing a search, click the Selected Locations link.
This link appears if at least one parcel is selected.
To select and deselect parcels using drawing tools:
- Click the Show Selection Tools button on the map’s general toolbar.
The drawing toolbar appears.
Use these tools to make your parcel selection:
Selection Toolbar Button
Description

Draw a Point
Click one or more points on the map to select the parcels that contain the points.

Draw a Polyline
Click two or more points on a map to draw a multi-segment line (a polyline) connecting the points that you click. Double-click on the final point to stop drawing. All parcels that intersect the resulting polyline are selected.

Draw a Polygon
Click three or more points on a map to draw a polygon. The system redraws the polygon after each click. Double-click on the final point to stop drawing. All parcels that are at least partially within the resulting polygon are selected.

Deselect One
Click a selected parcel to deselect it.
Note: Selecting a parcel does not deselect previously selected parcels. You must use the Deselect One or the Deselect All tool to remove parcels from your selection.
Deselect All
Click this button to deselect all parcels.

Close
Click to close the toolbar.
Review details of your selections on the Selected Locations list.
The Selected Locations list replaces the search window whenever parcels are selected.
Working With the Selected Locations List
The Selected Locations overlay enables you to review information about the locations you have selected. It also provides options for deselecting individual locations or all locations.
This example illustrates the Selected Locations overlay.
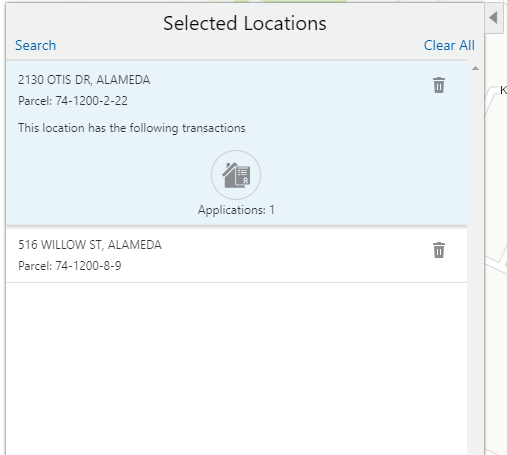
To use the Selected Locations overlay:
Review the address and parcel information for locations that you selected.
Each selected location appears on a card.
When you select a parcel, the card represents the parcel. If the parcel has multiple addresses, a link on the card shows the number of addresses, and clicking the link displays the complete list of addresses.Click a location card to select it and learn more about the parcel.
On the map, the polygon for the selected location is outlined. If the parcel is associated with existing applications, an application marker also appears on the selected parcel.
If the selected parcel is associated with applications, the card expands and displays an Applicationsicon with an application count. If the parcel is not associated with any applications, the selected card looks the same as it does when it’s collapsed.
To see a list of applications for a parcel, click the Applications icon.
The Applications list replaces the Selected Locations list. The list includes these elements:
Page Element
Description
<Address> and Parcel ID for the parcel.
The identifying information for the parcel appears at the top of the list.
<Application ID> and Application Type>
The first column in the application list displays identifying information about the application.
<Application Status>
The second column in the application list displays the application status.

The last column in the application list displays the Go icon. Click this icon to open the appropriate application details page (the Permit page or the Planning Application page) in a new window.
To return to the Selected Locations list, click the return button in the window header.
Starting an Application
The purpose of selecting parcels on a map is to start an application for the specified location.
To start an application:
Confirm that the correct parcels are selected.
To go to the Apply page, click the Apply button.
This button is not visible to anonymous public users.
The Apply page provides multiple options to help you choose the correct application type and start the application.
As long as the application intake form includes a Property section, the property information will be pre-filled based on the parcels that were selected when you clicked the Apply button.
See also Starting an Application.
To use the Guide to choose an application type, click the Guide button.
The Guide is a questionnaire to help identify the recommended applications for a project. The Guide button is available only if an Oracle Policy Automation (OPA) definition is associated with the agency record. For more information, see Setting Up Agencies and Managing OPA Policies for Agency.
If you start an application at the end of your guided questionnaire, the property information section of the intake form will be pre-filled based on the parcels that were selected when you clicked the Guide button.
Showing Transactions
Agency staff, registered public users, and anonymous public users can all view transaction markers on the map. Registered public users can additionally filter the map to show only their own transactions.
To show transactions on the map:
- Click the Show Transactions button on the map’s general toolbar.
The Show Transactions overlay appears.
In the Show Transactions overlay, use these check boxes to choose if map markers identify application locations:
Page Element
Description
All Applications
When you select this check box, the map displays markers for all applications in the mapped area. Deselecting this check box clears the map markers.
My Applications
Only registered public users see this check box. They can select this check box to filter applications so that only the user’s own applications are marked on the map. Deselecting this check box clears the map markers.
This check box and the All Applications check box are mutually exclusive, so selecting one deselects the other.
If you choose to show map markers, use the Results Shown message at the bottom of the window to see how many map markers are shown.
The message informs you how many results have been mapped and how many total results exist. The number of results shown is based on the whole map extent and does not change as you zoom and pan.
Users can see up to 200 results at a time. If more than 200 results exist, use the Previous (<) and Next (>) icons to scroll to a different block of results and update the map to show markers for the new block of results.
To filter applications by date or by the type of application (permit versus planning):
 Click the Filter By button to display additional filter fields.
Enter filter criteria in these fields:
Page Element
Description
Start Date
If you enter a start date, only applications that were submitted on or after this date are included.
End Date
If you enter an end date, only applications that were submitted on or before this date are included.
Type
Select Permit or Planning Application to show just one kind of application. To go back to seeing all applications, clear the selection by choosing Type.
Click Apply.
The filter section of the window is hidden, and the Filter By icon changes from gray to blue to show that filters are active.
To clear filters, display the filter area and click the Clear button.
- To close the Show Transactions overlay, click the Show Transactions button on the map’s general toolbar again.