3Setting Up Planning Applications
Setting Up Planning Application Types
Define the types of planning applications supported by an agency, including pre-applications. You add a planning application type and associate workflow process definitions on the Planning Application Type definition page.
Before you can create an application form, you must first create a planning application type on the Planning Application Type definition page. The type defines attributes that will be available on the planning application.
This example illustrates the Planning Application Type definition page, which is described in the following sections.
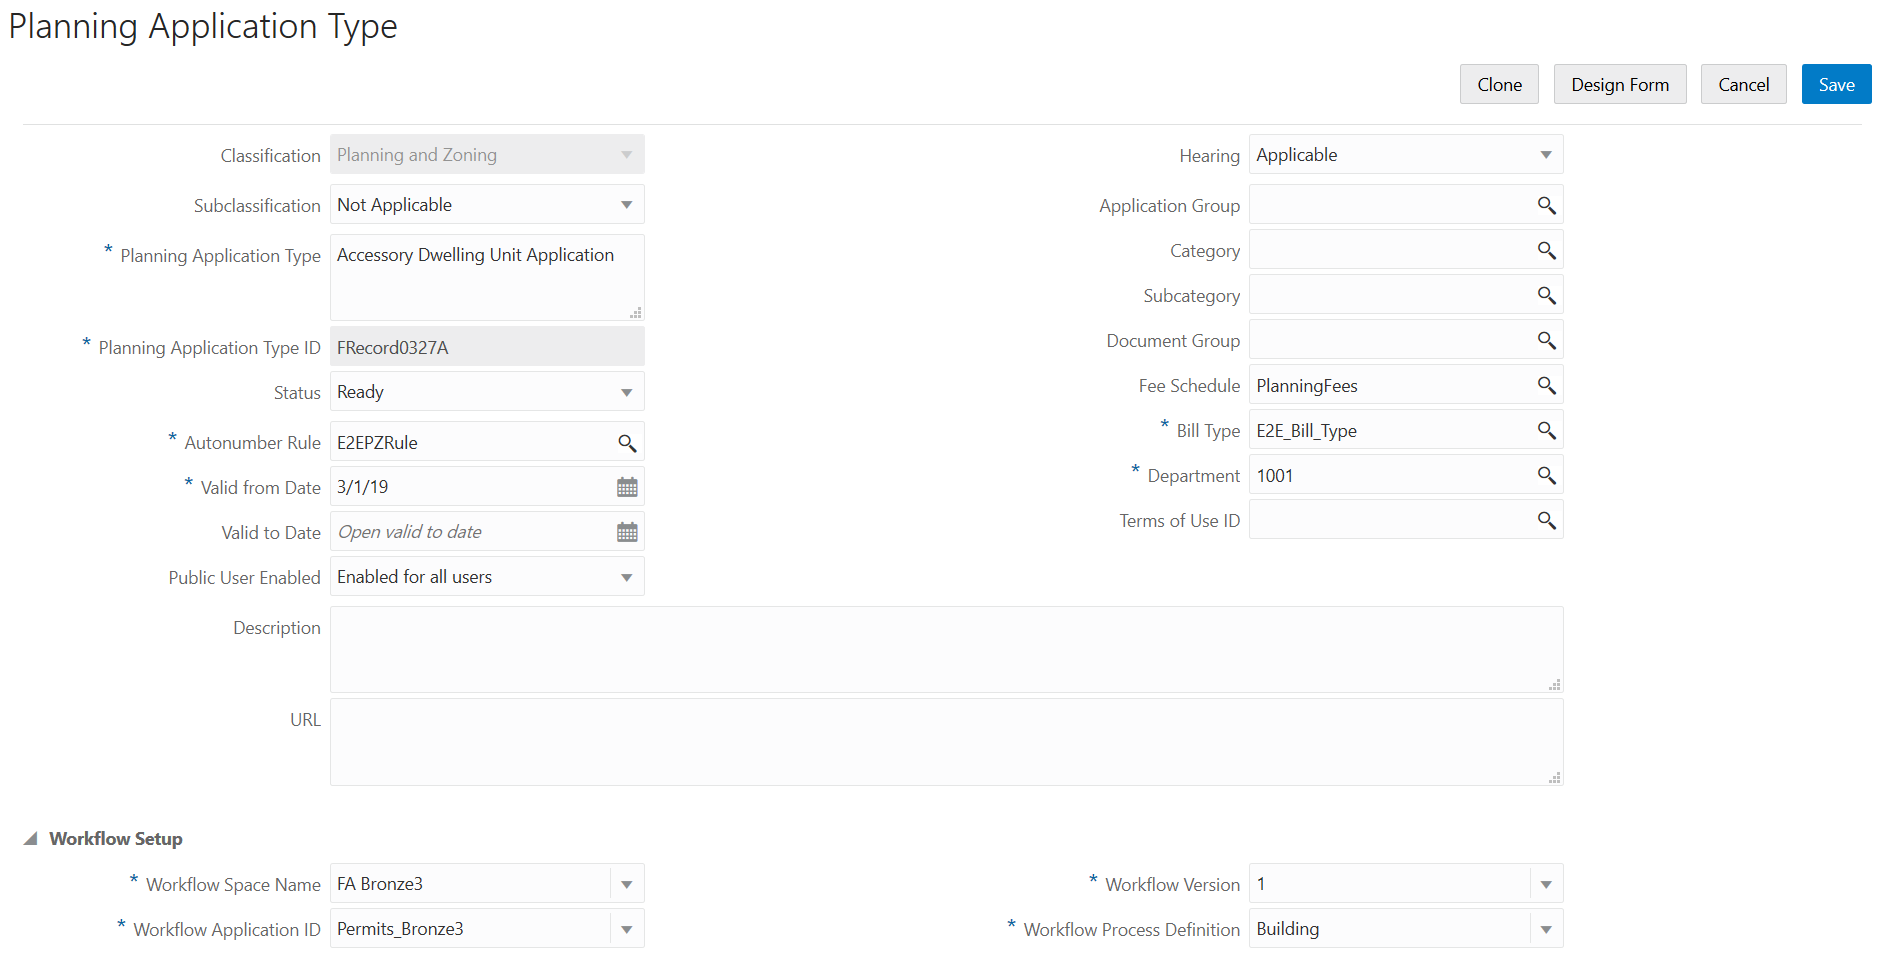
Adding Planning Application Type Definitions
Select .
On the Transaction Type – Planning Applications page, click the Add button.
On the Planning Type Applications page, enter values for the following fields:
Page Element
Description
Classification
Displays the type of application. The classification for this page indicates this is a planning application.
Subclassification
Displays the type of application.
If you would like to create a pre-application type, select Pre-Application from the drop-down list. The default value is Not Applicable, which indicates a standard planning application.
Planning Application Type
Enter a name for the type of planning application.
Planning Application Type ID
Enter a unique alphanumeric code or short name for the planning application type. Do not use special characters, including symbols or punctuation, or spaces.
Status
Select from the following to indicate the planning application type status:
Preliminary: The planning application type is being defined but is not available for use.
Ready: The planning application type is enabled for immediate use.
Note: The application setup must be published in the form designer prior to setting the planning application status to Ready.Void: The planning application type is no longer available.
Autonumber Rule
Select the autonumbering rule to increment numbers for planning applications.
For more information, see Setting Up Autonumbering.
Valid from Date and Valid to Date
Enter a range of dates when this planning application type is valid. The default from date is the current date. The default end date is Open. You can update these dates as needed.
Public User Enabled
Select from the following to indicate whether this planning application type is enabled for public users:
Enabled for all users
Enabled for registered users
Not enabled for public users (default)
For a newly created application type, this is always set to Not enabled for public users. When you are ready to publish the new application form, update this value. See Publishing Intake Forms.
Hearing
Select whether public hearings are applicable or not applicable to this planning application type.
For more information, see Setting Up Hearing Bodies, Setting Up Hearing Hierarchies, and Setting Up Hearing Decisions.
Application Group
Select an application transaction group that you want to associate with the planning application type.
For more information, see Setting Up Transaction Groups.
Category
Select a transaction category that you want to associate with the planning application type.
For more information, see Setting Up Transaction Categories.
Subcategory
Select a transaction subcategory that you want to associate with the planning application type.
For more information, see Setting Up Transaction Subcategories.
Document Group
Select a document group to manage attachments for the planning application type. For more information, see Setting Up Document Groups.
Fee Schedule
Select a fee schedule that you want to associate with the planning application type. A department is required when you enter a fee schedule ID.
For more information, see Setting Up Fee Schedules.
Bill Type
Select a bill type to associate with the planning application type.
The billing type identifies the type of invoice that can be generated from the record. The bill type is required.
For more information, see Setting Up Bill Types.
Department
Select a department that you want to associate with the planning application type. A department is required if you add a Fee Schedule ID to the planning application type.
If a department is specified on the Fee Item setup page, the fee item department overrides the department specified here on the planning application type.
For more information, see Setting Up Departments.
Terms of Use ID
Select a terms of use definition to associate with the planning application type. The available values for planning applications are determined by the usage on the terms of use ID.
For more information, see Setting Up Terms of Use.
Description
Enter a description of the planning application type that appears on the Apply page, where a user initiates an application.
URL
Enter a URL to provide a link to more information about the planning application type on the Apply page, where a user initiates an application.
Setting Up Workflow for a Planning Application
You set up workflow using the Oracle Autonomous Integration Cloud (OIC) before associating the workflow with the planning application type.
For more information, see Setting Up Process Definitions for Workflow.
Select .
On the Transaction Type – Planning Applications page, click the Add button.
In the Workflow Setup section on Planning Application Type page, enter values for the following fields:
Page Element
Description
Workflow Space Name
Enter the space where the workflow process application is stored. You can group related applications in a space as well as enable users to collaborate when developing applications.
Workflow Application ID
Enter the name of the workflow process application in OIC. For more information, see Creating and Managing Applications.
Workflow Version
Enter the version of the workflow process application.
Workflow Process Definition
Enter the name of the workflow process definition that applies to this particular planning application.
Saving a Transaction Type
When you first save a transaction type definition, it may take a few moments to complete. On the first save, the system:
Saves all the transaction type attributes.
Creates the custom database objects (such as view objects).
Creates the REST endpoint for that transaction type.
Creates the Fusion Application sandbox needed for developing the application form layout.
Cloning Planning Application Types
Click the Clone button to create a clone of the current planning application type, which you can then use to create a different planning application or to create a different version of the current planning application.
For more information on cloning permits and planning applications, see Cloning Transaction Type Definitions.
Designing Planning Application Forms
After you have entered the appropriate initial information for the planning and zoning type, you can then begin to design the intake form that end users will use to submit an online application for a permit. You create an intake form using the designer. You access the designer by clicking the Design Form button.
For more information on designing intake forms, see Using the Intake Form Designer.
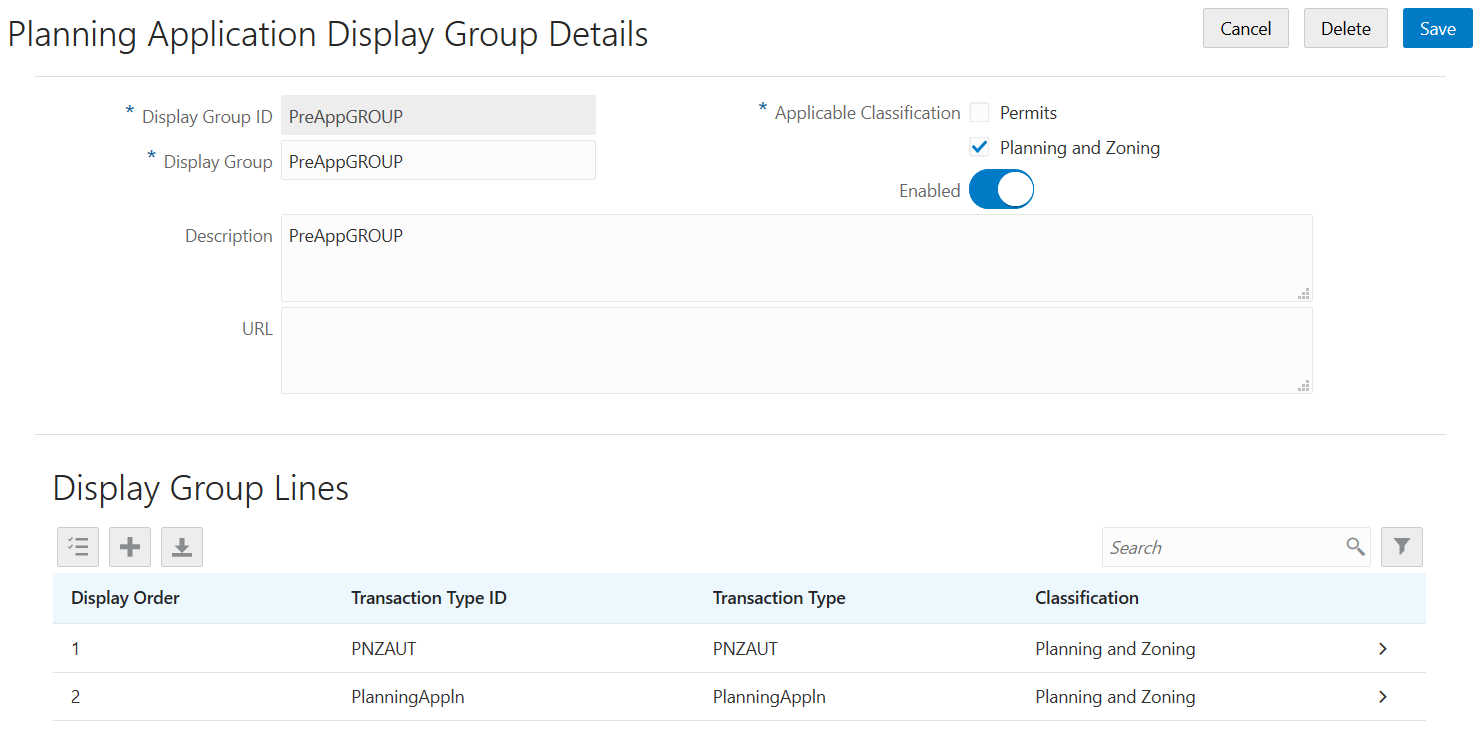
Setting Up Planning Application Display Groups
Use the Display Group setup pages to add planning application display groups that appear on your agency’s landing page, where a user starts an application.
A planning application display group identifies a meaningful grouping of permit and planning application types displayed as a list on the Apply page. The list appears as the permits and planning applications that agency staff or guest users can select to initiate the application process.
For more information about how the Apply page looks and is used, see Starting an Application.
Before setting up planning application display groups, you must set up planning application types for your agency. See Setting Up Planning Application Types.
This example illustrates the Planning Application Display Group Details page, which is described in the following text.
Adding Planning Application Display Groups
Select .
On the Planning Application Display Group page, click Add to add a new grouping.
On the Planning Application Display Group Details page, enter values for the following:
Page Element
Description
Display Group
Enter a planning application display group name.
Description
Enter a description of the display group that appears on the Apply page for guests.
URL
Enter a URL used to access additional information about a transaction type.
Applicable Classification
Select the check box for the applications to which this display group applies. Choose from these options:
Permits
Planning and Zoning
This option determines whether a display group type is shown on the Apply page for public users. A display group can be included with both the Permit Applications and the Planning Applications.
Verify that the Enabled switch is turned on. The switch is turned on by default for new planning application display groups.
In the Display Group Lines section, click Add to set up a line on the Display Group Line Details page. The display group lines make up the list of planning application types in the new display group.
Note: Both permit transaction types and planning application transaction types can be added to a display group. For example, you can add a permit transaction type to a planning application display group and the other way around.Page Element
Description
Display Order
Enter a numerical value in this field to specify the order in which you want the planning application type to be displayed, if desired. The default value is 0 and upon saving, the system automatically assigns the next value.
Transaction Type ID
Select an existing transaction type ID.
The description for the ID you enter here will appear in the Transaction Type field.
Transaction type information
Review the attribute information for the planning application type to verify you have selected the correct transaction type ID:
Transaction Type
Classification
Application Group
Category
Subcategory
For more information about transaction type attributes, see Setting Up Planning Application Types.
On the Planning Application Display Group Details page, click Save.
Modifying Planning Application Display Groups and Lines
You can modify planning application display groups and lines on the Planning Application Display Group Details and Display Group Line Details pages, respectively.
Select .
On the Planning Application Display Group page, select the row for the planning application group that you want to modify.
On the Planning Application Display Group Details page, you can:
Modify the description. You cannot change the group name.
Turn the Enabled switch on or off to enable or disable the display group.
If you made any changes, click Save.
To modify the display group lines (the list of planning applications in a display group), select the row for the planning application group that you want to modify on the Planning Application Display Group page.
On the Planning Application Display Group Details page, select a display group line in the Display Group Lines grid.
On the Display Group Line Details page, you can change the values in these fields:
Update the Display Order field to change the order in which the lines appear.
Update the Transaction Type ID field with another existing planning application type ID.
If you made any changes, click Save.
Deleting Planning Application Display Groups and Lines
Select .
On the Planning Application Display Group page, select the row for the planning application group that you want to delete.
If you want to delete the display group, click Delete on the Planning Application Display Group Details page.
If you want to delete multiple display groups, you can delete them from the Planning Application Display Group page:
Click Edit.
Select the check boxes for the display groups to delete.
Click Delete.
To delete a display group line, go to the Planning Application Display Group Details page and select a display group line in the Display Group Lines grid.
On the Display Group Line Details page, click Delete.
If you want to delete multiple display group lines, you can delete them from the Planning Application Display Group Details page:
Click Edit.
Select the check boxes for the display group line rows to delete.
Click Delete.
Managing Pre-Application Meeting Configuration
Pre-applications are the initial step in the planning and zoning process, and are used to allow the property owner or developer to work with agency planners to receive feedback prior to submitting planning applications. A pre-application meeting is scheduled between the property owner or developers and agency planners to determine the necessary applications and approvals for the project.
Configuring the Pre-Application Meeting
Administrators set up and manage the pre-application meeting configuration on the Manage Pre-Application Meeting Configuration page.
Select . Or, Select Setup and Maintenance tile on the Agency Springboard > Select Public Sector Planning and Zoning > Planning Application Types functional area > Manage Pre-Application Meeting Configuration task.
On the Manage Pre-Application Meeting Configuration page, the Pre-Application Meeting section allows you to set up applicant privileges. Enter values for the following fields:
Page Element
Description
Applicant can request
Select to allow an applicant to request a pre-application meeting. Applicants can access the Pre-Application Meeting Request page. See Working with Pre-Application Meetings. and schedule a meeting based on the availability of the agency staff.
Applicant can reschedule
Select to allow an applicant to reschedule their meeting.
The Meeting Availability section allows you to set up the parameters for scheduling meetings, determined by:
Planner meeting schedule or
Agency meeting schedule
Planner meeting schedule: Select to allow users to schedule meetings based on the availability of their assigned planner.
Note: You also need to ensure that all the Planners are assigned a Pre-Application meeting work schedule on the Agency Staff Profile. Enter values for the following fields:Page Element
Description
Meeting Duration in Hours
Select a value to set the maximum amount of time the meeting can be scheduled for. Users will see this value as the duration of the meeting, and they are not allowed to edit the field. See the section Scheduling a Pre-Application Meeting under Working with Pre-Application Meetings.
Schedule after Number of Days
Select a value to set the number of days from the current date, so that users can schedule a meeting on a date available after the number of days specified here. For example, if you select a value 5 on the 10th day of this month, the calendar on the Pre-Application Meeting Request page displays the dates that are available after the 15th day of the month.
Schedule up to Number of Days
Select a value to set the number of days that will be available for the users to select a date on the calendar for scheduling the meeting. For example, if you select a value of 90, the calendar on the Pre-Application Meeting Request page displays 90 calendar days starting from the date the user is making the selection.
See the section Scheduling a Pre-Application Meeting under Working with Pre-Application Meetings.
Agency meeting schedule: Select to allow users to schedule meetings based on the schedule of the agency. In addition to the fields described above, enter values for the following fields:
Note: If you select this option, then you need not assign Pre-Application meeting schedule to the planners as the Pre-Application meeting schedule will not be considered while determining the availability.Page Element
Description
Pre-Application Work Schedule
Select the Agency level work schedule that needs to be considered while determining the availability for the pre-application meeting.
Maximum Concurrent Meetings
Select a value to determine the maximum number of meetings that can be scheduled at a time.
Setting Up Hearing Bodies
With Oracle Public Sector Compliance and Regulation Cloud, you will use the Public Hearing feature to configure hearing bodies and hearing hierarchies, schedule hearings, and record decisions.
Setting Up Public Hearing
A public hearing is an official meeting where members of the public, the hearing body, and the applicant of the planning and zoning application come together to discuss the facts about the application submitted by the applicants.
The following topics apply to administrators for setting up and maintaining the Public Hearing process:
Setting up Hearing Body
Setting up Hearing Hierarchy
Setting up Hearing Decision
Setting Up Hearing Body
A hearing body is a group of individuals formed to evaluate the testimony presented by applicants and to provide feedback.
Adding a Hearing Body
To add a hearing body:
Select .
Click Add on the Hearing Body page and enter values for the following fields:
Page Element
Description
Hearing Body Code
Enter a unique identifier of the hearing body.
Name
Enter a name for the hearing body.
Additional Information
Enter any text as details about the hearing body.
Enabled
Turn on the switch to make the hearing body available for use.
Appeal Period
Select the number of days after the public hearing, when an appeal is allowed.
Maximum Agenda Items
Select a value from the options. As an agency user you can configure the maximum number of agenda items that can be heard on a day.
Address fields
Enter the address of the hearing. Enter the ZIP code, or click the Don’t Know link to enter values for the following fields:
Country: U.S (Default value)
ZIP Code
Address Line 1
Address Line 2
City
State
Postal Code
Select a pattern of recurrence of the meeting from these fields:
Page Element
Description
Recurrence Pattern
Select the pattern for the recurrence of the public hearing:
Weekly
Monthly
Select the Weekly recurrence if you want to schedule the meeting every week. Enter values for the following fields:
Page Element
Description
Weeks between Occurrences
Select the number of weeks between one meeting occurrence and the next.
Days of the Week
Select the days of the week on which you want the meeting to recur.
Recurrence Start Date Time
Select a date and time from which the meeting recurrence should be effective.
Select the Monthly recurrence if you want to schedule the meeting every month. Enter values for the following fields:
Page Element
Description
Months between Occurrences
Select the number of months between one meeting occurrence and the next.
Days of the Week
Select the check box if you want to schedule the meeting on particular days of the week. Click Add to open the Days of the Week page and select the days of the week, for example First Monday:
Occurrence: Select – First, Second, Third, Fourth, or Last the day of week
Weekday: Select the day of the week from Monday, Tuesday, and so on.
Turn on the Enable switch to make the setting available for use and click Save. Use the Add button to include multiple rows.
Note: You can modify or delete the entry. Click the row and use the Days of the Week page to make the change.Dates
Select the check box if you want to schedule the meeting on particular dates of the week. Click Add to open the Dates page and select from all the available dates.
Turn on the Enable switch to make the setting available for use and click Save. Use the Add button to include multiple rows.
Note: You can modify or delete the entry. Click the row and use the Dates page to make the change.Recurrence Start Date Time
Select a date and time from which the meeting recurrence should be effective.
Click Save to save the new hearing body and return to the Hearing Body page.
Modifying a Hearing Body
To modify a hearing body:
Select .
On the Hearing Body page, click the record of the hearing body you want to edit.
On the Hearing Body details page you can make changes to the fields and click Save.
Note: You can make changes to all the fields except the Hearing Code.The Hearing Body page now lists the updated record.
Deleting a Hearing Body
To delete a hearing body:
Select .
On the Hearing Body page, click the record of the hearing body you want to delete.
On the Hearing Body details page you can click the Delete button. Click OK on the confirmation message.
The Hearing Body page lists only the existing records.
Setting Up Hearing Hierarchies
Hearing Hierarchy defines the levels of hearing bodies that an application can be escalated through. In an agency, a planning and zoning application can be escalated to a higher body in cases of appeal, where the highest hearing body decision is considered final.
Agencies set up their hearing hierarchy to address events such as an appeal. For example, a hearing begins with the Planning Committee and then an appeal escalates the application to the Planning Commission. If appealed again, the application moves to the City Council.
Adding a Hearing Hierarchy
To add a hearing hierarchy:
Select .
Click Add on the Hearing Hierarchy page and enter values for the following fields:
Page Element
Description
Hierarchy Code
Enter a unique identifier of the hearing body.
Hierarchy
Enter a name for the hearing hierarchy.
Enabled
Turn on the switch to make the hearing hierarchy available for use.
Description
Enter any text to describe the hierarchy.
Click Add and enter values for the following fields:
Page Element
Description
Hearing Body Code
Select a hearing body code to associate with the new hearing hierarchy.
Sequence
Select a number to determine the escalation level of the selected hearing body within the hierarchy. For example, if the value 2 is selected, the selected hearing body will be the second in the hierarchy for the public hearing.
Appeal Allowed
Turn on the switch if you want to allow the agency to appeal after the hearing body places its decision. The agency will not be allowed to appeal the hearing to the next body in the hierarchy, if the switch is turned off.
Enabled
Turn on the switch if you want to allow the hearing body to be available for use.

Click to add a new row and add a new hearing body in the hierarchy.

Click to delete the row. The hearing body will be removed from the hierarchy.
Click Save to save the newly created hierarchy and return to the Hearing Hierarchy page, where the new hierarchy you created is listed.
Modifying a Hearing Hierarchy
To modify a hearing hierarchy:
Select .
On the Hearing Hierarchy page, click the hearing hierarchy row you want to edit.
On the Hearing Hierarchy details page make changes to the fields and click Save.
Note: You can make changes to all the fields except the Hierarchy Code.
Deleting a Hearing Hierarchy
To delete a hearing hierarchy:
Select
On the Hearing Hierarchy page, click the hearing hierarchy row you want to delete.
On the Hearing Hierarchy details page, click Delete and click OK on the confirmation page to delete the hearing hierarchy.
Click Save and return to the Hearing Hierarchy page. The page lists the updated hierarchy rows.
Setting Up Hearing Decisions
The outcome of a public hearing is referred to as hearing decision. Agency staff such as assigned planners update the decision from the hearing body into the system.
System-defined Public Hearing Decisions
Oracle delivers hearing decisions for use during the hearing process. System administrators can configure the decisions specific to their agency, which are mapped to one of the system-defined decisions listed below:
Approved
None
Denied
Continue
Adding a Hearing Decision
Select .
The Hearing Decision page lists all the decisions you have configured. Click Add.
One the Hearing Decision Status detail page, enter values for the following fields:
Page Element
Description
Code
Enter a unique identifier of the hearing decision.
Name
Enter a name to identify the decision. Example, Approved with Conditions, Not Result, and so on.
Description
Enter any text to describe the decision.
Decision
Select one of the system-defined decisions to map to the new decision you are creating:
Approved:
None
Denied
Continue
Enabled
Turn on the switch to make the decision available to use.
Click Save to save the new hearing decision and return to the Hearing Decision page, which lists the newly created decision.
Modify a Hearing Decision
To modify a hearing decision:
Select .
The Hearing Decision page lists all the decisions you have configured. Click the row of the decision you want to modify.
On the Hearing Decision detail page, make changes to the fields and click Save.
Note: You can make changes to all the fields except the Code.The Hearing Decision page lists the updated row.
Deleting a Hearing Decision
To delete a hearing decision:
Select .
The Hearing Decision page lists all the decisions you have configured. Click the row of the decision you want to delete.
On the Hearing Decision detail page, click Delete and confirm deletion by selecting OK.
Click Save and return to the Hearing Decision page. The page lists the updated decision rows.