2Setting Up Your Agency
Setting Up Agencies
An agency is an organization that offers a range of services to its constituents, including issuing permits and licenses.
Administrators add and modify agency information using the Agency page.
Set up exactly one agency, with agency ID 1. Oracle does not currently support multiple agencies.
Adding an Agency
Select .
On the Agency Information tab, click Add.
On the Agency Information - Details page, enter values for the following fields:
Page Elements
Definition
Agency ID
Enter the number 1 as the ID for your agency.
Name and Description
Enter a name and a short description for the agency.
Country
Enter the country in which the agency is located.
This value is informational only. Address fields throughout the system support only USA addresses.
Currency
Enter the currency that the agency uses for financial transactions.
This value is informational only. It does not affect the currencies for fees, cash drawers, or payment adaptors.
Time Zone
Select your agency’s local time zone. All times displayed in Oracle Public Sector Compliance and Regulation use this time zone.Parcel Owner Format
This field is reserved for future functionality. Currently, regardless of your selection, parcels have one field to identify the parcel owner and an additional field to identify a secondary owner.
Time Format, Date Format, and Number Format
Select the default formats that the agency uses to display times, dates, and numbers for anonymous users.
Hide property owners from public users
Turn on this switch to hide property owner information from public users.
Note: This check box is reserved for future use and has not yet been implemented.Property Information Access
Select the level of access that agency staff have to property information on applications and permits. Options are:
Read Only: Agency staff can only view property information.
Edit: Agency staff can view and edit property information, but they cannot add new property information.
Add New: Agency staff can view, edit, and add new property information.
Oracle Policy Automation ID
Enter the unique identifier for an agency-wide Oracle Policy Automation (OPA) policy model.
OPA is a separate Oracle product. OPA policy models provide logic models for questionnaires that help public users determine which applications they need to complete.
The policy model that you enter here is used by offerings that do not have an offering-specific policy model. To specify an offering-level policy definition, select the Features tab on the Agency Information page, then click the Options link for the offering.
For more information on Oracle Policy Automation, see Overview of Oracle Policy Automation Configuration.
Click Save.
Modifying an Agency
Select .
Click a row on the Agency Information tab.
Update the agency information field values.
Click Save.
Adding an Agency Address
Select .
Click a row on the Agency Information page.
Select the Addresses tab, and click Add.
On the Addresses - Details page, enter values for the following fields:
Page Elements
Definition
Address ID
Enter a unique ID for the address.
Primary
Select to indicate that this is the primary address for the agency. An agency may have only one primary address.
From Date and To Date
Enter the date range for which the address is valid.
Zip Code
If you know the zip code for the address, enter it here. The system automatically populates the City and State based on the zip code you enter.
If you don’t know the zip code, click the don’t know link to narrow down your choice of zip codes by entering a city and state.
Address Line 1 and Address Line 2
Enter the street number or post office box number, along with any additional address information such as apartment or suite number.
City and State
Enter the city and state for the address.
Postal Code
Enter the postal code for the address. The available values for this field are filtered based on the city and state that you select.
Click Save.
Modifying an Agency Address
Select .
Click a row on the Agency Information tab.
Select the Addresses tab.
Click a row on the Addresses tab. You can:
Update the agency address field values.
Note: You cannot change a primary address row to non-primary. Instead, when you update a non-primary row to primary, all other address rows are saved as non-primary.Delete the address. You will be prompted to confirm the permanent deletion.
Note: You cannot delete primary address rows.
Click Save.
Deleting an Agency Address
Select .
Click a row on the Agency Information tab.
Select the Address tab.
Click Edit.
Select the check boxes next to all the agency addresses that you want to delete.
Click Delete. You will be prompted to confirm the permanent deletion.
Adding an Agency Language
Agency languages are reserved for future functionality. At this time, you do not need to add languages to your agency.
Modifying Permit Options
Select .
Click a row on the Agency Information tab.
Select the Features tab.
Oracle provides seed data for the list of offerings on the Features tab. At this time, the only available offering is Permits, which also encompasses Planning and Zoning functionality.
Disregard the Enabled column in the list of offerings. The offering is enabled in the Functional Setup Manager (FSM).
Click Options for the Permits offering.
On the Permit Options page, you can update values for the following fields:
Page Elements
Definition
Oracle Policy Automation ID
Enter the unique identifier for the Oracle Policy Automation policy model to be used for this offering.
The offering-specific policy model that you specify here takes priority over any agency-wide policy definition that you enter on the main Agency Information page.
Message Title
Enter a short text version of the landing page message in a title format. If you leave this field blank, the value in the Label field on the Link Details page for the menu navigation link Online Permits is displayed.
Message Summary
Enter a longer version of the landing page message title in a sentence format. If you leave this field blank, the value in the Description field on the Link Details page for the menu navigation link Online Permits is displayed.
Button Content URL
Enter a content URL for the Read More button. Public users click this button to access the agency’s own permit information page, outside of Oracle Public Sector Permits. If you leave this field blank, the Read More button opens a dialog box that displays the Landing Page Message.
Note: If you want to link to a page outside of Oracle Public Sector Permits, you must enter a URL here.Landing Page Message
Enter a welcome message in rich text to appear in a dialog box on the landing page, if a URL to access the agency’s page is not defined.
For more information on Oracle Policy Automation, see Overview of Oracle Policy Automation Configuration.
For more information on the Landing Page Message Definition, see Defining Summary Details.
Setting Up Countries
A country definition includes the country name and various identifying codes.
You add, modify, and delete countries on the Country page.
Adding a Country
Select .
On the Country page, click Add.
On the Country Details page, enter values for the following fields:
Page Element
Description
Country Code
Enter a the unique code that your system uses for the country. For example, you might enter FRA for France.
ISO Alpha 2 Code
Enter the two-letter International Organization of Standardization (ISO) code for the country. For example, you would enter FR as the code for France.
ISO Numeric 3 Code
Enter the three-digit United Nations (UN) M.49 code for the country. For example, you would enter 250 as the code for France.
Country Name
Enter the name of the country as it appears in your system.
Click Save.
Modifying a Country
Select .
Click a row on the Country page.
On the Country Details page you can:
Update the country field values.
Note: You cannot edit the Country Code.Delete the country. You will be prompted to confirm the permanent deletion.
Click Save.
Deleting Countries
Select .
Click Edit.
Select the check boxes next to all the countries you want to delete.
Click Delete. You will be prompted to confirm the permanent deletion.
Setting Up States
A state definition includes information such as the state name, country, and various ID codes.
You add, modify, and delete states on the State page.
Adding a State
Select .
On the State page, click Add.
On the State Details page, enter values for the following fields:
Page Element
Description
Country
Enter the code for the country that the state is in.
State Code ISO
Enter the International Organization of Standardization (ISO) code for the state.
Code
Enter the unique code that your system uses for the state.
State Name
Enter the name of the state.
Type
Enter the subdivision type.GNIS ID
Enter the Geographic Names Information System (GNIS) ID for the state’s location.
Click Save.
Modifying a State
Select .
Click a row on the State page.
On the State Details page you can:
Update the state field values.
Note: You cannot edit the Country or State Code ISO fields.Delete the state. You will be prompted to confirm the permanent deletion.
Click Save.
Deleting States
Select .
Click Edit.
Select the check boxes next to all the states you want to delete.
Click Delete. You will be prompted to confirm the permanent deletion.
Setting Up Cities
A city definition includes information such as the city name, country, state, and certain ID codes.
You add, modify, and delete cities on the City page.
Adding a City
Select .
On the City page, click Add.
On the City Details page, enter values for the following fields:
Page Element
Description
Country Code and State Code
Enter the codes for the country and state in which the city is located.
County
Enter the five-digit International Committee for Information Technology Standards (INCITS) code for the county in which the city is located.
FIPS Code
Enter the seven-digit Federal Information Processing Standard (FIPS) code for the city.
City Name
Enter the name of the city.
GNIS ID
Enter the Geographic Names Information System (GNIS) ID for the city’s location.
Click Save.
Modifying a City
Select .
Click a row on the City page.
On the City Details page you can:
Update the city field values.
Note: You cannot edit the Country Code, State Code, or County fields.Delete the city. You will be prompted to confirm the permanent deletion.
Click Save.
Deleting Cities
Select .
Click Edit.
Select the check boxes next to all the cities you want to delete.
Click Delete. You will be prompted to confirm the permanent deletion.
Setting Up Counties
A county definition includes information such as the county name, country, state, and certain ID codes.
You add, modify, and delete counties on the County page.
Adding a County
Select .
On the County page, click Add.
On the County Details page, enter values for the following fields:
Page Element
Description
Country and State
Enter the codes for the country and state that the county is in.
INCITS Code
Enter the five-digit International Committee for Information Technology Standards (INCITS) code for the county.
County Name
Enter the name of the county.
FIPS Code
Enter the seven-digit Federal Information Processing Standard (FIPS) code for the county.
GNIS ID
Enter the Geographic Names Information System (GNIS) ID for the county’s location.
Click Save.
Modifying a County
Select .
Click a row on the County page.
On the County Details page you can:
Update the county field values.
Note: You cannot edit the Country, State, or INCITS Code fields.Delete the county. You will be prompted to confirm the permanent deletion.
Click Save.
Deleting Counties
Select .
Click Edit.
Select the check boxes next to all the counties you want to delete.
Click Delete. You will be prompted to confirm the permanent deletion.
Setting Up Currencies
A currency definition includes currency codes, a description, and the number of decimals that can be used to represent an amount in the currency.
You add, modify, and delete currencies on the Currency page.
Adding a Currency
Select .
On the Currency page, click Add.
On the Currency Details page, enter values for the following fields:
Page Element
Description
Currency Code
Enter a the unique code that your system uses for the currency.
ISO Code
Enter the three-digit International Organization of Standardization (ISO) 4217 numeric code for the currency. For example, you would enter 840 for the US dollar.
Description
Enter a short description of the currency.
Decimal Position
Enter the number of decimal places that can be used to represent an amount for the currency. For example, the United States dollar uses two decimal positions.
Click Save.
Modifying a Currency
Select .
Click a row on the Currency page.
On the Currency Details page you can:
Update the currency field values.
Note: You cannot edit the Currency Code field.Delete the currency. You will be prompted to confirm the permanent deletion.
Click Save.
Deleting Currencies
Select .
Click Edit.
Select the check boxes next to all the currencies you want to delete.
Click Delete. You will be prompted to confirm the permanent deletion.
Setting Up Holiday Calendars
Holiday calendars establish the days that agency offices are closed and no field service operations are offered.
These days appear as unavailable, non-working days in calendar views throughout the system such as for public user and inspector calendars. Non-working days in holiday calendars apply to all employees and do not need to be defined for employee profiles.
Each holiday calendar spans a date range that you define. Within that date range, you define individual events for each non-working holiday.
Administrators add, modify, and delete holiday schedules and events on the Holiday Calendar page.
Adding a Holiday Calendar
Select .
On the Holiday Calendar page, click Add.
On the Holiday Calendar Details page, enter values for the following fields:
Page Element
Description
Calendar ID and Description
Enter a unique ID and description for the calendar. For example, you might enter an ID of 2019 and a description of Holiday Calendar 2019.
Valid from Date and Valid to Date
Enter the date range for the holiday calendar. For example, you might enter a Valid from Date of 2019–01–01 and a Valid to Date of 2019–12–31 to represent a calendar that spans the entire 2019 calendar year.
Add an event.
Note: You must have values defined for all required holiday calendar fields before you can add an event.Click Save.
Note: When you click Save, the Holiday Calendar page closes.
Adding an Event
Select .
Click a row on the Holiday Calendar page.
On the Holiday Schedule Details page, click Add.
On the Event Details page, enter an Event ID, an Event Date, and a Description for the event. For example, you might enter an ID of MD, a date of May 29, 2017, and a description of Memorial Day.
Click Save.
Modifying a Holiday Calendar
Select .
Click a row on the Holiday Calendar page.
On the Holiday Calendar Details page you can:
Update the holiday schedule field values.
Note: You cannot edit the Calendar ID.Delete the holiday calendar. You will be prompted to confirm the permanent deletion.
Add, modify, or delete events.
Click Save.
Note: When you click Save, the Holiday Calendar page closes.
Modifying an Event
Click a row on the Holiday Calendar Details page.
On the Event Details page you can:
Update the event date or description.
Delete the event. You will be prompted to confirm the permanent deletion.
Click Save.
Deleting Holiday Calendars
Select .
Click Edit.
Select the check boxes next to all the holiday schedules you want to delete.
Click Delete. You will be prompted to confirm the permanent deletion.
Deleting Events
Click Edit on the Holiday Calendar Details page.
Select the check boxes next to all the events you want to delete.
Click Delete. You will be prompted to confirm the permanent deletion.
Setting Up Work Schedules
Work schedules establish the days of the week and daily hours of operation for agency employees.
Create schedules based on the type of employee and work location. Calendar views, such as inspector calendars, reference work schedules to determine the time slots that are displayed on the calendar as available for scheduling. Algorithms for assigning resources also use work schedules to determine availability. You assign work schedules to employee profiles using the Agency Staff page. See Setting Up Agency Staff.
Administrators and business analysts add, modify, and delete work schedules on the Work Schedule page.
Adding a Work Schedule
Select .
On the Work Schedule page, click Add.
On the Work Schedule Details page, enter values for the following fields:
Page Element
Description
Schedule ID and Description
Enter a unique ID and description for the schedule. For example, you might enter an ID of OFFICESAT and a description of Saturday Office Schedule.
Start Date
Enter the first day of the schedule.
End Date
Enter the last date of the schedule. You can leave this field blank to give the schedule an open end date.
Work Start Time and Work End Time
Enter the start and end time for the schedule. For example, you might enter a work start time of 09:00 AM and a work end time of 05:00 PM.
Break Start Time and Break End Time
Enter the start and end time for a break within the schedule. For example, you might enter a break start time of 12:00 PM and a break end time of 01:00 PM.
Note: These fields are optional, but if you enter a break start time, you must also enter a break end time.Recurrence and Weeks Between Occurrences
Select whether the schedule reoccurs weekly and how many weeks are between each occurrence. For example, if you select a recurrence of Weekly with 1 week between occurrences, the schedule repeats every week.
Work Days
Select the days of the weeks to which the schedule applies.
Click Save.
Modifying a Work Schedule
Select .
Click a row on the Work Schedule page.
On the Work Schedule Details page you can:
Update the work schedule field values.
Note: You cannot edit the Schedule ID field.Delete the schedule. You will be prompted to confirm the permanent deletion.
Click Save.
Deleting Work Schedules
Select .
Click Edit.
Select the check boxes next to all the work schedules you want to delete.
Click Delete. You will be prompted to confirm the permanent deletion.
Setting Up Ownership Types
Ownership type indicates how a business was established; for example, a corporation or a nonprofit. You set up ownership types for your agency on the Ownership Type page.
Adding an Ownership Type
Select .
On the Ownership Type page, click Add New to add an ownership type.
On the Ownership Type Details page, enter a name for the ownership type.
Enter a description.
Verify that the Enabled switch is turned on. The switch is turned on by default for a new ownership type.
Click Save.
Modifying an Ownership Type
Select e.
On the Ownership Type page, click the row for the ownership type that you want to modify.
On the Ownership Type Details page you can:
Modify the ownership type description. You cannot change the name.
Click the Enabled switch to enable or disable the ownership type.
If you made any changes, click Save.
Deleting an Ownership Type
Select e.
On the Ownership Type page, click the row for the ownership type that you want to delete.
On the Ownership Type Details page, click Delete.
If you want to delete multiple ownership types, you can delete them from the Ownership Type page:
Click Edit.
Select the check boxes for the ownership type rows to delete.
Click the Delete icon.
Setting Up Property Types
Property type categorize properties according to criteria such as how the property is used or the type of dwelling.
You add, modify, and delete property types on the Property Type page.
Adding a Property Type
Select
On the Property Type page, click Add.
On the Property Type Detail page, enter values for the following fields:
Page Element
Description
Property Type
Enter the type of property, such as Residential or Commercial.
Description
Enter a property type description.
Verify that the Enabled switch is turned on.
The switch is on by default for a new property type.
Click Save.
Modifying a Property Type
Select
Click a row on the Property Type page.
On the Property Type Detail page you can:
Update the property type description.
Turn off the Enabled switch to deactivate the property type.
Click Save.
Deleting Property Types
Select
To view a definition before deleting it, click the row to be deleted, then click the Delete button on the Property Type Details page.
To delete one or more definitions without viewing details:
Click Edit.
Select the check boxes next to the definitions that you want to delete.
Click Delete.
You will be prompted to confirm the permanent deletion.
Setting Up Property Conditions
A property condition identifies the general condition of the property. This value is used to indicate the general age of a property, a property’s physical condition, or other condition.
You add, modify, and delete property conditions on the Property Condition page.
Adding a Property Condition
Select
On the Property Condition page, click Add.
On the Property Condition Detail page, enter values for the following fields:
Page Element
Description
Property Condition
Enter the property condition, such as Poor or Good.
Description
Enter a description of the property condition.
Verify that the Enabled switch is turned on.
The switch is on by default for a new property condition.
Click Save.
Modifying a Property Condition
Select
Click a row on the Property Condition page.
On the Property Condition Detail page you can:
Update the property condition description.
Turn off the Enabled switch to deactivate the property type.
Click Save.
Deleting Property Conditions
Select
To view a definition before deleting it, click the row to be deleted, then click the Delete button on the Property Condition Details page.
To delete one or more definitions without viewing details:
Click Edit.
Select the check boxes next to the definitions that you want to delete.
Click Delete.
You will be prompted to confirm the permanent deletion.
Setting Up Units of Measure
Units of measure are used to express measurements such as quantity or duration. Each unit of measure must have a unit type such as Length, Area, or Time.
You add, modify, and delete units of measure on the Unit of Measure page.
Adding a Unit of Measure
Select
On the Unit of Measure page, click Add.
On the Unit of Measure Details page, enter values for the following fields:
Page Element
Description
Unit of Measure
Enter a unique unit of measure ID.
Description
Enter a description of the unit of measure.
Unit Type
Select the type of measurement. The delivered unit types are Area, Length, Time, and Volume.
You can define additional values on the Lookup Type Details page. Add new values to the ORA_PSC_CC_UOM_TYPE lookup type.
ISO Code
Enter the ISO unit of measure code.
Click Save.
Modifying a Unit of Measure
Select
Click a row on the Unit of Measure page.
On the Unit of Measure Details page, make the necessary modifications.
Click Save.
Deleting Units of Measure
Select
To view a definition before deleting it, click the row to be deleted, then click the Delete button on the Unit of Measure Details page.
To delete one or more definitions without viewing details:
Click Edit.
Select the check boxes next to the definitions that you want to delete.
Click Delete.
You will be prompted to confirm the permanent deletion.
Setting Up Unit of Measure Conversions
A unit of measure (UOM) conversion definition specifies the factor for converting a unit of measure to an equivalent amount of a different unit of measure.
You add, modify, and delete unit of measure conversions on the UOM Conversion page.
Adding a UOM Conversion
Select
On the UOM Conversion page, click Add.
On the UOM Conversion Detail page, enter values for the following fields:
Page Element
Description
UOM
Select the unit of measure that is the starting unit for the conversion.
UOM To
Enter the target unit of measure. This unit of measure must be the same type as the original unit of measure. For example, you can convert a unit of length to another unit of length, but you can’t convert a unit of length to a unit of weight.
Conversion Rate
Enter the conversion factor used to convert the original unit of measure to the target unit of measure. For example, to convert minutes to hours, enter a conversion rate of 60.
Verify that the Enabled switch is turned on.
The switch is on by default for a new UOM conversion.
Click Save.
Modifying a UOM Conversion
Select
Click a row on the UOM Conversion page.
On the UOM Conversion Detail page you can:
Update the UOM conversion field values.
Disable the UOM conversion by turning the Enabled switch off.
Click Save.
Deleting UOM Conversions
Select
To view a definition before deleting it, click the row to be deleted, then click the Delete button on the Unit of Measure Conversion Details page.
To delete one or more definitions without viewing details:
Click Edit.
Select the check boxes next to the definitions that you want to delete.
Click Delete.
You will be prompted to confirm the permanent deletion.
Setting Up Conditions
A condition indicates a dependency or contingency for completing the application process. You set up conditions on the Conditions page.
You add, modify, and delete conditions on the Conditions page.
Condition Overview
A condition indicates a status, criterion, or action that can apply to an object in the system, such as a permit or a planning application.
Conditions are defined with a severity that might affect operations when applied. Condition rules with a Hold severity prevent one or more of the operations that are selected at the time of applying the condition. Condition rules with a Lock severity prevent all operations as described in the table here.
| Rule |
Applicable Objects |
Usage |
|---|---|---|
| Prevent New |
Parcel |
Agency staff applies a condition to a parcel record that prevents an applicant from submitting any new permit or planning application that contains a parcel object. |
| Prevent Workflow Advancing |
Permit and planning application |
Agency staff applies a condition to a permit or planning application record that prevents workflow from advancing. The permit or planning application workflow tasks cannot be completed until the condition is resolved. |
| Prevent Issue or Final |
Permit and planning application |
Agency staff applies a condition to a permit or a planning application record that prevents the permit or application cycle from completing its final step until the condition is resolved. Your workflow process definition must explicitly identify the final human task that is blocked by this condition. Use the PSC_FINAL_ACTIVITY custom property to identify this task. See Using Custom Properties. |
| Restrict Payment |
Permit and planning application |
Agency staff applies a condition to a permit or a planning application record that prevents a user from processing a payment. |
| Prevent Inspection Schedule |
Permit |
This condition rule prevents agency staff from scheduling a new inspection. It does not affect existing inspections that have already been scheduled. |
| Prevent Inspection Result |
Permit |
This condition rule prevents agency staff from finalizing the inspection results. |
Adding Conditions
Select .
On the Condition page, click the Add New button.
On the Condition Details page, enter values for the following fields:
Page Element
Description
Condition Name
Enter a unique condition name.
Object Type
Select an object type to categorize the condition, based on the object type to which it is applied:
Parcel
Transaction (includes permit and planning applications)
Display Message
Enter a message that will be displayed to external users, up to 150 characters.
Severity
Select a severity level for each condition from these options:
Lock
At the most severe level, the Lock condition suspends all operations, including workflow advancing, payment processing, inspection scheduling, and inspection results.
Hold
Agency staff can select which rules to apply to conditions with the Hold level of severity.
Notice
The Notice level functions as an alert and has no effect on operations.
For more information, see Applying Conditions to Applications.
Description
Enter a description.
Inherit
Select to enable the condition to be applied automatically to any existing transactions belonging to the parcel. This field appears only if you have selected the Parcel object type.
Verify that the Enabled switch is turned on. New conditions are active by default.
Click Save.
Modifying Conditions
Select .
Click a row on the Condition page.
On the Condition Details page you can update the display message, severity, description, and the Enable switch.
Click Save.
Deleting Conditions
Select
Click a row on the Condition page.
On the Condition Details page, click Delete to delete the condition.
For more information, see the documentation Applying Conditions to Applications.
Setting Up Autonumbering
Set up autonumber rules to increment identifying numbers for documents such as permits and invoices. The identifying numbers can include multiple parts, and each part can represent either a sequential number, static text, or a date.
You add, modify, and delete autonumber rules on the Autonumber page.
This example illustrates the Autonumber Details page.

Adding an Autonumber Rule
Select
On the Autonumber page, click Add.
On the Autonumber Details page, enter values for the fields in the Rule Header section:
Page Element
Description
Rule Name
Enter a unique name for the rule.
Copy Existing Rule
Click this link to copy the rule definition from an existing autonumber rule. The copy action copies the number type and the reset frequency as well as the actual rule definition.
Clicking the link opens a a modal window with a list of existing autonumber definitions. Locate the definition you want to copy, then click the Select button for that definition
Description
Enter a description for the autonumber rule.
Maximum Size
Indicate the maximum length of the generated number.
Note: As you set up your autonumber rule, take care that the maximum size of the autonumber accommodates the maximum length of each part of the identifier plus any separators that you define.Number Type
Select the type of object to that can use this autonumber rule:
Cashier session
Note: If you select this number type, make sure that the parts that you define for the rule have a part type of Sequential only.Deposit slip
Inspection
Invoice
Permit
Planning application
Project
Receipt
These values are defined on the Lookup Type Details page for the ORA_PSC_CC_AUTONUM_TYPE lookup type.
Reset Sequential Number
The identifier that an autonumber rule generates can include a mix of static text, a date, and a sequential number. Select how often the sequential number portion of the identifier is reset to zero:
None: Sequential numbers continue to increment as defined without resetting.
Monthly: The sequential number portion of the identifier resets to zero at the beginning of each month.
Yearly: The sequential number portion of the identifier resets to zero at the beginning of each year.
In the Rule Definition section of the page, enter the number of parts, or segments, for the rule:
Page Element
Description
Number of Parts
Select the number of parts, or segments, comprising the rule, up to 5 parts. Segments can be static text, a date, or a sequential number.
For example, the identifier
IVC-0000010067-OCT10is made of 3 segments (static text, then a sequential number, then a date) separated by hyphens. The identifierINVOICE_001is made of 2 segments (static text and a sequential number) separated by an underscore.When you select the number of parts, the corresponding number of rows appear in the rule definition grid. For example, if there are two parts, then rows labeled Part 1 and Part 2 appear.
In the rule definition grid, select the part type for each row, then enter the related information in the additional fields that appear.
Part Type
Related Information
Static Text
In the unlabeled field that appears next to the part type, enter text that remains the same for all identifiers. For example, enter IVC or INVOICE.
Note: Do not include spaces in the static text.Cashier session IDs must be numeric, so don't include any static text in an autonumber definition with the Cashier Session number type.
Sequential
In the unlabeled field that appears next to the part type, enter the next document number to use. The number must be 1 or greater. The system increases this number by one each time a new identifier is generated and saved.
In the Maximum Length field, Enter the maximum number of digits for the sequential number. Select a number from one to ten.
Select the Zero Padding check box to add zeros before the generated number to make up the number of digits in the definition. For example, if the maximum length of this part is 5 digits, and the current number is 15, zero padding formats this part as 00015.
Date
In the unlabeled field that appears next to the part type, select the date format.
The available date formats are made of these date codes in various combination:
Years: YYYY represents the year with its full four digits, and YY represents the year by its last two digits.
Months: MM represents the month as a two-digit number, and MMM represents the month as a three-character abbreviation such as JAN for January.
Days: DD represents days as two-digit numbers. This is the only option for days.
Quarters: Q represents quarters. For example, the code for the first quarter of the year is 1.
Cashier session IDs must be numeric, so don't include any dates in an autonumber definition with the Cashier Session number type.
In the rule grid, select a Separator to appear after each part except the last.
Select from the following separators:
(None)
- (hyphen)
/ (forward slash)
* (asterisk)
Verify the generated number for the selected date format and separators in the Next Number Preview field.
Click Save.
An error appears if the overall maximum size of the autonumber doesn’t accommodate the maximum lengths of all of the parts and separators that you define.
Modifying an Autonumber Rule
Select
On the Autonumber page, click the row you want to modify.
Update the rule header and rule definition fields on the Autonumber Details page.
Click Save.
Deleting an Autonumber Rule
Select
Click the row you want to modify.
On the Autonumber Details page, click Delete.
Setting Up Contact Types
A contact type describes the role or position of a contact person for a permit.
Contact types apply only to permit contacts, not to profile contacts. Permits have contacts if the Contact List element is included in the permit application.
Adding a Contact Type
Select
On the Contact Type page, click Add.
On the Contact Type Detail page, enter values for the following fields:
Page Element
Description
Contact Type
Enter the type of contact, such as Business Owner, Individual, or Emergency Contact.
Description
Enter a description of the contact type.
Verify that the Enabled switch is turned on.
The switch is on by default for a new contact type.
Click Save.
Modifying a Contact Type
Select
Click a row on the Contact Type page.
On the Contact Type Detail page you can:
Update the contact type description. Only the Description field can be changed.
Turn off the Enabled switch to deactivate the contact type.
Click Save.
Deleting Contact Types
Select
To view a definition before deleting it, click the row to be deleted, then click the Delete button on the Contact Type Details page.
To delete one or more definitions without viewing details:
Click Edit.
Select the check boxes next to the definitions that you want to delete.
Click Delete.
You will be prompted to confirm the permanent deletion.
Setting Up Project Types
A project type describes the kind of project that an agency staff can select at the time of creating a project. You add new project types based on the nature of the project you are adding. Selection of a project type is mandatory while creating a new project, so, a minimum of one project type is required to be set up.
You add, modify, and delete project types on the Project Type page.
Adding a Project Type
Select .
On the Project Type page, click Add.
On the Project Type Detail page, enter values for the following fields:
Page Element
Description
Project Type
Enter the type of project, such as Commercial Project or Residential Project.
Rule ID
Select a rule ID. Rule ID is an autonumbering sequence that you set up for a particular project type. When you are creating a project with a certain project type, a project ID is generated based on the sequence defined for the project type.
Rule IDs are created using the Autonumber page. For more information, see Setting Up Autonumbering.
Description
Enter a description of the project type.
Long Description
Enter a detailed description of the project type.
Document Group
Select a document group to allow your users to organize the various categories of attachment files into a grouping.
See Setting Up Document Categories and Subcategories and Setting Up Document Groups.
Verify that the Enabled switch is turned on. The switch is turned On by default for a new project type.
Click Save.
Modifying a Project Type
Select
Click a row on the Project Type page.
On the Project Type Detail page you can:
Update the rule ID, description, and long description.
Turn off the Enabled switch to deactivate the project type.
Click Save.
Deleting a Project Type
Select
To view a definition before deleting it, click the row to be deleted, then click the Delete button on the Project Type Details page.
To delete one or more definitions without viewing details:
Click Edit on the Project Type page.
Select the check boxes next to the definitions that you want to delete.
Click Delete. You will be prompted to confirm the permanent deletion.
Setting Up Code Types
Code types are specific published codes, guidelines, ordinances, and so forth. Examples might include the International Building Code, published by the International Code Council (ICC), and the National Fire Code, published by the National Fire Protection Association (NFPA).
You add, modify, and delete code types on the Code Type page.
Adding a Code Type
Select
On the Code Type page, click Add.
On the Code Type Detail page, enter values for the following fields:
Page Element
Description
Code Type ID
Enter a unique code type ID for a specific code type. For example, enter IFC for International Fire Code.
Name
Enter the complete name of the code type.
Description
Enter a description of the code type.
Click Save.
Modifying a Code Type
Select
Click a row on the Code Type page.
On the Code Type Detail page you can update the code name and description.
Click Save.
Deleting Code Types
Select
To view a definition before deleting it, click the row to be deleted, then click the Delete button on the Code Type Details page.
To delete one or more definitions without viewing details:
Click Edit.
Select the check boxes next to the definitions that you want to delete.
Click Delete.
You will be prompted to confirm the permanent deletion.
Setting Up Code References
Code references provide detailed specifications that come from a broad range of codes, guidelines, ordinances, and so forth. Even if the source document does not use the word “code,” use the Code References pages to enter the information into the system. A code reference maps to a specific section in the source document.
You add, modify, and delete code references on the Code Reference page.
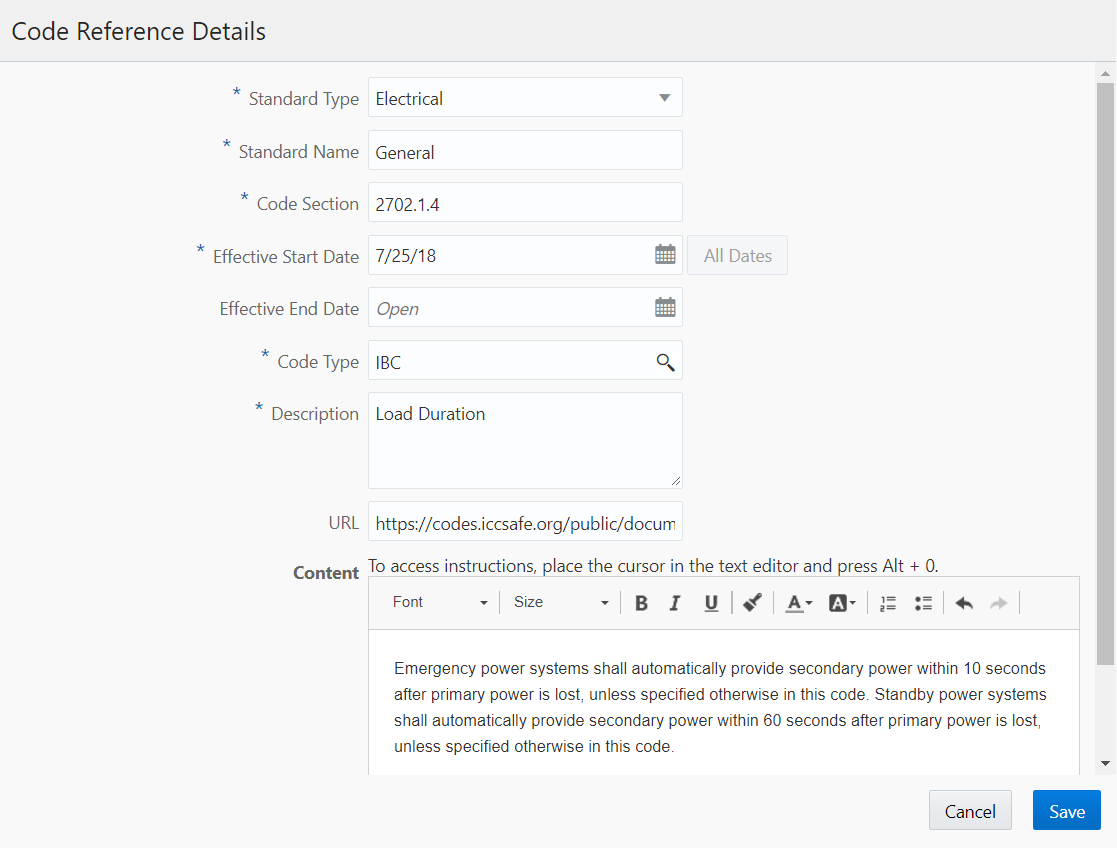
This example illustrates the Code Reference Details page.
Prerequisites
Before you set up code references, you must define:
Code types, which represent specific published documents that contain codes, guidelines, and so forth.
Standard types, which describe the different fields or disciplines that codes relate to. Examples might include fire safety or electrical systems.
Set up standards types by defining values for the ORA_PSC_CC_STD_CODE_TYPE lookup type. Define these values on the Lookup Type pages. See Setting Up Lookups.
Adding a Code Reference
Select
On the Code Reference page, click Add.
On the Code Reference Detail page, enter values for the following fields:
Page Element
Description
Standard Type
Select the type of standard that the code falls under. Standard types represents fields or disciplines such as Materials, Engineering, or Installation.
Standard Name
Enter the title of the section that contains this code reference. This title comes from the source document.
Code Section
Enter the section number for this code reference. The number uniquely identifies this reference within the source document.
Effective Start Date and Effective End Date
Enter the official effective start date of the code reference, and optionally enter an end date.
Code Type
Select a code type from the values that you defined on the Code Type page. The code type identifies the source document.
Description
Enter a description of the reference.
URL
Enter a URL link to the source document.
Content
Enter detailed content copied from the source document.
Click Save.
Modifying a Code Reference
Select
Click a row on the Code Reference page.
On the Code Reference Detail page, make any necessary changes.
Click Save.
Deleting a Code Reference
Select
Click a row on the Code Reference page.
On the Code Reference Detail page, click Delete.
You will be prompted to confirm the permanent deletion.
Setting Up Public Users
Public user setup includes configuration options related to public user registration and account management.
This image illustrates the Public User Setup page.
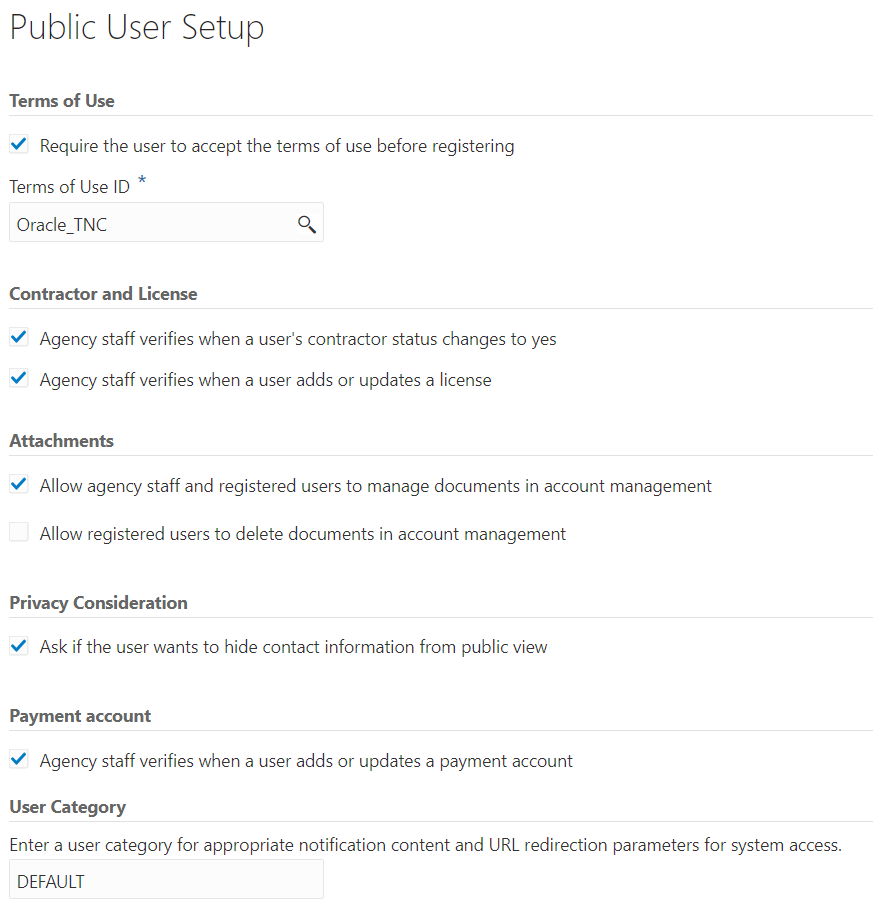
To set up public users:
Select
In the Terms of Use section of the page, configure these options:
Page Element
Description
Require the user to accept the terms of use before registering
Select this check box if public users must accept your terms of use as part of the registration process.
Terms of Use ID
If you require public users to accept your terms of use during registration, select the terms of use definition for the registration process.
This field is visible only if the Require the user to accept the terms of use before registering check box is selected.
Note: If you change the Terms of Use ID, users who have already registered are required to accept the new terms the next time they sign in. In this scenario, a window with the new terms opens as soon as the public user signs in. The user must select the agreement check box in order to continue.In the Contractor and License section of the page, configure these options:
Page Element
Description
Agency staff verifies when a user’s contractor status changes to yes
Select this check box if agency staff must verify the contractor status of a public user who self-identifies as a contractor.
Agency staff verifies when a user adds or updates a license
Select this check box if agency staff must verify all licenses that are added to a user profile. Public users can add one license during the registration process. Public users and agency staff can add additional licenses using account management functionality.
In the Attachments section of the page, configure these options:
Page Element
Description
Allow agency staff and registered users to manage documents in account management
Select this check box to enable attachments in user accounts. When you enable attachments, both users and agency staff can add attachments to user accounts and modify information about existing attachments.
Agency staff can also delete attachments, but public users can’t delete attachments unless you also select the “Allow registered users to delete documents in account management” check box on this page.
Allow registered users to delete documents in account management
Select this check box to allow public users to delete attachments that are associated with their account. This setting does not affect agency staff, who can always delete account attachments.
This check box is visible only if you enable attachments by selecting the “Allow agency staff and registered users to manage documents in account management” check box.
In the Privacy Consideration section of the page, configure these options:
Page Element
Description
Ask if the user wants to hide contact information from public view
Select this check box to give public users the option to mask their name and contact information when a member of the public views the user’s applications.
If this check box is selected, the initial registration page gives users the opportunity to mask their information. Help text explains that the public can still view the property address even if the user’s information is masked.
After a user registers, either the user or agency staff can update this preference using Account Management functionality.
In the Payment Account section of the page, configure this option:
Page Element
Description
Agency staff verifies when a user adds or updates a payment account
Select this check box if agency staff must verify all payment accounts (also called trust accounts) that are added to a user profile. Public users and agency staff can add payment accounts using account management functionality.
In the User Category section of the page, configure this option:
Page Element
Description
Enter a user category for appropriate notification content and URL redirection parameters for system access
Enter the user category to be assigned to registered public users. Typically you should use the delivered category DEFAULT.
The user category that you specify will be associated with user accounts that are created by the public user registration process.
The category controls the templates for account-related notifications such as emails for first-time registration and for resetting the account password. The category also controls URL redirection so that when users set or reset their password in the Oracle Applications Cloud, they are immediately transferred to the public sector system.
For more information about user categories, see Managing Users in Public Sector Compliance and Regulation and Setting the Next URL for the Default User Category.
Click Save.
Setting Up Public User Roles
To ensure that registered public users have appropriate system access, you must define which role is assigned to the user IDs that are created during the registration process.
When a public user registers, the Oracle system assigns a single role to the new user. Because the user is assigned just one role, access to different areas of the system is established through a role hierarchy. In this hierarchy, the various roles that provide access to different areas of the system are all children of a single parent role that you create.
Setting up public user roles involves these steps:
Use the Security Console to create a specific set of roles for public user:
This step is explained in detail in the topic Creating Custom Roles for Public Sector Community Development. It consists of these tasks:
Create custom roles that provide access to permit-related functionality.
Create the single role assigned during user registration, and set up its role hierarchy.
In the hierarchy, the child roles include the delivered PSC Registered Public User role as well as the additional roles that you created for permit access.
Note: Do not use the delivered PSC Registered Public User as your single role for registered public users. This role does not provide access to permit-related functionality.
Use the Public User Roles page to identify the role to be assigned during user registration.
Identifying the Single Role to be Assigned During Public User Registration
To identify the single role to be assigned during public user registration:
Select
If the Public User Roles page already lists a role, delete it before you add the new role.
The button for adding a role is hidden if a row already exists. You cannot modify the existing row, so you must instead delete it and then add a new one.
To delete the existing row:
Click the row to access the Role Details page.
Click Delete.
On the Public User Roles page, click Add.
On the Role Details page, use the Role ID field to select the single role to be assigned during the public user registration process.
The Role ID is the only enterable field on the Role Details page. To select a role based on the descriptive role name rather than the numerical role ID, use the prompt button for the Role ID field, then expand the Search Criteria section of the lookup page so you can search by role name.
Note: If you correctly followed the instructions for creating the single role to be assigned to registered public users, the role name is PSC Custom Registered Public User and the role code is CUSTOM_PSC_REGISTERED_PUBLIC_USER.Click Save.
Setting Up Terms of Use
The Terms of Use page stores rules and guidelines to which user must agree as a condition of using a service. The terms act as a legal contract. They are also known as Terms and Conditions or Terms of Service. When you set up a terms of use definition, you also specify the contexts where the definition is available. For example, you can specify that certain terms can be used for public user registration but not for permit applications or planning and zoning applications.
You add, modify, and delete terms of use definitions on the Terms of Use page.
This example illustrates the Terms of Use Details page.
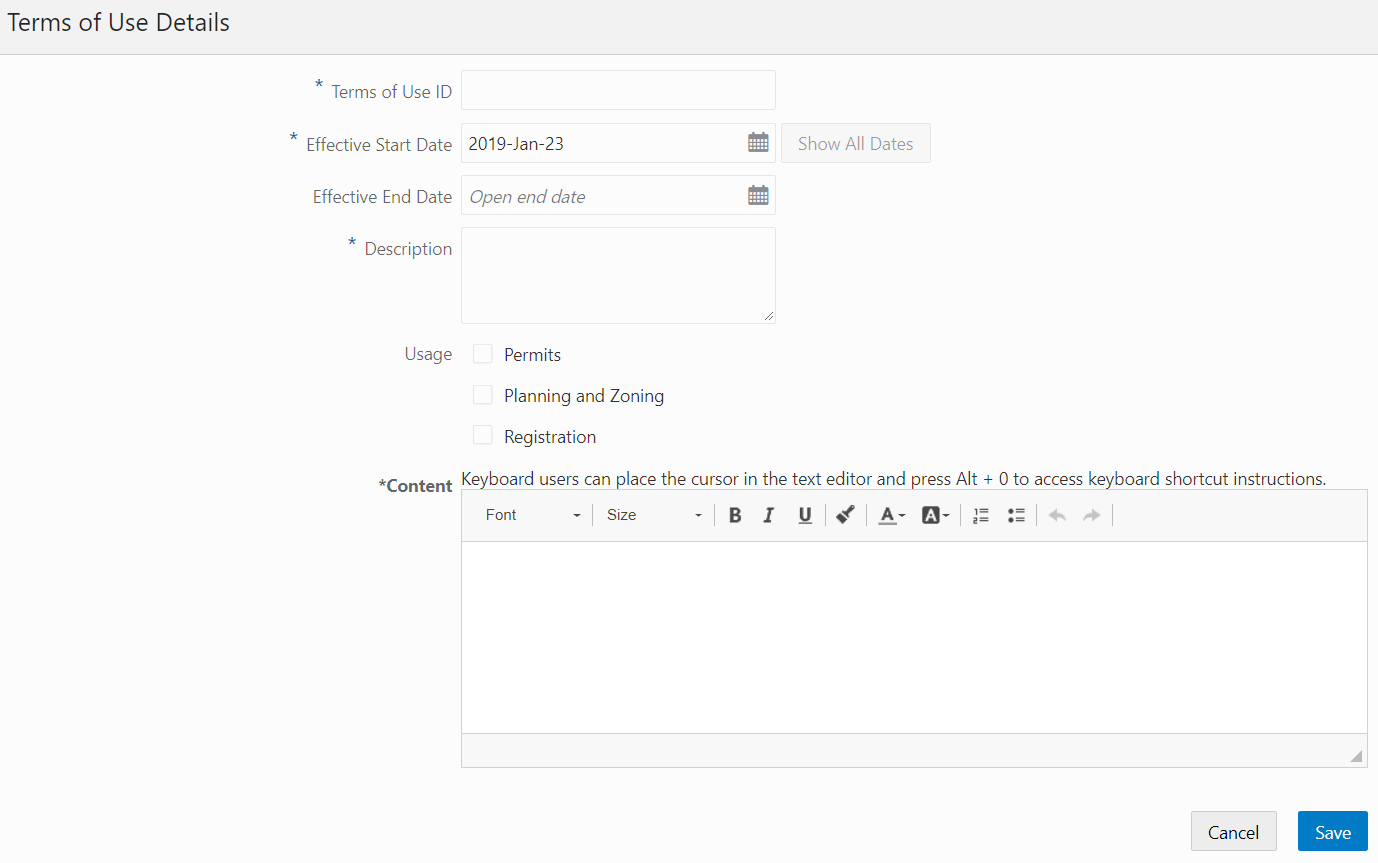
Adding Terms of Use
Select
On the Terms of Use page, click Add.
On the Terms of Use Details page, enter values for the following fields.
Page Element
Description
Terms of Use ID
Enter an identifier for the terms of use definition.
If a definition changes over time, create multiple definitions with the same ID and new effective dates. The effective dates of the different versions must not have gaps or overlap.
Effective Start Date
Enter the first day that the definition is valid.
Effective End Date
Enter the date, if any, when the definition will no longer be valid. To keep the definition valid indefinitely, do not enter a date. If no date is specified, the field displays the text Open end date.
After a definition is saved, the end date becomes read-only. Although you can’t make manual changes, the system can still update the end date to accommodate new effective-dated entries. For example, if the currently effective definition has an open end date, and you create a new definition with a later start date, the original definition’s end date changes to the day before the new definition goes into effect.
Show All Dates
Click this button to access the effective-dated history of the definition. This button is not available during the creation of a new definition.
On the page that displays this history, use the Add button to add a new effective-dated entry for the definition. The new entry inherits the same Terms of Use ID. You provide the new effective start date and other details for the definition.
The system provides logic to prevent gaps or overlaps in the effective-dated history.
Description
Enter a description of the terms of use. This is not part of the Terms of Use text that public users see.
Usage
Select the Permits check box to make this terms of use definition available for permits applications. This option makes the definition available to the Terms of Use ID field on the Permit Type page. Note that it is also necessary to add the Terms of Use element to the permit form.
Select the Planning and Zoning check box to make this terms of use definition available for planning applications. This option makes the definition available to the Terms of Use ID field on the Planning Application Type page. Note that it is also necessary to add the Terms of Use element to the planning application form.
Select the Registration check box to make this terms of use available for registration functionality. This option makes the definition available to the Terms of Use ID field on the Public User Setup page. See Setting Up Public Users.
You must select at least one check box.
Content
Enter and format the detailed content of the terms to which a user must agree. This is the text that users see when they are asked to agree to the terms.
Click Save.
Modifying Terms of Use
Select
Click a row on the Terms of Use page.
On the Terms of Use Details page, you can update the description, usage and content.
Click Save.
Managing Effective-Dated Terms of Use Definitions
This example illustrates the Terms of Use Details modal page that displays the effective-dated history of a terms of use definition.
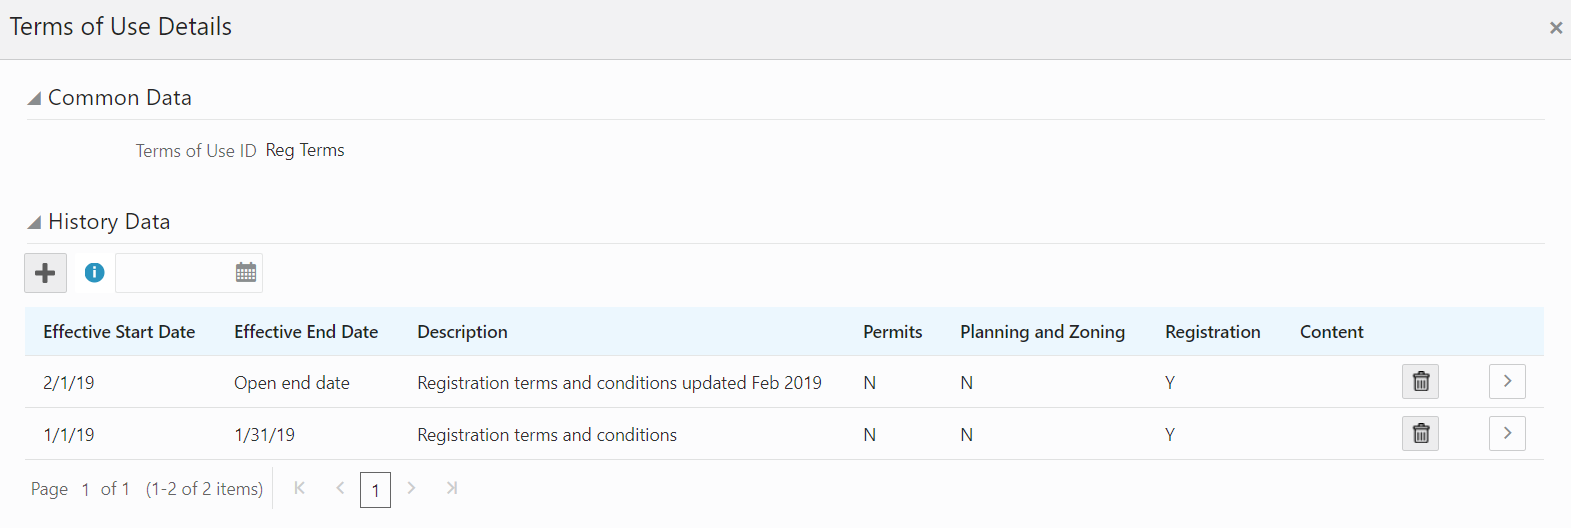
Select .
Click a row on the Terms of Use page to open the Terms of Use Details page.
Click the Show All Dates button to view the effective-dated history of the definition you opened.
Expand the Common Data section to see the Terms of Use ID.
Expand the History section to see a list of all versions of this terms of use definition.
Click a history row to open the Terms of Use Details page for the specific row.
Click the Add button in the History section to create a new version of the definition.
In the new definition, you can modify any of the data except for the Terms of Use ID. An error message appears if the new effective dates create gaps or overlaps in the definition history.
Deleting Terms of Use
Select
Click a row on the Terms of Use page.
On the Terms of Use Details page, click Delete.
You are prompted to confirm the permanent deletion.
Setting Up the Twilio Security Endpoint
This topic discusses how to enable and set up the Twilio security endpoint for text message communications.
Text communications through Twilio is an optional feature provided in Oracle Functional Setup Manager (FSM) . Before configuring this feature, you must first enable it.
Enabling the Twilio Integration
Access FSM by selecting in the navigator.
Select a PSCR offering such as Public Sector Permits or Public Sector Planning and Zoning.
Click the Change Feature Opt In link.
Click the Features icon for the System Administration functional area.
Click the Enable check box for the Text Communications through Twilio feature.
Note: You can deselect the Enable check box to disable the Text Communications through Twilio feature.
Configuring the Twilio Security Endpoint
Once the Twilio integration is enabled, you can configure the Twilio security endpoint on the Manage Twilio Security Endpoint page.
Access FSM by selecting in the navigator.
Select a PSCR offering such as Public Sector Permits or Public Sector Planning and Zoning.
Select the System Administration functional area.
In the Show field, select All Tasks.
Select the Manage Twilio Security Endpoint task.
On the Manage Twilio Security Endpoint page, enter information for the following fields:
Page Element
Description
URL
Enter the URL to access Twilio’s token endpoint. This should include the host and the context root information. Use the sandbox endpoint for testing and then use the live URL when you go live.
Security Policy
Select the applicable token from the drop-down list.
Username
Enter the API client_id value for your Twilio endpoint account.
Password
Enter the Twilio endpoint API secret code for your Twilio endpoint account.
Click Save and Close to save the configuration and return to the Setup page.
Delivered Communication Events
Oracle Public Sector Community Development delivers a robust registry of communication events that are triggered by transactions and processes within the application. You can view a list of communication events in this topic.
Ad Hoc Communication Resource
| Event Name |
Communication Description |
|---|---|
| Ad Hoc Communication Event |
An ad hoc email or notification was sent. |
For more information on ad hoc communications, see Working with Ad Hoc Communications.
Communication Record Details
| Event Name |
Communication Description |
|---|---|
| Web Form Response |
Notifies agency staff that an applicant responded to a web form questionnaire. |
For more information on web form questionnaires, see Working with Application Communications.
Fee Communications
| Event Name |
Communication Description |
|---|---|
| New Fees Due |
When agency staff manually adds a new fee, the applicant receives a notification that new fees have been assessed and are due. |
For more information on manually adding a fee item, see Working with Fees and Payments.
Generic Alert Resource
| Event Name |
Communication Description |
|---|---|
| General Alerts |
Text was created to appear in the banner of the Agency Springboard or the landing pages for anonymous and registered users. |
For more information about generic alerts, see Defining Alerts.
Inspection Communications
| Event Name |
Communication Description |
|---|---|
| Final Inspection Passed |
When an inspector submits the final inspection for a permit with a passing result, the permit technician or applicant receives a notification. For more information about performing inspections, see Oracle Inspector Overview. |
| Inspection Canceled |
When the applicant or agency staff cancel an inspection, the applicant, inspection contact, inspector, and inspection supervisor can receive a notification. For more information, see Managing Inspections for an Agency and Managing Inspections for a Permit. |
| Inspection Complete |
When the inspector completes any inspection and submits the inspection results, the applicant or agency staff receive a notification that the inspection is complete, regardless of the inspection result. A notification is also sent when inspections are updated from Scheduled to Completed. For more information about performing inspections, see Oracle Inspector Overview. |
| Inspection ETA Updated |
When the inspector updates the estimated time of arrival to an inspection site for a scheduled inspection, the contact at the inspection location receives a notification. For more information about performing inspections, see Oracle Inspector Overview. |
| Inspection Requested |
The system can automatically create an email notification to the permit technician when an inspection request has been created. For more information about requesting inspections, see Requesting Inspections. |
| Inspection Rescheduled |
When the applicant or agency staff reschedule an inspection, the applicant, inspection contact, inspector, and inspection supervisor can receive a notification. For more information about rescheduling an inspection, see Assigning Inspections Using the Supervisor Calendar and Requesting Inspections. |
| Inspection Scheduled |
The system can automatically create an email notification to the inspector and inspection contact when the inspection has been scheduled and assigned to the inspector. For more information about assigning an inspection, see Assigning Inspections Using the Supervisor Calendar. |
Oracle Policy Automation Anonymous Results
| Event Name |
Communication Description |
|---|---|
| Anonymous Results Save |
The anonymous public user receives an email with the results of recommended permits after submitting the permit guide questionnaire. |
For more information about the Permit Guide for anonymous public users, see Setting Up the Landing Page for Anonymous Users.
Payment History Resource
| Event Name |
Communication Description |
|---|---|
| Payment Received |
A successful payment triggers a notification configured using an email template. |
Permits Workflow Communications
| Event Name |
Communication Description |
|---|---|
| Workflow 001 Workflow 002 Workflow 003 Workflow 004 Workflow 005 |
These delivered events are not associated with specific actions in the Public Sector system. Instead, they are generic events that are delivered for use with workflow. For example, you can use these events when configuring workflow to send notifications related to permit status changes. When you set up workflow in the Oracle Integration Cloud, you implement notifications by creating a workflow event that sends an event name, template name, and permit ID to the communications center. The communication center then takes care of sending the notification. |
Planning and Zoning Workflow Communications
| Event Name |
Communication Description |
|---|---|
| PNZ Workflow 001 PNZ Workflow 002 PNZ Workflow 003 PNZ Workflow 004 PNZ Workflow 005 |
These delivered events are not associated with specific actions in the Public Sector system. Instead, they are generic events that are delivered for use with workflow. For example, you can use these events when configuring workflow to send notifications related to planning application status changes to applicants and owners. When you set up workflow in the Oracle Integration Cloud, you implement notifications by creating a workflow event that sends an event name, template name, and planning application ID to the communications center. The communication center then takes care of sending the notification. |
Plan Review Communications
The following events are provided for plan reviews:
| Event Name |
Communication Description |
|---|---|
| Plan Reviewers Completed a Review Cycle |
The plan check coordinator receives a notification when all plan reviewers complete their reviews. |
| Plan Review Completed |
The applicant receives a notification with the outcome of the plan review plan coordinator cancels the review cycle or the plan review cycle is closed. |
For more information about plan review communications, see Managing Manual Plan Review Cycles and Managing Electronic Plan Review Cycles.
User Profile Notifications
The User Profile Notifications resource provides the following events.
| Event Name |
Communication Description |
|---|---|
| User Account Information Changed |
Notifies a public user when the user's account is updated by agency personnel. |
| Contractor License Verification Failed |
Notifies a public user that the contractor's license could not be verified. |
| Contractor License Verification Pending |
Notifies a public user that the contractor's license verification is pending. |
| Contractor License Verification Passed |
Notifies a public user that the contractor's license has been verified. |
| Law Enforcement Verification Failed |
Notifies a public user that their status as a member of law enforcement or a judicial agency could not be verified. |
| Law Enforcement Verification Pending |
Notifies a public user that verification for being a member of law enforcement or a judicial agency is pending. |
| Law Enforcement Verification Passed |
Notifies a public user that verification for being a member of law enforcement or a judicial agency is complete. |
| License Verification Failed |
Notifies a public user that the license could not be verified. |
| License Verification Pending |
Notifies a public user that the license verification is pending. |
| License Verification Passed |
Notifies a public user that the license has been verified. |
| Welcome Business Profile |
Sends a welcome notification and instructions to a permit applicant who creates a new business profile. |
| User Profile Information Changed |
Notifies a public user when the user's profile is updated by agency personnel. |
| Welcome Personal Profile |
Sends a welcome notification and instructions to a permit applicant who creates a new personal profile. |
User Trust Account Notifications
The User Trust Account Notifications resource provides the following events.
| Event Name |
Communication Description |
|---|---|
| Trust Account Verification Failed |
Notifies a public user that the trust account could not be verified. |
| Trust Account Verification Pending |
Notifies a public user that the trust account verification is pending. |
| Trust Account Verification Passed |
Notifies a public user that the trust account has been verified. |
Setting Up Communication Events
Communication events trigger delivery of different communication types to various users. The agency defines the content and recipients using communication templates.
Agency users add, modify, and delete communication templates on the Communication Event Details page.
The communication events themselves are delivered with Oracle Public Sector Community Development. For a list of the available communication events, see Delivered Communication Events.
Adding Communication Templates
Select in the navigator.
Click the row on the Communication Event page for which you want to add a template.
On the Communication Event Details page, click Add in the Communication Template grid.
On the Communication Template Details page, enter values for the following fields:
Page Elements
Definition
Code
Enter a unique identifier code for the communication template.
Note: To make the code unique, Oracle recommends that you create it using a portion of the communication event name. For example, you might use SUB01 for the email template of the Application Submit communication event. This is because communication template codes must be unique across all communication events. If you create a communication template for one event that has the same code as a template for another event, you will receive an error when you try to save it.Name
Enter a name for the communication template.
Channel Type
Specify the type of communication that this template generates. Values are:
Alert: Generates text that is displayed to users when they log in to the application.
Email: Generates an email that is sent to users.
Notification: Generates a notification that appears when users click the notification icon in the application.
Text: Generates a short message service (SMS) text message that is sent to users.
Note: The fields that are available to define on this page vary depending on the channel type that you select.Visibility
Select which type of user can see this communication. Values are:
Account owner
Public user
Agency staff only
Note: This field does not appear for the Alert channel type.Enabled
Turn this switch on to activate the communication template. When this switch is turned off, the application does not generate the communication when the associated event is triggered.
Start Date Time and End Date Time
Enter the time period for which the alert is displayed.
Note: These fields appear only for the Alert channel type.MIME Type (Multipurpose Internet Mail Extensions type)
Select the format of the email that this communication template generates. Values are:
HTML
Text
Note: This field appears only for the Email channel type.Notification Priority
Turn this switch on to display notifications generated by this communication template at the top of the notification list.
Note: This field appears only for the Notification channel type.User Can Delete
Turn this switch on to enable users to delete notifications generated by this communication template from their notification lists.
Note: This field appears only for the Notification channel type.Select and Insert
These fields enable you to insert variable attributes into your communications. You select the field and the attribute that you want to insert in that field, and click Insert to enter a variable for that attribute.

For example, if you select the Body field and the Permit ID attribute, and click Insert, the ${Permit ID} variable is inserted into the Message Body field of the communication template.
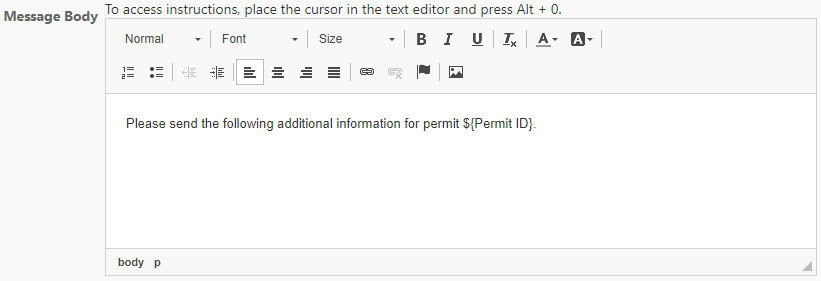
Whenever the application generates a communication using this template, it inserts the permit ID that is associated with the triggered communication event into the body text.
Remarks
Enter any additional information about the communication template. These remarks are not included in the generated communication.
From
For the Email channel type, enter the email address of the person or organization who is sending the generated email.
For the Text channel type, select the phone number of the person or organization who is sending the generated text message.
To
Enter the email addresses, user IDs, or phone numbers of the people or organizations that you want to receive the communication.
Note: Enter email addresses for the Email channel type, user IDs for the Alert and Notification channel types, and phone numbers for the Text channel type.Cc and Bcc
Enter the email addresses of the people or organizations that you want to receive a copy or blind copy of the communication.
Note: These fields appear only for the Email channel type.Subject
Enter a brief description of the purpose and content of the communication.
Note: This field appears only for the Email and Notification channel types.Message Body
Enter the main body text of the communication.
You can enter only plain, unformatted text for the Alert channel type, the Text channel type, and the Email channel type with the Text MIME type.
You can enter rich text, links, and images for the Notification channel type and the Email channel type with the HTML MIME type.
Click Save.
Modifying Communication Templates
Select .
Click the row on the Communication Event page for which you want to modify a template.
Click the row in the Communication Template grid that you want to modify.
On the Communication Template Details page you can:
Click Clone to create a copy of the communication template.
Update the communication template field values.
Note: You cannot edit the Code or Channel Type fields.
Click Save.
Deleting Communication Templates
Select .
Click the row on the Communication Event page for which you want to delete templates.
Click Edit in the Communication Template grid.
Select the check boxes next to all of the communication templates that you want to delete.
Click Delete. You will be prompted to confirm the permanent deletion.
Setting Up Reports
The report parameters that you define on the Report Configuration pages filter the data that is generated for the reports. You can use delivered or provide customized reports.
Oracle Public Sector Community Development delivers these reports:
| Report Name |
Description |
Initiated From |
|---|---|---|
| Deposit Slip |
Lists deposit information. |
|
| Inspection Summary |
Displays inspection-related information. |
|
| Payment Invoice |
Displays invoice information. |
|
| Building Permit |
Displays permit-related information. |
|
| Payment Receipt |
Lists payment receipt information. |
|
| Inspection Activity |
Displays all inspection activity for an agency over a specified date range. |
BI Catalog () |
| Planning Application |
Displays planning activity over a specified date range. You select which applications are included the report. You can generate the report for one or more specific applications, or for all applications handled by your agency. |
BI Catalog () |
For reports initiated from within Public Sector Compliance and Regulation, you add, modify, and delete report parameters on the Report Configuration Details page.
Adding Report Parameters
Select .
Click the report row on the Report Configuration page for which you want to add a parameter.
On the Report Configuration Details page, click Add in the Parameters grid.
Enter values for the following fields:
Page Elements
Definition
Parameter ID and Parameter Name
Enter a unique ID and name for the report parameter.
Parameter Data Type
Enter the data type for the report parameter.
Control Object and Control Name
Enter a field from which the report receives data along with a name for that field.
Click Save.
Modifying Report Parameters
Select .
Click the report row on the Report Configuration page for which you want to modify a parameter.
Click the row in the Parameters grid that you want to modify.
You can:
Update the report parameter field values.
Delete the report parameter. You will be prompted to confirm the permanent deletion.
Click Save.
Deleting Report Parameters
Select .
Click a row on the Report Configuration page.
Click Edit in the Parameters grid.
Select the check boxes next to all of the report parameters that you want to delete.
Click Delete. You will be prompted to confirm the permanent deletion.
Updating the Report Path
Select .
Click the report row on the Report Configuration page for which you want to modify the report path.
On the Report Configuration Details page, enter a path to the desired BI Publisher report.
Click Save.
Setting Up Document Categories and Subcategories
You set up document categories and subcategories on the Document Category pages to organize the various types of attachment files.
This example illustrates the Document Category Details page, which is described in the following text.
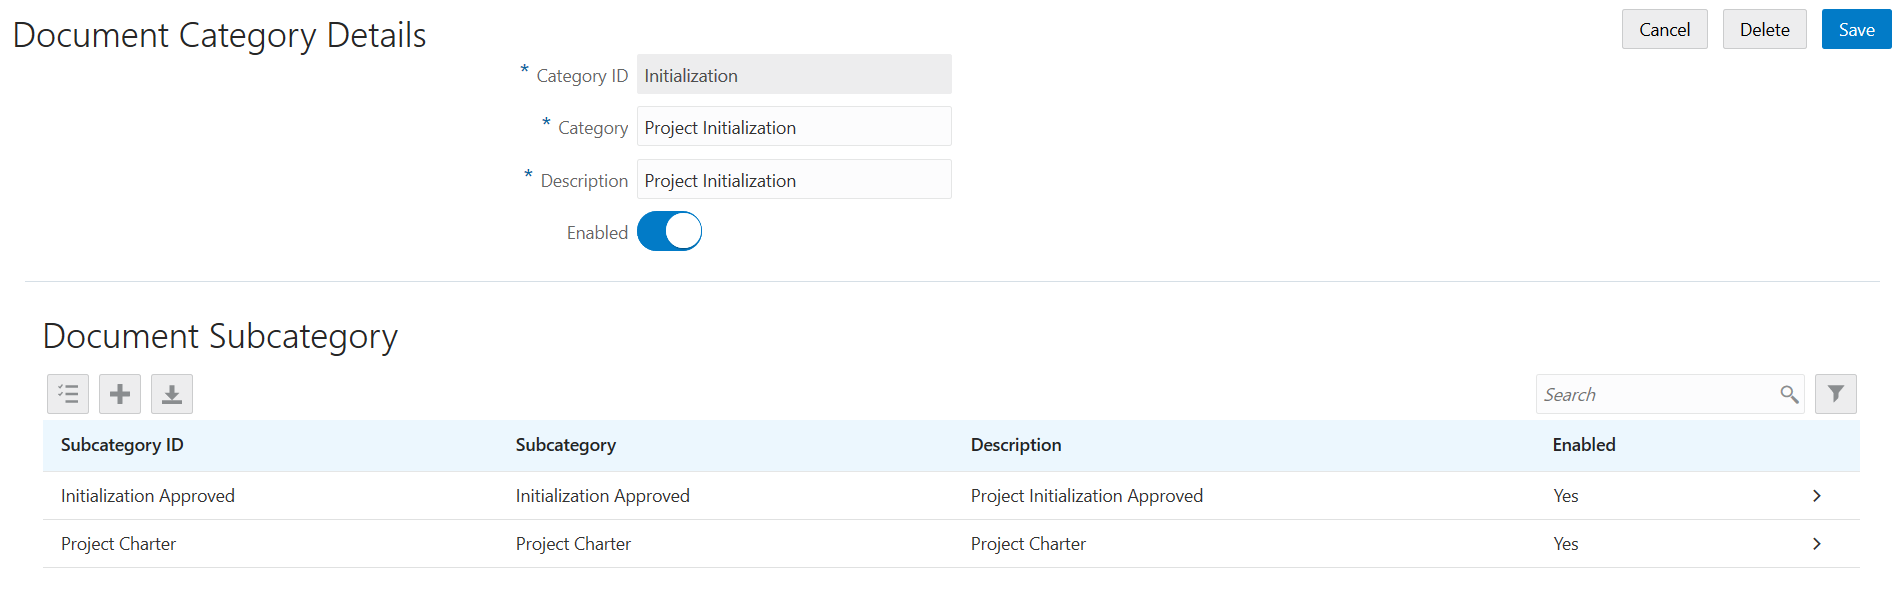
Adding Document Categories and Subcategories
Select .
On the Document Category page, click Add to add a new document category.
Enter values on the Document Category Details page:
Page Element
Description
Category ID
Enter an identifier for the category.
Category
Enter a name for the category.
Description
Enter a description of the category.
Enabled
Turn the switch on to make the category available for use. The category is disabled by default.
Click Save.
If you want to add a subcategory, click Add in the Document Subcategory section.
On the Document Subcategory Details page, enter an ID, name, and description for the subcategory.
Click Save.
Modifying Document Categories and Subcategories
Select .
On the Document Category page, select the row for the category that you want to modify.
On the Document Category Details page, you can modify the category name and description, and turn the Enabled switch on or off.
Click Save to save any changes.
To modify a document subcategory:
Select the associated category to open the Document Category Details page.
Select the subcategory that you want to modify.
On the Document Subcategory Details page, you can change the subcategory name and description, and turn the Enabled switch on or off.
Click Save.
Deleting Document Categories and Subcategories
Select .
On the Document Category page, select the row for the category that you want to delete.
If you want to delete the document category, click Delete on the Document Category Details page.
Note: When you delete a document category, all associated subcategories are also deleted.If you want to delete multiple document categories, you can delete them on the Document Category page:
Click Edit.
Select the check boxes for the document category rows to delete.
Click Delete.
To delete the document subcategory, click Delete on the Document Subcategory Details page.
If you want to delete multiple subcategories, you can delete them from the Document Category Details page using the Edit and Delete buttons.
Setting Up Document Groups
You set up document groups using the Document Group pages to organize the various categories of attachment files into a grouping.
This example illustrates the Document Group Details page, which is described in the following text.
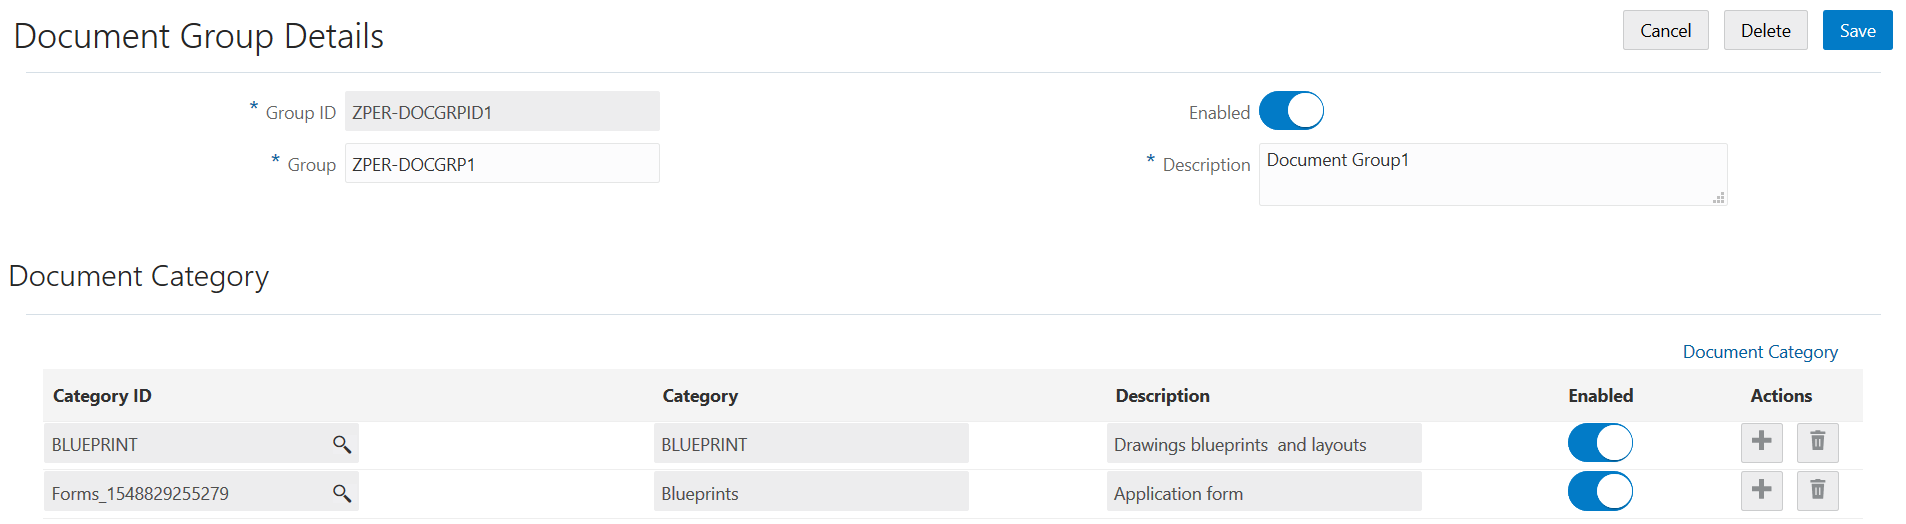
Adding Document Groups
Select .
On the Document Group page, click Add to add a new document group.
Enter values on the Document Group Details page:
Page Element
Description
Group ID
Enter an identifier for the group.
Group
Enter a name for the group.
Description
Enter a description of the group.
Enabled
Turn the switch on to make the group available for use. The group is disabled by default.
Click Save.
Add document categories that make up the grouping by clicking Add in the Document Category section.
Enter a document category ID or use the lookup prompt to find a category ID.
If desired, you can click the Document Category link to research which category to choose. For more information about document categories, see Setting Up Document Categories and Subcategories.
Click Save.
Modifying Document Groups
Select .
On the Document Group page, select the row for the group that you want to modify.
On the Document Group Details page, you can modify the group name and description, and turn the Enabled switch on or off.
Click Save to save any changes.
You add or remove document categories from the group in the Document Category section.
To modify a document category, you must go to the Document Category definition pages. See Setting Up Document Categories and Subcategories.
Deleting Document Groups
Select .
On the Document Group page, select the row for the group that you want to delete.
Click Delete on the Document Group Details page.
If you want to delete multiple document groups, you can delete them on the Document Group page:
Click Edit.
Select the check boxes for the document group rows to delete.
Click Delete.
To delete a document category from the group, click the Delete icon for the document category row in the Document Category section.
Setting Up Dashboards
You add, modify, and delete dashboard configurations on the Dashboard Configurations page.
Adding a Dashboard Configuration
Select .
On the Dashboard Configuration page, click Add.
On the Dashboard Configuration Details page, enter values for the following fields:
Page Element
Description
Dashboard ID
Enter a unique name for the dashboard.
Description
Enter a description of the dashboard
Path
Enter the Oracle Business Intelligence (BI) Catalog portal path for the dashboard. For example the portal path for the Permits dashboard is %2Fshared%2FPublic%20Sector%2F_portal%2FPublic%20Sector&page=Permits.
Enabled
Turn on this switch to activate this dashboard.
Default
Turn on this switch to make this the default dashboard.
Note: Only one dashboard can be designated as the default.Click Save.
Modifying a Dashboard Configuration
Select .
Click a row on the Dashboard Configuration page.
On the Dashboard Configuration Details page you can:
Update the dashboard configuration field values.
Note: You cannot edit the Dashboard ID.Delete the dashboard configuration. You will be prompted to confirm the permanent deletion.
Click Save.
Deleting Dashboard Configurations
Select .
Click Edit.
Select the check boxes next to all the dashboard configurations that you want to delete.
Click Delete. You will be prompted to confirm the permanent deletion.
Setting Up Lookups
This topic describes how to add and change values that appear in lookup lists. Lookup lists are referenced by various fields in the application that display a static set of values from which the end user can select a value.
Lookup Types and Lookup Values Overview
Lookup types in applications are used to represent a set of codes and their translated meanings. To the end users, a lookup type displays a list of values from which they select values.
You use the Lookup Types page to access lookup types, and you use the Lookup Type Details page to modify lookup types, add lookup values, and add lookup types, where authorized.
When working with lookups, you deal with lookup types and lookup values.
| Lookup Element |
Description |
|---|---|
| Lookup Type |
A lookup type is a static list of values users view to make entries in the application. The application references a lookup type to display its list of values. |
| Lookup Value |
A lookup value is a single item contained within a lookup type. For example, Paid is a lookup value for the Fee Status lookup type. Lookup types typically contain numerous lookup values. |
Lookup types are delivered as seed data for your service. You can only modify selected lookup types, such as Business Type, UOM Type, Standard Code Type, and so on. Most lookup types are read-only.
Modifying Lookup Types
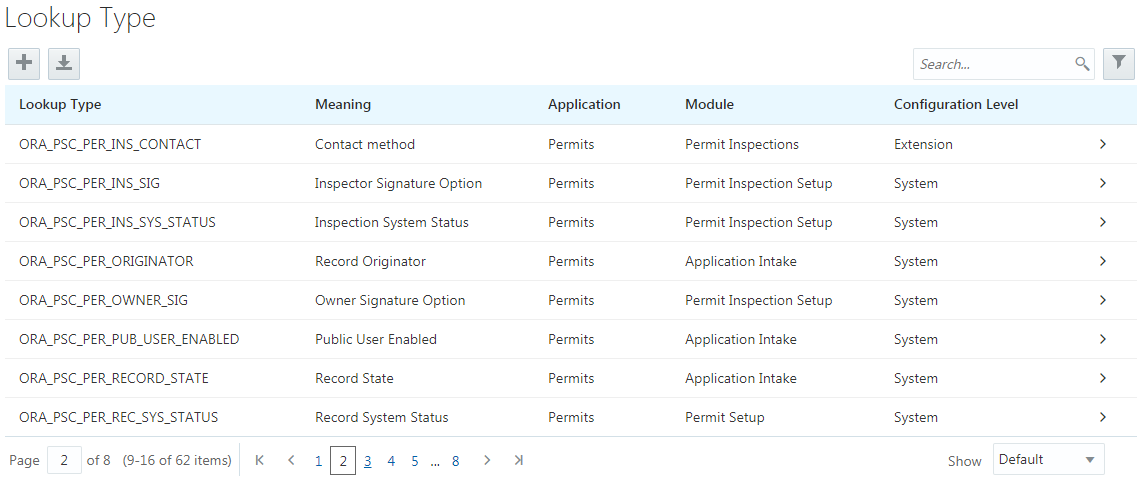
To modify a lookup type:
Select
On the Lookup Types page use the Search box to filter the lookup types by keyword.
For example, to view the Business Type lookup type, enter business in the Search box.
Click on the row for the lookup type you want to view.
View the contents of the Lookup Type Details page.
Page Element
Description
Lookup Type
Identifies the lookup type within the application.
Application
Identifies the application that uses the lookup type. For example, Permits, Common Components, and so on.
Meaning
The actual UI display name used to represent the list of values contained in the lookup type.
Configuration Level
Indicates at what level the lookup can be modified. Options are:
System: Only Oracle development teams can modify lookup types at this configuration level.
Extension: Customers can perform minimal tasks, such as add lookup values.
User: Customers can add lookup values, delete lookup values, update the meaning, and update the description.
Module
The internal application module using the lookup type, such as Billing Entry, Billing Setup, and so on.
Description
Identifies the purpose and use of the lookup type.
If you need to add lookup values, refer to the following section for steps for that task.
Click Cancel to close the lookup type, or click Save if you made any changes.
Adding Lookup Values
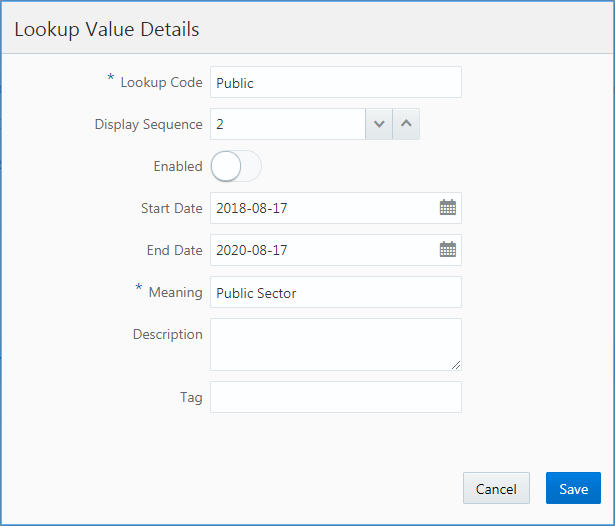
You can add lookup values to lookup types with a configuration level set to User or Extension.
To add lookup values:
Select
On the Lookup Types page use the Search box to filter the lookup types by keyword.
For example, to view the Business Type lookup type, enter business in the Search box.
Click on the row for the lookup type you want to view.
On the Lookup Type Details page, click Add under Lookup Value Type.
On the Lookup Value Details page, enter these values:
Page Element
Description
Lookup Code
An internal application code for each lookup value that is not visible to users. It is typically a shorter, less user-friendly representation of the item. For example, ORA_DRIVER_LIC for State Driver’s License, or LEN for Length, if listing units of measurement.
Display Sequence
Control in what sequence the lookup value appears in the list displayed to users, where 2 appears above 3. If you do not specify a sequence, the application displays the items in the order they were entered.
Enabled
Turn on to make a lookup value active. If a lookup value is not enabled, then the application does not display it to the end user in the list of values for that lookup type.
Start Date
Set a start date for the lookup value to become active. Even if the lookup value is enabled, if a start date is set, the application does not display the lookup value until the start date is reached.
End Date
Set an end date for a lookup value to no longer be displayed in a list of values.
Meaning
The display name for the lookup value. End users see this value in the list of values displayed at run time. They do not see the Lookup Code value.
Description
Provide any additional information to help identify the purpose of the lookup value or clarification regarding what it represents.
Tag
Tags allow you to add a label to your lookup codes. A tag can be used to categorize lookups based on facilitating searches or guiding how a lookup should be used.
Click Save.
Working with Configuration Levels
The configuration level attribute determines who can modify a lookup type and what can be modified. The configuration levels are:
System: Only Oracle development teams can modify lookup types at this configuration level.
Extension: Customers can perform minimal tasks, such as add lookup values.
User: Customers can add lookup values, delete lookup values, update the meaning, and update the description.
| Task |
User |
Extension |
System |
|---|---|---|---|
| Add a lookup type |
Yes |
No |
No |
| Delete a lookup type |
Yes |
No |
No |
| Modify lookup type meaning |
Yes |
No |
No |
| Modify lookup type description |
Yes |
No |
No |
| Add lookup values |
Yes |
Yes |
No |
| Delete lookup values |
Yes (if you created it) |
Yes (if you created it) |
No |
| Modify lookup value attributes |
Yes (except for Lookup Code) |
Yes (if you created it, and except for Lookup Code) |
No |
Adding Lookup Types
To add a lookup type:
Select
On the Lookup Types page click Add for the Lookup Type grid.
On the Lookup Type Details page, enter these values:
Lookup Type (The value you enter must be uppercase and cannot begin with the prefix ORA_, which is used to distinguish your custom lookup types from delivered lookup types.)
Meaning
Module
Description
Click Add for the Lookup Value grid for each lookup value you need to add to the lookup type.
-
Click Save.
Setting Up Data Format Exchange Maps
The Data Format Exchange utility is a data-mapping utility that enables you to map fields between source and target locations.
Business analysts create and modify Data Format Exchange maps on the Data Format Exchange page.
Adding a Data Format Exchange Map
Select .
On the Data Format Exchange page, click Add.
For the Definition step, enter values for the following fields:
Page Element
Description
Mapping Name and Description
Enter a name and description for the data mapping.
Source Type
Select the type of source format to be included in the data mapping.
Note: Currently, VO is the only valid value for this field.Target Type
Select the type of target format to be included in the data mapping.
Note: Currently, CSV is the only valid value for this field.Enabled
Turn this switch on to make the data mapping available to select in the Mapping Name field on the Export Journals to ERP page. For more information on exporting journals, see Exporting Journal Entries.
Click Next.
For the Source step, enter values for the following fields:
Page Element
Description
Source Name
Selects the source view to be included in the data mapping, such as Journals to Export.
Click Next.
For the Target step, click Upload to select a file that will be updated with the results of the field mapping.
Click Next.
For the Mapping step, enter values for the following fields:
Page Element
Description
Target Field
Displays each field in the target format.
Source Field
Select the source field that you want to map to each target field.
Transform
Select an option to modify the value for the target field.
Note: Currently, Constant is the only valid value for this field.Transform Parameter
Specify the parameter used to determine the value for the target field. For example, if the target field is Effective Date and the Transform value is Constant, the Transform Parameter might be 01/01/2018.
Click Submit to save the Data Format Exchange map.
Note: At any point during the process, you can click Previous to go back one step. You can also click Cancel to exit the data mapping setup process and discard your changes.
Modifying a Data Format Exchange Map
Select .
Select a mapping on the Data Format Exchange page.
For the Definition step, you can enable or disable the data mapping.
Click Next.
You can’t update any fields in the Source step.
Click Next.
For the Target step, you can click the file link to download a copy of the file.
Click Next.
For the Mapping step, you can update the values of the Source Field, Transform, and Transform Parameter fields.
Click Submit to save your changes to the Data Format Exchange map.
Note: At any point during the process, you can click Previous to go back one step. You can also click Cancel to exit the data mapping update process and discard your changes.