3Overview of Working With Incidents And Cases
Using the Agency Springboard
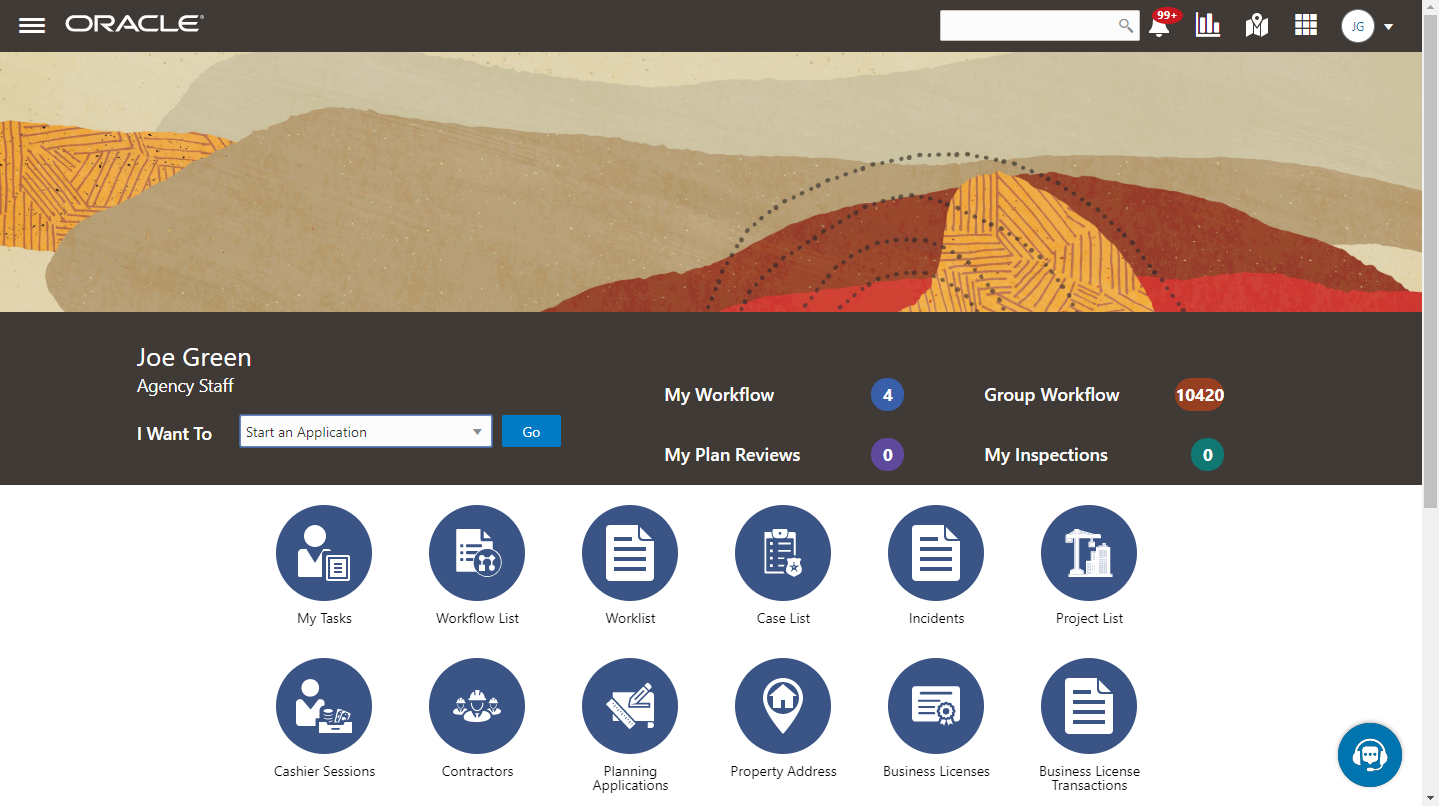
The Agency Springboard provides a landing page for agency staff to manage their work.
The Agency Springboard provides agency staff with a central launching page for access to tasks and pages that are relevant to the staff member’s role.
Some of the elements on the agency springboard are similar elements on the landing pages for public users, while others are specifically for agency staff.
This example illustrates the Agency Springboard. The springboard is configured to show the quick actions section (“I Want To” actions), the task list element (links to workflow tasks and to my plan reviews and my inspections), and a selection of springboard tiles. The alerts banner is not shown in the example.
For information about setting up the elements on the Agency Springboard, see Setting Up the Agency Springboard.
Global Banner
The global banner appears at the top of pages throughout the system.
The global banner for public users does not include all of the elements that are available to agency staff. The banner for agency staff includes these elements:
| Page Element |
Description |
|---|---|
 |
Click the Back icon to return to the previous page. The banner doesn’t include this icon when you’re on the springboard. |
 |
Click the Navigator icon to access pages using a hierarchical menu. |
 |
Click the Home icon to return to the Agency Springboard. The banner doesn’t include this icon when you’re already on the springboard. |
| Global Search (unlabeled search box) |
Enter search terms, then press enter or click the search icon to search for any of these objects:
Searching opens the search results page, which has tabs for each type of searchable object. Click a tab to see the indicated subset of search results, and click a row in the search results to access the object details. Tabs for features that you haven’t implemented are hidden. For example, if you don’t use project functionality, the Projects tab is hidden.
Note: Public users also have access to the global search, but their search results do not include code enforcement objects (citations, incidents and cases).
|
 |
Click the Notifications icon to open a pop-up window that lists the most recent unread notifications. Each notification row includes an action menu for marking the notification as read and a details button for opening the Notification Details page. The pop-up window also has a View Allbutton that opens the Notifications list page, where you can access all of your notifications. A badge on the icon indicates the number of unread notifications. If there are more than 99 unread notifications, the badge displays 99+. |
 |
Click the Reports and Analytics icon to access the Oracle Business Intelligence Catalog (BI Catalog) or access predefined dashboards. |
 |
Click the Maps icon to access these maps:
If you only have security access to one map, clicking the Maps icon opens that map. If you have access to both maps, clicking the Maps icon opens a menu so you can choose which map to open. |
 |
Click the Page Finder icon to open a pop-up window where you can search pages by their full or partial page name. As you type, the page list is updated to match your criteria. Click any page in the list to access it. The page finder provides a convenient alternative to the hierarchical menu navigation found in the Navigator. |
 |
Your user account is represented by a circle with your initials. Click this icon to access a menu with options for updating your user preferences, changing your password, or signing out. This menu also includes a Help item that provides access to system documentation. |
Alerts
Alerts are displayed as a banner that broadcasts messages with important information. These alerts are configured by the agency administrators.
Quick Actions (I Want To)
You can perform quick actions section using the I Want Todrop-down list. Choose an action, such as starting an application or scheduling an inspection, then click Go to access the related page.
This table lists the actions in the I Want Tolist. You see only the actions to which you have security access.
| Action |
Description |
|---|---|
| Start an Application |
Opens the Apply page, where you can chose an application type and start an application. See Choosing an Application Type. |
| Estimate Fees |
Opens the Apply page, where you can chose an application type and estimate fees for your application. See Getting an Online Fee Estimate. |
| Schedule an Inspection |
Opens the Inspection List page, where you can request a permit inspection. See Requesting Inspections. |
| Report an Issue |
Opens the Select an Issue Type page, where you can being the process of reporting a code enforcement issue. See Reporting Issues. |
| Pay Citation |
Opens the Pay Citation page, where you can enter a citation ID and enter payment information on behalf of a public user. See Paying Citations |
Task Lists
The task list section provides links to the Task Management page. Each link corresponds to a specific tab on the Task Management page. Use the links and the tabs to view the indicated type of task. The number next to each link provides a count of the indicated type of task.
My Workflow
Group Workflow
My Plan Reviews
My Inspections
For more information about tasks, see Managing Tasks.
Tiles
The lower area of the springboard displays tiles that you click to access specific transactions.
The Issue Lifecycle
Code enforcement provides a process for tracking, evaluating, and managing possible code violations in your jurisdiction. After an issue is reported, it goes through a defined process where agency staff processes the initial incident and, if a violation is found during the initial inspection, a case is created to enable agency staff to manage the issue until it is resolved.
Incidents, Cases, and Issues
This table explains the different terms that apply to a reported problem.
| Term |
Definition |
|---|---|
| Incident |
When an problem is reported, the system object that corresponds to the report is an Incident. If several people report the same problem, there can be multiple incidents for the problem. Code technicians claim incoming incidents and process them using a fixed set of possible actions. A technician can close the incident, mark it as a duplicate, assign it to a different technician, or schedule an inspection so that a code enforcement officer can determine if a code violation exists. |
| Case |
If an incident is determined to be a code violation, a case is created. The case is the tracking mechanism for all violation-related activity such as sending a notice of violation, issuing a citation, tracking fees and payments, or managing an appeal. |
| Issue |
Issue is a general term for a problem that is entered into the code enforcement system. It refers to both incidents and cases. An issue is not a system object. Public user pages always use the term Issue because public users don’t need to distinguish between incidents and cases. Agency-facing pages use the term Issue in limited situations where incidents and cases appear together. |
Incident and Case Process Flow
Incidents and cases have their own distinct process flows as illustrated below. Not all issues go through all of these events, but the diagrams provide a general outline of the issue lifecycle.
This diagram illustrates the lifecycle of an incident.

The events in the case lifecycle are illustrated below, although not all cases go through all of these events:
This diagram illustrates the lifecycle of a case.

Time Rules and the Issue Lifecycle
Time rules calculate due dates for specific events based on a trigger date and the issue priority. For events such as inspections that can occur multiple times, the amount of time until the due date can also be based on the occurrence count of the process (first inspection, second inspection, and so forth). An issue subtype definition includes a complete set of time rules, and Issues inherit the rules from the issue subtype.
For more information about setting up time rules, see Setting Up Time Rules.
Reporting an Issue
The code enforcement landing page for public users provides the entry point for members of the public to report issues.
Only registered users can report issues. A user who begins reporting an issue without signing in is prompted to sign in before entering any issue details. Depending on the agency’s configuration, users may be allowed to choose whether the issue includes their name and contact information.
Users start an issue report by choosing the general type of problem and then a more specific type of problem. The agency defines these categories by creating issue types and issue subtypes.
Users also provide the issue location, a description, and optional attachments such as photos or videos. Agencies can also add their own questions to collect additional information.
Submitting an issue report creates a new incident and uses the agency’s time rules to calculate the due date for reviewing the incident.
For more information about issue reporting, see Reporting Issues.
Claiming an Incident
Code enforcement technicians are responsible for the initial review and processing of incidents.
Technicians use the worklist to view a list of incoming incidents. The main Incoming Incidents tab shows all unassigned incidents. This tab has subtabs for viewing overdue incidents and incidents that are marked as a priority.
From the worklist, technicians use the Claim action to assign themselves to the incident. The technician who is assigned to the incident is then responsible for reviewing and processing it before the incident review due date.
Claiming an incident removes it from the Incoming Incident worklist tab and adds it to the Incidents tab, where technicians can take further action on their assigned incidents.
For more information about claiming incidents, see Reviewing and Claiming Incidents.
Reviewing and Processing an Incident
Technicians use the worklist to view their assigned incidents. The main Incidents tab shows all incidents assigned to the current user. This tab has subtabs for viewing overdue incidents and incidents that are marked as a priority.
Technicians have these options for processing incidents:
Schedule an inspection to determine if a violation has occurred.
The technician chooses a date and a code enforcement officer for the inspection.
Mark the incident as a duplicate of either another incident or a case.
Technicians can search existing incidents and cases to see if the issue was already reported.
Close the incident and provide a reason.
Incidents are closed when they are in compliance, invalid, or when they are referred to another agency to handle the issue.
Reassign the incident to a different technician.
For more information about the actions that a technician can take, see Processing Incidents.
Inspecting the Incident
A mobile inspector visits the location that is related to the assigned incident inspection. The officer completes the inspection by submitting a result on the mobile device, choosing from the four options:
Mark the incident as in compliance, which closes the inspection.
Mark the incident as in violation, which creates a case with a status of Violation. A notice of violation is sent to the responsible party and a re-inspection is scheduled. The notice lists the various code references associated with the violation. It also lists the corrective actions.
Refer the incident to another agency to handle the issue, which closes the inspection.
Close the incident if it is invalid.
For more information about mobile inspections, see Oracle Municipal Code Officer Overview.
Creating a Case
A case is created when an incident inspection results in violation.
As a code technician, you manage the case activity using a collection of case detail pages that consolidates all aspects of a case:
Property information, responsible parties, and case history are recorded and managed.
Recorded inspection activity is tracked and new inspections are scheduled.
A notice object is created, which the technician uses to generate a notice.
Code References are updated.
Comments and attachments are reviewed.
Any appeal requests and their hearings are tracked.
Citations are issued and their fees and payments are tracked.
For more information about case details, see Processing Cases.
Issuing a Notice of Violation
A code technician is responsible for generating a notice and dispatching it to the party responsible for the violation. You can access the worklist or the case detail pages to work with notices. The following information is available on the Notice of Violation page, which can be updated before generating the notice:
Compliance date.
Issue description.
Responsible party and mailing address.
Code references.
The notices page on the worklist allows you to delete code references. Code technicians can add code references from case detail pages.
The notice of violation is printed and sent to the responsible party. A copy of the notice is attached to the notice record.
For more information about notices, see Working with Notices.
Issuing a Notice of Citation
Code officers and code technicians can issue citations based on the inspection result and the time rules set up.
A code technician is responsible for generating a notice of citation and dispatching it to the party responsible for the violation. The details of the citation fees and payments are recorded in a separate fees and payments page.
The following information is available on the Notice of Citation page, which can be updated before generating the notice:
Compliance date.
Issue description.
Due date for citation fee payment.
Responsible party and mailing address.
Code references.
The notices page on the worklist allows you to delete code references. Code technicians can add code references from case detail pages.
The notice of citation, which contains the fee component, is printed and sent to the responsible party. A copy of the notice is attached to the notice record.
For more information about citations, see Working with Citations.
Managing Appeals
Agency staff can act on behalf of the responsible party to request an appeal for a violation or citation that the responsible party is associated with.
Code technicians manage activity related to appeals and hearings in the case detail pages by accessing the Case list:
Request appeal.
Schedule hearing.
Update hearing decision.
The status of the case changes based on the hearing decision.
For more information about appeals, see Working with Appeals and Hearings.
Paying a Citation
The code enforcement landing page for public users includes an option for paying citations. The person paying the citation must register and sign in first.
To pay a citation, the user enters the citation ID and follows the guided payment process.
For more information about the payment process, see Paying Citations.
Incident and Case Status Updates
As and when the status of a case changes, the status of the associated incident is updated automatically. The following table lists the various status changes for a case and their updates to the associated incident:
| Status of Case |
Status Update to the Incident |
|---|---|
| Violation |
Violation |
| Closed as a referral |
Closed as a referral, with referral code detail |
| Closed as a result of compliance |
Closed as a result of compliance |
| Void |
Closed, with reason – Error |
| Compliance |
Closed as a result of compliance |
Using the Worklist
The code enforcement worklist provides a central location for performing code enforcement tasks. Various tabs list incidents or cases based on where they are in their lifecycle, and action menus provide quick access to the tasks that can be performed at each stage.
Access the worklist by clicking the Worklist tile on the agency springboard. Initially all tabs to which you have access appear. Click a tab to see the incidents or cases that meet the tab filter criteria and to access the relevant actions.
Some tabs have subtabs that further filter the incidents or cases. Subtab action menus have the same actions as the parent tabs.
When you click a tab other than the one that is initially selected, only the newly selected tab and its subtabs are visible. Similarly, when you select a subtab, only that subtab is visible.
To return from a subtab to its parent, or from a main tab to the default view where all tabs are visible, click the Back to Incoming Incidents icon next to the Search icon.
The worklist has the following tabs:
| Tab |
Displays |
Available Actions |
Additional Information |
|---|---|---|---|
| Incoming Incidents |
Unclaimed incidents. These are incidents in Reported status that do not have an assigned technician. This tab includes a map view for displaying incident locations. |
Claim |
Claiming an incident assigns the current user as the technician for the incident. Claiming also removes the incident from this tab. The Overdue subtab shows unclaimed incidents with a due date before the current date. The Priority subtab shows unclaimed incidents where the Priority switch is enabled. |
| Incidents |
Unprocessed incidents (those in Reported status) where the current user is the assigned technician. This tab includes a map view for displaying incident locations. |
|
The actions that are available here are also available from the incident detail page. Completing any of the available actions removes the incident from this tab. The Overdue subtab shows claimed incidents with a due date before the current date. The Priority subtab shows claimed incidents where the Priority switch is enabled. |
| Notice of Violation |
Violation notice object records created for code violations. |
|
The Generate action signifies that the notice object alone is created, and you should use the action to open the Generate Notice page and complete the details and print. The Continue action signifies that the notice is generated, and you can make changes to the details before printing it. Any changes made to the notice process will automatically update the case detail pages. |
| Notice of Citation |
Citation notice object records created for code violations. |
|
A citation notice also contains information about the citation fees. |
| Appeals |
Cases that have requested appeals in Scheduled status. |
|
|
| Unassigned Cases |
Unassigned cases. These are cases that do not have an assigned technician. |
Claim |
|
| Cases |
All active cases assigned to the logged in technician. |
Update Status |
Once the status of a case changes to Compliance, it is removed from the list. |