4Managing Incidents
Reviewing and Claiming Incidents
When an issue is reported, an incident is created. Code enforcement technicians use the worklist to claim incoming incidents. The technician who claims the incident is responsible for processing it.
For more information about the code enforcement worklist, see Using the Worklist.
To claim an incident:
From the agency springboard, click the Worklist tile.
The Incoming Incidents tab appears by default. This tab displays all unclaimed incidents.
Optionally select a subtab to further filter the list of incoming incidents:
Click the Overdue tab to display unclaimed incidents with a due date before the current date.
Click the Priority tab to display unclaimed incidents with a priority setting of Yes.
For unclaimed incidents, the priority settings corresponds to whether the person reporting the incident said that the issue poses a health hazard or public safety risk.
To return from a subtab to the main Incoming Incidents tab, click the Back to Incoming Incidents icon next to the Search icon.
Review the following summary information about the incident:
Page Element
Description
Incident
This column displays:
The incident ID that is assigned based on the agency’s autonumbering rules.
The incident type and subtype, separated by a hyphen.
The incident status. Unclaimed incidents have a status of Reported.
Location
Displays the incident address and the incident’s district type and district.
If district information is missing, a warning icon appears in its place.
Issue
Displays the incident description.
Attachments
Click the attachments icon to open a window with an carousel-style viewer for attachments. Each attachment appears as a thumbnail of an image (for pictures or videos) or a generic file type icon (such as a PDF icon).
Reported Date
Displays the date that the incident was created.
Due By
Displays the date by which the review and processing must be complete. (Processing can be scheduling an inspection, marking the incident as a duplicate, or closing the incident.)
If processing is already overdue, a warning icon appears next to the date.
The due date is calculated based on your agency’s time rules and the date that the incident was submitted.
If necessary, review the complete details for the incident.
Click the View More Details icon to access the Incident page.
On the Incident page, review the information on the Overview, Details, Comments, and Attachments tabs.
For more information about the Incident detail page, see Working With Incident Details.
Click the Back icon in the banner at the top of the page to return to the worklist, and re-navigate to the desired worklist tab.
Click the Claim button to claim the incident.
Claiming an incident makes you the assigned technician. As the assigned technician, you are now responsible for processing the incident.
Processing Incidents
The code enforcement technician who claims an incident has four options for processing it: scheduling an inspection, marking it as a duplicate, reassigning it to another technician, or closing it.
Code enforcement technicians access the four processing options from an Actions menu. This menu appears on the Incidents tab of the worklist, which lists incidents where the current user is the assigned technician. It’s also available on the Overview section of the Incident detail page. See Working With Incident Details.
Accessing Incident Actions from the Worklist
To access the Actions menu for an incident in the worklist:
From the agency springboard, click the Worklist tile.
Select the Incidents worklist tab to view incidents in Reported status where you are the assigned technician.
Do not use the Incoming Incidentstab or its subtabs. These display only incidents without an assigned technician, so the Actions menu is not available.
Optionally select a subtab to further filter the list of incoming incidents:
Click the Overdue tab to display incidents with a due date before the current date.
Click the Priority tab to display incidents with a priority setting of Yes.
To return from a subtab to the main Incoming Incidents tab, click the Back to Incoming Incidents icon next to the Search icon.
Click the Actions icon for an incident.
A drop-down list of actions appears.
Accessing Incident Actions from the Incident Details
The Actions button on the Overview section of Incident Details page is identical to the Actions button on the Worklist. Click the button to see a drop-down menu of available actions.
You have two options for accessing incident details:
To access incident details via the Worklist:
Click the Worklist tile on the agency springboard.
Access a tab that displays the incident you want to access, and locate the incident in the list.
Click the View More Details icon for the incident.
To access incident details via the Incidents list:
Click the Incident List tile on the agency springboard.
On the Incidents list page, locate the incident and click it.
Scheduling an Inspection When Autoassignment is Active
If the technician who reviews an incident determines that it is a valid incident, the next step is to schedule an inspection. If the code enforcement autoassignment option is active, the system does the work for you.
To schedule an inspection when autoassignment is active:
Access the Actions menu for an incident.
Select Schedule Inspection from the menu.
The system schedule an inspection for the next available date. The inspection is assigned to a code enforcement officer who is associated with the incident’s district. A confirmation message tells you the inspection date and the assigned officer, and you are done.
Scheduling an Inspection Manually
To schedule an inspection manually:
Access the Actions menu for an incident.
Select Schedule Inspection from the menu.
The Schedule an Inspection window opens.
Review the following read-only fields for contextual information:
Page Element
Description
Priority
Indicates whether the incident has been marked as a priority. The incident priority can affect the due date calculation.
Due Date
Displays the date by which the inspection should be completed. The inspection due date is determined by the time-based rules for the associated issue subtype. These rules are based on the incident submission date and whether the incident is marked as a priority.
District Type
Displays the incident’s district type, which is inherited from the issue subtype.
District
Displays the incident’s district, which is based on the district type and the incident location.
The default list of available code officers consists of the code officers who are assigned to this district.
Accept the default Inspection Date, or enter a new one.
The default inspection date is normally the inspection due date. However, if you are scheduling the inspection manually because autoassignment couldn’t find an eligible officer before the due date, the default date is the next date that an officer is available without being overbooked.
Review any existing comments.
Existing comments display the date and time the comment was created, the user ID of the person who added the comment, and the first 200 characters of the comment text. If any comments are truncated, click the comment to open a window that displays the entire comment. A comments search box is available if any comments exist.
Optionally add additional comments:
Click Add Comment.
In the Add Comment window, enter your comment in the rich text field.
Alternatively, insert a copy of an existing comment by clicking Select Comments. For more information about working with comments, see Working with Comments.
Click Save to close the Add Comment window and return to the Schedule an Inspection window.
Even if you cancel the Schedule an Inspection action, the new comment remains.
Select an inspector from the list in the Assign section.
The list displays the Name of each inspector who is available on the inspection date.
The Inspection Count for an officer indicates how many inspections that person is already scheduled to perform on the specified date. A warning icon appears next to the count if choosing the officer would overbook the officer (based on your system setting for the maximum number of inspections per officer per day).
If no inspectors are available, change the inspection date.
Click Save to schedule the inspection on the selected date with the selected inspector.
The inspection is scheduled, and the incident status changes to Inspection.
After you schedule an inspection, the incident no longer appears on the Incidents worklist tab. You can still access the incident from the incident list and incident details pages. See Working With Incident Details.
Checking for Duplicates and Marking an Incident as a Duplicate
To check for duplicates and mark an incident as a duplicate:
Access the Actions menu for an incident.
Select Mark as Duplicate from the menu.
The Check for Duplicate window opens. The Selected Incident section at the top of the window displays the incident ID, issue type, issue subtype, and address for the incident that you are marking as a duplicate.
Click the Cases and Incidents links to view initial lists of possible duplicates
The search that is performed when you open the page shows active incidents and cases that match the issue subtype and location of the selected incident. Cases and incidents appear in separate lists that appear when you click the corresponding links.
The search results show the case or incident ID, the issue type and subtype, the status, the address, and the reported date.
Optionally enter your own search criteria and click Search to look for other cases or incidents that the selected incident duplicates.
Select the check box for an incident or case that the selected incident duplicates.
Click Mark as Duplicate, then click OK in the confirmation message window.
The original incident status changes to Closed with a reason of Duplicate. The related issue information is saved so that the Incident detail page for the newly marked duplicate shows which incident or case was duplicated.
After you mark an incident as a duplicate, it no longer appears on the Incidents worklist tab. You can still access the incident from the incident list and incident details pages. See Working With Incident Details.
Closing an Incident
Sometimes an incident can be closed immediately, without first being inspected.
To close an incident:
Access the Actions menu for an incident.
Select Close from the menu.
The Close Incident window opens.
In the Close Reason field, select one of the following reasons:
Value
Description
Compliance
No violation has occurred.
Error
The incident was created in error.
Referral
The incident has been referred to another department or agency.
Review any existing comments, and optionally add additional comments.
To add new comments:
Click Add Comment.
In the Add Comment window, enter your comment in the rich text field.
Alternatively, insert a copy of an existing comment by clicking Select Comments. For more information about working with comments, see Working with Comments.
Click Save to close the Add Comment window and return to the Close Incident window.
Even if you cancel the Close Incident action, the new comment remains.
Click Save.
The incident status changes to Closed.
After you close the incident, it no longer appears on the Incidents worklist tab. You can still access the incident from the incident list and incident details pages. See Working With Incident Details.
Reassigning an Incident to Another Technician
To reassign an incident to another technician:
Access the Actions menu for an incident.
Select Reassign from the menu.
The Reassign window opens. The name of the Current Assignee appears at the top of the page.
Select a new technician from the Name list.
This list shows people who have the code enforcement technician role.
Click the Save button.
After you reassign an incident, only the newly assigned technician sees the incident on Incidents worklist tab.
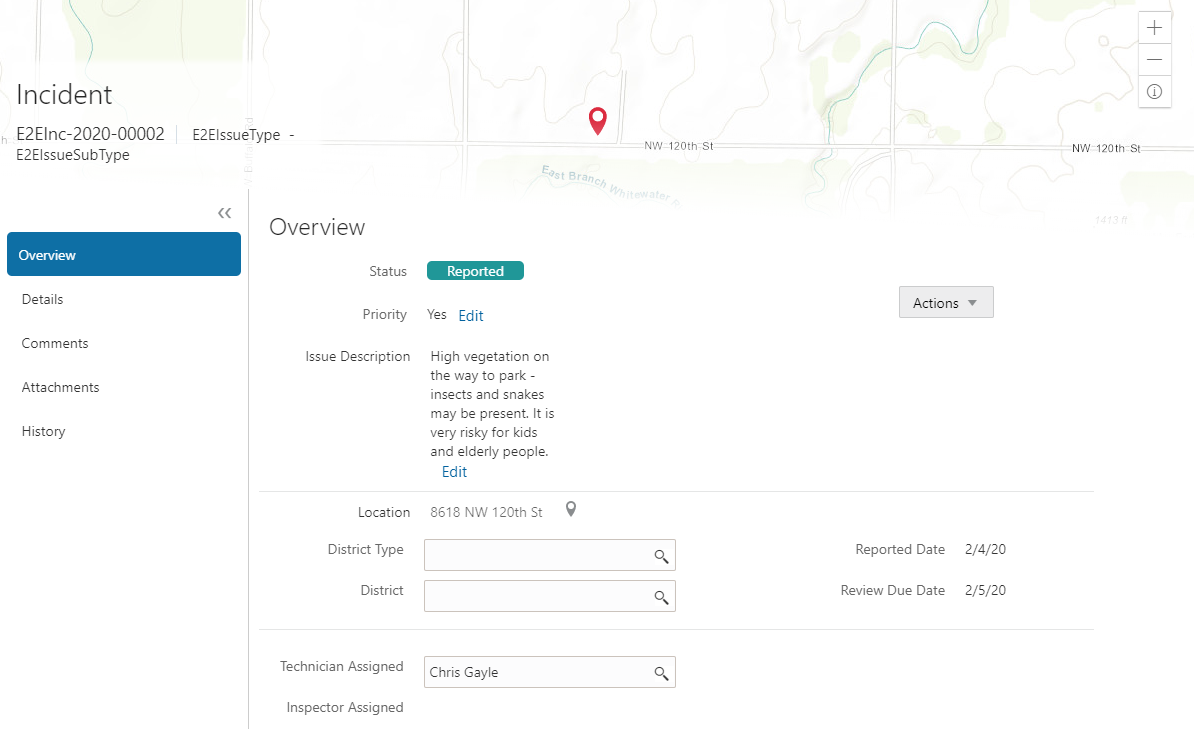
Working With Incident Details
The Incident page includes sections for the incident overview, details, comments, attachments, and history. The page also displays a map with the incident location. Use this page to view and update incident information, to claim or assign the incident, and to perform the actions for processing the incident.
This example illustrates the Incident detail page. The left frame provides links to tabs with various types of information.
Accessing Incident Details
To access incident details from the Worklist:
Click the Worklist tile on the agency springboard.
Access a tab that displays the incident you want to access, and locate the incident in the list.
Click the View More Details icon for the incident.
To access incident details from the Incidents list:
Click the Incident List tile on the agency springboard.
On the Incidents list page, locate the incident and click it.
Using the Incident Overview Tab
The Overview tab on the Incident page displays summary information, enables you to update assignments, and provides access to the same actions that you can perform from the Worklist page.
To use the Overview tab:
Access the incident.
The Incident page appears and displays the Overview tab by default. If you navigate away from this tab, return by clicking Overview in the left frame.
Review the incident Status and, if the incident is closed, review the closure Reason.
The following table describes incidents statuses and reasons:
Status
Description
Reported
This incident has not been processed. The status does not indicate whether the incident has been claimed.
The Claim action is available if no technician is assigned. After the incident is claimed, the actions for processing the incident become available.
Inspection
An inspection has been scheduled, and the inspection results have not yet been recorded.
Violation
The inspection resulted in a violation. When this happens, a case is created. The incident becomes read-only. When the case is closed, the incident status also changes to Closed.
Closed
When in incident is closed, the Reason provides additional information:
Compliance: No violation exists, or the violation has been corrected and the related case has been closed.
Duplicate: The incident was closed as a duplicate of another incident or of a case. .
Error: The incident was created in error, or its related case was closed with a status of Void.
Referral: The incident (or it’s related case) was referred to another department or agency.
Technicians who are assigned to incidents can use the Close action manually close the incident with any of these reasons except Duplicate. To close a case as a duplicate, the technician uses the Mark as Duplicate action.
Review information that is specific to how the incident has been processed:
These fields are visible when relevant:
If the incident was determined to be a violation, the Case field displays the ID of the case that was created. The ID is a link to the case.
If the incident was closed as a duplicate, the Related Incident or Related Case field displays the ID of the duplicated transaction. The ID is a link to the transaction.
If the incident was closed as a referral, the Referral Type and Referral Code appear.
The referral type indicates if the incident was referred to an Agency Department or to an External Agency. The referral code was selected at the time the incident was closed. For information about referral codes, see Setting Up Referral Bodies.
Review the following general incident information:
Page Element
Description
Priority
Displays Yes or No to indicate whether the incident is a priority issue.
The initial value corresponds to the how the person who reported the incident answered the question Does this issue pose a health hazard or public safety risk.
If the incident has been claimed and it is in Reported status, the assigned technician can click the adjacent Edit link to change the incident priority.
Issue Description
Displays a description of the problem that was reported.
If the incident is in Reported status, the assigned technician can click the adjacent Edit link to open the Edit Description window and change the description. Even if the technician edits the description, the original issue description still appears on the Details tab.
Location
Displays the location of the incident. This can include an address and any additional location information that was provided.
If the incident is in Reported status, the assigned technician can click the map marker icon next to the current location to open the Update Location window and select a new location.
The technician can type the new location into the address search box or drag the map so that the location crosshairs are over the new location. When the technician closes the window, the new address replaces the old one on this page. The original address still appears on the Details tab.Reported Date
Displays the date that the incident was originally submitted.
Review Due Date
Displays the due date for code technician to process the incident. Claiming an incident is not sufficient: the technician must close the incident or schedule an inspection. (The inspection does not have to be performed by the review due date—it has its own due date.)
The review due date is calculated based on the issue subtype, the date the incident was reported, and the incident priority.
Review information about the incident district, and update the information if necessary.
Page Element
Description
District Type ID
Identifies the code enforcement district type for the incident. For example, incidents might be associated with a fire prevention district type.
The district type is inherited from the issue subtype and is read-only. However, if the field is blank because the issue subtype doesn’t have a district type, you can manually select one. The field becomes read-only after you enter a value.
District
Confirm or update the specific district where the incident is located. This district is based on the district type and the issue location:
With GIS integration, the system finds the district using the GIS map layer that is associated with the district type..
If the agency doesn’t use GIS integration, the system looks for the code enforcement district that is associated with the parcel.
If the system is unable to determine the district, you can manually enter one.
The district determines the default code officers for the incident. For example, if an incident is in fire prevention district 2, then the code officers who are assigned to that district are listed when you schedule an inspection.
Code officers are assigned to specific districts using the Code Enforcement Districts attribute of the Code Enforcement Officer job function.
For more information about setting job function attributes, see Setting Up Agency Staff.
Review and, if necessary, update the incident assignments using these fields:
Page Element
Description
Technician Assigned
Identify the code enforcement technician who is responsible for the initial review and processing for the incident.
You can update this field directly, or use the Reassign action in the Actions menu.
Inspector Assigned
Identify the code enforcement officer who is responsible for an initial inspection. An inspector is assigned when the inspection is scheduled.
This field is editable only if the incident is in Inspection status. When you change the assignment, the system does not check the new assignee’s workload. After you assign the new inspector, the assignment is also updated on the corresponding inspection record.
If an inspection has been scheduled, review the Inspection ID and Inspection Status fields.
These fields display information about the initial inspection for the incident.
Use the Actions menu to perform any of the following actions:
Action
Description
Schedule Inspection
Select the inspection date and the inspector for an incident.
Mark as Duplicate
Identify another issue (an incident or a case) that this incident duplicates. Incidents that are marked as duplicates are closed, and the ID of the related transaction appears on the Overview tab.
Reassign
Choose a new code enforcement technician. This action has the same result as directly editing the Technician Assigned field.
Close
Close the incident and specify a reason for the closure.
Note: These are the same actions that are available in the worklist on the tabs where code enforcement technicians view their assigned incidents. For more information, see Processing Incidents.
Using the Incident Details Tab
The Detail tab on the Incident page displays read-only information from the original issue report.
To use the Details tab:
Access the incident.
Click Details in the left panel.
Review the following read-only information.
Page Element
Description
Address
Displays the original location of the incident. This can include an address and any additional location information that was provided.
Issue Description
Displays the original description of the problem that was reported.
Does this issue pose a health hazard or public safety risk?
Displays Yes or No to indicate whether the issue was marked as a health hazard or public safety risk when it was originally reported. This value is also the initial value for the incident priority shown on the Overview tab.
<User-defined fields>
Displays any user-defined fields from the intake form.
Name, Email, and Phone
Displays contact information for the person who reported the incident. If your agency allows public users to hide their information when reporting an issue, these fields can be blank.
Working With Incident Comments
The Comments tab on the Incident page enables you to add comments using the same comments tool that you use for adding case comments. For detailed information on adding comments, see Working with Comments.
Viewing Incident Attachments
The Attachments tab lists the file attachments that were uploaded as part of the original incident report.
To view incident attachments:
Access the incident.
Click Attachments in the left panel.
Review information for the attachments in the list:
Attachment information is not labeled, but it consists of the following:
A thumbnail showing an image (for pictures or videos) or a generic file type icon (such as a PDF icon).
File name
File size
File description, if one was entered when the file was uploaded.
Date and time that the attachment was uploaded.
To view additional details or update the description:
Click the Actions icon for the row and select View Details from the menu.
Review information in these fields: File Name, File Size, Uploaded By, and Uploaded On.
Review and optionally modify the Description.
Click Cancel or, if you updated the description, click Save
To download a local copy of the file, click the Actions icon for the row and select Download from the menu.
The download process is based on your browser. If you’re not prompted for a file location, the file is saved to your downloads folder.
To remove the attachment from the incident, click the Actions icon for the row and select Delete from the menu.
Viewing Incident History
To view a history of an incident’s status change:
Access the incident.
Click History in the left panel.
Review the following status history information:
Page Element
Description
Status
Displays the new status after an incident status change.
Updated By
Identifies the person who performed the action that updated the incident status.
Updated Date
Displays the date that the status changed.
Reason
Displays the reason, if any, that is associated with the status change. For example, if a code enforcement technician closes an incident without scheduling an inspection, this field displays the reason that the technician selected when closing the incident.