16Setting Up Time Recording
Time Recording Overview
Time recording enables agencies to track the amount of time their employees spend on various activities.
Agencies can use this recorded time to:
Bill for time spent.
Report on key performance indicators.
To set up your agency for time recording, you define:
Time recording categories and subcategories.
See Setting Up Time Categories and Subcategories.
Note: This step is not strictly required because you can add time entries without categories or subcategories. You must define time recording categories and subcategories, however, before associating them with time entry types.Time entry types.
Fee schedules.
Note: This step is required for billing based on time spent.
Once you’ve setup up your time recording framework, agency staff can enter time and assess fees on the transaction pages. For more information, see Adding Time Entries and Assessing Fees for Time Entries.
Setting Up Time Categories and Subcategories
Time categories and subcategories enable agencies to classify how their staff is spending their time.
Categories and their subcategories are reusable across transactions and products, and can be used to calculate fees and generate reporting information.
You add, modify, and delete time categories and subcategories on the Time Category page ().
This example shows the Time Category page

Adding a Time Category
On the Time Category page, click Add.
On the Time Category Details page, enter a Category ID, a Category, and a Description for the category.
Turn on the Enableswitch to make this category available to select for time entry types. This switch is turned off by default for new time categories.
Add a subcategory.
Note: You must have values defined for all required time category fields before you can add a subcategory.Click Save.
Adding a Time Subcategory
Click a row on the Time Calendar page.
On the Time Category Details page, click Add.
On the Time Subcategory Details page, enter a Subcategory ID, a Subcategory, and a Description for the subcategory.
Ensure that the Enable switch is turned on so that the subcategory is available to select for time entry types. This switch is turned on by default for new time subcategories.
Click Save.
Modifying a Time Category
Click a row on the Time Calendar page.
On the Time Category Details page, you can:
Update the time category fields.
Note: You can’t edit the Calendar ID field.Enable or disable the time category.
Delete the time category. You will be prompted to confirm the permanent deletion.
Add, modify, or delete time subcategories.
Click Save.
Modifying a Time Subcategory
Click a Time Subcategory row on the Time Category Details page.
On the Time Subcategory Details page, you can:
Update the time subcategory fields.
Note: You can’t edit the Subcategory ID field.Enable or disable the time subcategory.
Delete the time subcategory. You will be prompted to confirm the permanent deletion.
Click Save.
Deleting Time Categories
On the Time Category page, click Select Multiple.
Select the check boxes next to all the time categories you want to delete.
Click Delete. You will be prompted to confirm the permanent deletion.
Deleting Time Subcategories
On the Time Category Details page, click Select Multiple.
Select the check boxes next to all the time subcategories you want to delete.
Click Delete. You will be prompted to confirm the permanent deletion.
Setting Up Time Entry Types
Time entry types enable you to associate time categories and subcategories with the transactions where they can be used to record time.
Each time entry type represents a unique, reusable combination of time category, time subcategory, classification, and transaction. For example, you might create a time entry type for air travel associated with a permit inspection.
You add, modify, and delete time entry types on the Time Entry Type page ().
This example shows the Time Entry Type page
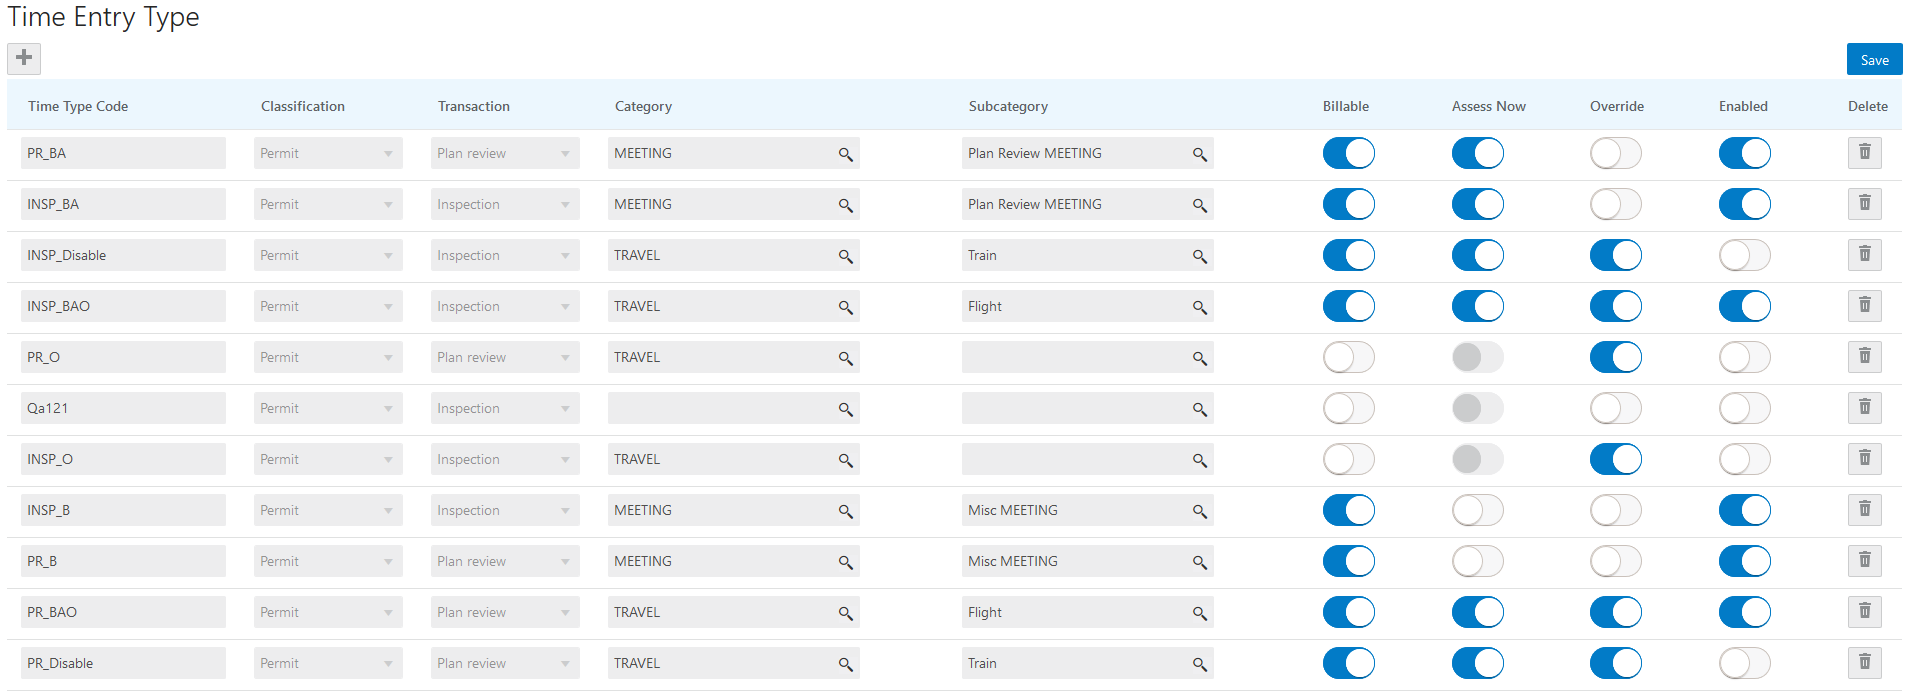
Adding a Time Entry Type
On the Time Entry Type page, click Add.
For the new time entry type row, enter values for the following fields:
Page Element
Description
Time Type Code
Enter the code that agency staff members use to enter all the default values associated with this time entry type when adding time entries.
Classification
Select a product area, such as Permit.
Transaction
Select a specific transaction, such as Plan Review or Inspection.
Category and Subcategory
Select the time category and subcategory for the time entry type. For more information on time categories and subcategories, see Setting Up Time Categories and Subcategories.
Note: You can leave these fields blank. You can’t select a subcategory without first selecting a category.Billable
Turn this switch on to make entries associated with this time entry type billable by default.
Assess Now
Turn this switch on to immediately assess fees for entries associated with this time entry type by default.
Note: This switch is available only when the Billable switch is turned on.Override
Turn this switch on to enable agency staff to override the Billable default setting when adding a time entry.
Enabled
Turn this switch one to make the time entry type available to select when adding time entries.
Click Save.
Modifying a Time Entry Type
Once you save a time entry type, you can no longer edit the following fields:
Time Type Code
Classification
Transaction
Category
Subcategory
You can toggle the four switches:
Billable
Assess Now
Override
Enabled
Deleting a Time Entry Type
Click the Delete button next to a time entry type row to delete it.